【vim】插件管理及代码智能提示与补全环境的配置 |
您所在的位置:网站首页 › 插件代码结构怎么写 › 【vim】插件管理及代码智能提示与补全环境的配置 |
【vim】插件管理及代码智能提示与补全环境的配置
|
1. 引言
可以使用脚本/插件来给vim添加各种神奇的功能,从更换颜色主题、到代码智能提示,甚至项目管理。无数开发者通过开源社区贡献自己开发的插件,使得vim有可能变得无比强大。这儿http://vim-scripts.org/vim/scripts.html 是一份vim扩展脚本的列表。 然而,我的思想是尽量不要使用vim插件,除了那些非常优秀且对自己的工作而言所必需的。这样,当需要配置一台新电脑或者临时要在别人的电脑上工作时,最起码能比较方便地配置好环境,或者直接使用默认环境熟练地完成任务,而不是离开了插件什么也不会。 对我自己而言,我基本上只需要4个(种)插件: 管理插件的插件(插件管理器) 最喜欢的配色方案 Doxygen注释自动生成 代码智能提示与补全除了颜色主题因个人喜好和环境不同各不相同外,其余插件我都只会选择最流行,且公认最优、最好用的那个。下文将分别介绍这几种插件,并给出在Linux(Ubuntu, CentOS)和Mac OSX上配置的方法。但是在这之前,最好确认以下几个条件: 连上宽带互联网 安装好git 安装好vim并确认其版本号至少是7.3.584,且支持python2(这是代码提示与补全插件要求的) 2. 插件管理器Vundle是一个流行的vim插件管理器,它的网址是https://github.com/VundleVim/Vundle.vim 以下是安装步骤: git clone https://github.com/VundleVim/Vundle.vim.git ~/.vim/bundle/Vundle.vim如果目录.vim/bundle不存在请先创建 打开~/.vimrc,在文件头加入以下内容 """""""""""""""""""""""""""""""""""""""""""""""""""""""""""""" " Vundle set nocompatible " be iMproved, required filetype off " required " set the runtime path to include Vundle and initialize set rtp+=~/.vim/bundle/Vundle.vim call vundle#begin() " alternatively, pass a path where Vundle should install plugins "call vundle#begin('~/some/path/here') " let Vundle manage Vundle, required Plugin 'VundleVim/Vundle.vim' " The following are examples of different formats supported. " Keep Plugin commands between vundle#begin/end. " plugin on GitHub repo "Plugin 'tpope/vim-fugitive' " plugin from http://vim-scripts.org/vim/scripts.html "Plugin 'L9' " Git plugin not hosted on GitHub "Plugin 'git://git.wincent.com/command-t.git' " git repos on your local machine (i.e. when working on your own plugin) "Plugin 'file:///home/gmarik/path/to/plugin' " The sparkup vim script is in a subdirectory of this repo called vim. " Pass the path to set the runtimepath properly. "Plugin 'rstacruz/sparkup', {'rtp': 'vim/'} " Avoid a name conflict with L9 "Plugin 'user/L9', {'name': 'newL9'} " All of your Plugins must be added before the following line call vundle#end() " required filetype plugin indent on " required " To ignore plugin indent changes, instead use: "filetype plugin on " " Brief help " :PluginList - lists configured plugins " :PluginInstall - installs plugins; append `!` to update or just :PluginUpdate " :PluginSearch foo - searches for foo; append `!` to refresh local cache " :PluginClean - confirms removal of unused plugins; append `!` to auto-approve removal " " see :h vundle for more details or wiki for FAQ " Put your non-Plugin stuff after this line """""""""""""""""""""""""""""""""""""""""""""""""""""""""""""""从其中的注释可以知道,Vundle支持多种形式的插件源,并给出了示例。这些插件源包括:github上的插件、http://vim-scripts.org/vim/scripts.html上的插件、非github上的git插件、本地硬盘上的插件等。 打开vim,运行 :PluginInstall 命令来自动安装插件,过程中有可能需要输入github用户名和密码。等待Vundle安装完成即可。Vundle正在自动安装在.vimrc中指定的插件:
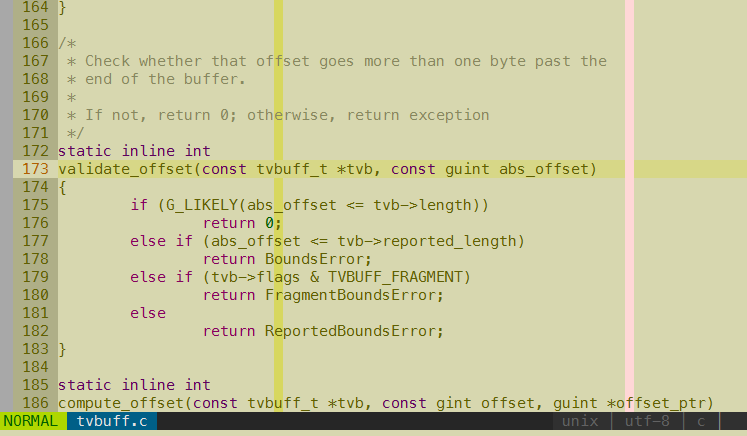
3. 配色方案 vim默认有一些配色方案,如果这些都不喜欢,可以从网上下载安装别的配色方案。solarized和molokai都是流行的配色方案,然而这两个主题在终端(terminal)模式下或者SecureCRT上使用都会有一些问题,而我目前最喜欢的khaki没有这个问题,它的样子如下图所示(其中设置了行号、当前号高亮、语法高亮等)
安装步骤: 在~/.vimrc中的Vundle插件列表区域中添加khaki的源位置Plugin 'vim-scripts/khaki.vim' 保存后退出,再打开vim,运行:PluginInstall命令安装。 在~/.vimrc中,Vundle区域后面的某处,添加 if !has("gui_running") set t_Co=256 endif colorscheme khaki保存后重启vim即可。 4. Doxygen注释自动生成为自己的代码写好注释是一个良好的习惯,而编写Doxygen风格的注释更是可以通过doxygen工具为代码自己生成文档,非常好用。DoxygenToolkit(https://github.com/vim-scripts/DoxygenToolkit.vim)就是这样的一个插件。安装和使用: 在~/.vimrc中的Vundle插件列表区域中添加DoxygenToolkit的源位置Plugin 'vim-scripts/DoxygenToolkit.vim'保存后退出,再打开vim,运行:PluginInstall命令安装 在~.vimrc中,Vundle区域后的某处,设置DoxygenToolkit插件在@author区域自动填充的作者名称,比如 let g:DoxygenToolkit_authorName="[email protected]" 使用时,将光标定位到文件首行,输入:DoxAuthor将插入文件头注释骨架(第一次会让你输入文件版本号),如下: /** * @file test.cpp * @brief * @author [email protected] * @version 1.0 * @date 2015-08-21 */并把光标停留在@brief 后面,等待输入文件描述。在光标定位到数据结构声明或函数声明的第一行,运行:Dox,将生成数据结构或函数的注释骨架,如下: /** * @brief */ struct foo { char str; void* ptr; }; /** * @brief * * @param a * @param b * * @return */ int bar(int a, int b) { return a+b; }并把光标定位在@brief 后,期待你输入具体的注释内容。 5. 代码智能提示与补全写代码的时候,变量名、函数名、类名等代码符号的智能提示和补全功能是非常有用的,可以大大提高编码效率。然而,在YouCompleteMe(简称YCM)这个神奇的插件出现之前,vim一直使用tag机制来完成这个功能。由于tag只会笨拙地分析代码中的字符串,并不能识别其语法说语义,导致代码的提示并不好用。随着clang的出现,使开发人员可以对程序代码进行事实上的语义分析(调用clang分析器之类的),于是真正的智能提示和补全插件出现了,它就是由 google 的工程师 Strahinja Val Markovic 所开发的YCM(https://github.com/Valloric/YouCompleteMe)。 5.1 YouCompleteMe的安装与配置YCM使用C++和python开发,是一个复杂的插件,光是通过Vundle下载的文件就达到120多MB。另外YCM不只是有新的开发的功能,它还包含了其他一些有用的插件。下图是作者本人提示的演示动图:
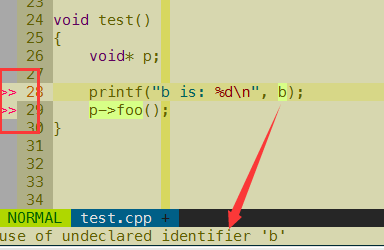
除了代码提示与补全外,借助libclang强大的语法与语义分析能力,YCM还可以在编辑的时候提示出错的行与出错原因,如下图所示:
另外,YCM还可以补全路径,文件名等。
安装与配置步骤: 如果是在Ubuntu 14.04上,运行以下命令安装 sudo apt-get install vim-addon-manager sudo apt-get install vim-youcompleteme vim-addons install youcompleteme 来安装YCM插件,非常简单。否则到2.==2016.12.30补充 在CentOS7上安装YouCompleteMe== 1.1.下载Vundle和YouCompleteMe插件 输入以下指令,下载Vundle git clone https://github.com/gmarik/Vundle.vim.git ~/.vim/bundle/Vundle.vim下载成功后,在用户根目录下面,修改.vimrc文件,追加下面语句以便后续安装YouCompleteMe插件 set nocompatible filetype off set rtp+=~/.vim/bundle/Vundle.vim call vundle#begin() Plugin 'gmarik/Vundle.vim' Plugin 'Valloric/YouCompleteMe' call vundle#end() filetype plugin indent on然后在vim中先按Esc建,并且输入以下指令安装插件: :PluginInstall 1.2.编译YouCompleteMe 在编译之前下载编译工具,准备编译YouCompleteMe yum install gcc gcc-c++ cmake python-devel编译YouCompleteMe使其支持C/C++ 自动补全 cd ~/.vim/bundle/YouCompleteMe ./install.py --clang-completer如果是Ubuntu 12.04,有好多问题要解决,如果条件允许最好直接用14.04. 否则到3.a. 系统自带的vim版本过低,需要先把版本升级到7.4,目前除了下源码编译我不知道有什么别的方法。参考:https://github.com/Valloric/YouCompleteMe/wiki/Building-Vim-from-source。b. CMake版本过低,需要升级到2.8.11以上。到http://www.cmake.org/download/ 下一高版本即可。c. 有可能没有安装ctags,apt-get安装一个即可,后文要用到。 与以上插件一样,在.vimrc中添加 Plugin 'Valloric/YouCompleteMe',并运行:PluginInstall命令安装。 下载最新的clang。YCM是为clang 3.6设计的,理论上的最低版本不应低于3.2+。YCM使用clang提供的libclang来解析代码主义等.从 http://llvm.org/releases/download.html 下载为你的系统预编译好的clang。但上面的列表并没有为所有系统提供精确的版本,比如我要在CentOS 7.0 64bit上编译YCM,但上面没有,所以只好自己编译,方法是:a. 下载LLVM source code: llvm-3.6.2.src.tar.xz, 解压到llvm-3.6.2.srcb. 下载Clang source code: cfe-3.6.2.src.tar.xz, 解压到llvm-3.6.2.src/tools/clangc. 下载Compiler RT source code: compiler-rt-3.6.2.src.tar.xz, 解压到llvm-3.6.2.src/projects/compiler-rtd. 下载Clang tools Extra:clang-tools-extra-3.6.2.src.tar.xz,解压到llvm-3.6.2.src/tools/clang/tools/extrae. 不妨在llvm-3.6.2.src父目录中建立build目录并编译mkdir llvm_build; cd llvm_build../llvm-3.6.2.src/configure --enable-optimized --enable-targets=host-onlymake && make install这里一定要记得make install,否则clang源码中的头文件没有放到/usr/include相关目录下,一会编译YCM库时会报找不到头文件的错误。(这个编译的非常慢,生成1.6GB+文件) 编译ycm_support_libs。a. 这要求系统安装了cmake, python(2.6+), python-devel(2.6+)等,如果不满足条件cmake的时候会提示错误。b. cd~; mkdir ycm_build; cd ycm_buildc. 如果是安装了预编译好的clang,请运行cmake -G "Unix Makefiles" -DPATH_TO_LLVM_ROOT=~/clang+llvm-3.4.2-x86_64-unknown-ubuntu12.04 . ~/.vim/bundle/YouCompleteMe/third_party/ycmd/cpp,生成Makefile。其中clang+llvm-3.4.2-x86_64-unknown-ubuntu12.04是clang预编译包解压后的路径,里面有bin,lib,include等目录;否则,如果是自己在第4步从源码编译的clang,则运行 cmake -G "Unix Makefiles" -DEXTERNAL_LIBCLANG_PATH=~/llvm_build/Release+Asserts/lib/libclang.so . ~/.vim/bundle/YouCompleteMe/third_party/ycmd/cpp,生成Makefile。其中~/llvm_build是用于从源码编译的build目录。d. 运行 make ycm_support_libs生成YCM支持库这一过程会在~/.vim/bundle/YouCompleteMe/third_party/ycmd/下生成几个.so。至此,YCM编译已结束。 配置YCMa. YCM在语义分析时使用libclang,而libclang需要参数选项,这从哪里来呢?YCM通过提供给一个代码工程一个python文件的方式来通知libclang所需的参数选项,这个文件就是.ycm_extra_conf.py。YCM安装好后在,在路径~/.vim/bundle/YouCompleteMe/third_party/ycmd/examples/.ycm_extra_conf.py有一个默认的配置文件,可以把它拷贝到你的代码所在主目录下,并进行修改。主要是修改此文件中的flags表,加入自己代码所在路径、语言类型(C/C++)等。 # These are the compilation flags that will be used in case there's no # compilation database set (by default, one is not set). # CHANGE THIS LIST OF FLAGS. YES, THIS IS THE DROID YOU HAVE BEEN LOOKING FOR. flags = [ '-Wall', '-Wextra', '-Werror', '-Wc++98-compat', '-Wno-long-long', '-Wno-variadic-macros', '-fexceptions', '-DNDEBUG', # You 100% do NOT need -DUSE_CLANG_COMPLETER in your flags; only the YCM # source code needs it. '-DUSE_CLANG_COMPLETER', # THIS IS IMPORTANT! Without a "-std=" flag, clang won't know which # language to use when compiling headers. So it will guess. Badly. So C++ # headers will be compiled as C headers. You don't want that so ALWAYS specify # a "-std=". # For a C project, you would set this to something like 'c99' instead of # 'c++11'. '-std=c++11', # ...and the same thing goes for the magic -x option which specifies the # language that the files to be compiled are written in. This is mostly # relevant for c++ headers. # For a C project, you would set this to 'c' instead of 'c++'. '-x', 'c++', '-isystem', '../BoostParts', '-isystem', # This path will only work on OS X, but extra paths that don't exist are not # harmful '/System/Library/Frameworks/Python.framework/Headers', '-isystem', '../llvm/include', '-isystem', '../llvm/tools/clang/include', '-I', '.', '-I', './ClangCompleter', '-isystem', './tests/gmock/gtest', '-isystem', './tests/gmock/gtest/include', '-isystem', './tests/gmock', '-isystem', './tests/gmock/include', ] b. 在.vimrc中添加以下配置项(更多项见https://github.com/Valloric/YouCompleteMe#general-usage)。 " YCM " 允许自动加载.ycm_extra_conf.py,不再提示 let g:ycm_confirm_extra_conf=0 " 补全功能在注释中同样有效 let g:ycm_complete_in_comments=1 " 开启tags补全引擎 let g:ycm_collect_identifiers_from_tags_files=1 " 键入第一个字符时就开始列出匹配项 let g:ycm_min_num_of_chars_for_completion=1 " YCM相关快捷键,分别是\gl, \gf, \gg nnoremap gl :YcmCompleter GoToDeclaration nnoremap gf :YcmCompleter GoToDefinition nnoremap gg :YcmCompleter GoToDefinitionElseDeclaration其中, g:ycm_confirm_extra_conf如果不设为0的话,用vim每次打开代码文件,YCM都会提示是否确认加载某某.ycm_extra_conf.py文件; ycm_collect_identifiers_from_tags_files设为1,指定YCM收集传统tags文件的信息,另外当tags改变时,YCM会重新索引它们。YCM对tags文件的格式有特殊的要求:The only supported tag format is the Exuberant Ctags format. The format from "plain" ctags is NOT supported. Ctags needs to be called with the --fields=+l option (that's a lowercase L, not a one) because YCM needs the language: field in the tags output。如有问题请参阅YCM官网相关FAQ;比如引入C++tags: " 引入 C++ 标准库tags set tags+=/data/misc/vim/stdcpp.tags 3个快捷键设置是用来快速跳转到符号声明或定义的。我往往只用gg,即将光标定位到某个符号上,按\键后(默认的leader键是\),快速按两次g键,将跳转到该符号的声明或定义位置(Tips: 按+o返回)其他技巧: 执行:YcmDiags显示所有错误, 它其实是打开了一个location list窗口,也可能通过:lopen打开. 使用:lclose可以关闭 有些系统函数如fopen, strcpy如果不智能提示,可以按+键。 如果有的文件死活无法正确提示(如果结构体之类),请检查一下文件编码,改成utf-8。(vim中 :set fileencoding=utf8)5.2 完善代码提示与补全 如5.1所述,YouCompleteMe插件是如此地强大。然而,某些时候它可能还是会有些小问题,比如无法提示宏定义等等,导致无法补全,这时候还是需要借助传统的tags文件。indexer插件可以针对不同的工程目录自动地生成、更新和引入不同的tags文件,详见http://www.vim.org/scripts/script.php?script_id=3221。它需要依赖DfrankUtil和Vimprj 两个插件,需要一并安装。 安装与配置步骤: 1. 在.vimrc的Vundle区域内加入以下内容 Plugin 'DfrankUtil' Plugin 'vimprj' Plugin 'indexer.tar.gz'之后运行:PluginInstall安装; 2. 打开.vimrc,加入以下内容: " indexer " 设置indexer 调用 ctags 的参数 " 默认 --c++-kinds=+p+l,重新设置为 --c++-kinds=+p+l+x+c+d+e+f+g+m+n+s+t+u+v " 默认 --fields=+iaS 不满足 YCM 要求,需改为 --fields=+iaSl let g:indexer_ctagsCommandLineOptions="--c++-kinds=+p+l+x+c+d+e+f+g+m+n+s+t+u+v --fields=+iaSl --e xtra=+q"3. indexer会根据你的代码工程的不同,自动生成并在其中的代码文件被打开时自动加载tags文件。它是通过配置文件来指定工程设置的,此文件为~/.indexer_files。以下是一个配置示例,演示了2个不同的工程的Indexer配置。 [CoolProject] /home/user/cool_project [AnotherProject] option:ctags_params = "--languages=c++" /home/user/another_project/src /home/user/another_project/lib6 参考 Valloric, YouCompleteMe Github官方主页 yangyangwithgnu,所需即所获:像 IDE 一样使用vim searcher2xiao, CentOS 7 + vim + ycm (clang) + NERDTree环境配置 其他各插件官方页面
|


【本文地址】