SpringCloud网关Gateway认证鉴权【SpringCloud系列7】 |
您所在的位置:网站首页 › 接入网关认证客户端怎么卸载 › SpringCloud网关Gateway认证鉴权【SpringCloud系列7】 |
SpringCloud网关Gateway认证鉴权【SpringCloud系列7】
|
SpringCloud 大型系列课程正在制作中,欢迎大家关注与提意见。 程序员每天的CV 与 板砖,也要知其所以然,本系列课程可以帮助初学者学习 SpringBooot 项目开发 与 SpringCloud 微服务系列项目开发 本文章是系列文章中的一篇 1、SpringCloud 项目基础工程搭建 【SpringCloud系列1】2、SpringCloud 集成Nacos注册中心 【SpringCloud系列2】3、SpringCloud Feign远程调用 【SpringCloud系列3】4、SpringCloud Feign远程调用公共类抽取 【SpringCloud系列4】5、SpringCloud 整合Gateway服务网关 【SpringCloud系列5】6、SpringCloud 整合 Spring Security 认证鉴权【SpringCloud系列6】
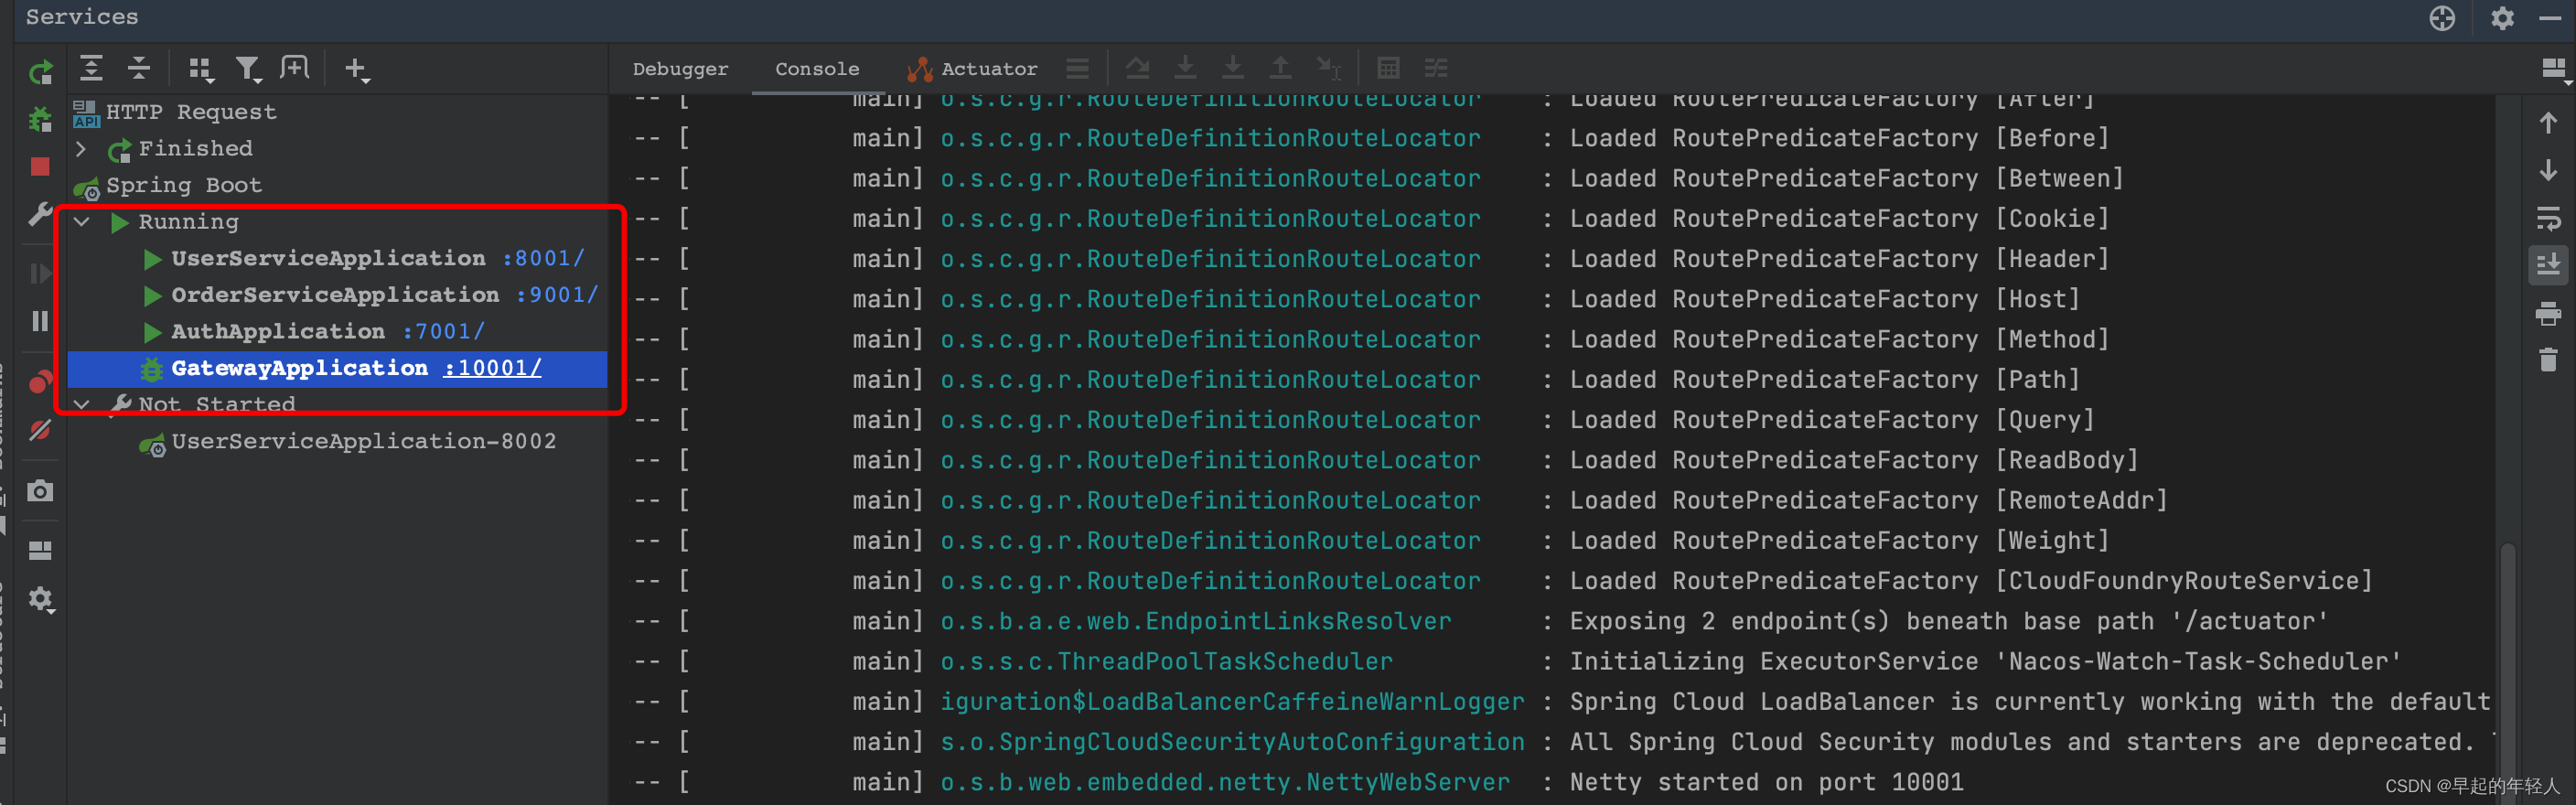
这里添加的 security 与 oauth2 相关配置 ,是为了解密 auth-api 中生成的 access_token 令牌信息 org.springframework.cloud spring-cloud-starter-security org.springframework.cloud spring-cloud-starter-oauth2 com.alibaba fastjson然后添加安全拦截配置 import org.springframework.context.annotation.Bean; import org.springframework.context.annotation.Configuration; import org.springframework.security.config.annotation.web.reactive.EnableWebFluxSecurity; import org.springframework.security.config.web.server.ServerHttpSecurity; import org.springframework.security.web.server.SecurityWebFilterChain; /** * @description 安全配置类 * @author 早起的年轻人 */ @EnableWebFluxSecurity @Configuration public class SecurityConfig { //安全拦截配置 @Bean public SecurityWebFilterChain webFluxSecurityFilterChain(ServerHttpSecurity http) { return http.authorizeExchange() .pathMatchers("/**").permitAll() .anyExchange().authenticated() .and().csrf().disable().build(); } }配置 JwtAccessTokenConverter 所使用的密钥信息 import org.springframework.beans.factory.annotation.Autowired; import org.springframework.context.annotation.Bean; import org.springframework.context.annotation.Configuration; import org.springframework.security.oauth2.provider.token.TokenStore; import org.springframework.security.oauth2.provider.token.store.JwtAccessTokenConverter; import org.springframework.security.oauth2.provider.token.store.JwtTokenStore; /** * @author 早起的年轻人 * @version 1.0 **/ @Configuration public class TokenConfig { String SIGNING_KEY = "test_key"; @Autowired private JwtAccessTokenConverter accessTokenConverter; @Bean public TokenStore tokenStore() { return new JwtTokenStore(accessTokenConverter()); } @Bean public JwtAccessTokenConverter accessTokenConverter() { JwtAccessTokenConverter converter = new JwtAccessTokenConverter(); converter.setSigningKey(SIGNING_KEY); return converter; } }然后 网关配置文件中添加 auth-api 相关的路由 server: port: 10001 spring: application: name: '@project.name@' cloud: nacos: server-addr: localhost:8848 # nacos地址 gateway: routes: # 网关路由配置 - id: rewritepath_route uri: https://www.baidu.com/ predicates: - Path=/search/** filters: - RewritePath=/search/(?.*), /$\{segment} - id: user-service # 路由id,自定义,只要唯一即可 # uri: http://127.0.0.1:8081 # 路由的目标地址 http就是固定地址 uri: lb://user-service # 路由的目标地址 lb就是负载均衡,后面跟服务名称 predicates: # 路由断言,也就是判断请求是否符合路由规则的条件 - Path=/user/** # 这个是按照路径匹配,只要以/user/开头就符合要求 - id: order-service # 路由id,自定义,只要唯一即可 # uri: http://127.0.0.1:8081 # 路由的目标地址 http就是固定地址 uri: lb://order-service predicates: - Path=/order/** - id: auth-api # 路由id,自定义,只要唯一即可 # uri: http://127.0.0.1:8081 # 路由的目标地址 http就是固定地址 uri: lb://auth-api predicates: - Path=/oauth/** 2 网关认证过虑器 import com.alibaba.fastjson.JSON; import com.baomidou.mybatisplus.core.toolkit.StringUtils; import lombok.extern.slf4j.Slf4j; import org.springframework.beans.factory.annotation.Autowired; import org.springframework.cloud.gateway.filter.GatewayFilterChain; import org.springframework.cloud.gateway.filter.GlobalFilter; import org.springframework.core.Ordered; import org.springframework.core.io.buffer.DataBuffer; import org.springframework.http.HttpStatus; import org.springframework.http.server.reactive.ServerHttpResponse; import org.springframework.security.oauth2.common.OAuth2AccessToken; import org.springframework.security.oauth2.common.exceptions.InvalidTokenException; import org.springframework.security.oauth2.provider.token.TokenStore; import org.springframework.stereotype.Component; import org.springframework.util.AntPathMatcher; import org.springframework.web.server.ServerWebExchange; import reactor.core.publisher.Mono; import java.io.InputStream; import java.nio.charset.StandardCharsets; import java.util.*; /** * @author 早起的年轻轻人 * @version 1.0 * @description 网关认证过虑器 */ @Component @Slf4j public class GatewayAuthFilter implements GlobalFilter, Ordered { //白名单 private static List whitelist = null; static { //加载白名单 try ( InputStream resourceAsStream = GatewayAuthFilter.class.getResourceAsStream("/security-whitelist.properties"); ) { Properties properties = new Properties(); properties.load(resourceAsStream); Set strings = properties.stringPropertyNames(); whitelist= new ArrayList(strings); } catch (Exception e) { whitelist = new ArrayList(); log.error("加载/security-whitelist.properties出错:{}",e.getMessage()); e.printStackTrace(); } } @Autowired private TokenStore tokenStore; @Override public Mono filter(ServerWebExchange exchange, GatewayFilterChain chain) { //请求的url String requestUrl = exchange.getRequest().getPath().value(); AntPathMatcher pathMatcher = new AntPathMatcher(); //白名单放行 for (String url : whitelist) { if (pathMatcher.match(url, requestUrl)) { return chain.filter(exchange); } } //检查token是否存在 String token = getToken(exchange); if (StringUtils.isBlank(token)) { return buildReturnMono("没有认证",exchange); } //判断是否是有效的token OAuth2AccessToken oAuth2AccessToken; try { oAuth2AccessToken = tokenStore.readAccessToken(token); boolean expired = oAuth2AccessToken.isExpired(); if (expired) { return buildReturnMono("认证令牌已过期",exchange); } return chain.filter(exchange); } catch (InvalidTokenException e) { log.info("认证令牌无效: {}", token); return buildReturnMono("认证令牌无效",exchange); } } /** * 获取token */ private String getToken(ServerWebExchange exchange) { String tokenStr = exchange.getRequest().getHeaders().getFirst("Authorization"); if (StringUtils.isBlank(tokenStr)) { return null; } return tokenStr; } private Mono buildReturnMono(String error, ServerWebExchange exchange) { ServerHttpResponse response = exchange.getResponse(); Map map = new HashMap(); map.put("code",403); map.put("message",error); String jsonString = JSON.toJSONString(map); byte[] bits = jsonString.getBytes(StandardCharsets.UTF_8); DataBuffer buffer = response.bufferFactory().wrap(bits); response.setStatusCode(HttpStatus.UNAUTHORIZED); response.getHeaders().add("Content-Type", "application/json;charset=UTF-8"); return response.writeWith(Mono.just(buffer)); } @Override public int getOrder() { return 0; } }Spring Cloud Gateway 根据作用范围划分为 GatewayFilter 和 GlobalFilter GatewayFilter : 需要通过spring.cloud.routes.filters 配置在具体路由下,只作用在当前路由上或通过spring.cloud.default-filters配置在全局,作用在所有路由上。GlobalFilter : 不需要在配置文件中配置,作用在所有的路由上,最终通过GatewayFilterAdapter包装成GatewayFilterChain可识别的过滤器 3 启动服务 测试
使用很久之前的一个token 在网关中将token解析,获取登录 token 中对应的用户 userId , 在网关中的令牌校验过滤器 GatewayAuthFilter 中添加内容: public class GatewayAuthFilter implements GlobalFilter, Ordered { @Override public Mono filter(ServerWebExchange exchange, GatewayFilterChain chain) { ... ... //----------获取token中的用户令牌-------------------------------------------------------------------- OAuth2Authentication authentication = tokenStore.readAuthentication(token); User authUser = (User) authentication.getPrincipal(); //获取保存的用户令牌 我这里是一个JSON String username = authUser.getUsername(); //使用Fastjson 将json字符串转为map Map parse = JSON.parseObject(username, Map.class); //获取其中的 userId String userId = parse.get("userId").toString(); ServerHttpRequest req = exchange.getRequest(); HttpHeaders httpHeaders = req.getHeaders(); ServerHttpRequest.Builder requestBuilder = req.mutate(); // 先删除,后新增 //requestBuilder.headers(k -> k.remove("要修改的header的key")); // requestBuilder.header("要修改的header的key", 处理完之后的header的值); // 或者直接修改,要求修改的变量为final requestBuilder.headers(k -> k.set("userId", userId)); log.info("令牌解析成功:userId is {}",userId); ServerHttpRequest request = requestBuilder.build(); exchange.mutate().request(request).build(); return chain.filter(exchange); } catch (InvalidTokenException e) { log.info("认证令牌无效: {}", token); return buildReturnMono("认证令牌无效", exchange); } } }这里是获取了用户的 userId ,然后将userId添加到请求头中,比如在后续的 admin 管理后台的服务中,可以直接通过 @RequestHeader 获取 到此 网关中的鉴权功能开发完成。 本项目源码 https://gitee.com/android.long/spring-cloud-biglead/tree/master/biglead-api-07-auth 如果有兴趣可以关注一下公众号 biglead ,每周都会有 java、Flutter、小程序、js 、英语相关的内容分享 |
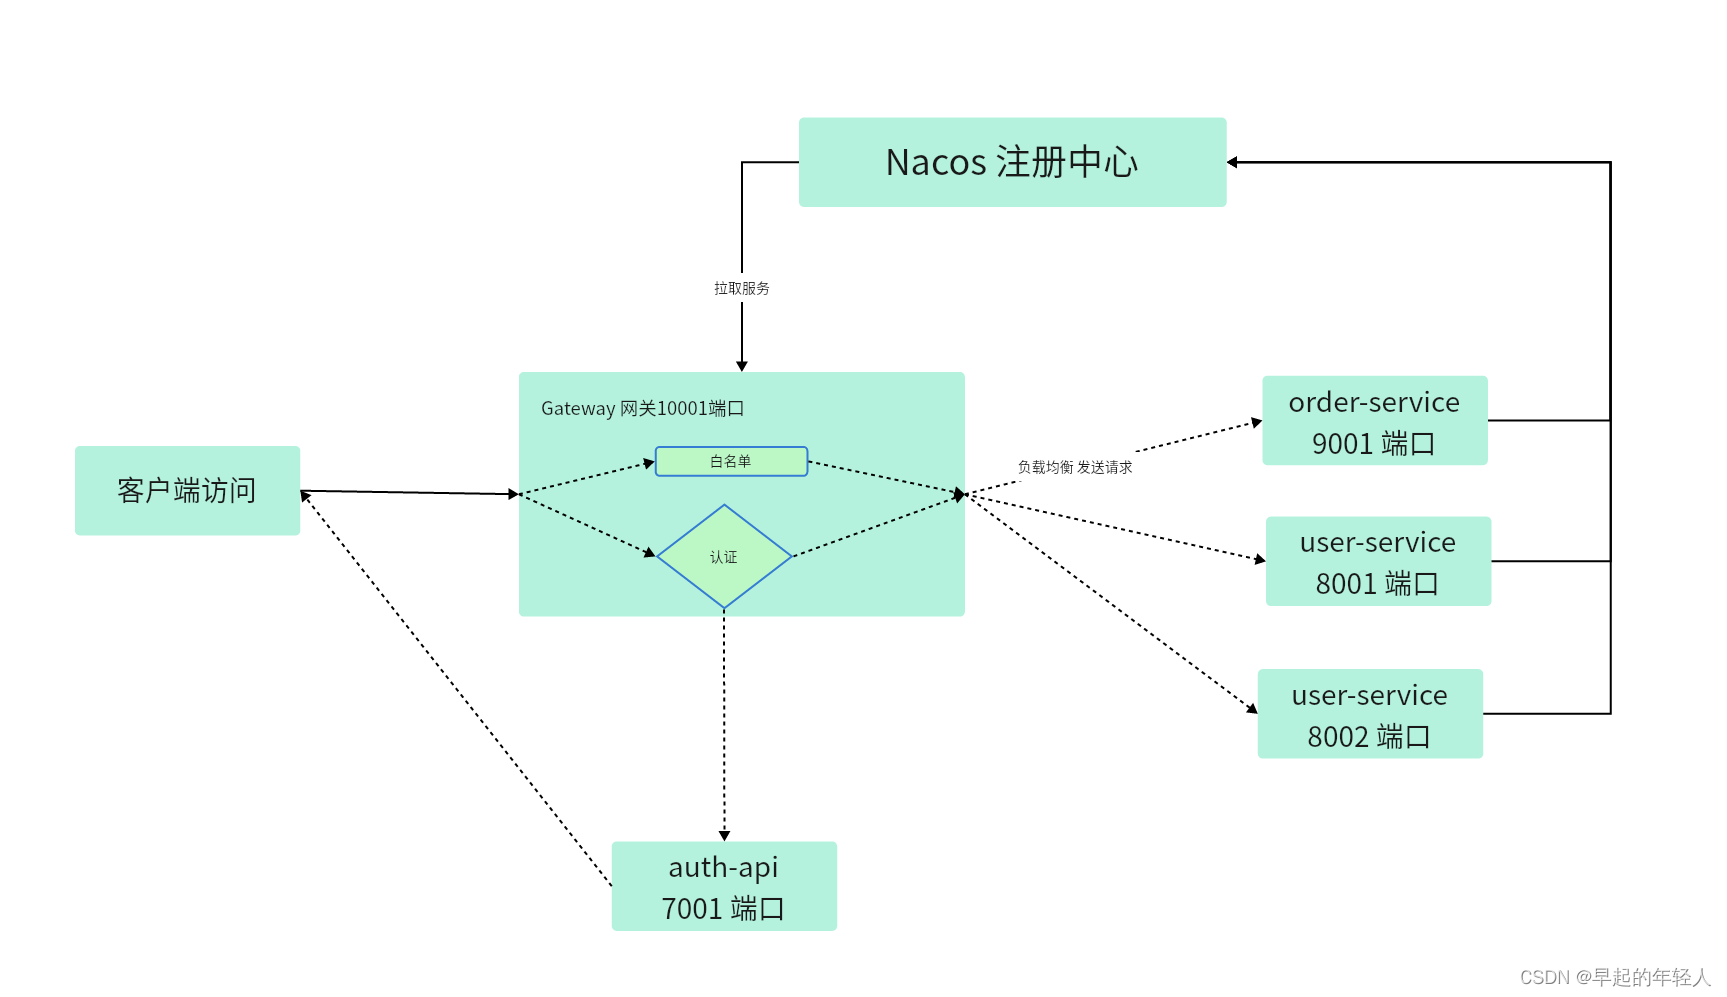 本文章实现的是 Gateway 网关中的令牌校验功能 ,上图中所示用户所有的访问全部走网关,然后在网关每次都调用 auth-api 鉴权,当访问量足够大的时候,还是会有访问性能问题,所以优化如下:
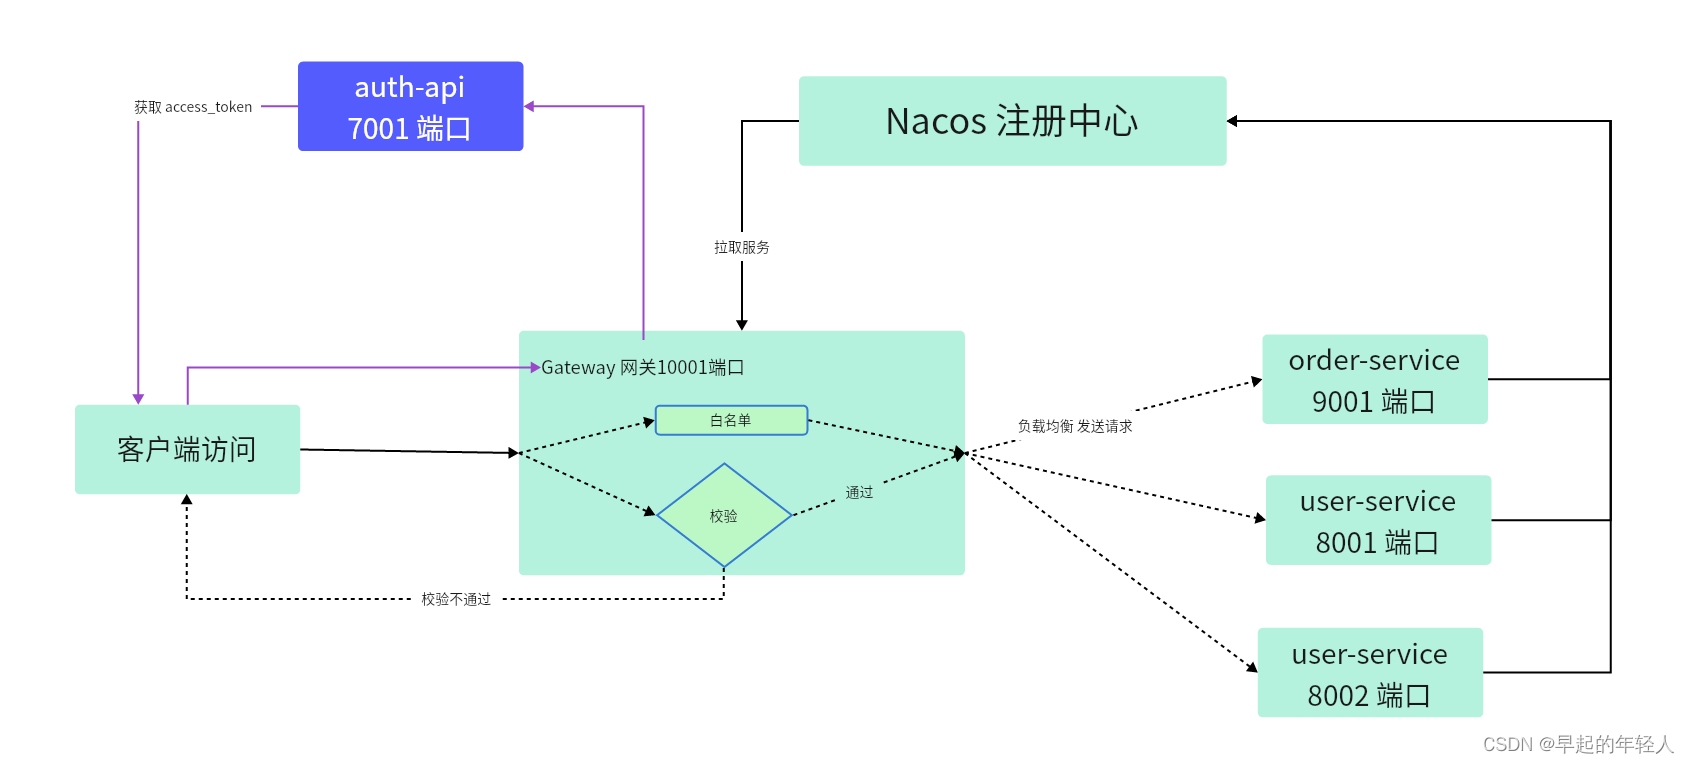
 首先通过网关访问订单详情
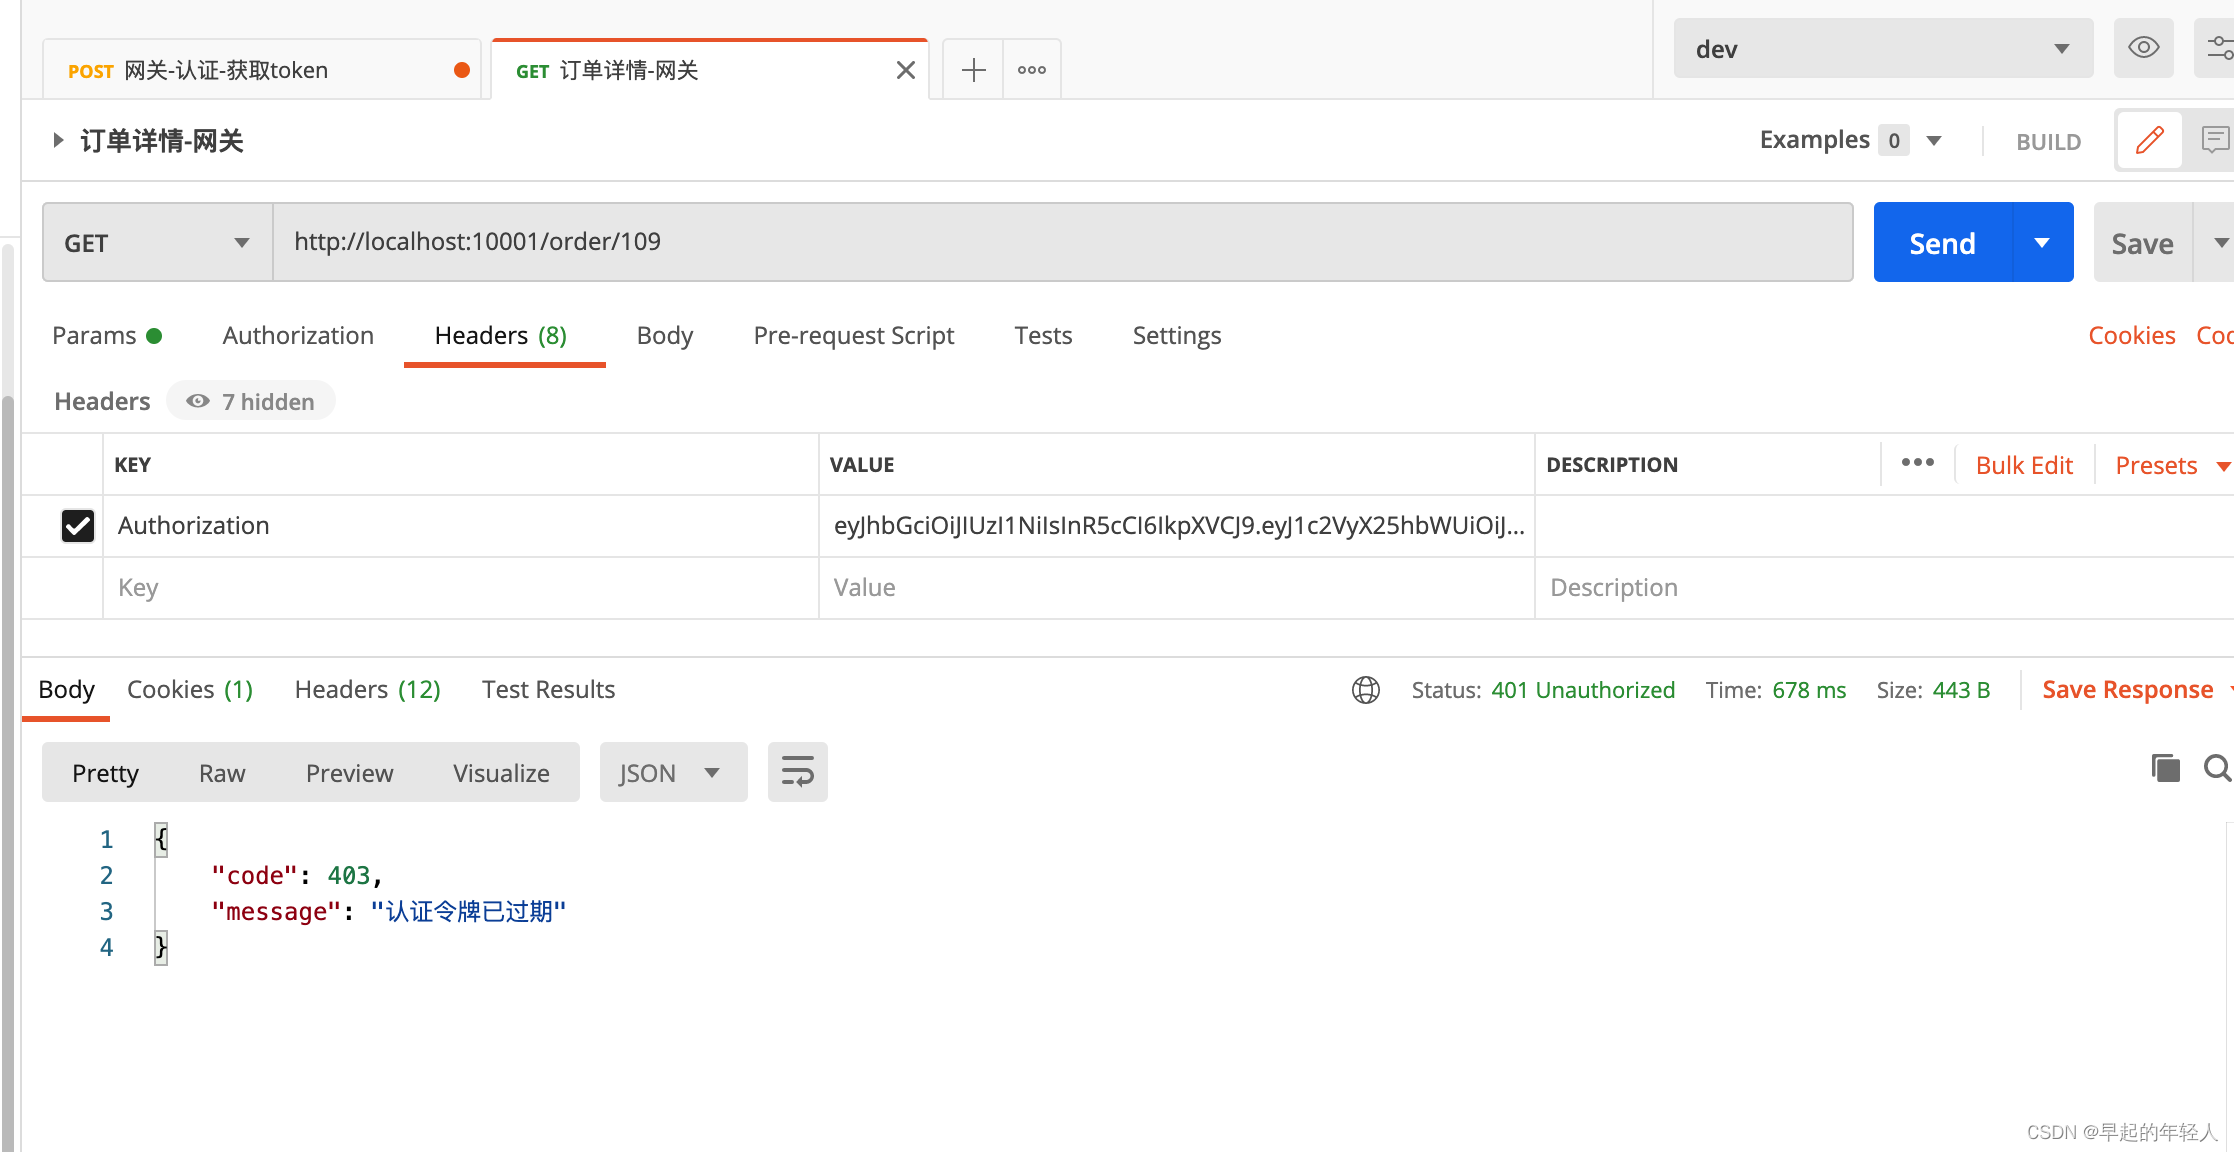 然后再通过网关获取令牌
 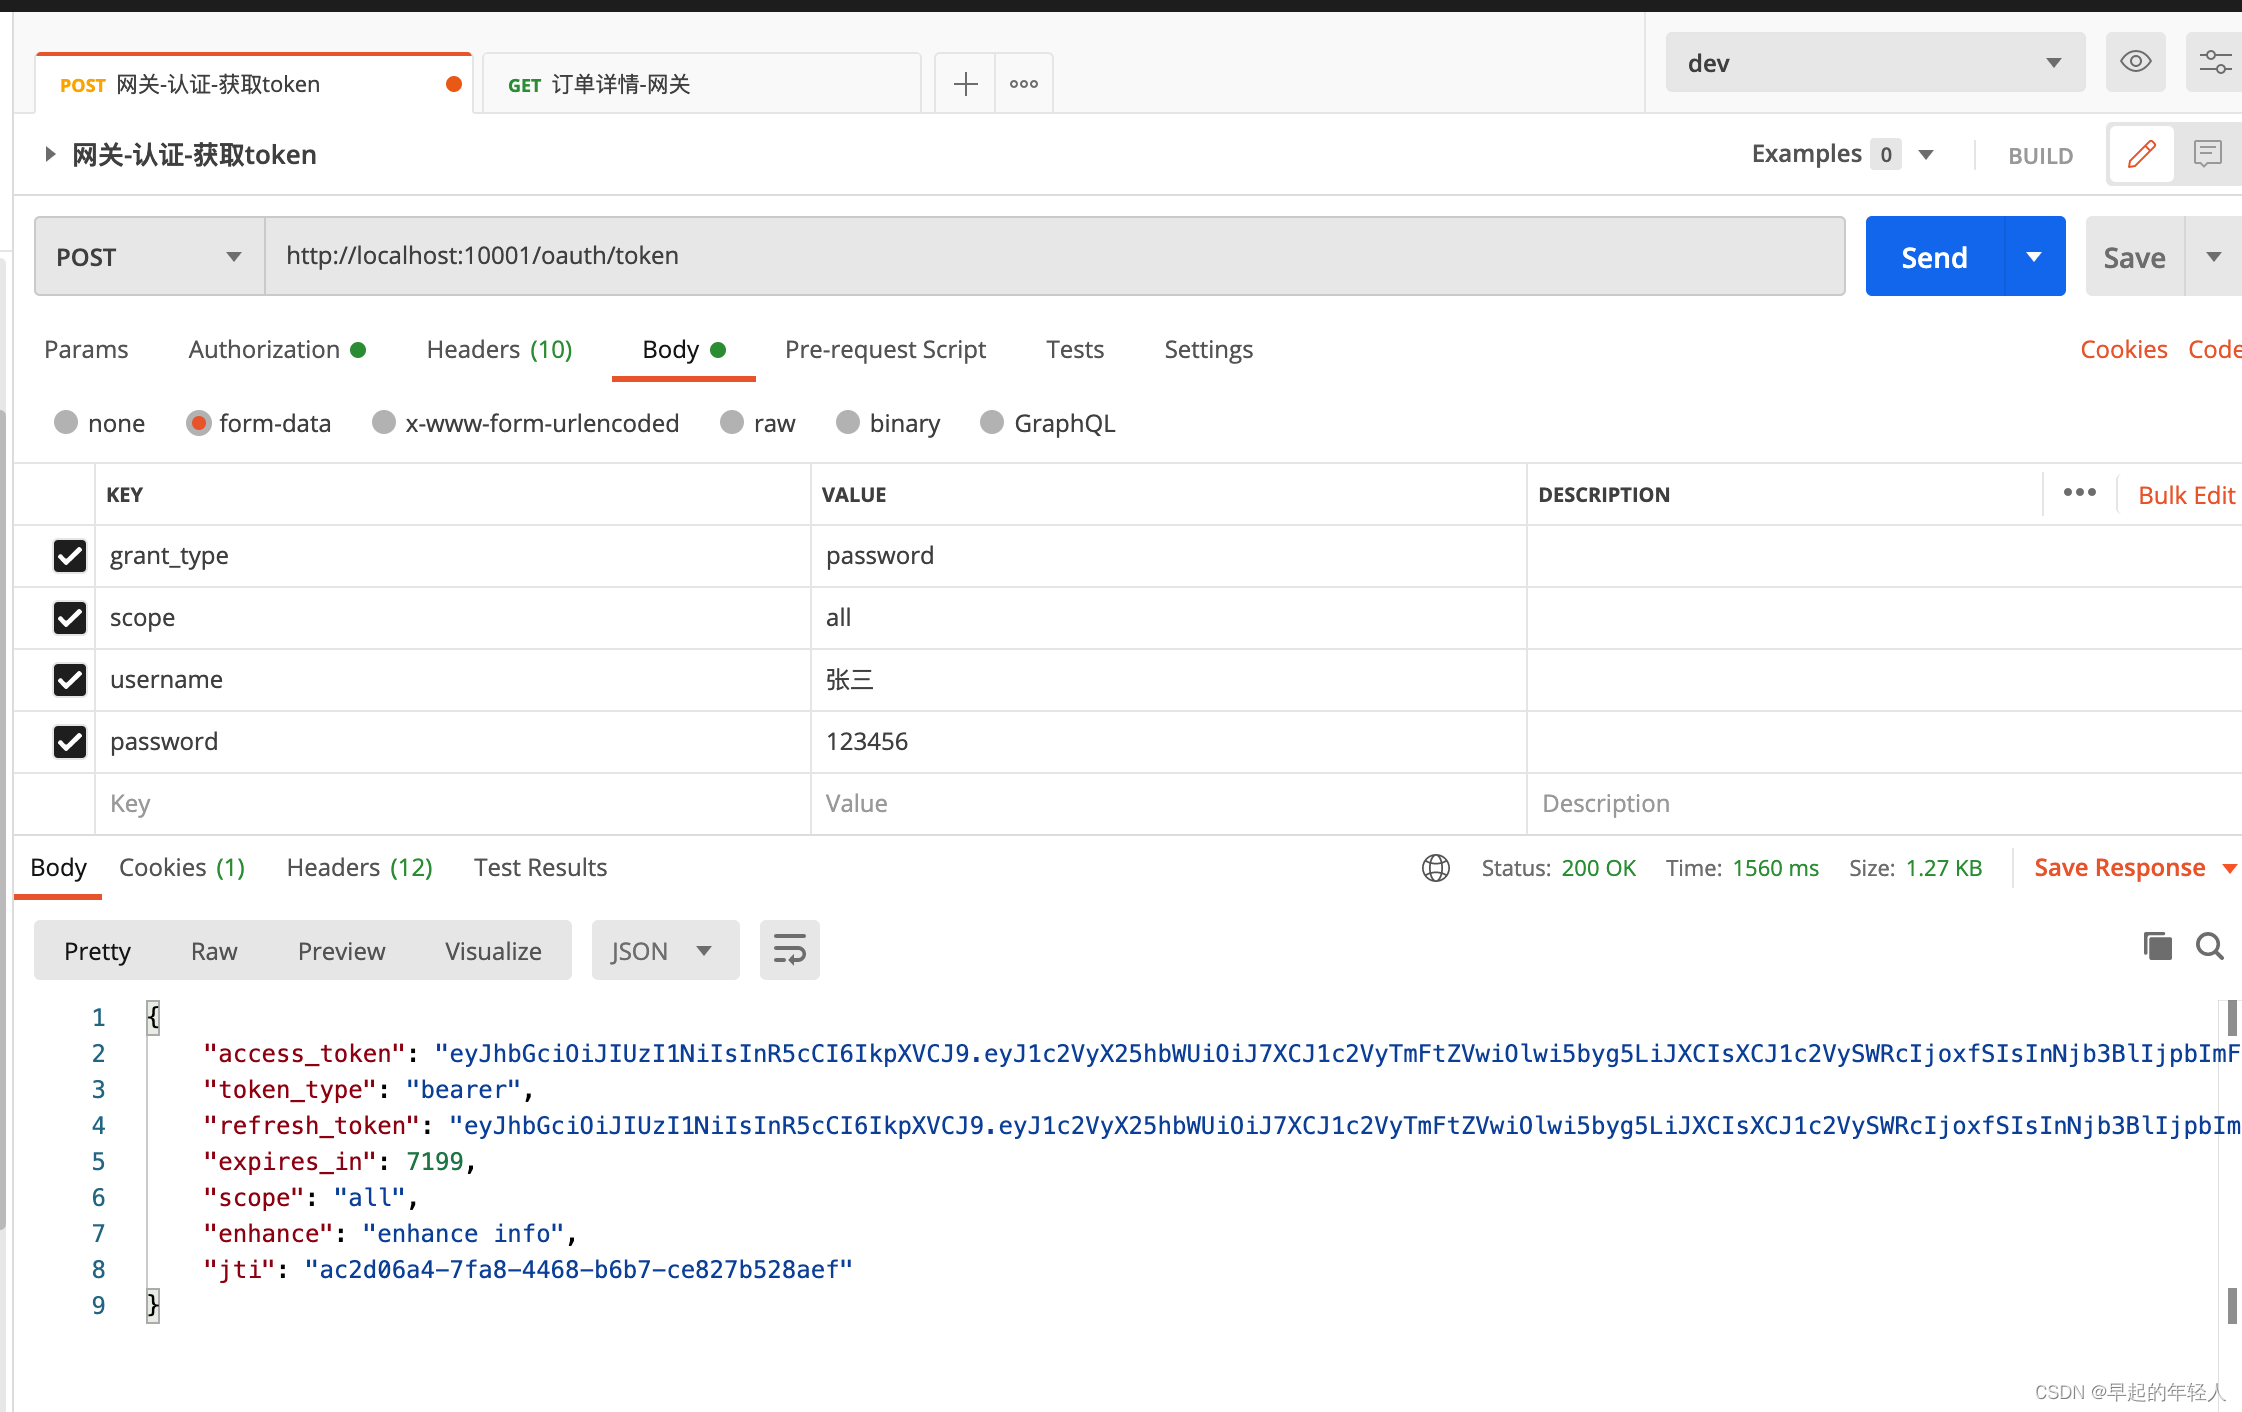 然后使用新获取到的令牌来访问订单详情
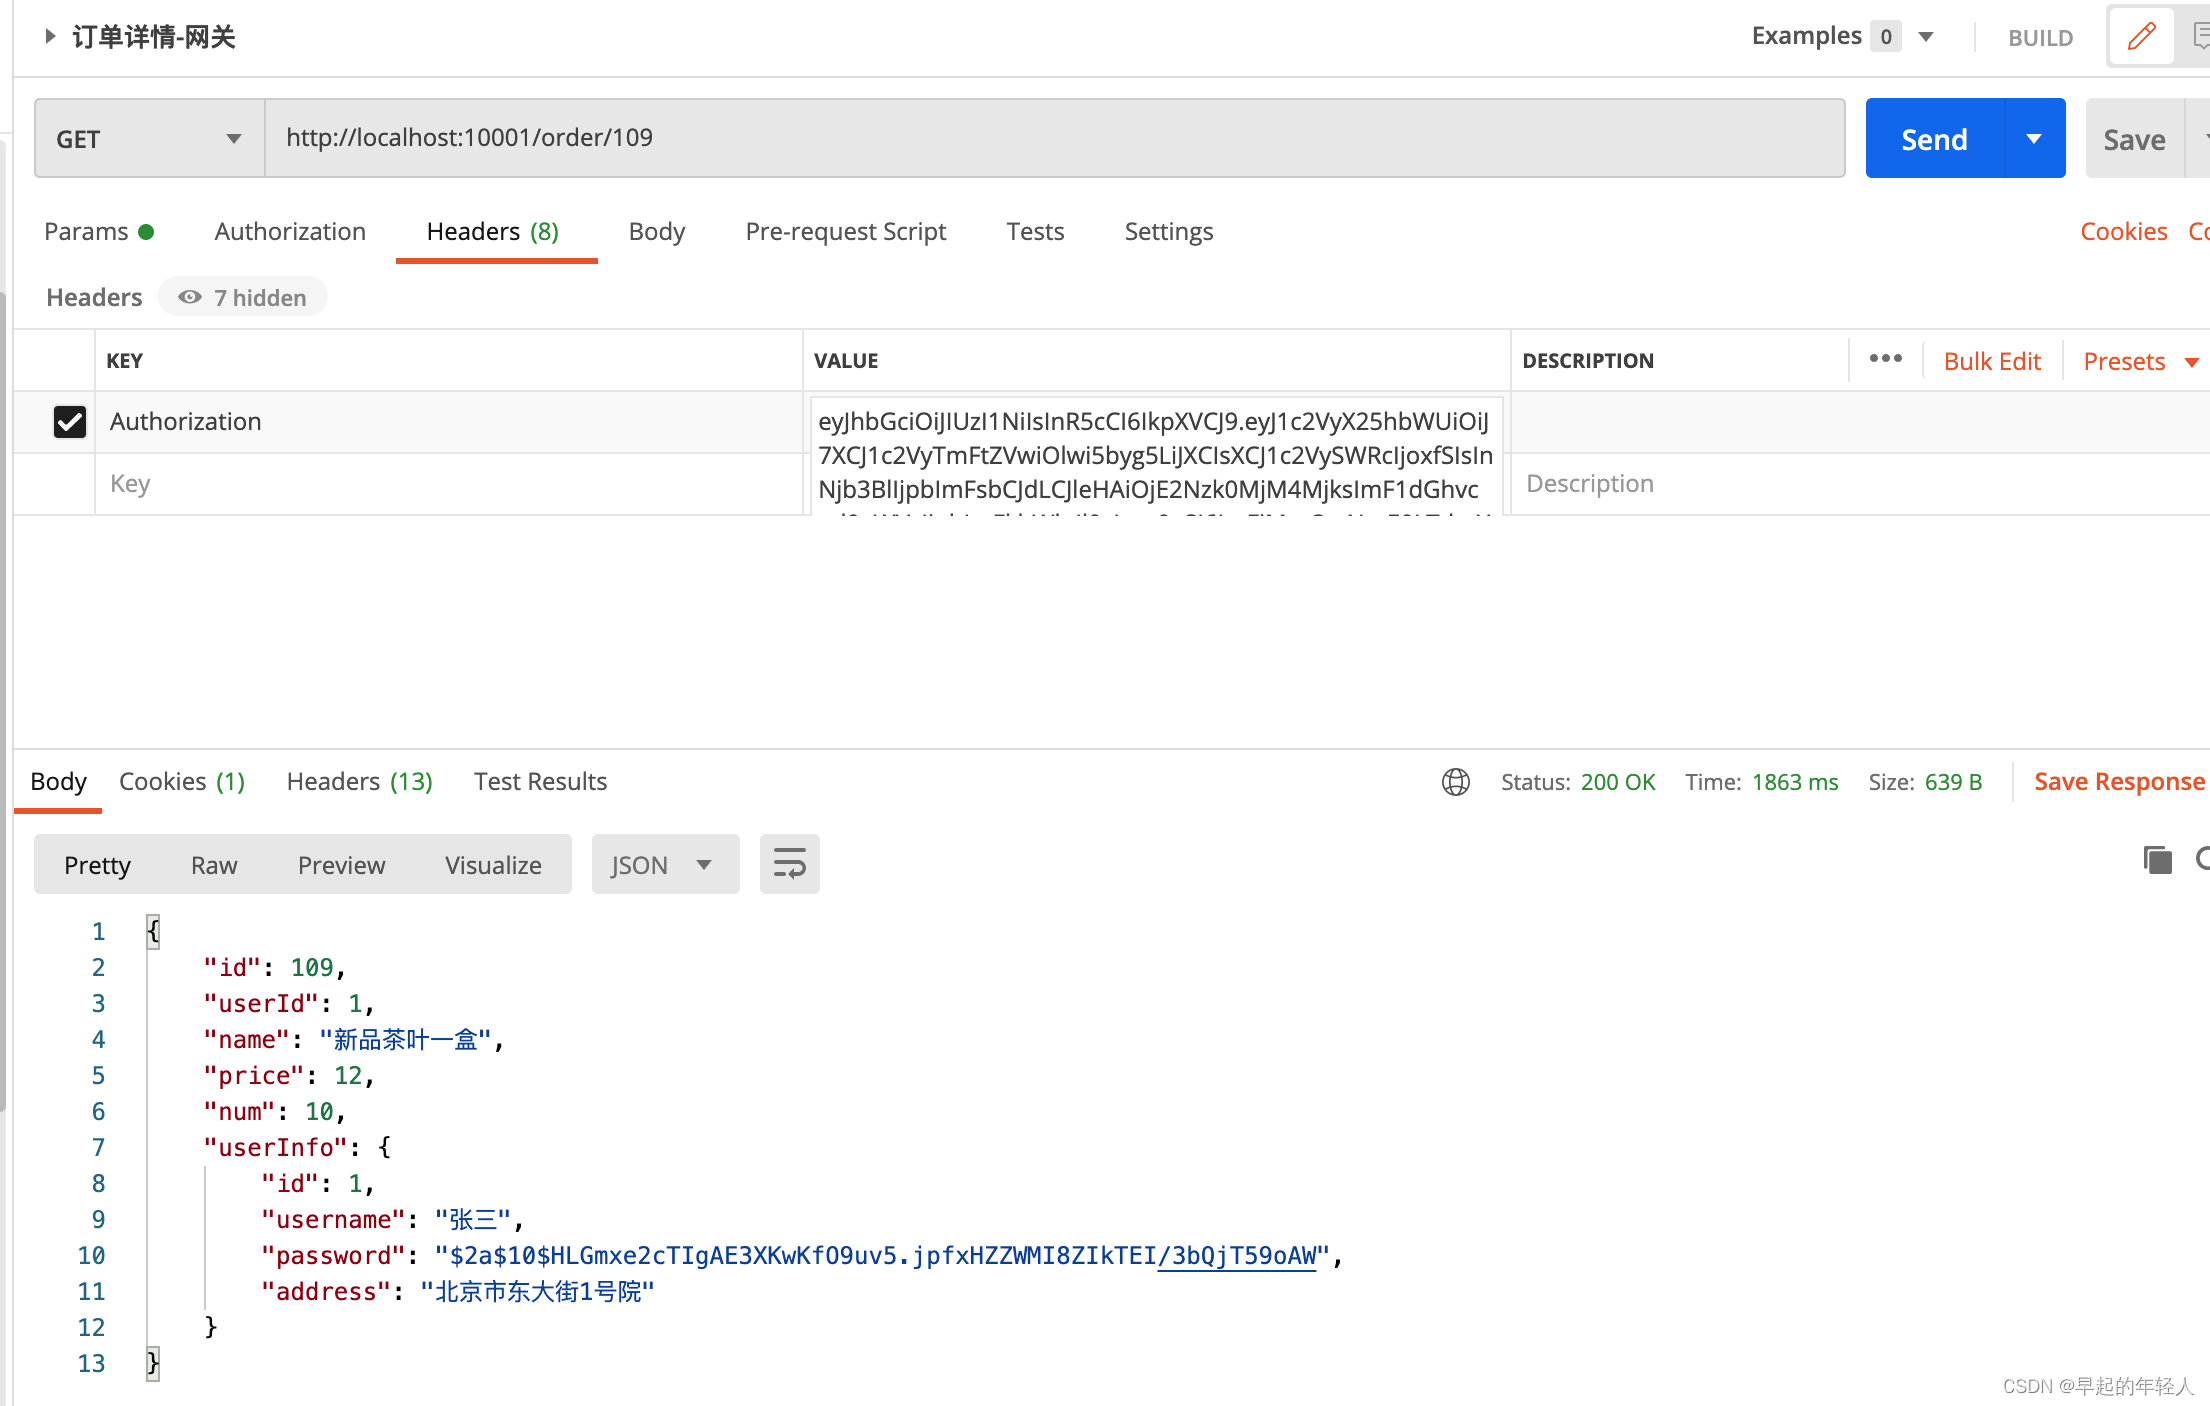

【本文地址】
今日新闻 |
推荐新闻 |