【了解detectron2框架】(我哭死TT,原博主写得太好了,全程感动感激涕零) |
您所在的位置:网站首页 › 感激涕零图片 › 【了解detectron2框架】(我哭死TT,原博主写得太好了,全程感动感激涕零) |
【了解detectron2框架】(我哭死TT,原博主写得太好了,全程感动感激涕零)
|
这里写目录标题
detectron2框架1.2 demo.py代码解析1.2.1 结构解析选择进程的启动方法。1.2.2.1 命令行参数加载1.2.2.3 模型配置加载1.2.2.4 模型生成1.2.2.5 总结
predictor.pyvisualizer.py源码解析(detectron2.utils.visualizer)class VisImage(detectron2为图片封装的一个类)class Visualizer:
save as json
没转载完全,去看原文!!!——FAIR开源框架detectron2代码解析,对初学者太友好了
detectron2框架
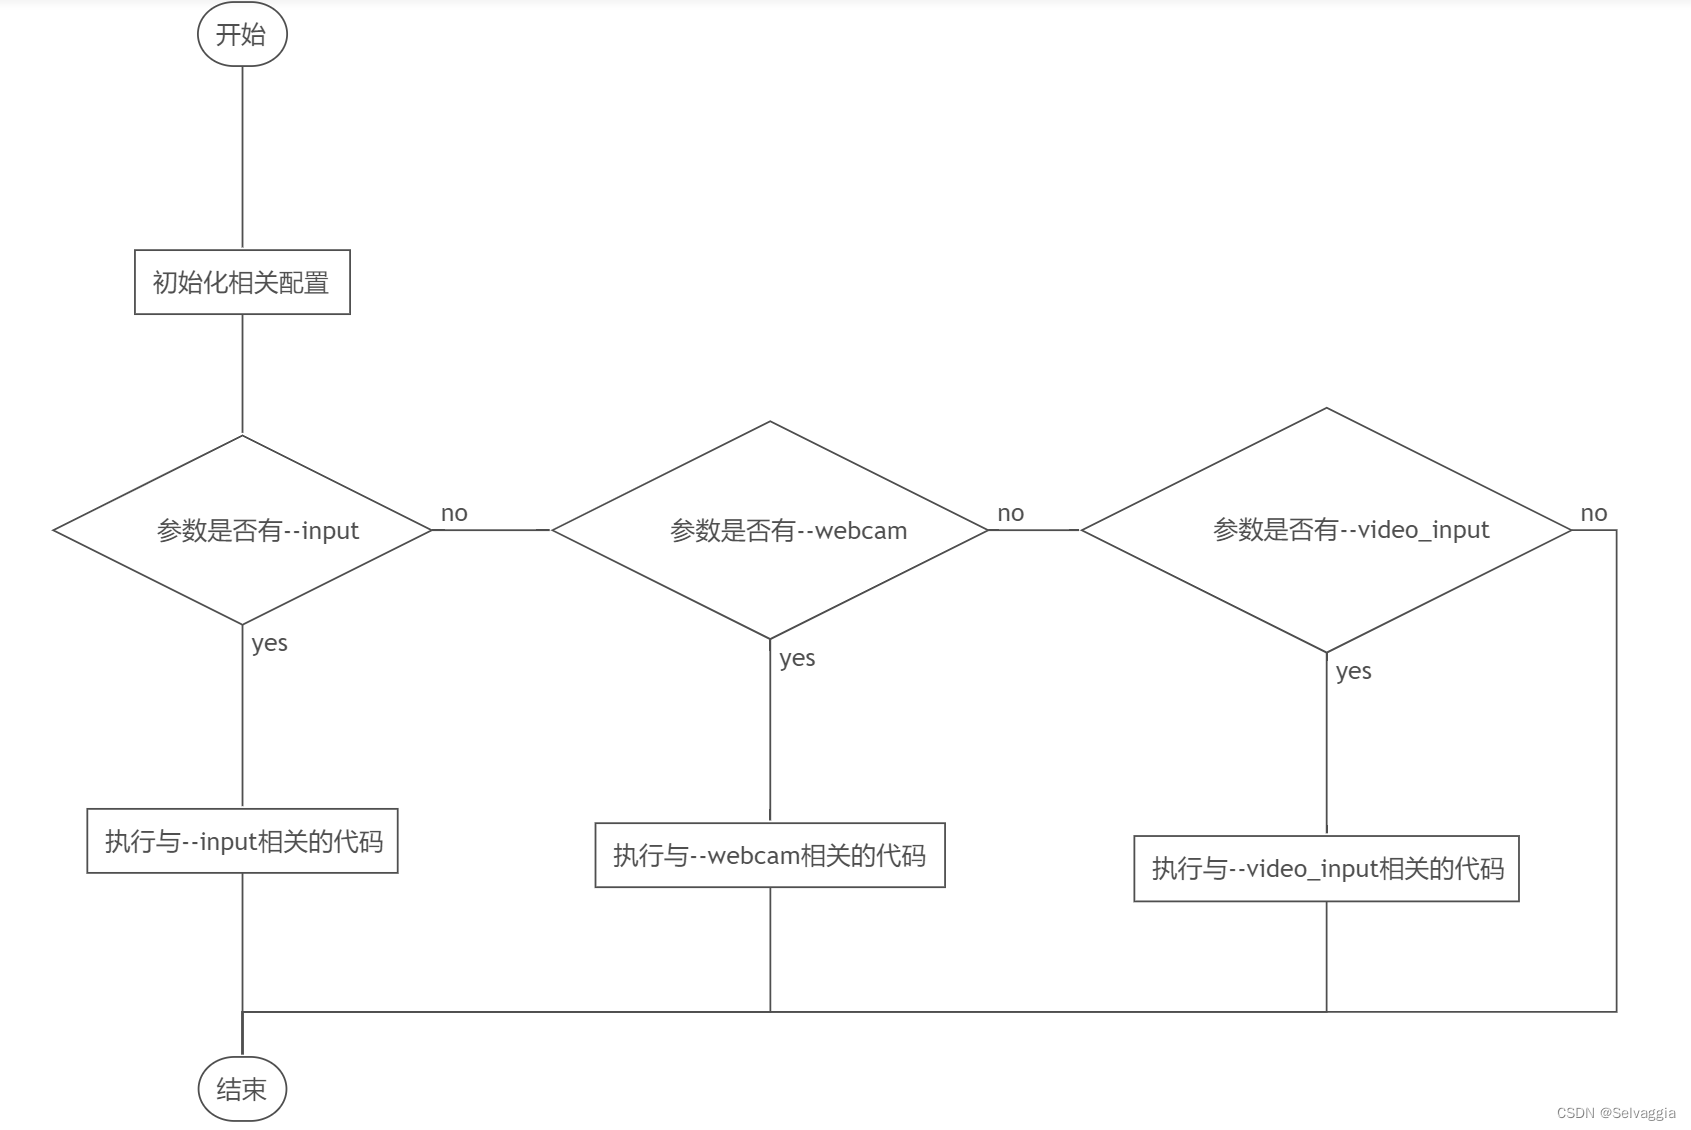
使用方法 cd demo/ python demo.py --config-file ../configs/COCO-InstanceSegmentation/mask_rcnn_R_50_FPN_3x.yaml \ --input input1.jpg input2.jpg \ [--other-options] --opts MODEL.WEIGHTS detectron2://COCO-InstanceSegmentation/mask_rcnn_R_50_FPN_3x/137849600/model_final_f10217.pkl参数--config后面跟着的是网络的配置文件,也就是存储网络结构的文件存放的位置,--input指定输入图片,[--other-options]是其他选项的意思,这里只是示意,实际的使用是参考后面的格式,--opts指定了选项,这里指定了权重的位置,实际上如果不指定的话,demo会在远处下载。 1.2 demo.py代码解析 1.2.1 结构解析demo.py的大致结构如下: # 有删减,还有一些其余包的导入 from detectron2.config import get_cfg from detectron2.data.detection_utils import read_image from detectron2.utils.logger import setup_logger from predictor import VisualizationDemo # constants WINDOW_NAME = "COCO detections" def setup_cfg(args): cfg = get_cfg() #有删减 return cfg def get_parser(): parser = argparse.ArgumentParser(description="Detectron2 demo for builtin configs") #有删减 return parser if __name__ == "__main__": #有删减 args = get_parser().parse_args() #··· cfg = setup_cfg(args) demo = VisualizationDemo(cfg) #··· if args.input: #··· elif args.webcam: #··· elif args.video_input: #···首先我们从main函数入手,在这个模块被当作主函数调用的时候,它的简要步骤如下:
网络摄像头简称WEBCAM ,英文全称为WEB CAMERA multiprocessing模块提供了一个 set_start_method()函数,该函数可用于设置启动进程的方式。需要注意的是,该 函数的调用位置,必须位于所有与多进程有关的代码之前 一个解析博客(Python multiprocessing.set_start_method方法代码示例) 1.2.2.1 命令行参数加载紧接着,代码调用了get_parser().parse_args()并把返回值赋给args 1.2.2.3 模型配置加载在加载完logger以后,调用cfg设置函数cfg = setup_cfg(args),根据我们刚刚加载好的命令行参数args设置了一系列的东西。 setup_cfg函数的定义如下: from detectron2.config import get_cfg def setup_cfg(args): # load config from file and command-line arguments cfg = get_cfg() # To use demo for Panoptic-DeepLab, please uncomment the following two lines. # from detectron2.projects.panoptic_deeplab import add_panoptic_deeplab_config # noqa # add_panoptic_deeplab_config(cfg) cfg.merge_from_file(args.config_file) cfg.merge_from_list(args.opts) # Set score_threshold for builtin models cfg.MODEL.RETINANET.SCORE_THRESH_TEST = args.confidence_threshold cfg.MODEL.ROI_HEADS.SCORE_THRESH_TEST = args.confidence_threshold cfg.MODEL.PANOPTIC_FPN.COMBINE.INSTANCES_CONFIDENCE_THRESH = args.confidence_threshold cfg.freeze() return cfg # Set score_threshold for builtin modelsbuiltin models 内置模型 get_cfg函数负责返回detectron2的默认参数的一份拷贝,而这份参数是以CfgNode进行存储的,包含了大量的网络信息,但是要注意的是缺少了例如权重路径之类的关键信息,因此需要进行设置。 而merge_from_file函数则是CfgNode的类方法,他会进行参数更新(没有细看) 然后设置了三个阈值,其中第一个阈值cfg.MODEL.RETINANET.SCORE_THRESH_TEST为预测类概率的阈值,只有当预测出的bbox的概率,也就是score大于这个阈值的时候才会被认为这是一个预测,默认的阈值为0.05。 --confidence-threshold 0.4第二个阈值cfg.MODEL.ROI_HEADS.SCORE_THRESH_TEST是用来平衡精度与召回率的,这一段的解释比较长,官方的注释如下: python demo/demo.py \ --config-file projects/SWINTS/configs/SWINTS-swin-finetune-totaltext.yaml \ --input datasets/ocr_en_422k/* \ --output output/ocr_en \ --confidence-threshold 0.4 \ --opts MODEL.WEIGHTS work_dirs/tt_model_final.pth 1.2.2.4 模型生成在初始化模型参数完成后VisualizationDemo被调用,VisualizationDemo函数(这个是核心)是从demo.py旁边的predictor.py导入进来的,它的代码如下: #有删减 from detectron2.data import MetadataCatalog from detectron2.engine.defaults import DefaultPredictor class VisualizationDemo(object): def __init__(self, cfg, instance_mode=ColorMode.IMAGE, parallel=False): """ Args: cfg (CfgNode): instance_mode (ColorMode): parallel (bool): whether to run the model in different processes from visualization. Useful since the visualization logic can be slow. """ self.metadata = MetadataCatalog.get( cfg.DATASETS.TEST[0] if len(cfg.DATASETS.TEST) else "__unused" ) self.cpu_device = torch.device("cpu") self.instance_mode = instance_mode self.parallel = parallel if parallel: num_gpu = torch.cuda.device_count() self.predictor = AsyncPredictor(cfg, num_gpus=num_gpu) else: self.predictor = DefaultPredictor(cfg) def run_on_image(self, image): """ Args: image (np.ndarray): an image of shape (H, W, C) (in BGR order). This is the format used by OpenCV. Returns: predictions (dict): the output of the model. vis_output (VisImage): the visualized image output. """ def _frame_from_video(self, video): #··· def run_on_video(self, video): """ Visualizes predictions on frames of the input video. Args: video (cv2.VideoCapture): a :class:`VideoCapture` object, whose source can be either a webcam or a video file. Yields: ndarray: BGR visualizations of each video frame. """ class AsyncPredictor: #···在这部分,最关键的是parallel参数的选择,如果设置了并行化,则会在gpu上异步执行代码,否则会生成一个DefaultPredictor的类并返回,而这个异步类的定义也在这个文件夹下。本文以更通用的DefaultPredictor类作为解析。 1.2.2.5 总结加载部分首先读取命令行给出的参数,读取关键的权重以及网络配置信息,并得到一个参数对象;紧接着生成一个logger;接下来将命令行参数与大量的默认参数进行合并,生成最终的网络配置;最后,判断硬件环境选择GPU还是在CPU,然后在硬件上根据配置文件生成并初始化检测器对象并返回。 这样就得到了这个检测器对象,如果我们已知了输入的类型,实际上可以直接调用这个对象生成预测,就像上面的例子代码那样。 predictor.py首先,image = image[:,::-1,:] 这一行代码产生的效果是对原来的一张图片实现 翻转(flip) 的效果 接下来详细解释一下这一行代码的含义(image是一个三维数组): 1. image[:,::-1,:]中的第一个冒号代表了图片的纵列,单独一个冒号指的是对图片的所有纵列进行操作。 2. image[:,::-1,:]中的 ::-1 的是表示从右向左进行遍历输出(对应的模式是 start:end:stride),::-1中第一个冒号代表读取每行第一个到最后一个像素,第二个冒号后是切片步长,如果为1则和原图一样排列,如果为-1则是反向排列(镜像),经过这个之后便实现了翻转。 3. 最后一个冒号代表的是图片的通道 原文链接:https://blog.csdn.net/weixin_42469716/article/details/109327189 visualizer.py源码解析(detectron2.utils.visualizer) class VisImage(detectron2为图片封装的一个类)首先来看看detectron2为图片封装的一个类,源码如下,初始化时只需要传入下面两个参数即可。 img (ndarray): an RGB image of shape (H, W, 3).scale (float): scale the input image两个函数的功能也是一目了然,没啥好说的,一个保存save,一个从类中取图像数据。 class VisImage: def __init__(self, img, scale=1.0): self.img = img self.scale = scale self.width, self.height = img.shape[1], img.shape[0] self._setup_figure(img) def _setup_figure(self, img): fig = mplfigure.Figure(frameon=False) self.dpi = fig.get_dpi() fig.set_size_inches( (self.width * self.scale + 1e-2) / self.dpi, (self.height * self.scale + 1e-2) / self.dpi, ) self.canvas = FigureCanvasAgg(fig) ax = fig.add_axes([0.0, 0.0, 1.0, 1.0]) ax.axis("off") ax.imshow(img, extent=(0, self.width, self.height, 0), interpolation="nearest") self.fig = fig self.ax = ax def save(self, filepath): self.fig.savefig(filepath) def get_image(self): canvas = self.canvas s, (width, height) = canvas.print_to_buffer() buffer = np.frombuffer(s, dtype="uint8") img_rgba = buffer.reshape(height, width, 4) rgb, alpha = np.split(img_rgba, [3], axis=2) return rgb.astype("uint8") class Visualizer:先来看看该类的大致成员、函数: init:需要传入一个rgb排列的图片,一般是numpy array的类型; draw_instance_predictions:前面提过,输入模型的运算结果,返回一个VisImage类型; draw_text:根据指定的位置position绘制文字text; draw_box:传入box_coord,tuple类型,(x0, y0, x1, y1); get_output:返回一个VisImage类型 Detectron2-可视化 save as json先抄下来,防止可以用 import json # 给定的JSON字符串 json_str = ''' { "RequestId": "86B83935-DD36-195B-B6E4-D07BE370C8B6", "Data": "{"algo_version": "48f3e265513a79d5f9bc26f0c010476bbd856b2d", "data": {"face": {"algo_version": "48f3e265513a79d5f9bc26f0c010476bbd856b2d", "angle": 0, "data": {"address": "四川省攀枝花市榕树街277号", "birthDate": "1986年1月9日", "ethnicity": "汉", "idNumber": "510124198809071234", "name": "王銘宇", "sex": "男"}, "ftype": 0, "height": 397, "orgHeight": 397, "orgWidth": 619, "prism_keyValueInfo": [{"key": "name", "keyProb": 100, "value": "王銘宇", "valuePos": [{"x": 139, "y": 75}, {"x": 194, "y": 75}, {"x": 194, "y": 94}, {"x": 139, "y": 94}], "valueProb": 100}, {"key": "sex", "keyProb": 100, "value": "男", "valuePos": [{"x": 139, "y": 122}, {"x": 159, "y": 122}, {"x": 159, "y": 144}, {"x": 139, "y": 144}], "valueProb": 100}, {"key": "ethnicity", "keyProb": 100, "value": "汉", "valuePos": [{"x": 260, "y": 122}, {"x": 282, "y": 122}, {"x": 282, "y": 142}, {"x": 260, "y": 142}], "valueProb": 100}, {"key": "birthDate", "keyProb": 100, "value": "1986年1月9日", "valuePos": [{"x": 141, "y": 170}, {"x": 303, "y": 168}, {"x": 304, "y": 183}, {"x": 142, "y": 185}], "valueProb": 100}, {"key": "address", "keyProb": 100, "value": "四川省攀枝花市榕树街277号", "valuePos": [{"x": 141, "y": 221}, {"x": 385, "y": 221}, {"x": 385, "y": 241}, {"x": 141, "y": 241}], "valueProb": 100}, {"key": "idNumber", "keyProb": 100, "value": "510124198809071234", "valuePos": [{"x": 226, "y": 338}, {"x": 543, "y": 336}, {"x": 543, "y": 355}, {"x": 227, "y": 356}], "valueProb": 100}], "sliceRect": {"x0": 10, "x1": 623, "x2": 629, "x3": 10, "y0": 17, "y1": 18, "y2": 398, "y3": 412}, "warning": {"completenessScore": 100, "isCopy": 0, "isReshoot": 0, "qualityScore": 89.296059, "tamperScore": 99.99968}, "width": 619}}, "height": 416, "orgHeight": 416, "orgWidth": 629, "width": 629}", "Code": "如果识别成功,不会返回此字段", "Message": "如果识别成功,不会返回此字段" } ''' # 解析JSON字符串为Python字典 data_dict = json.loads(json_str) # 格式化输出文本 formatted_text = f"RequestId: {data_dict['RequestId']}\n" formatted_text += "Data:\n" formatted_text += f" Algo Version: {data_dict['Data']['algo_version']}\n" formatted_text += " Data:\n" formatted_text += f" Name: {data_dict['Data']['data']['face']['data']['name']}\n" formatted_text += f" Sex: {data_dict['Data']['data']['face']['data']['sex']}\n" formatted_text += f" Ethnicity: {data_dict['Data']['data']['face']['data']['ethnicity']}\n" formatted_text += f" Birth Date: {data_dict['Data']['data']['face']['data']['birthDate']}\n" formatted_text += f" Address: {data_dict['Data']['data']['face']['data']['address']}\n" formatted_text += f" ID Number: {data_dict['Data']['data']['face']['data']['idNumber']}\n" formatted_text += f" Warning - Completeness Score: {data_dict['Data']['data']['face']['warning']['completenessScore']}\n" formatted_text += f" Warning - Quality Score: {data_dict['Data']['data']['face']['warning']['qualityScore']}\n" formatted_text += f" Warning - Tamper Score: {data_dict['Data']['data']['face']['warning']['tamperScore']}\n" formatted_text += f"Code: {data_dict['Code']}\n" formatted_text += f"Message: {data_dict['Message']}\n" # 打印输出格式化后的文本 print(formatted_text) import json # 解析JSON数据 data = json.loads(result) # 获取文本块列表 blocks = data["prism_wordsInfo"] # 根据每个文本块的位置信息,将文本块按照从上到下、从左到右的顺序排序 blocks.sort(key=lambda x: (x["location"]["top"], x["location"]["left"])) # 生成带格式的文本 text = "" for block in blocks: text += block["word"] + " " if block["location"]["width"] + block["location"]["left"] >= 1: text += "\n" print(text) jsObj = json.dumps(predictions.tolist()) fileObject = open('jsonFile.json', 'w') fileObject.write(jsObj) fileObject.close() |
【本文地址】