网站提示用微信扫码登录,他们是怎么实现的? |
您所在的位置:网站首页 › 怎样从公众号提取二维码 › 网站提示用微信扫码登录,他们是怎么实现的? |
网站提示用微信扫码登录,他们是怎么实现的?
|
大家好,我是技术UP主小傅哥。 作为一个技术码农,在使用社区、论坛或者各类AI服务的时,经常会看到这样一个提示:“使用微信公众号扫码登录”。那因为这种的登录方式除了登录,还可以让用户沉淀到公众号上,以后还能接收到公众号推广,可谓是一举两得。那它是怎么做的呢?🤔  小傅哥,先举个这样登录的例子🌰,让大家熟悉下这个业务场景。 通过这样的一个页面效果展示,我们粗略的可以知道,用户页面不断的 checkScan 检测,是需要用到一个唯一ID值。而当用户用微信扫码后,这个唯一ID值则可以通过微信公众号获取到并保存,同时创建出唯一ID 和 Token 的映射关系。那么当 checkScan 扫描到服务端有这么一个映射,则可以把 Token 取回来存到浏览器中,让用户登录成功。 流程就是这样,那具体的代码实现是如何处理的呢?接下来小傅哥就给大家分享下,怎么来实现一下这个方案。 文末提供了「星球:码农会锁」🧧优惠加入方式,以及本节课程的代码地址。项目演示地址:https://gaga.plus - 8个实战项目 一、流程设计微信扫码登录的流程主要包括;用户、浏览器、后端服务、公众号,这四个部分。我们可以先通过UML流程图,了解下整个调用关系。  首先,由用户发起登录操作。让WEB页面从服务端获取登录凭证。之后,前端页面拿到登录凭证后,可以使用 Ticket 从公众号服务平台换取二维码。最后,用户扫码登录。扫码后,服务端会接收到来自公众号的回调消息,服务端再把回调消息中的 openid【用户唯一标识】和 ticket 进行绑定。这个时候你也可以创建出 jwt token 反馈给前端,作为登录成功的存储信息,后续校验 jwt token 就可以了。 首先,由用户发起登录操作。让WEB页面从服务端获取登录凭证。之后,前端页面拿到登录凭证后,可以使用 Ticket 从公众号服务平台换取二维码。最后,用户扫码登录。扫码后,服务端会接收到来自公众号的回调消息,服务端再把回调消息中的 openid【用户唯一标识】和 ticket 进行绑定。这个时候你也可以创建出 jwt token 反馈给前端,作为登录成功的存储信息,后续校验 jwt token 就可以了。有了这样一个流程的理解,接下来,我们就可以看下代码是如何实现的了。 二、对接文档 - 公众号平台微信公众号测试平台:https://mp.weixin.qq.com/debug/cgi-bin/sandboxinfo?action=showinfo&t=sandbox/index - 不需要申请公众号即可完成测试,类似沙箱环境获取 Access Token 文档:https://developers.weixin.qq.com/doc/offiaccount/Basic_Information/Get_access_token.html生成带参数的二维码:https://developers.weixin.qq.com/doc/offiaccount/Account_Management/Generating_a_Parametric_QR_Code.html - 最终就是用户扫描的二维码内网穿透工具,natapp.cn - 因为需要让公众号调用到本地的服务,所需要把你的服务映射到公网上使用。注意;要选择付费的12元,否则不能对接。三、功能实现小傅哥这里采用了 DDD 的工程模型结构,开发公众号扫码登录服务端案例。如果你对 DDD 还不是太熟悉,可以看下小傅哥写的系列 DDD 教程;《Java 简明教程》-> bugstack.cn -> 路书 1. 工程结构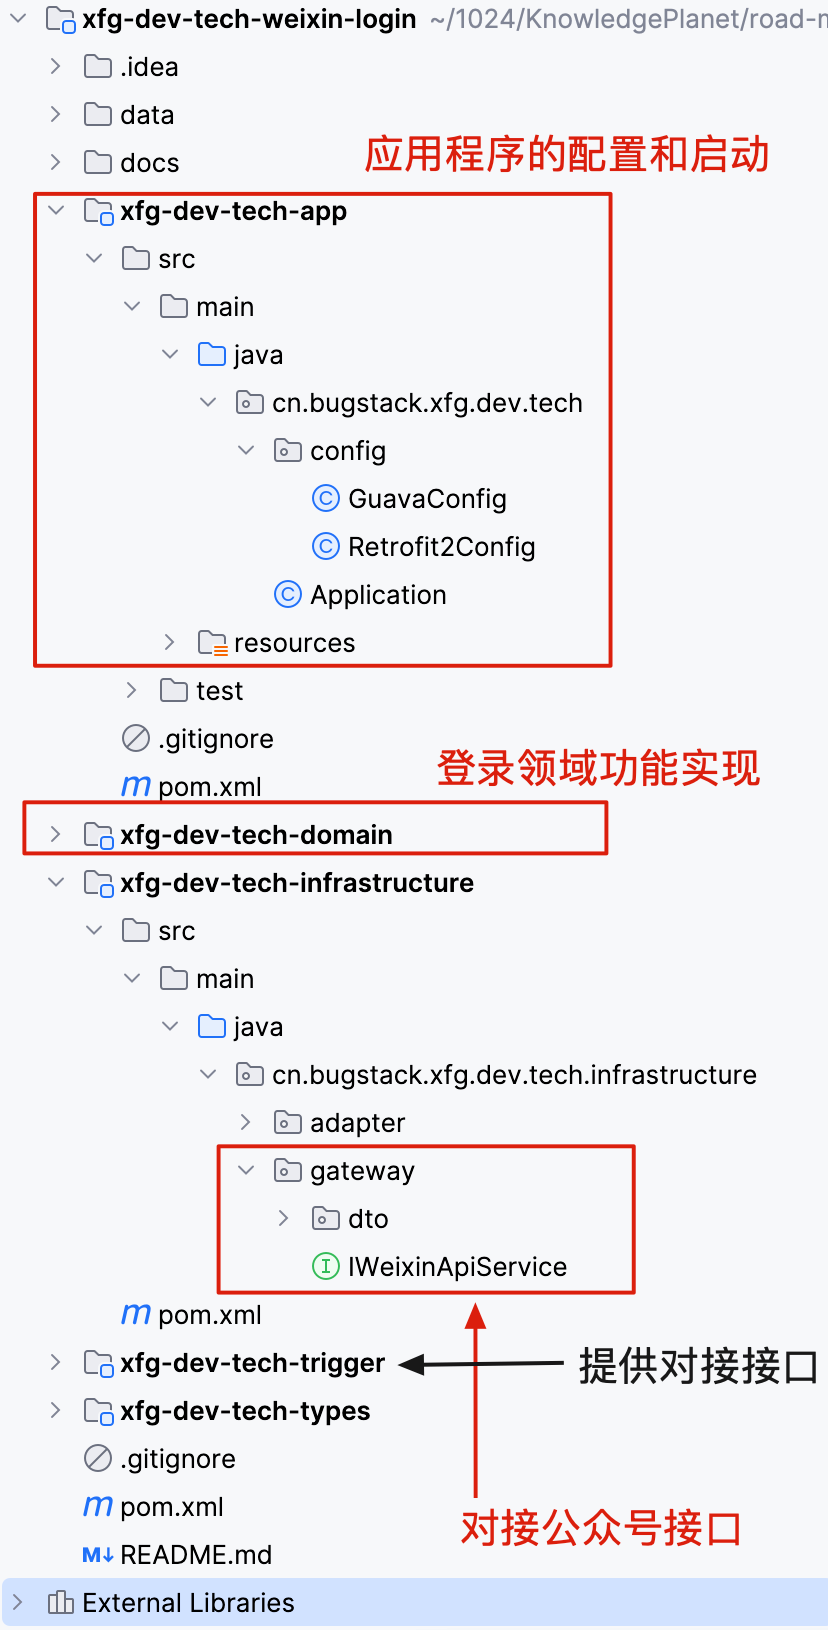 xfg-dev-tech-app 是启动应用程序的入口,其他模块也被直接或者间接的引入到 app 模块下,这样才能被 Spring 扫描加载。xfg-dev-tech-infrastructure 是基础设施层,用于对接外部接口、缓存、数据库等相关内容的连接使用。本节主要是对接微信开发平台的接口。采用的是 retrofit2 技术框架,这样对接起来更加方便。xfg-dev-tech-domain 是功能实现层,像是登录的具体实现,就是在 domain 领域层实现的。你将来使用 DDD 做的其他功能,也是放到 domain 领域下实现,每一个功能就是就是一个模块。xfg-dev-tech-types 用于定义基本的类型、枚举、错误码等内容。2. 二维码获取 xfg-dev-tech-app 是启动应用程序的入口,其他模块也被直接或者间接的引入到 app 模块下,这样才能被 Spring 扫描加载。xfg-dev-tech-infrastructure 是基础设施层,用于对接外部接口、缓存、数据库等相关内容的连接使用。本节主要是对接微信开发平台的接口。采用的是 retrofit2 技术框架,这样对接起来更加方便。xfg-dev-tech-domain 是功能实现层,像是登录的具体实现,就是在 domain 领域层实现的。你将来使用 DDD 做的其他功能,也是放到 domain 领域下实现,每一个功能就是就是一个模块。xfg-dev-tech-types 用于定义基本的类型、枚举、错误码等内容。2. 二维码获取从微信官网文档阅读可以知道,为了获取扫码登录的二维码,则需要3步; 先获取 AccessToken,它是公众号的全局唯一接口调用凭据,公众号调用各接口时都需使用access_token。通过 AccessToken 获取 ticket 凭证,凭证用于衔接用户扫码登录和公众号回调后获取凭证,以此关联用户登录信息。通过 ticket 传递给前端,前端页面访问微信地址直接获取二维码。2.1 接口对接 - retrofit2代码语言:javascript复制public interface IWeixinApiService { /** * 获取 Access token * 文档:Get_access_token * * @param grantType 获取access_token填写client_credential * @param appId 第三方用户唯一凭证 * @param appSecret 第三方用户唯一凭证密钥,即appsecret * @return 响应结果 */ @GET("cgi-bin/token") Call getToken( @Query("grant_type") String grantType, @Query("appid") String appId, @Query("secret") String appSecret ); /** * 获取凭据 ticket * 文档:Generating_a_Parametric_QR_Code * 前端根据凭证展示二维码 * * @param accessToken getToken 获取的 token 信息 * @param weixinQrCodeRequestDTO 入参对象 * @return 应答结果 */ @POST("cgi-bin/qrcode/create") Call createQrCode(@Query("access_token") String accessToken, @Body WeixinQrCodeRequestDTO weixinQrCodeRequestDTO); } 使用 retrofit2 对接接口,它可以以一种面向对象的思维,使用 HTTP 接口,免去自己处理中间的对接过程。另外 okhttp3 框架对接接口也非常好用,有的时候可以配合一起使用。代码语言:javascript复制@Slf4j @Configuration public class Retrofit2Config { private static final String BASE_URL = "https://api.weixin.qq.com/"; @Bean public Retrofit retrofit() { return new Retrofit.Builder() .baseUrl(BASE_URL) .addConverterFactory(JacksonConverterFactory.create()) .build(); } @Bean public IWeixinApiService weixinApiService(Retrofit retrofit) { return retrofit.create(IWeixinApiService.class); } } 使用 retrofit2 开发好接口后,在再 xfg-dev-tech-app 模块的 config 文件夹下,创建服务。【这有点像 MyBatis 的 Dao 接口一样,只需要定义好接口即可】2.2 ApiPost 请求接口:https://mp.weixin.qq.com/cgi-bin/showqrcode?ticket=TICKET 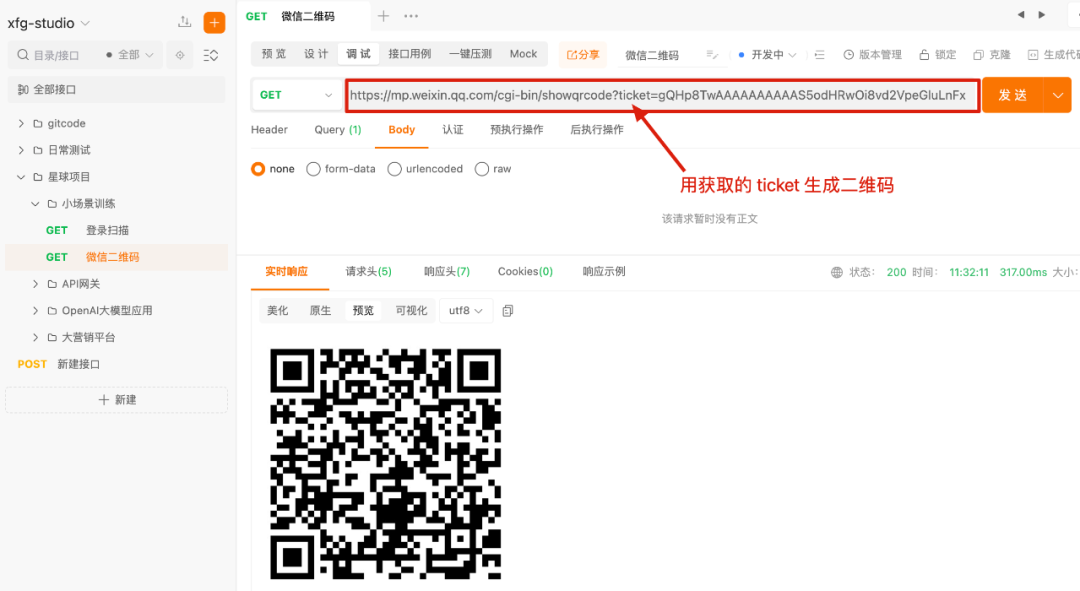 APIPost 模拟网页获得的扫码登录的二维码。接下来程序到测试的时候,产生的 ticket 会放到这里模拟使用。3. 登录码开发 APIPost 模拟网页获得的扫码登录的二维码。接下来程序到测试的时候,产生的 ticket 会放到这里模拟使用。3. 登录码开发源码:cn.bugstack.xfg.dev.tech.trigger.http.LoginController 代码语言:javascript复制@Slf4j @RestController() @CrossOrigin("*") @RequestMapping("/api/v1/login/") public class LoginController { @Resource private ILoginService loginService; @RequestMapping(value = "weixin_qrcode_ticket", method = RequestMethod.GET) public Response weixinQrCodeTicket() { try { String qrCodeTicket = loginService.createQrCodeTicket(); log.info("生成微信扫码登录 ticket {}", qrCodeTicket); return Response.builder() .code(Constants.ResponseCode.SUCCESS.getCode()) .info(Constants.ResponseCode.SUCCESS.getInfo()) .data(qrCodeTicket) .build(); } catch (Exception e) { log.info("生成微信扫码登录 ticket 失败", e); return Response.builder() .code(Constants.ResponseCode.UN_ERROR.getCode()) .info(Constants.ResponseCode.UN_ERROR.getInfo()) .build(); } } @RequestMapping(value = "check_login", method = RequestMethod.GET) public Response checkLogin(@RequestParam String ticket) { try { String openidToken = loginService.checkLogin(ticket); log.info("扫描检测登录结果 ticket:{} openidToken:{}", ticket, openidToken); if (StringUtils.isNotBlank(openidToken)) { return Response.builder() .code(Constants.ResponseCode.SUCCESS.getCode()) .info(Constants.ResponseCode.SUCCESS.getInfo()) .data(openidToken) .build(); } else { return Response.builder() .code(Constants.ResponseCode.NO_LOGIN.getCode()) .info(Constants.ResponseCode.NO_LOGIN.getInfo()) .build(); } } catch (Exception e) { log.info("扫描检测登录结果失败 ticket:{}", ticket); return Response.builder() .code(Constants.ResponseCode.UN_ERROR.getCode()) .info(Constants.ResponseCode.UN_ERROR.getInfo()) .build(); } } }开发两个接口; /api/v1/login/weixin_qrcode_ticket - 获取微信 ticket 凭证/api/v1/login/check_login - 轮训验证登录4. 公众号开发首先,只要做公众号开发的流程,就必须有公众号的对接。这个对接就是你在自己按照公众号文档开发好对接程序,配置到公众号平台。 4.1 配置说明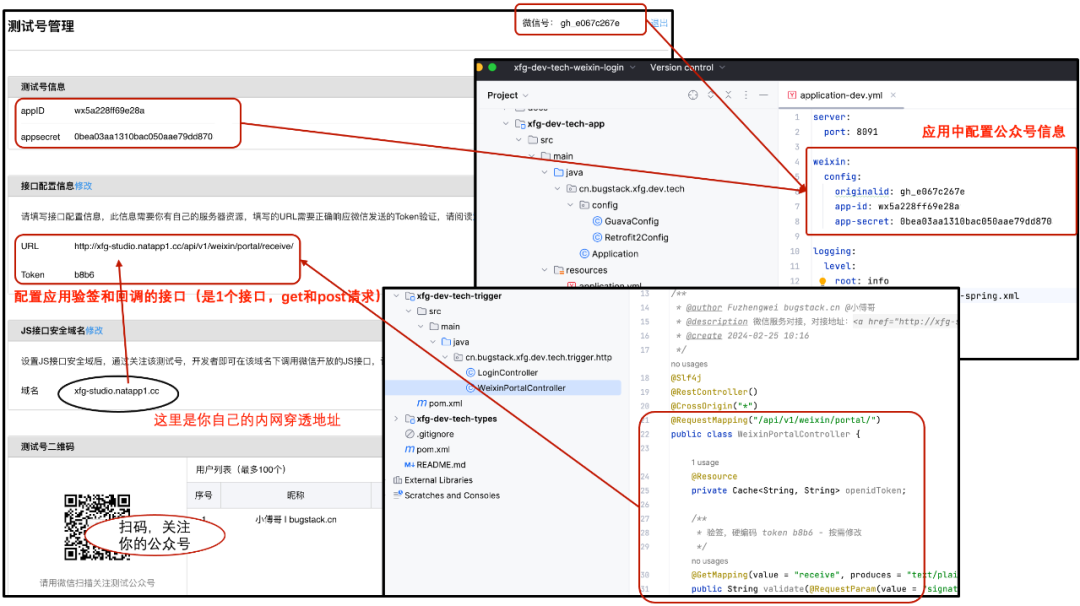 如图所示,是你在登录微信公众号测试平台,添加接口配置和JS安全域名以后看到的内容。 最顶上,微信号,需要配置到 xfg-dev-tech-weixin-login 的 application-dev.yml 文件中。测试号信息 appID、appsecret,也需要配置到 application-dev.yml 文件中。接口信息的配置,需要你在启动 xfg-dev-tech-weixin-login,同时在本地测试时启动 natapp 内网穿透工具后。用你的内网穿透地址,和工程的请求地址的 URL 配置到公众号接口里。配置的时候会进行验签,验签成功则配置成功。你还要扫描关注测试号二维码,这样才能看到测试信息。4.2 验签服务源码:cn.bugstack.xfg.dev.tech.trigger.http.WeixinPortalController 代码语言:javascript复制@Slf4j @RestController() @CrossOrigin("*") @RequestMapping("/api/v1/weixin/portal/") public class WeixinPortalController { @Value("${weixin.config.originalid}") private String originalid; @Resource private Cache openidToken; /** * 验签,硬编码 token b8b6 - 按需修改 */ @GetMapping(value = "receive", produces = "text/plain;") public String validate(@RequestParam(value = "signature", required = false) String signature, @RequestParam(value = "timestamp", required = false) String timestamp, @RequestParam(value = "nonce", required = false) String nonce, @RequestParam(value = "echostr", required = false) String echostr) { try { log.info("微信公众号验签信息开始 [{}, {}, {}, {}]", signature, timestamp, nonce, echostr); if (StringUtils.isAnyBlank(signature, timestamp, nonce, echostr)) { throw new IllegalArgumentException("请求参数非法,请核实!"); } boolean check = SignatureUtil.check("b8b6", signature, timestamp, nonce); log.info("微信公众号验签信息完成 check:{}", check); if (!check) { return null; } return echostr; } catch (Exception e) { log.error("微信公众号验签信息失败 [{}, {}, {}, {}]", signature, timestamp, nonce, echostr, e); return null; } } /** * 回调,接收公众号消息【扫描登录,会接收到消息】 */ @PostMapping(value = "receive", produces = "application/xml; charset=UTF-8") public String post(@RequestBody String requestBody, @RequestParam("signature") String signature, @RequestParam("timestamp") String timestamp, @RequestParam("nonce") String nonce, @RequestParam("openid") String openid, @RequestParam(name = "encrypt_type", required = false) String encType, @RequestParam(name = "msg_signature", required = false) String msgSignature) { try { log.info("接收微信公众号信息请求{}开始 {}", openid, requestBody); // 消息转换 MessageTextEntity message = XmlUtil.xmlToBean(requestBody, MessageTextEntity.class); // 扫码登录【消息类型和事件】 if ("event".equals(message.getMsgType()) && "SCAN".equals(message.getEvent())) { // 实际的业务场景,可以生成 jwt 的 token 让前端存储 openidToken.put(message.getTicket(), openid); return buildMessageTextEntity(openid, "登录成功"); } log.info("接收微信公众号信息请求{}完成 {}", openid, requestBody); return buildMessageTextEntity(openid, "测试本案例,需要请扫码登录!"); } catch (Exception e) { log.error("接收微信公众号信息请求{}失败 {}", openid, requestBody, e); return ""; } } private String buildMessageTextEntity(String openid, String content) { MessageTextEntity res = new MessageTextEntity(); // 公众号分配的ID res.setFromUserName(originalid); res.setToUserName(openid); res.setCreateTime(String.valueOf(System.currentTimeMillis() / 1000L)); res.setMsgType("text"); res.setContent(content); return XmlUtil.beanToXml(res); } } 验签和接收公众号回调,是一个固定的代码,同时验签和接收公众号回调也都是同一个接口名字,只是一个是 get 请求,另外一个是 post 请求。验签地址:http://xfg-studio.natapp1.cc/api/v1/weixin/portal/receive 你需要更换为你的内网穿透域名地址。在接收公众号回调中,有一块固定的代码。接收公众号消息类型为事件,事件类型为扫码(SCAN),从中可以获得 ticket 这个唯一凭证。验证登录时,简单模拟写入到缓存中。openidToken.put(message.getTicket(), openid); 实际的业务场景会转换为登录的 jwt token 数据。4.3 内网穿透 内网穿透工具,购买一个12元的付费隧道。https://natapp.cn/购买后,配置你的隧道本地端口为 8091 也就是你本地 SpringBoot 程序的端口。如果你不是 8091 端口,可以修改为其他的软件下载,内网穿透需要一个本地的软件。你可以从它的网站下载。https://natapp.cn/#download 各个版本也都支持,里面也有相关的使用教程。安装软件后,启动 natapp 和应用,就可以把你的地址配置到上面了。四、功能验证1. 启动 SpringBoot 服务代码语言:javascript复制 . ____ _ __ _ _
/\\ / ___'_ __ _ _(_)_ __ __ _ \ \ \ \
( ( )\___ | '_ | '_| | '_ \/ _` | \ \ \ \
\\/ ___)| |_)| | | | | || (_| | ) ) ) )
' |____| .__|_| |_|_| |_\__, | / / / /
=========|_|==============|___/=/_/_/_/
:: Spring Boot :: (v2.7.12)
24-02-25.17:13:00.372 [main ] INFO EndpointLinksResolver - Exposing 1 endpoint(s) beneath base path '/actuator'
24-02-25.17:13:00.405 [main ] INFO Http11NioProtocol - Starting ProtocolHandler ["http-nio-8091"]
24-02-25.17:13:00.440 [main ] INFO TomcatWebServer - Tomcat started on port(s): 8091 (http) with context path ''
24-02-25.17:13:00.461 [main ] INFO Application - Started Application in 4.268 seconds (JVM running for 4.941)
2. 启动内网穿透 内网穿透工具,购买一个12元的付费隧道。https://natapp.cn/购买后,配置你的隧道本地端口为 8091 也就是你本地 SpringBoot 程序的端口。如果你不是 8091 端口,可以修改为其他的软件下载,内网穿透需要一个本地的软件。你可以从它的网站下载。https://natapp.cn/#download 各个版本也都支持,里面也有相关的使用教程。安装软件后,启动 natapp 和应用,就可以把你的地址配置到上面了。四、功能验证1. 启动 SpringBoot 服务代码语言:javascript复制 . ____ _ __ _ _
/\\ / ___'_ __ _ _(_)_ __ __ _ \ \ \ \
( ( )\___ | '_ | '_| | '_ \/ _` | \ \ \ \
\\/ ___)| |_)| | | | | || (_| | ) ) ) )
' |____| .__|_| |_|_| |_\__, | / / / /
=========|_|==============|___/=/_/_/_/
:: Spring Boot :: (v2.7.12)
24-02-25.17:13:00.372 [main ] INFO EndpointLinksResolver - Exposing 1 endpoint(s) beneath base path '/actuator'
24-02-25.17:13:00.405 [main ] INFO Http11NioProtocol - Starting ProtocolHandler ["http-nio-8091"]
24-02-25.17:13:00.440 [main ] INFO TomcatWebServer - Tomcat started on port(s): 8091 (http) with context path ''
24-02-25.17:13:00.461 [main ] INFO Application - Started Application in 4.268 seconds (JVM running for 4.941)
2. 启动内网穿透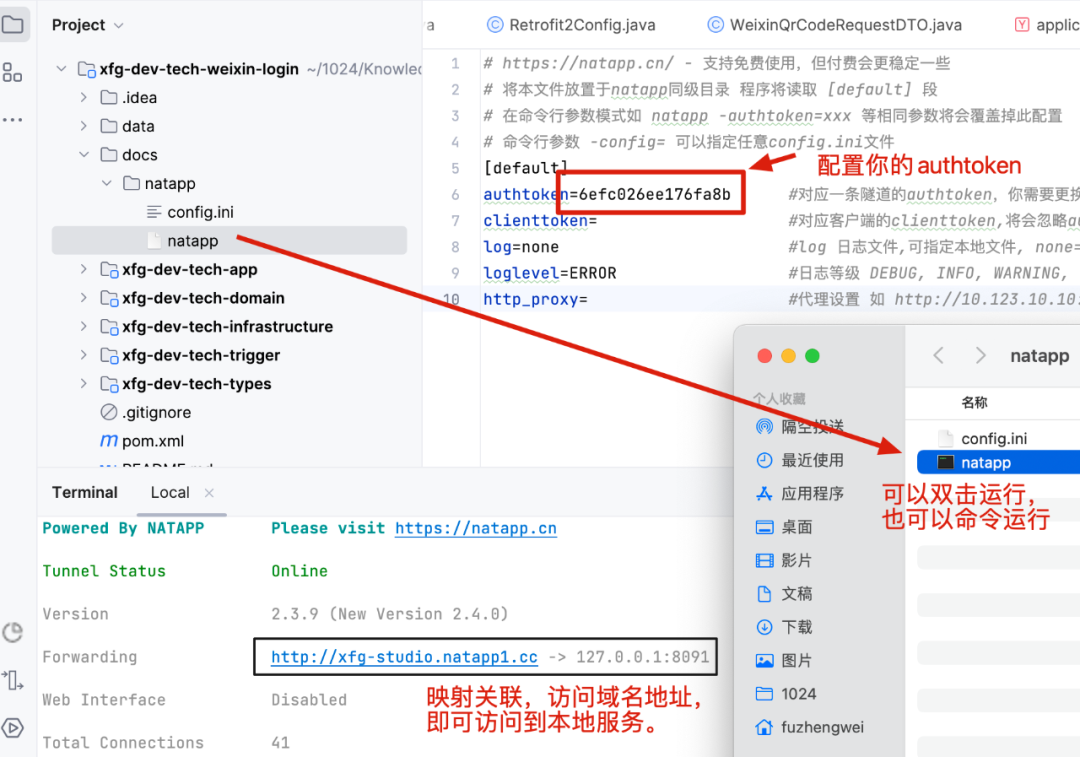 从 natapp.cn 你的隧道中获取 authtoken 配置到本地你下载的软件里。【我下载的mac版本】之后你可以双击启动,也可以通过./natapp 启动3. 获取二维码3.1 获取 ticket 凭证 从 natapp.cn 你的隧道中获取 authtoken 配置到本地你下载的软件里。【我下载的mac版本】之后你可以双击启动,也可以通过./natapp 启动3. 获取二维码3.1 获取 ticket 凭证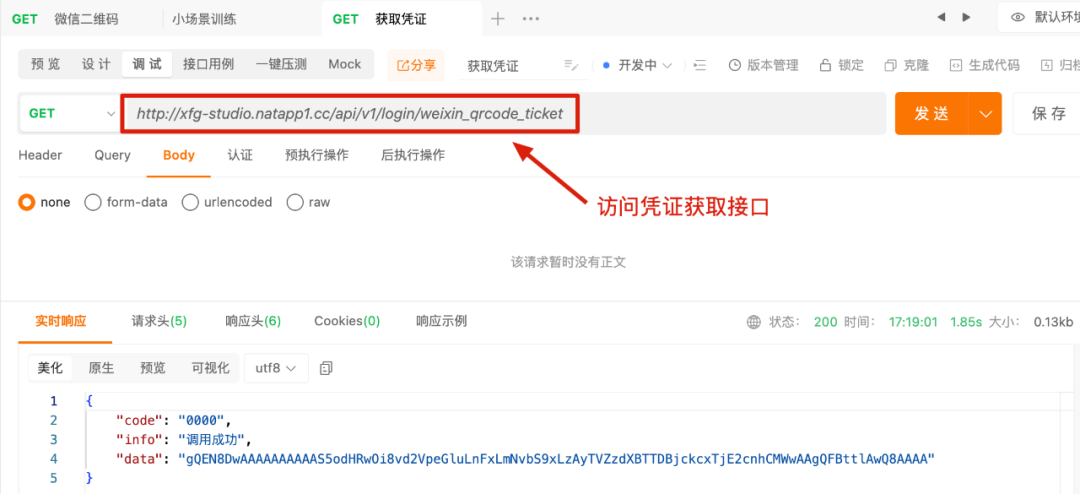 访问接口:http://xfg-studio.natapp1.cc/api/v1/login/weixin_qrcode_ticket - 你需要替换为你的地址。 3.2 生成二维码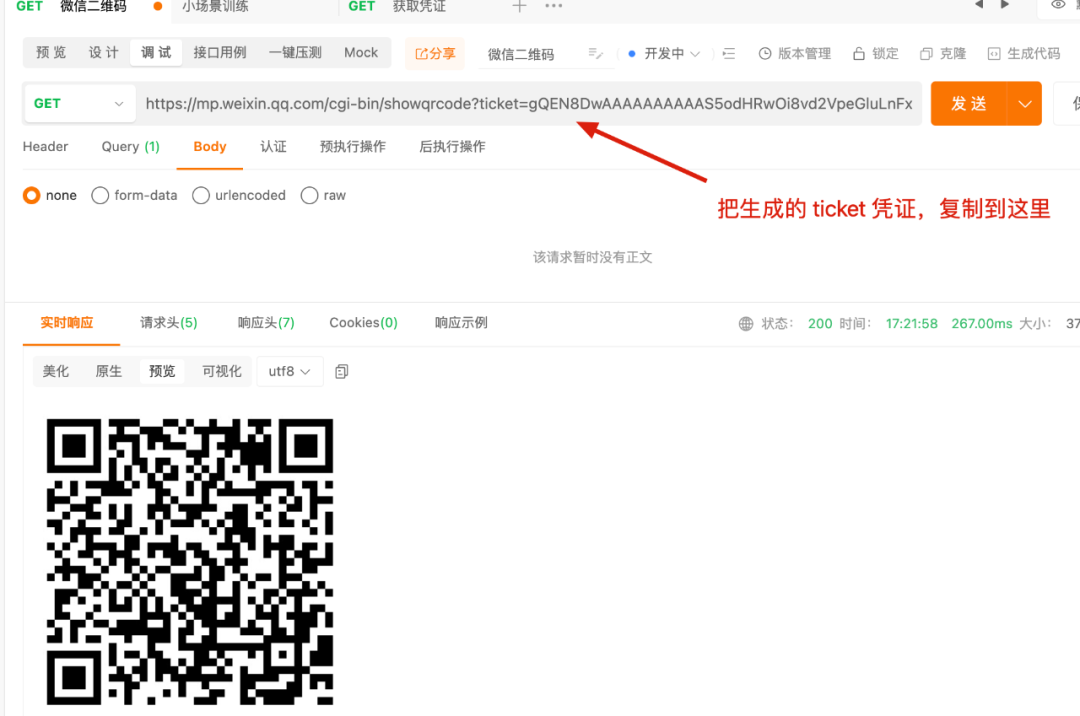 访问接口:http://xfg-studio.natapp1.cc/api/v1/login/check_login - 你需要替换为你的地址。 4. 扫码登录使用微信扫描二维码,观察服务端日志和手机提示。 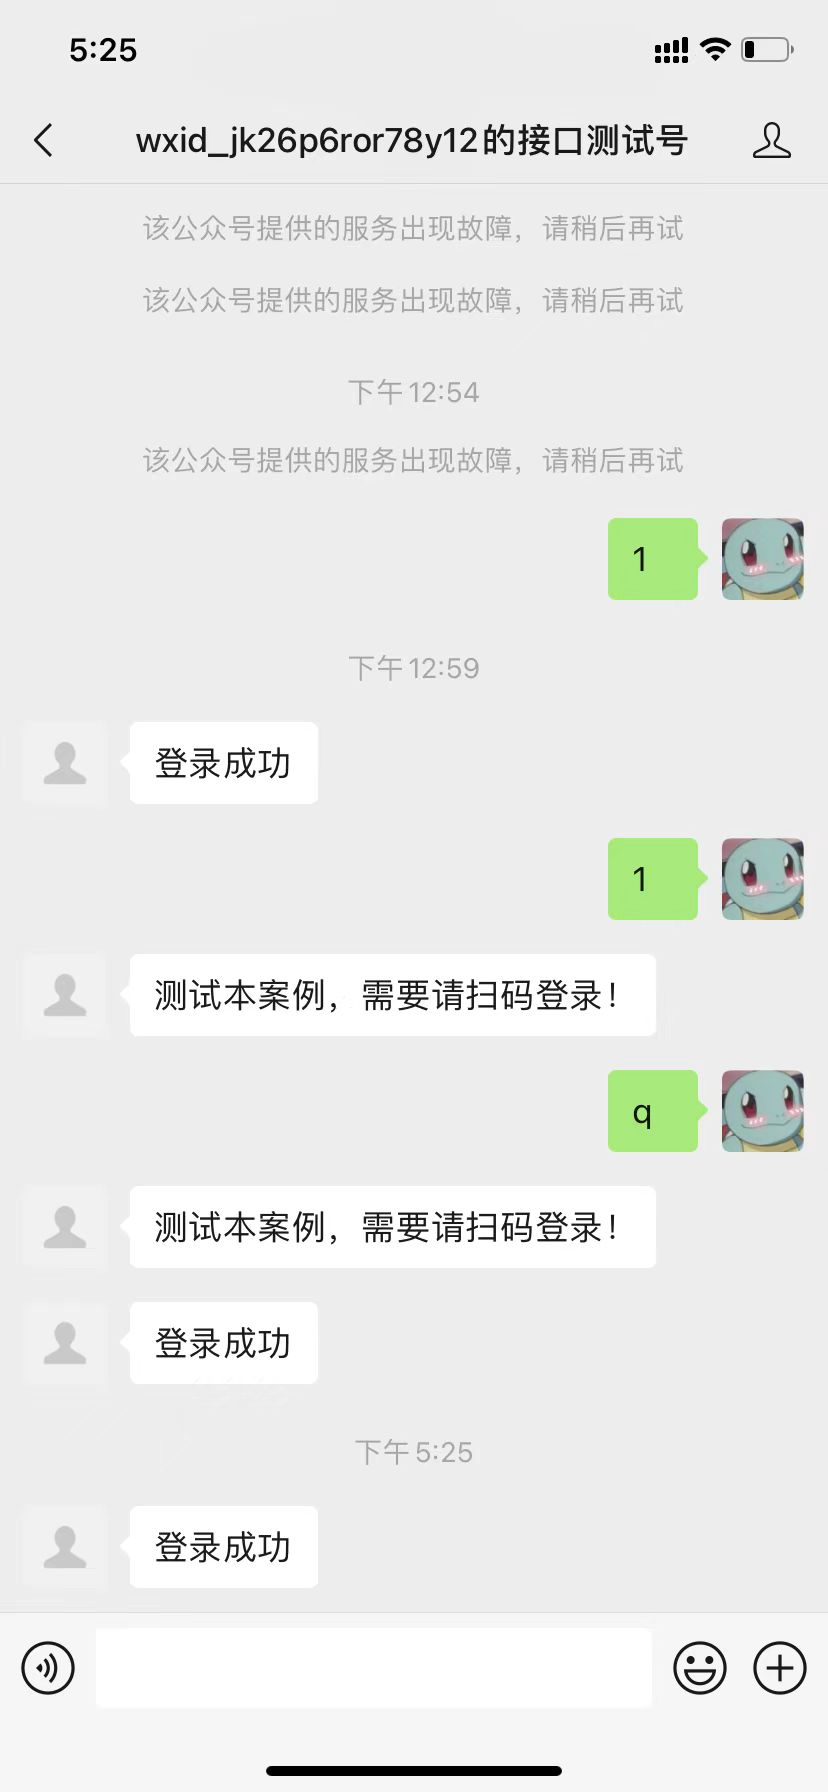 代码语言:javascript复制24-02-25.17:25:09.096 [http-nio-8091-exec-3] INFO LoginController - 生成微信扫码登录 ticket gQHN7zwAAAAAAAAAAS5odHRwOi8vd2VpeGluLnFxLmNvbS9xLzAycTRMbnB4TDBjckcxT043cjFCMWoAAgR1B9tlAwQ8AAAA
24-02-25.17:25:18.793 [http-nio-8091-exec-5] INFO WeixinPortalController - 接收微信公众号信息请求or0Ab6ivwmypESVp_bYuk92T6SvU开始
1708853118
扫码登录后,可以看见反馈的状态信息以及服务端的日志。5. 循环模拟登录 代码语言:javascript复制24-02-25.17:25:09.096 [http-nio-8091-exec-3] INFO LoginController - 生成微信扫码登录 ticket gQHN7zwAAAAAAAAAAS5odHRwOi8vd2VpeGluLnFxLmNvbS9xLzAycTRMbnB4TDBjckcxT043cjFCMWoAAgR1B9tlAwQ8AAAA
24-02-25.17:25:18.793 [http-nio-8091-exec-5] INFO WeixinPortalController - 接收微信公众号信息请求or0Ab6ivwmypESVp_bYuk92T6SvU开始
1708853118
扫码登录后,可以看见反馈的状态信息以及服务端的日志。5. 循环模拟登录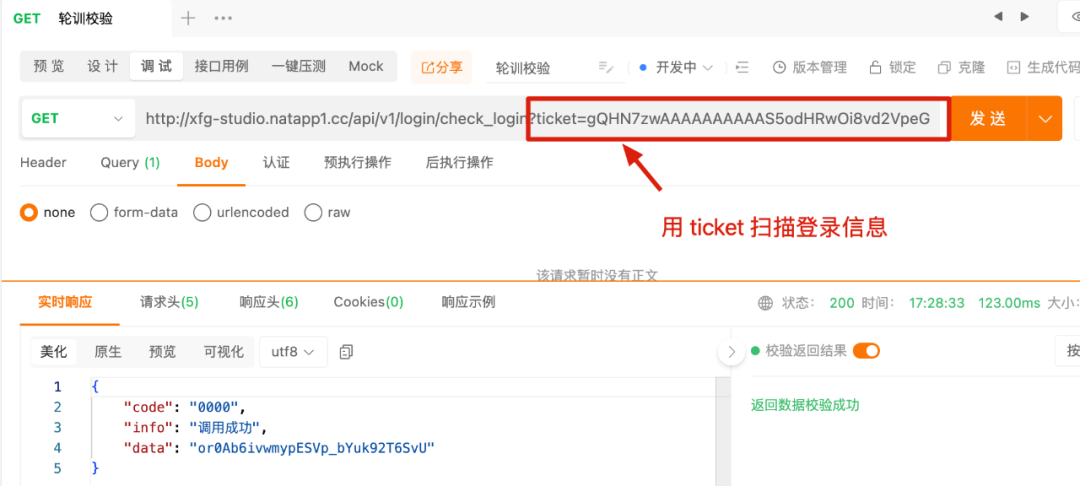 访问接口:http://xfg-studio.natapp1.cc/api/v1/login/check_login - 你需要替换为你的地址。好,到这表明已经登录成功,并返回openid信息。自己的业务场景,可以返回一个 token 保存到浏览器。 访问接口:http://xfg-studio.natapp1.cc/api/v1/login/check_login - 你需要替换为你的地址。好,到这表明已经登录成功,并返回openid信息。自己的业务场景,可以返回一个 token 保存到浏览器。
|
【本文地址】
今日新闻 |
推荐新闻 |