OpenCV |
您所在的位置:网站首页 › 怎么改变图片属性为jpg › OpenCV |
OpenCV
|
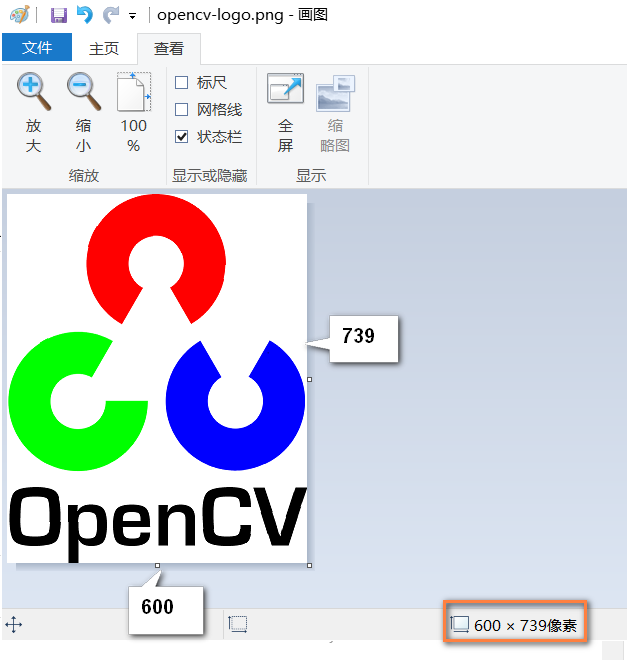
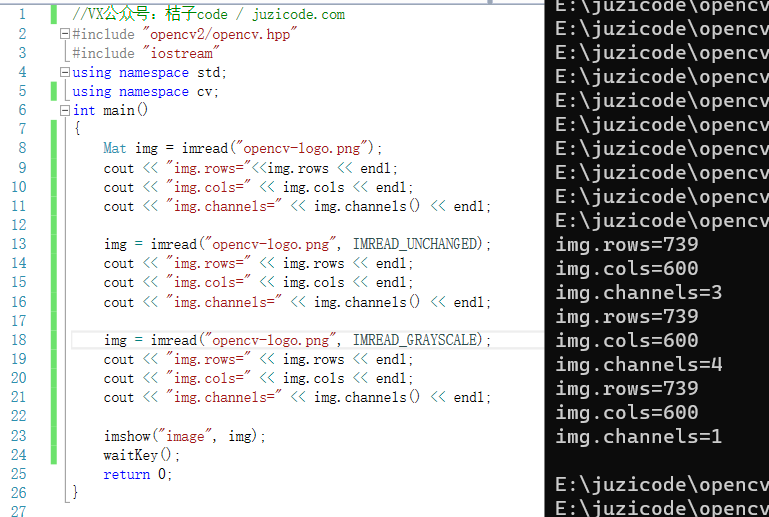
原文链接:http://www.juzicode.com/archives/5399 返回Opencv-Python教程 在OpenCV-Python中图像表示成numpy数组,图像的属性也可以通过numpy的属性获得。 1、图像行列数、通道数(shape属性)一个图像像素的行列数(高、宽)、通道数可以通过shape属性获取,需要注意的是numpy数组的shape属性下标0表示的图像的行数(rows,高),下标1表示的是列数(cols,宽),下标2表示的是通道数,但是如果是灰度图shape是一个二元组,则不存在下标2的元素。 import numpy as np import cv2 print('VX公众号: 桔子code / juzicode.com') print('cv2.__version__:',cv2.__version__) img = cv2.imread('..\\opencv-logo.png') print('img.shape',img.shape) rows = img.shape[0] cols = img.shape[1] channel = img.shape[2] print('rows=%d,cols=%d,channel=%d'%(rows,cols,channel)) cv2.imshow('juzicode.com',img) cv2.waitKey() #原图方式 img = cv2.imread('..\\opencv-logo.png',cv2.IMREAD_UNCHANGED) print('img.shape',img.shape) rows = img.shape[0] cols = img.shape[1] channel = img.shape[2] print('rows=%d,cols=%d,channel=%d'%(rows,cols,channel)) cv2.imshow('juzicode.com',img) cv2.waitKey() #灰度图方式 img = cv2.imread('..\\opencv-logo.png',cv2.IMREAD_GRAYSCALE) print('img.shape',img.shape) rows = img.shape[0] cols = img.shape[1] channel = img.shape[2] #这里抛异常 print('rows=%d,cols=%d,channel=%d'%(rows,cols,channel)) cv2.imshow('juzicode.com',img) cv2.waitKey()运行结果: VX公众号: 桔子code / juzicode.com cv2.__version__: 4.5.2 img.shape (739, 600, 3) rows=739,cols=600,channel=3 img.shape (739, 600, 4) rows=739,cols=600,channel=4 img.shape (739, 600) #转换为灰度图,shape是一个二元组,访问下标2导致抛异常 Traceback (most recent call last): File "img-properties.py", line 37, in channel = img.shape[2] IndexError: tuple index out of range另外我们也可以用Windows的画图板程序打开原图看到图像得行列数,其行数(rows,高,y轴)为739对应了shape[0],列数(cols,宽,x轴)为600对应了shape[1]:
对比C++版本的OpenCV,可以直接访问Mat的rows、cols属性和channels()方法获取到图像的宽高以及通道数:
在OpenCV-Python对外接口里图像用numpy数组表示,所以numpy数据的属性同样适用于OpenCV-Python中图像的属性,详情可参考 NumPy数组的属性和常用创建方法。 下面的例子中仍是通过3种不同方式获取图像后对比各个属性的例子: import numpy as np import cv2 print('VX公众号: 桔子code / juzicode.com') print('cv2.__version__:',cv2.__version__) img = cv2.imread('..\\opencv-logo.png') print('img.ndim=',img.ndim) #维度,也是其shape属性的长度=len(shape) print('img.itemsize=',img.itemsize) #单个数据长度 print('img.size=',img.size) #总长度,有多少个数据 print('img.nbytes=',img.nbytes) #占用的内存空间=itemsize*size print('img.dtype=',img.dtype) #数据类型,字符串形式 print('img.shape=',img.shape) #形状,是一个tuple print('img.data=',img.data) #数据buffer print() #原图方式 img = cv2.imread('..\\opencv-logo.png',cv2.IMREAD_UNCHANGED) print('img.ndim=',img.ndim) #维度,也是其shape属性的长度=len(shape) print('img.itemsize=',img.itemsize) #单个数据长度 print('img.size=',img.size) #总长度,有多少个数据 print('img.nbytes=',img.nbytes) #占用的内存空间=itemsize*size print('img.dtype=',img.dtype) #数据类型,字符串形式 print('img.shape=',img.shape) #形状,是一个tuple print('img.data=',img.data) #数据buffer print() #灰度图 img = cv2.imread('..\\opencv-logo.png',cv2.IMREAD_GRAYSCALE) print('img.ndim=',img.ndim) #维度,也是其shape属性的长度=len(shape) print('img.itemsize=',img.itemsize) #单个数据长度 print('img.size=',img.size) #总长度,有多少个数据 print('img.nbytes=',img.nbytes) #占用的内存空间=itemsize*size print('img.dtype=',img.dtype) #数据类型,字符串形式 print('img.shape=',img.shape) #形状,是一个tuple print('img.data=',img.data) #数据buffer运行结果: VX公众号: 桔子code / juzicode.com cv2.__version__: 4.5.2 img.ndim= 3 img.itemsize= 1 img.size= 1330200 img.nbytes= 1330200 img.dtype= uint8 img.shape= (739, 600, 3) img.data= img.ndim= 3 img.itemsize= 1 img.size= 1773600 img.nbytes= 1773600 img.dtype= uint8 img.shape= (739, 600, 4) img.data= img.ndim= 2 img.itemsize= 1 img.size= 443400 img.nbytes= 443400 img.dtype= uint8 img.shape= (739, 600) img.data= 3、dtype属性dtype属性描述的是numpy数组中数据类型,可以通过astype进行转换后看到dtype的变化,以及因为dtype变化引起itemsize相关属性的变化。 下面这个例子读出opencv-logo.png图像后再转换为np.uint32和np.float64: import numpy as np import cv2 print('VX公众号: 桔子code / juzicode.com') print('cv2.__version__:',cv2.__version__) img = cv2.imread('..\\opencv-logo.png') print('img.ndim=',img.ndim) #维度,也是其shape属性的长度=len(shape) print('img.itemsize=',img.itemsize) #单个数据长度 print('img.size=',img.size) #总长度,有多少个数据 print('img.nbytes=',img.nbytes) #占用的内存空间=itemsize*size print('img.dtype=',img.dtype) #数据类型,字符串形式 print('img.shape=',img.shape) #形状,是一个tuple print('img.data=',img.data) #数据buffer #转换 print('转换为uint32') img = img.astype(np.uint32) print('img.ndim=',img.ndim) #维度,也是其shape属性的长度=len(shape) print('img.itemsize=',img.itemsize) #单个数据长度 print('img.size=',img.size) #总长度,有多少个数据 print('img.nbytes=',img.nbytes) #占用的内存空间=itemsize*size print('img.dtype=',img.dtype) #数据类型,字符串形式 print('img.shape=',img.shape) #形状,是一个tuple print('img.data=',img.data) #数据buffer #转换 print('转换为float64') img = img.astype(np.float64) #print(img[150:200,200:250]) print('img.ndim=',img.ndim) #维度,也是其shape属性的长度=len(shape) print('img.itemsize=',img.itemsize) #单个数据长度 print('img.size=',img.size) #总长度,有多少个数据 print('img.nbytes=',img.nbytes) #占用的内存空间=itemsize*size print('img.dtype=',img.dtype) #数据类型,字符串形式 print('img.shape=',img.shape) #形状,是一个tuple print('img.data=',img.data) #数据buffer运行结果: VX公众号: 桔子code / juzicode.com cv2.__version__: 4.5.2 img.ndim= 3 img.itemsize= 1 img.size= 1330200 img.nbytes= 1330200 ##=size*itemsize=1330200*1 img.dtype= uint8 img.shape= (739, 600, 3) 转换为uint32 img.ndim= 3 img.itemsize= 4 img.size= 1330200 img.nbytes= 5320800 ##=size*itemsize=1330200*4 img.dtype= uint32 img.shape= (739, 600, 3) 转换为float64 img.ndim= 3 img.itemsize= 8 img.size= 1330200 img.nbytes= 10641600 ##=size*itemsize=1330200*8 img.dtype= float64 img.shape= (739, 600, 3)从运行结果看单个元素占用空间itemsize和总空间大小nbytes均发生了变化。 小结:因为图像在OpenCV-Python是以numpy数组形式表示的,图像的属性比如行列数、通道数、数据类型、size等相关属性都可以通过numpy属性获取。 原文链接:http://www.juzicode.com/archives/5399 扩展阅读: OpenCV-Python教程NumPy数组的属性和常用创建方法 |
【本文地址】
今日新闻 |
推荐新闻 |