如何在Arduino开发板上使用SD卡模块 – 八色木 |
您所在的位置:网站首页 › 怎么使用CD卡 › 如何在Arduino开发板上使用SD卡模块 – 八色木 |
如何在Arduino开发板上使用SD卡模块 – 八色木
|
我们经常会碰到这样的问题,在有些项目中可能需要收集大量的数据,例如在需要记录一个月内传感器读取的数据,这么多的数据存放在开发板的EEPROM中不太现实,要把这些数据转移到电脑上做相关的分析是怎么办呢? 如果我们能将这些数据存储在SD卡上,则可以轻松地在计算机上传递和处理它们。 本文将向大家展示如何在Arduino开发板上使用SD卡模块存储数据。代码和测试程序请继续往下看。 SD卡模块的接口定义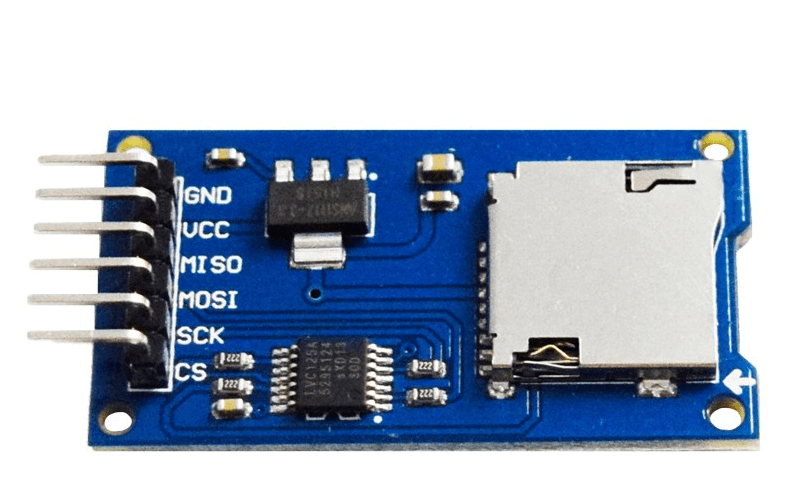 SD卡模块 SD卡模块
SD卡模块拥有六个引脚分别是GND、VCC、MISO、MOSI、SCK、CS。对应的针脚功能见下表: PinPin NameFunction1GND Ground 2VCCPower Supply3MISOMaster-in, Slave-out 4MOSI Master-out, Slave-in 5SCKSerial Clock6CSChip Select Arduino UNO开发板的SPI接口SD卡模块使用的是SPI接口( 串行外围接口 )与微控制器进行通信。对应Arduino开发板哪些接口用于SPI通信呢?以Arduino UNO为例,请见下图: 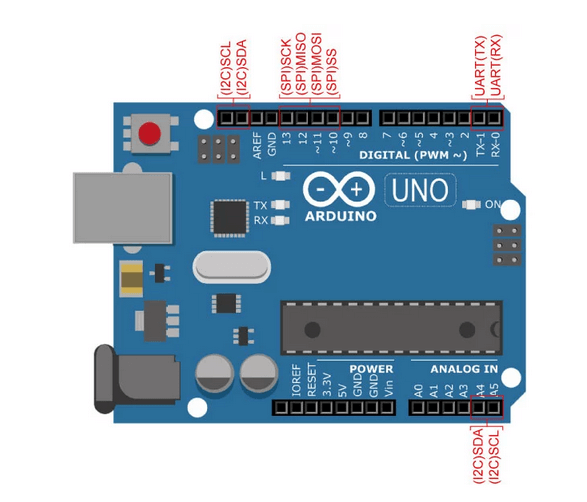 Arduino UNO开发版的接口定义 Arduino UNO开发版的接口定义
我们可以看到,Arduino UNO开发板拥有两路I2C接口,分别是A4,A5和AREF引脚左侧的两个阵脚。拥有一路SPI接口,位于D10~D13。 Arduino与SD卡模块的连接Arduino与SD卡模块连接,将占用Arduino上的三个数字引脚分别是SCK、MOSI和MISO,此外,还需要连接CS引脚和VCC引脚。详细见下图: 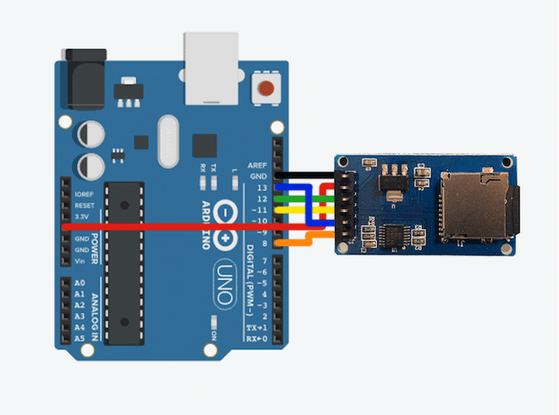
绿色(MISO)和黄色(MOSI)线连接到Arduino的12和11脚。 蓝色(SCK)需要连接在13脚上。橙色(CS)连接到8脚。 测试代码 显示SD卡片信息 #include #include #define CS 8 Sd2Card card; SdVolume volume; SdFile root; boolean initCard() { Serial.print("Connecting to SD card... "); // Initialize the SD card if(!card.init(SPI_HALF_SPEED, CS)) { // An error occurred Serial.println("\nError: Could not connect to SD card!"); Serial.println("- Is a card inserted?"); Serial.println("- Is the card formatted as FAT16/FAT32?"); Serial.println("- Is the CS pin correctly set?"); Serial.println("- Is the wiring correct?"); return false; } else Serial.println("Done!"); return true; } void setup() { Serial.begin(9600); if(!initCard()) while(1); Serial.println("\n----------------"); Serial.println("---Basic Info---"); Serial.println("----------------"); Serial.print("An "); switch (card.type()) { case SD_CARD_TYPE_SD1: Serial.print("SD1"); break; case SD_CARD_TYPE_SD2: Serial.print("SD2"); break; case SD_CARD_TYPE_SDHC: Serial.print("SDHC"); break; default: Serial.print("Unknown"); } Serial.println(" type card got connected"); // Try to open the filesysten on the card if(!volume.init(card)) { Serial.println("Could not open / on the card!\nIs the card formatted as FAT16/32?"); while(1); } else { Serial.print("The inserted card is formatted as: FAT"); Serial.println(volume.fatType(), DEC); Serial.print("And the card has a size of: "); // Calculate the storage capacity of the volume uint32_t cardSize = volume.blocksPerCluster() * volume.clusterCount(); Serial.print(cardSize / 2048); Serial.println("MB!"); } Serial.println("\n----------------"); Serial.println("--Stored files--"); Serial.println("----------------"); // Print a list of files that are present on the card root.openRoot(volume); root.ls(LS_R); } void loop(void) { }这段只能显示SD卡的一些基本属性,比如大小、类型和内部保存的文件信息。 写入SD卡代码写卡的代码的初始化部分几乎与上一个代码基本相同。代码中SD卡必须进行初始化,而不是打开。初始化之后,必须打开文件。当打开一个文件进行编写时,如果文件不存在,就会自动创建一个文件。光标总是放在文件的末尾。因此,如果您在打开一个文件时不移动它,您只需将新文本附加到其中即可。由于内容存储在SD卡上,您可以简单地使用计算机读取文件的内容。 代码如下: #include #include #define CS 8 int i = 0; File logFile; boolean initCard() { Serial.print("Connecting to SD card... "); // Initialize the SD card if (!SD.begin(CS)) { // An error occurred Serial.println("\nError: Could not connect to SD card!"); Serial.println("- Is a card inserted?"); Serial.println("- Is the card formatted as FAT16/FAT32?"); Serial.println("- Is the CS pin correctly set?"); Serial.println("- Is the wiring correct?"); return false; } else Serial.println("Done!"); return true; } void setup() { Serial.begin(9600); if (!initCard()) while (1); // Files that are opened for writing will be // created automatically if they don't already // exist on the SD card logFile = SD.open("log.txt", FILE_WRITE); if (!logFile) { Serial.println("Could not open logfile!"); while (1); } } void loop() { // Replace the condition with a meaningful one // To indicate that writing to the file is done // and it can be closed. if (i++ < 10) { // Dummy Value, replace with real readout long sensorValue = random(0, 1023); // Write a few lines to the logfile logFile.print("[ERROR: "); logFile.print(millis()); logFile.print("] "); logFile.println("Sensor A missing!"); logFile.print("[INFO: "); logFile.print(millis()); logFile.print("] "); logFile.print("Sensor B reading: "); logFile.println(sensorValue); } else { logFile.close(); Serial.println("Writing finished!"); } delay(500); } 读取存储在SD卡上的文件代码应该非常容易理解。这个例子和写文件的例子之间唯一的区别是文件是按字节读取的。因此,必须遍历要从文件中读取的字节数。代码如下: #include #include #define CS 8 int i = 0; File sensorFile; boolean initCard() { Serial.print("Connecting to SD card... "); // Initialize the SD card if (!SD.begin(CS)) { // An error occurred Serial.println("\nError: Could not connect to SD card!"); Serial.println("- Is a card inserted?"); Serial.println("- Is the card formatted as FAT16/FAT32?"); Serial.println("- Is the CS pin correctly set?"); Serial.println("- Is the wiring correct?"); return false; } else Serial.println("Done!"); return true; } void setup() { Serial.begin(9600); if (!initCard()) while (1); // Files that are opened for reading have to // exist. They will not be created. sensorFile = SD.open("value.txt", FILE_WRITE); if (!sensorFile) { Serial.println("Could not open sensor file!"); while (1); } else { // Move the cursor the the beginning of the file for reading sensorFile.seek(0); // Read the entire file and print // it to the serial console. while (sensorFile.available()) Serial.write(sensorFile.read()); } } void loop() { } |
【本文地址】
今日新闻 |
推荐新闻 |