微服务(四) |
您所在的位置:网站首页 › 微服务模块 › 微服务(四) |
微服务(四)
|
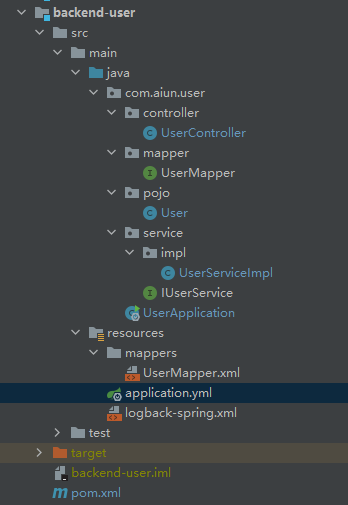
上一篇:微服务(三)—— MyBatis逆向工程模块(backend-generator). 目录 一、创建项目二、项目结构1.目录结构2.pom.xml3.配置文件application.yml4.启动项目 一、创建项目首先创建一个SpringBoot和Spring Cloud项目,这里需要考虑SpringBoot和Spring Cloud的版本问题
这里涉及到接口文档描述Swagger和微服务单点登录问题,看后面介绍。 微服务(十二)—— Swagger. 微服务(十)—— 单点登录. controller层调用service层接口,下面看service层的实现类UserServiceImpl package com.aiun.user.service.impl; /** * 用户模块实现类 * @author lenovo */ @Service("iUserService") public class UserServiceImpl implements IUserService { @Autowired private UserMapper userMapper; @Autowired private RedisTemplate redisTemplate; @Override public ServerResponse login(String userName, String password) { int resultCount = userMapper.checkUsername(userName); if (resultCount return ServerResponse.createByErrorMessage("密码错误"); } String key = userName; String token = JsonUtils.object2JsonStr(user); ValueOperationsvalueOperations = redisTemplate.opsForValue(); //用户登录成功后,将该用户对象作为token值保存到redis里,并且设置过期时间为1小时 valueOperations.set(key, token, 1, TimeUnit.HOURS); return ServerResponse.createBySuccess("登录成功", user); } @Override public ServerResponse register(User user) { ServerResponse validResponse = this.checkValid(user.getUsername(), UserConst.USERNAME); if (!validResponse.isSuccess()) { return validResponse; } validResponse = this.checkValid(user.getEmail(), UserConst.EMAIL); if (!validResponse.isSuccess()) { return validResponse; } // 指定用户角色 user.setRole(UserConst.Role.ROLE_CUSTOMER); // MD5 加密 user.setPassword(MD5Utils.MD5EncodeUtf8(user.getPassword())); int resultCount = userMapper.insert(user); if(resultCount == 0) { return ServerResponse.createByErrorMessage("注册失败"); } return ServerResponse.createBySuccessMessage("注册成功"); } @Override public ServerResponse getInformation(int userId) { User user = userMapper.selectByPrimaryKey(userId); if(user == null) { return ServerResponse.createByErrorMessage("当前用户不存在"); } user.setPassword(StringUtils.EMPTY); return ServerResponse.createBySuccess(user); } //....... }用户接口层IUserService package com.aiun.user.service; /** * 用户接口 * @author lenovo */ public interface IUserService { /** * 用户登录 * @param userName * @param password * @return */ ServerResponse login(String userName, String password); /** * 注册 * @param user * @return */ ServerResponse register(User user); /** * 用户名或邮箱的校验 * @param str * @param type * @return */ ServerResponse checkValid(String str, String type); /** * 获取用户信息 * @param userId * @return */ ServerResponse getInformation(int userId); /** * 更改密码 * @param oldPassword * @param newPassword * @param user * @return */ ServerResponse resetPassword(String oldPassword, String newPassword, User user); }Server层的实现类调用DAO层的Mapper层,UserMapper如下: package com.aiun.user.mapper; @Mapper @Repository public interface UserMapper { /** * 根据主键删除用户 * @param id 主键 * @return 影响的记录行数 */ int deleteByPrimaryKey(Integer id); /** * 插入用户 * @param record 用户信息 * @return 影响的记录行数 */ int insert(@Param("record") User record); /** * 有选择的插入用户 * @param record 用户信息 * @return 影响的记录行数 */ int insertSelective(@Param("record") User record); /** * 通过主键查询用户 * @param id 主键 * @return 用户信息 */ User selectByPrimaryKey(Integer id); /** * 通过主键有选择的更新用户 * @param record 用户信息 * @return 影响的记录行数 */ int updateByPrimaryKeySelective(@Param("record") User record); /** * 通过主键更新用户 * @param record 用户信息 * @return 影响的记录行数 */ int updateByPrimaryKey(@Param("record") User record); /** * 登录 * @param username 用户名 * @param password 密码 * @return 返回用户信息 */ User selectLogin(@Param("username") String username, @Param("password") String password); /** * 检查用户名 * @param username 用户名 * @return 影响的记录行数 */ int checkUsername(String username); /** * 检查email * @param email 邮箱 * @return 影响的记录行数 */ int checkEmail(String email); /** * 检查密码 * @param password * @param userId * @return */ int checkPassword(@Param("password") String password, @Param("userId") Integer userId); }注:这个Mapper层的接口除了要写Spring的@Repository注解,还需要写@Mapper注解,这个注解是告诉SpringBoot这是DAO层的Mapper映射接口,与这个接口对应的是mapper.xml文件,注意是SQL语句的编写,如下UserMapper.xml: id, username, password, email, phone, question, answer, role, create_time, update_time select from trade_user where id = #{id,jdbcType=INTEGER} delete from trade_user where id = #{id,jdbcType=INTEGER} insert into trade_user (id, username, password, email, phone, question, answer, role, create_time, update_time) values (#{record.id,jdbcType=INTEGER}, #{record.username,jdbcType=VARCHAR}, #{record.password,jdbcType=VARCHAR}, #{record.email,jdbcType=VARCHAR}, #{record.phone,jdbcType=VARCHAR}, #{record.question,jdbcType=VARCHAR}, #{record.answer,jdbcType=VARCHAR}, #{record.role,jdbcType=INTEGER}, now(), now()) insert into trade_user id, username, password, email, phone, question, answer, role, create_time, update_time, #{record.id,jdbcType=INTEGER}, #{record.username,jdbcType=VARCHAR}, #{record.password,jdbcType=VARCHAR}, #{record.email,jdbcType=VARCHAR}, #{record.phone,jdbcType=VARCHAR}, #{record.question,jdbcType=VARCHAR}, #{record.answer,jdbcType=VARCHAR}, #{record.role,jdbcType=INTEGER}, #{record.createTime,jdbcType=TIMESTAMP}, now(), update trade_user username = #{record.username,jdbcType=VARCHAR}, password = #{record.password,jdbcType=VARCHAR}, email = #{record.email,jdbcType=VARCHAR}, phone = #{record.phone,jdbcType=VARCHAR}, question = #{record.question,jdbcType=VARCHAR}, answer = #{record.answer,jdbcType=VARCHAR}, role = #{record.role,jdbcType=INTEGER}, create_time = #{record.createTime,jdbcType=TIMESTAMP}, update_time = now(), where id = #{record.id,jdbcType=INTEGER} update trade_user set username = #{record.username,jdbcType=VARCHAR}, password = #{record.password,jdbcType=VARCHAR}, email = #{record.email,jdbcType=VARCHAR}, phone = #{record.phone,jdbcType=VARCHAR}, question = #{record.question,jdbcType=VARCHAR}, answer = #{record.answer,jdbcType=VARCHAR}, role = #{record.role,jdbcType=INTEGER}, create_time = #{record.createTime,jdbcType=TIMESTAMP}, update_time = now() where id = #{id,jdbcType=INTEGER} select count(1) from trade_user where username = #{username} select from trade_user where username = #{username} and password = #{password} select count(1) from trade_user where email = #{email} select count(1) from trade_user where id = #{userId} and password = #{password}对于返回User对象的我用BaseResultMap进行映射和封装。 数据库建表语句: CREATE TABLE reade_user ( id int(11) NOT NULL AUTO_INCREMENT COMMENT ‘用户表id’, username varchar(50) NOT NULL COMMENT ‘用户名’, password varchar(50) NOT NULL COMMENT ‘用户密码,MD5加密’, email varchar(50) DEFAULT NULL, phone varchar(20) DEFAULT NULL, question varchar(100) DEFAULT NULL COMMENT ‘找回密码问题’, answer varchar(100) DEFAULT NULL COMMENT ‘找回密码答案’, role int(4) NOT NULL COMMENT ‘角色0-管理员,1-普通用户’, create_time datetime NOT NULL COMMENT ‘创建时间’, update_time datetime NOT NULL COMMENT ‘最后一次更新时间’, PRIMARY KEY (id), UNIQUE KEY user_name_unique (username) USING BTREE ) ENGINE=InnoDB AUTO_INCREMENT=22 DEFAULT CHARSET=utf8; 2.pom.xml首先引入父模块依赖 com.aiun BackendManageSystem 1.0-SNAPSHOT引入backend common 依赖 com.aiun backend-common 1.0-SNAPSHOT由于我在父模块添加了Spring Cloud依赖,所以这里就不需要添加Spring Cloud依赖,父模块的pom.xml文件见微服务(一)—— 项目结构. pom.xml文件 4.0.0 com.aiun BackendManageSystem 1.0-SNAPSHOT com.aiun backend-user 0.0.1-SNAPSHOT backend-user Demo project for Spring Boot 1.8 com.aiun backend-common 1.0-SNAPSHOT org.springframework.cloud spring-cloud-starter-netflix-eureka-client org.springframework.cloud spring-cloud-config-client org.springframework.boot spring-boot-starter-test test org.springframework.boot spring-boot-starter-web org.mybatis.spring.boot mybatis-spring-boot-starter mysql mysql-connector-java com.alibaba druid org.projectlombok lombok io.springfox springfox-swagger2 io.springfox springfox-swagger-ui com.google.guava guava org.springframework.boot spring-boot-maven-plugin spring-snapshots Spring Snapshots https://repo.spring.io/snapshot false spring-milestones Spring Milestones https://repo.spring.io/milestone false 3.配置文件application.yml # Spring spring: # 服务应用名称 application: name: backend-user # 数据源 datasource: driver-class-name: com.mysql.cj.jdbc.Driver url: jdbc:mysql://localhost:3306/trade?useUnicode=true&characterEncoding=UTF-8&serverTimezone=Asia/Shanghai username: root password: root # 指定druid 连接池以及druid 连接池配置 type: com.alibaba.druid.pool.DruidDataSource druid: initial-size: 1 # 初始连接数 max-active: 20 # 最大连接数 max-idle: 20 # 最大空闲 min-idle: 1 # 最小空闲 max-wait: 60000 # 最长等待时间 server: port: 8084 # 项目访问端口 servlet: context-path: /backend-user # 项目访问路径 eureka: client: service-url: defaultZone: http://localhost:8761/eureka/,http://localhost:8762/eureka/ instance: hostname: localhost # MyBatis mybatis: # 配置 MyBatis 数据返回类型别名(默认别名是类名) type-aliases-package: com.aiun.user.pojo # 配置 MyBatis Mapper 映射文件 mapper-locations: classpath:/mappers/*.xml # MyBatis SQL 打印(方法接口所在的包,不是 Mapper.xml 所在的包) # logging: # level: # com.aiun.order.mappers: debug # pagehelper pagehelper: helperDialect: sqlite #postgresql reasonable: true supportMethodsArguments: true params: countSql count: countSql returnPageInfo: check # 记录日志 logging: config: classpath:logback-spring.xml该文件是SpringBoot的配置文件,与properties文件不同的是它是键: 值,并且冒号后面要有一个空格,包的子目录也是通过空格体现,而且一个文件可以配置几个模块,例如上面我配置了开发环境dev和测试环境test,通过—符号进行分割。 这个配置文件主要配置的是应用名称、访问路径、端口、数据库、数据库连接池、日志和其他框架的配置。 4.启动项目打开SpringBoot的启动类UserApplication package com.aiun.user; /** * 用户模块启动类 * @author lenovo */ @SpringBootApplication public class UserApplication { public static void main(String[] args) { SpringApplication.run(UserApplication.class, args); } }启动该项目即可,然后就可以通过访问http://localhost:8084/backend-user/user/访问项目了 我这里通过Google插件Talend API Test进行后端接口测试 下一篇:微服务(五)—— 产品模块(backend-product). |
 这是官网给的Spring Cloud对应的Spring Boot版本
  在BackendManageSystem模块new 一个 module
 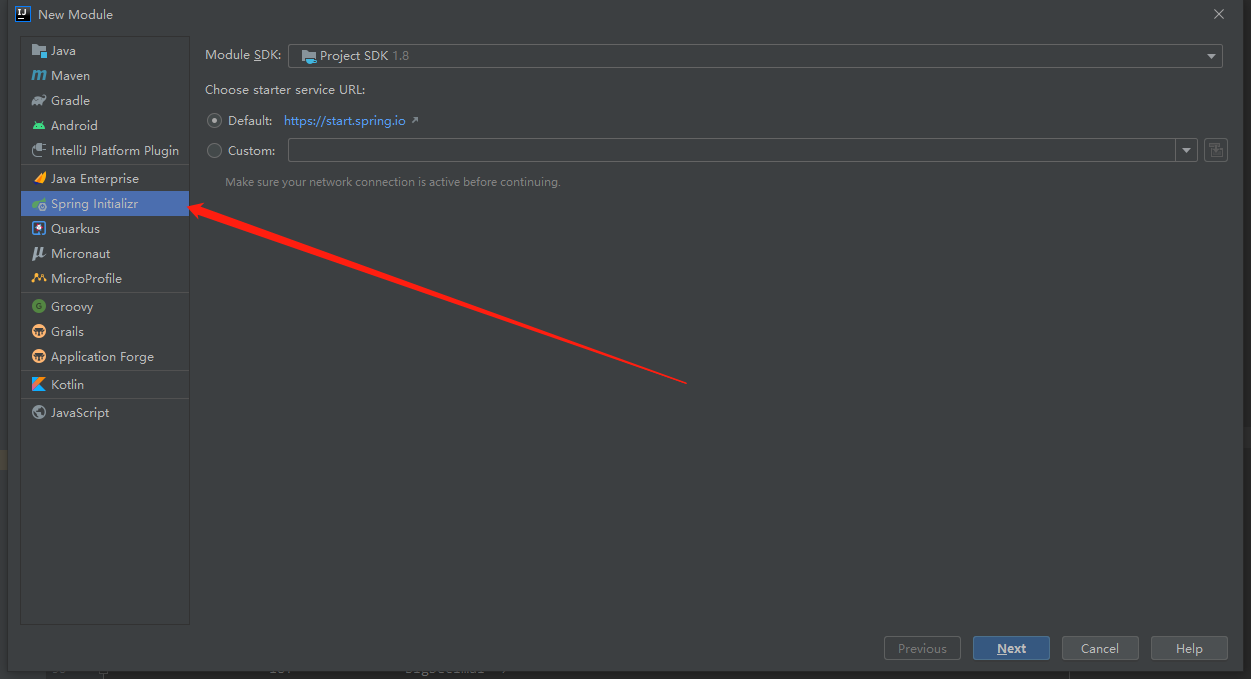 选择Spring Initializr,点击Next 选择版本
 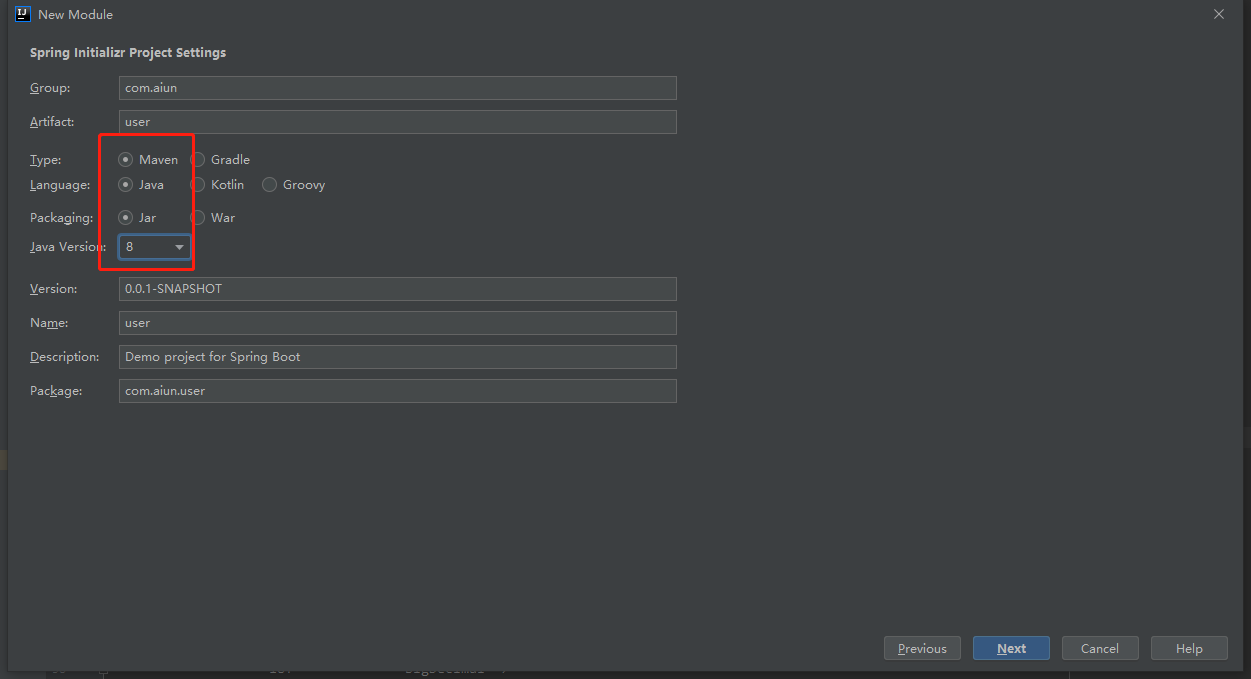 选择Spring Boot版本,Idea里都是最新版,我使用的是2.2.2版本,创建后修改Maven依赖即可;Lombok用于加构造方法注解; 然后是Web,JDBC、Mybatis相关的依赖,因为用户系统是需要往注册中心注册的,注册中心使用的是Spring Cloud的Eureka组件,所以需要Eureka Discover Client依赖;
 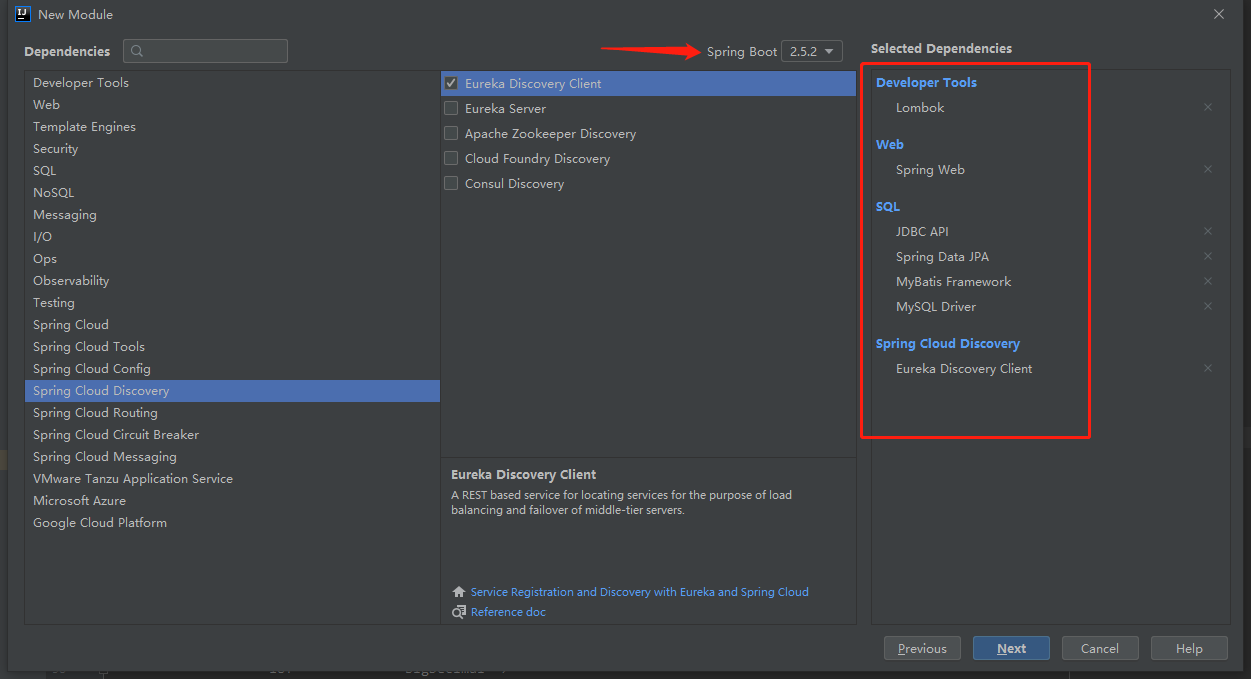 创建项目名称
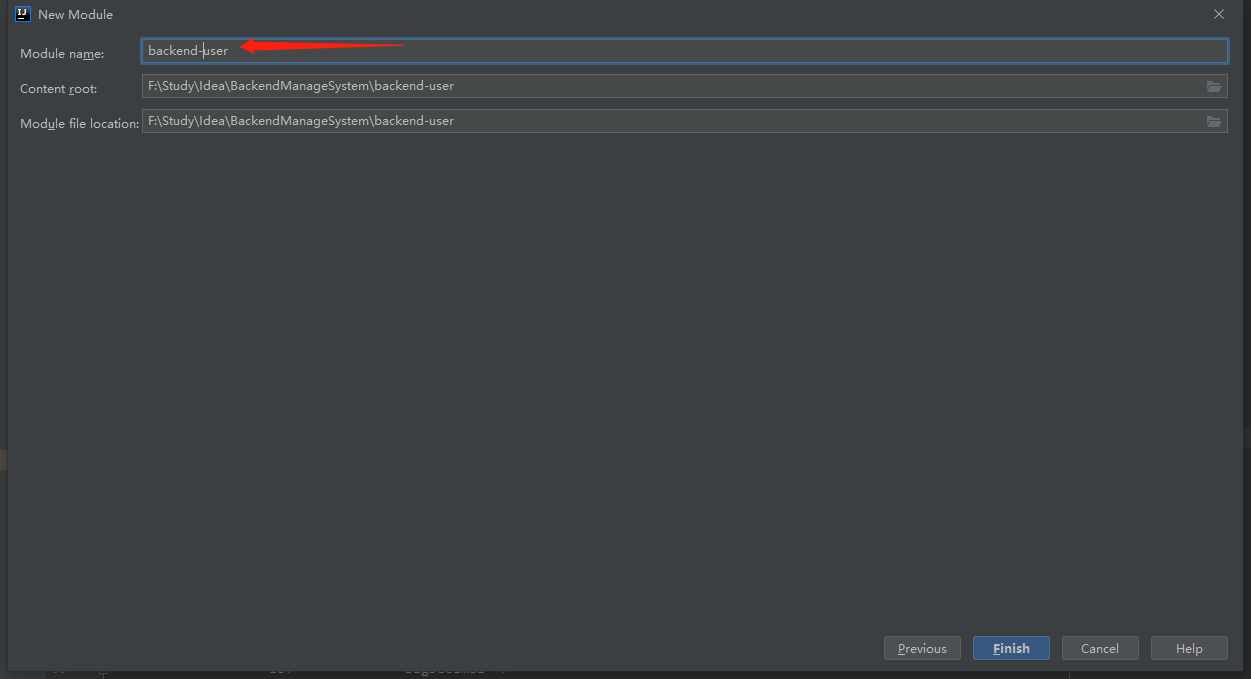
 controller用来接收前端的请求,下面看UserController的具体细节
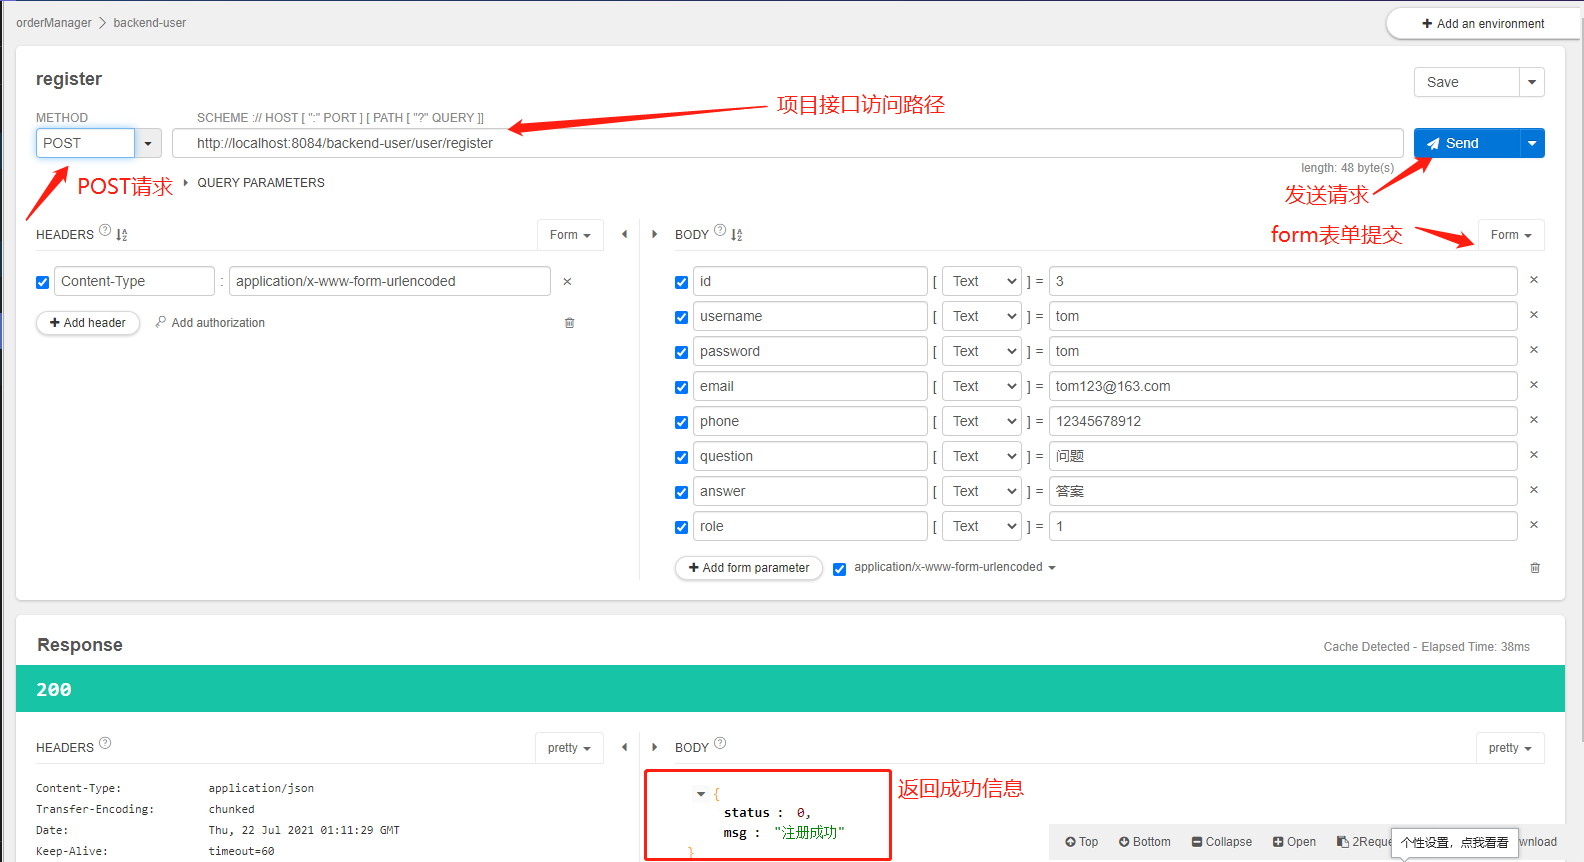 成功!!! 到这里用户模块就完成了。 注:项目已上传GitHub:https://github.com/AiunCode/BackendManageSystem.
【本文地址】