基于spring cloud 的连接不同数据库的查询案例(手把手配置详解) |
您所在的位置:网站首页 › 微服务不同数据库表关联 › 基于spring cloud 的连接不同数据库的查询案例(手把手配置详解) |
基于spring cloud 的连接不同数据库的查询案例(手把手配置详解)
|
目录 前言: springcloud案例介绍: 后端部分: 1.项目结构: 2.注册中心介绍(动态识别服务器ip及端口): 3.父模块所需依赖: 4.注册中心配置: 4.1所需依赖: 4.2.application.properties: 4.3启动类所需注解: order-service模块: 5.1.项目结构: 5.2所需依赖: 5.3.yml配置: 5.4.RestTemplateConfig: 5.5.entity: 5.6.Service核心代码: 5.7.controller : 5.8启动类所需注解: 商品模块结构: 编辑 前言:本文非常详细,主要讲解实际开发的代码部分,同时每个步骤都有标签,不用担心内容过长,内附详细代码。以及中途各种问题的解决方案。 springcloud案例介绍:
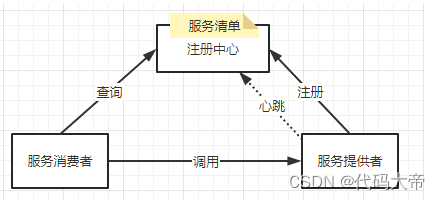
订单微服务能够查询订单信息,订单信息中包含商品数据,订单微服务要调用商品微服务完成查询 小案例流程图
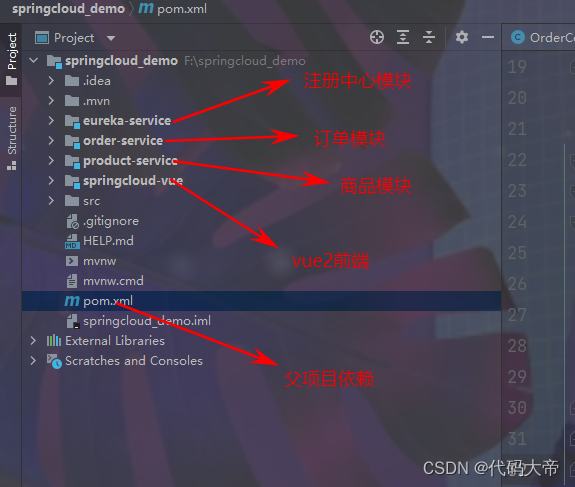
分三个模块: 1.订单模块 2.商品模块 3.注册中心 2.注册中心介绍(动态识别服务器ip及端口):
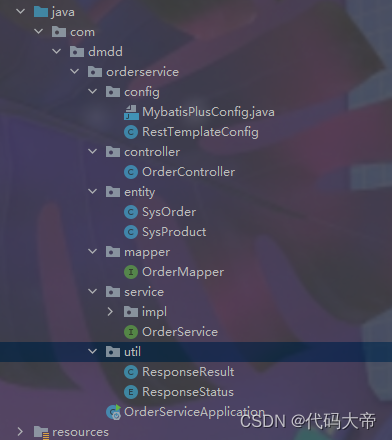
1) 服务提供者将自己的IP和端口注册到注册中心上 2) 服务提供者每隔一段时间向注册中心发送心跳包 3) 服务消费者调用提供者之前,先向注册中心查询提供者的IP和端口 4) 获得服务清单中的IP和端口后,消费者调用提供者 5) 服务提供者的IP和端口改变后,通过心跳机制更新注册中心上的服务清单 3.父模块所需依赖: 4.0.0 org.springframework.boot spring-boot-starter-parent 2.3.4.RELEASE com.dmdd springcloud_demo 0.0.1-SNAPSHOT springcloud_demo Demo project for Spring Boot 8 Hoxton.SR8 org.springframework.cloud spring-cloud-dependencies ${spring.cloud-version} pom import org.springframework.boot spring-boot-starter org.springframework.boot spring-boot-starter-test test org.springframework.boot spring-boot-maven-plugin中途有可能会遇到 依赖无法下载的问题,点击clean,再重新启动依赖即可 4.注册中心配置: 4.1所需依赖: 4.0.0 com.dmdd springcloud_demo 0.0.1-SNAPSHOT com.dmdd eureka-service 0.0.1-SNAPSHOT eureka-service eureka-service 8 org.springframework.cloud spring-cloud-starter-netflix-eureka-server org.springframework.boot spring-boot-maven-plugin该依赖需要继承父项目,如下配置,其中的内容来自于父项目依赖 com.dmdd springcloud_demo 0.0.1-SNAPSHOT 父项目依赖截图 表示该类是注册中心服务器 order-service模块: 5.1.项目结构:
该模块也需要继承父模块。 5.3.yml配置: server: port: 8081 spring: datasource: driver-class-name: com.mysql.cj.jdbc.Driver url: jdbc:mysql://localhost:3306/sys_order?serverTimezone=UTC&useUnicode=true&useSSL=false&characterEncoding=utf8&allowPublicKeyRetrieval=true username: root password: jly720609 application: name: order-service # redis: # host: 192.168.159.128 # port: 6379 mybatis-plus: type-aliases-package: com.blb.order_service.entity mapper-locations: classpath:mapper/*.xml configuration: log-impl: org.apache.ibatis.logging.stdout.StdOutImpl map-underscore-to-camel-case: true cache-enabled: true use-deprecated-executor: false #redis缓存配置 #spring.redis.database=0 #spring.redis.jedis.pool.max-active=100 #spring.redis.jedis.pool.max-wait=100ms #spring.redis.jedis.pool.max-idle=100 #spring.redis.jedis.pool.min-idle=10 eureka: client: fetch-registry: true register-with-eureka: true serviceUrl: defaultZone: http://127.0.0.1:8000/eureka eureka: client: fetch-registry: true register-with-eureka: true serviceUrl: defaultZone: http://127.0.0.1:8000/eureka实现传递动态ip和端口的配置 5.4.RestTemplateConfig: package com.dmdd.orderservice.config; import org.springframework.cloud.client.loadbalancer.LoadBalanced; import org.springframework.context.annotation.Bean; import org.springframework.context.annotation.Configuration; import org.springframework.web.client.RestTemplate; @Configuration public class RestTemplateConfig { /** * 创建RestTemplate交给容器 */ @LoadBalanced @Bean public RestTemplate restTemplate(){ return new RestTemplate(); } }服务器之间的访问主要就是靠它 订单模块访问商品模块 订单模块是服务消费者 商品模块是服务提供者 消费者模块需要配置此类 5.5.entity: package com.dmdd.orderservice.entity; import com.baomidou.mybatisplus.annotation.IdType; import com.baomidou.mybatisplus.annotation.TableField; import com.baomidou.mybatisplus.annotation.TableId; import lombok.AllArgsConstructor; import lombok.Data; import lombok.NoArgsConstructor; @NoArgsConstructor @AllArgsConstructor @Data public class SysOrder { @TableId(type = IdType.AUTO) private long id; private long productId; private long count; private long userId; private String time; @TableField(exist = false) private SysProduct product; }每个订单都对应一个商品。 5.6.Service核心代码: @Override public IPage selectOrdersByPage(Long current, Long pageSize) { Page sysOrderPage = new Page(); sysOrderPage.setCurrent(current); sysOrderPage.setSize(pageSize); IPage listIPage = orderMapper.listSelect(sysOrderPage); List records = listIPage.getRecords(); //获得两表连接的集合属性 for (SysOrder order : records) { //获得每个对象的商品id long productId = order.getProductId(); ResponseEntity product = restTemplate.getForEntity("http://product-service/product/" + productId, SysProduct.class); order.setProduct(product.getBody()); } //将两表连接的属性赋值给它 sysOrderPage.setRecords(records); return sysOrderPage; }1.通过mybatis-plus的方法查询订单表数据 2.获取每个订单的productId 3.访问商品模块的查询商品方法,通过productId查询商品信息 ResponseEntity product = restTemplate.getForEntity("http://product-service/product/" + productId, SysProduct.class);4.用订单对象存储商品对象 5.7.controller : package com.dmdd.orderservice.controller; import com.baomidou.mybatisplus.core.metadata.IPage; import com.dmdd.orderservice.entity.SysOrder; import com.dmdd.orderservice.service.OrderService; import com.dmdd.orderservice.util.ResponseResult; import org.springframework.beans.factory.annotation.Autowired; import org.springframework.http.ResponseEntity; import org.springframework.web.bind.annotation.CrossOrigin; import org.springframework.web.bind.annotation.GetMapping; import org.springframework.web.bind.annotation.PathVariable; import org.springframework.web.bind.annotation.RestController; @CrossOrigin @RestController public class OrderController { @Autowired private OrderService orderService; /** * 查询单个订单 微服务查询 */ @GetMapping("order/{id}") public ResponseEntity selectOne(@PathVariable Long id) { SysOrder order = orderService.getOrderById(id); return ResponseEntity.ok(order); } // @GetMapping("order/{id}") // public ResponseResult selectOne(Long id) { // SysOrder order = orderService.getOrderById(id); // return ResponseResult.ok(order); // } /** * 多表查集合 */ @GetMapping("orders/{current}/{pageSize}") public ResponseEntity selectOrders(@PathVariable(required = false) Long current, @PathVariable(required = false) Long pageSize) { IPage sysOrderIPage = orderService.selectOrdersByPage(current, pageSize); System.out.println(sysOrderIPage); return ResponseEntity.ok(sysOrderIPage); } }1.前后端分离需要配置跨域。注:商品模块无需配置此注解。因为在该案例中前端并没有直接访问商品模块。前端是通过访问订单模块,订单模块访问商品模块 @CrossOrigin2.返回参数采用 ResponseEntity 5.8启动类所需注解: package com.dmdd.productservice; import org.mybatis.spring.annotation.MapperScan; import org.springframework.boot.SpringApplication; import org.springframework.boot.autoconfigure.SpringBootApplication; import org.springframework.cloud.client.discovery.EnableDiscoveryClient; @EnableDiscoveryClient @SpringBootApplication @MapperScan(basePackages = "com.dmdd.productservice.mapper") public class ProductServiceApplication { public static void main(String[] args) { SpringApplication.run(ProductServiceApplication.class, args); } } @EnableDiscoveryClient表示该模块是注册中心客户端 商品模块结构: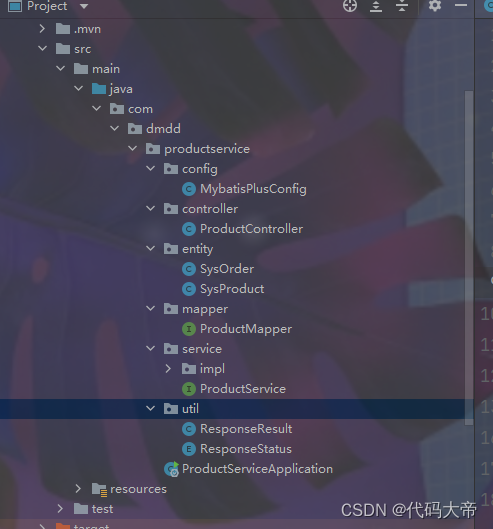
跟订单模块没多大区别 只需要注意 1.继承父模块 2.controller层的返回参数采用 ResponseEntity 3.yml配置关于注册中心的服务器名称 4.端口号记得换,别都用一个端口号。 |


【本文地址】
今日新闻 |
推荐新闻 |