STM32CubeMX学习笔记(40) |
您所在的位置:网站首页 › 嵌入式gui原理 › STM32CubeMX学习笔记(40) |
STM32CubeMX学习笔记(40)
|
一、LVGL简介
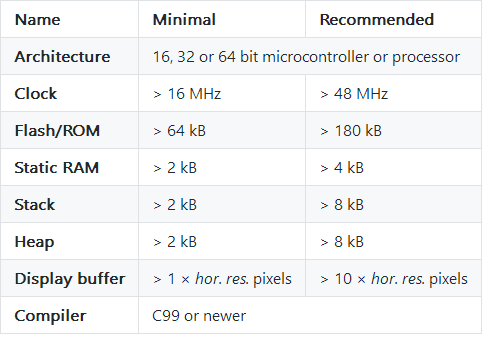
LVGL(Light and Versatile Graphics Library)轻量级通用型图形库,是一个免费的开源图形库,提供了创建嵌入式 GUI 所需的一切,具有易于使用的组件,美观的视觉效果和低内存占用等特点。支持触摸屏操作,移植简单方便,开发者一直在不断完善更新。 特点: 丰富且强大的模块化图形组件:按钮 (buttons)、图表 (charts)、列表 (lists)、滑动条 (sliders)、图片 (images) 等高级的图形引擎:动画、抗锯齿、透明度、平滑滚动、图层混合等效果支持多种输入设备:触摸屏、 键盘、编码器、按键等支持多显示设备不依赖特定的硬件平台,可以在任何显示屏上运行配置可裁剪(最低资源占用:64 kB Flash,16 kB RAM)基于UTF-8的多语种支持,例如中文、日文、韩文、阿拉伯文等可以通过类CSS的方式来设计、布局图形界面(例如:Flexbox、Grid)支持操作系统、外置内存、以及硬件加速(LVGL已内建支持STM32 DMA2D、NXP PXP和VGLite)即便仅有单缓冲区(frame buffer)的情况下,也可保证渲染如丝般顺滑全部由C编写完成,并支持C++调用支持Micropython编程,参见:LVGL API in Micropython支持模拟器仿真,可以无硬件依托进行开发丰富详实的例程详尽的文档以及API参考手册,可线上查阅或可下载为PDF格式 LVGL官网:https://lvgl.io官方文档:https://docs.lvgl.io/master/intro/index.htmlGithub仓库:https://github.com/lvgl/lvgl国内码云仓库:https://gitee.com/mirrors/lvgl正点原子教程:http://www.openedv.com/docs/book-videos/zdyzshipin/4free/littleVGL.html 二、FSMC配置LCD屏显示和触摸查看 STM32CubeMX学习笔记(38)——FSMC接口使用(TFT-LCD屏显示) 查看 STM32CubeMX学习笔记(39)——FSMC接口使用(TFT-LCD屏触摸) 三、TIM6基本定时器(可跳过,看LVGL心跳的配置方式选择) 3.1 参数配置在 Timers 中选择 TIM6 设置,并勾选 Activated 激活 在 Parameter Settings 进行具体参数配置。 Tclk 即内部时钟CK_INT,经过APB1预分频器后分频提供,如果APB1预分频系数等于1,则频率不变,否则频率乘以2,库函数中APB1预分频的系数是2,即PCLK1=36M,如图所以定时器时钟Tclk=36*2=72M。 定时器溢出时间: Tout = 1 / (Tclk / (psc + 1)) ∗ (arr + 1) 定时器时钟Tclk:72MHz预分频器psc:71自动重装载寄存器arr:999即 Tout = 1/(72MHz/(71+1))∗(999+1) = 1ms Prescaler(时钟预分频数):72-1 则驱动计数器的时钟 CK_CNT = CK_INT(即72MHz)/(71+1) = 1MHzCounter Mode(计数模式):Up(向上计数模式) 基本定时器只能是向上计数Counter Period(自动重装载值):1000-1 则定时时间 1/CK_CLK*(999+1) = 1msauto-reload-preload(自动重装载):Enable(使能)TRGO Parameters(触发输出):不使能 在定时器的定时时间到达的时候输出一个信号(如:定时器更新产生TRGO信号来触发ADC的同步转换) 3.2 配置NVIC
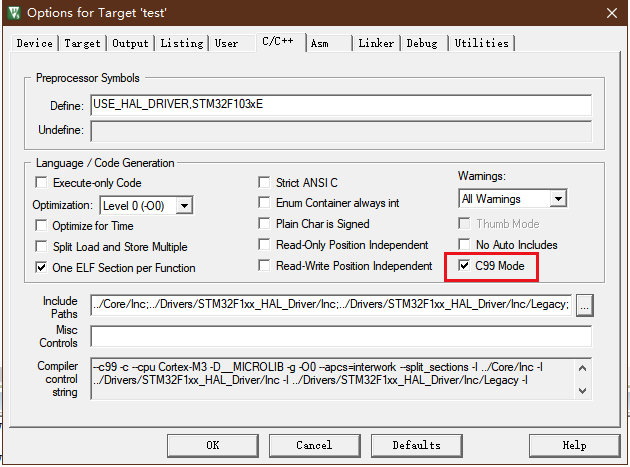
使能定时器中断 将最小栈空间改到 0x1000 注意:由于LVGL运行的硬件要求,故需要加大项目的栈空间到 2KB 和使能 C99 编译器功 能,修改 Stack_Size 的值大于 2KB(0x00000800),。
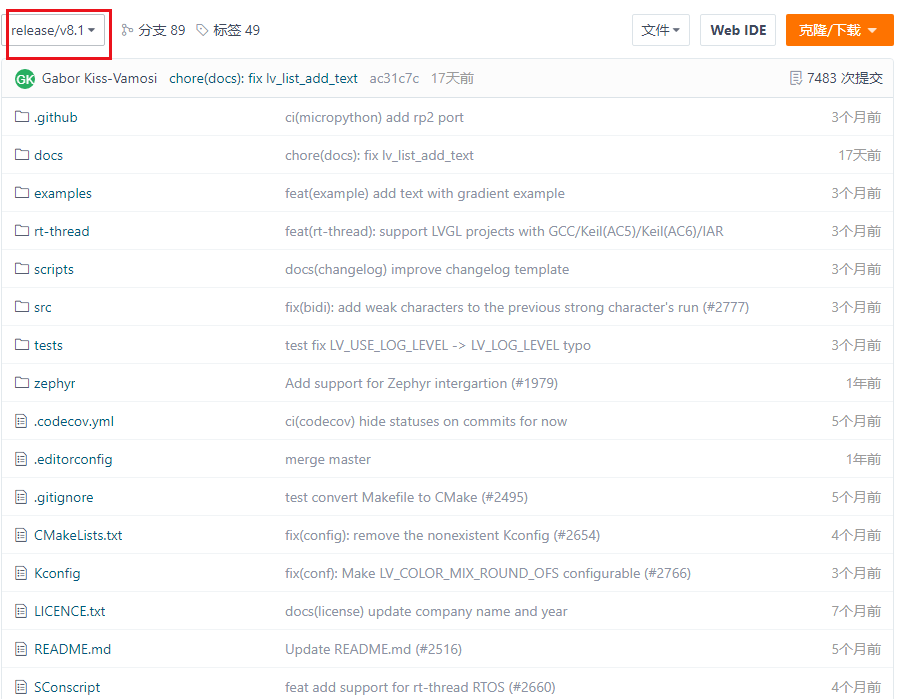
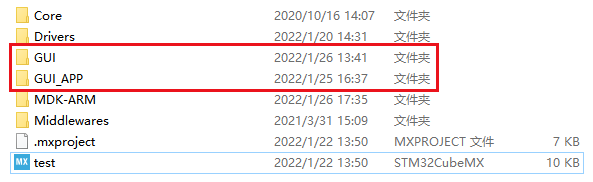
输入项目名和项目路径 我用的是 LVGL 8.1 版本 GUI 目录是用来存放跟LVGL库相关的所有文件的。 GUI_APP 是用来放我们自己的GUI应用代码的,因为现在才刚开始移植,还来不及自己写GUI应用,所以GUI_APP目录里面先留空。
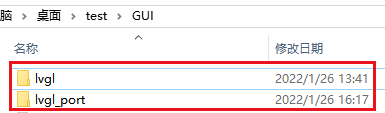
lvgl 官方各类控件的源程序。 lvgl_port 用于存放LVGL显示屏驱动、输入设备驱动及文件系统驱动。
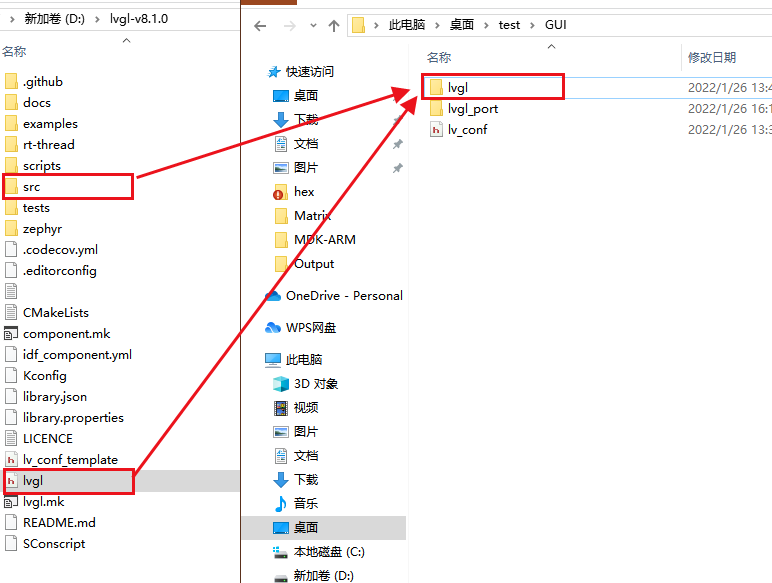
src 所有源码都在项目根目录的src文件夹里。 lvgl.h 包含了LVGL库中的所有头文件。
复制"lvgl-8.1.0\examples\porting"中的文件到工程目录下的"GUI\lvgl_port"目录下。并将他们改名 去掉template 。 lv_port_disp 为LVGL显示驱动。 lv_port_fs 为LVGL文件系统驱动。 lv_port_indev 为LVGL输入设备驱动。 5.5 拷贝配置文件lv_conf_template.h到GUI文件夹复制LVGL库根目录下的"lv_conf_template.h"文件到工程文件夹“GUI”下,并将"lv_conf_template.h"重命名为"lv_conf.h"。 lv_conf.h 是LVGL库的配置文件,里面有各种宏。
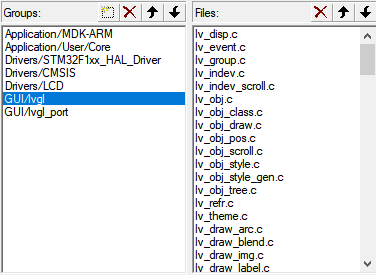
接下来我们在 mdk 里面新建 GUI/lvgl 和 GUI/lvgl_port 两个组文件夹,其中 GUI/lvgl 用于存放 src 文件夹的内容,GUI/lvgl_port 用于存放 examples\porting 文件夹的内容。 在GUI/lvgl组中添加以下文件夹中所有的.c文件: GUI/lvgl/src/lv_core GUI/lvgl/src/lv_draw GUI/lvgl/src/lv_extra(除了lib外,除非你用到了相关功能) GUI/lvgl/src/lv_font GUI/lvgl/src/lv_hal GUI/lvgl/src/lv_misc GUI/lvgl/src/lv_themes GUI/lvgl/src/lv_widgets //注意不要添加 GUI/lvgl/src/lv_gpu 中的文件,除非你用到了相关功能
在GUI/lvgl_port组中添加以下.c文件: GUI/lvgl_port/lv_port_disp.c GUI/lvgl_port/lv_port_indev.c //注意不要添加 GUI/lvgl_port/lv_port_fs.c 中的文件,除非你用到了相关功能在User组中添加lvgl_conf.h配置文件:
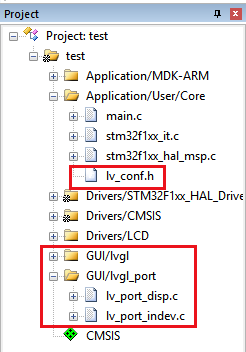
LVGL 的源码已经添加到开发环境的组文件夹下面,编译的时候需要为这些源文件指定头文件的路径,不然编译会报错。只需要将 GUI、GUI/lvgl、GUI/lvgl_port 的路径在开发环境里面指定即可。
C99:LVGL要求 C99 或更新的编译器,否则编译是会报错的。 使能文件及添加头文件 /*Copy this file as "lv_port_disp.c" and set this value to "1" to enable content*/ #if 1 /********************* * INCLUDES *********************/ #include "lv_port_disp.h" #include "lvgl.h" #include "bsp_ili9341_lcd.h"添加及修改屏幕像素高度和宽度,根据实际屏幕尺寸 /********************* * DEFINES *********************/ #define MY_DISP_HOR_RES (320) // 屏幕像素高度 #define MY_DISP_VER_RES (240) // 屏幕像素宽度 ··· ··· /*Set the resolution of the display*/ disp_drv.hor_res = MY_DISP_HOR_RES; disp_drv.ver_res = MY_DISP_VER_RES;找到 disp_init() 函数,将显示屏初始化驱动 ILI9341_Init() 放到这里 /*Initialize your display and the required peripherals.*/ static void disp_init(void) { ILI9341_Init(); }修改 lv_port_disp_init() 函数 void lv_port_disp_init(void) { /*------------------------- * Initialize your display * -----------------------*/ disp_init(); // 显示屏驱动初始化 /*----------------------------- * Create a buffer for drawing *----------------------------*/ /** * LVGL requires a buffer where it internally draws the widgets. * Later this buffer will passed to your display driver's `flush_cb` to copy its content to your display. * The buffer has to be greater than 1 display row * * There are 3 buffering configurations: * 1. Create ONE buffer: * LVGL will draw the display's content here and writes it to your display * * 2. Create TWO buffer: * LVGL will draw the display's content to a buffer and writes it your display. * You should use DMA to write the buffer's content to the display. * It will enable LVGL to draw the next part of the screen to the other buffer while * the data is being sent form the first buffer. It makes rendering and flushing parallel. * * 3. Double buffering * Set 2 screens sized buffers and set disp_drv.full_refresh = 1. * This way LVGL will always provide the whole rendered screen in `flush_cb` * and you only need to change the frame buffer's address. */ // 显示缓冲区初始化有三种方式,这里使用的是方式1,方式1消耗的硬件资源最小,但运行效果也是最差的,三种方式如下 // 第一种只创建一个缓存区,长度是横轴像素长度的 10 倍 // 第二种创建两个缓存区,长度都是横轴的 10 倍,可以结合 DMA 加快写入速度 // 第三种则是创建两个,大小是横轴乘以纵轴,相当于整个屏幕大小 /* Example for 1) */ static lv_disp_draw_buf_t draw_buf_dsc_1; // 显示缓冲区 static lv_color_t buf_1[MY_DISP_HOR_RES * 40]; /*A buffer for 10 rows*/ // 初始化显示缓冲区 lv_disp_draw_buf_init(&draw_buf_dsc_1, buf_1, NULL, MY_DISP_HOR_RES * 40); /*Initialize the display buffer*/ /* Example for 2) */ // static lv_disp_draw_buf_t draw_buf_dsc_2; // static lv_color_t buf_2_1[MY_DISP_HOR_RES * 10]; /*A buffer for 10 rows*/ // static lv_color_t buf_2_2[MY_DISP_HOR_RES * 10]; /*An other buffer for 10 rows*/ // lv_disp_draw_buf_init(&draw_buf_dsc_2, buf_2_1, buf_2_2, MY_DISP_HOR_RES * 10); /*Initialize the display buffer*/ /* Example for 3) also set disp_drv.full_refresh = 1 below*/ // static lv_disp_draw_buf_t draw_buf_dsc_3; // static lv_color_t buf_3_1[MY_DISP_HOR_RES * MY_DISP_VER_RES]; /*A screen sized buffer*/ // static lv_color_t buf_3_2[MY_DISP_HOR_RES * MY_DISP_VER_RES]; /*An other screen sized buffer*/ // lv_disp_draw_buf_init(&draw_buf_dsc_3, buf_3_1, buf_3_2, MY_DISP_VER_RES * LV_VER_RES_MAX); /*Initialize the display buffer*/ /*----------------------------------- * Register the display in LVGL *----------------------------------*/ static lv_disp_drv_t disp_drv; /*Descriptor of a display driver*/ // 初始化显示设备 lv_disp_drv_init(&disp_drv); /*Basic initialization*/ /*Set up the functions to access to your display*/ /*Set the resolution of the display*/ disp_drv.hor_res = MY_DISP_HOR_RES; disp_drv.ver_res = MY_DISP_VER_RES; /*Used to copy the buffer's content to the display*/ // 注册显示回调函数 disp_drv.flush_cb = disp_flush; /*Set a display buffer*/ // 注册显示缓冲区 disp_drv.draw_buf = &draw_buf_dsc_1; /*Required for Example 3)*/ //disp_drv.full_refresh = 1 /* Fill a memory array with a color if you have GPU. * Note that, in lv_conf.h you can enable GPUs that has built-in support in LVGL. * But if you have a different GPU you can use with this callback.*/ //disp_drv.gpu_fill_cb = gpu_fill; /*Finally register the driver*/ // 注册显示设备 lv_disp_drv_register(&disp_drv); }修改 disp_flush() 函数,将自己显示屏对应的填充颜色块函数放到这里,这个函数是用来刷新显示区域的,速度越快越好 /*Flush the content of the internal buffer the specific area on the display *You can use DMA or any hardware acceleration to do this operation in the background but *'lv_disp_flush_ready()' has to be called when finished.*/ static void disp_flush(lv_disp_drv_t * disp_drv, const lv_area_t * area, lv_color_t * color_p) { /*The most simple case (but also the slowest) to put all pixels to the screen one-by-one*/ int32_t x; int32_t y; for(y = area->y1; y y2; y++) { for(x = area->x1; x x2; x++) { /*Put a pixel to the display. For example:*/ /*put_px(x, y, *color_p)*/ ILI9341_DrawPixel((uint16_t)x, (uint16_t)y, (uint16_t)color_p->full); // 效率极低,卡顿严重 color_p++; } } /*IMPORTANT!!! *Inform the graphics library that you are ready with the flushing*/ lv_disp_flush_ready(disp_drv); }
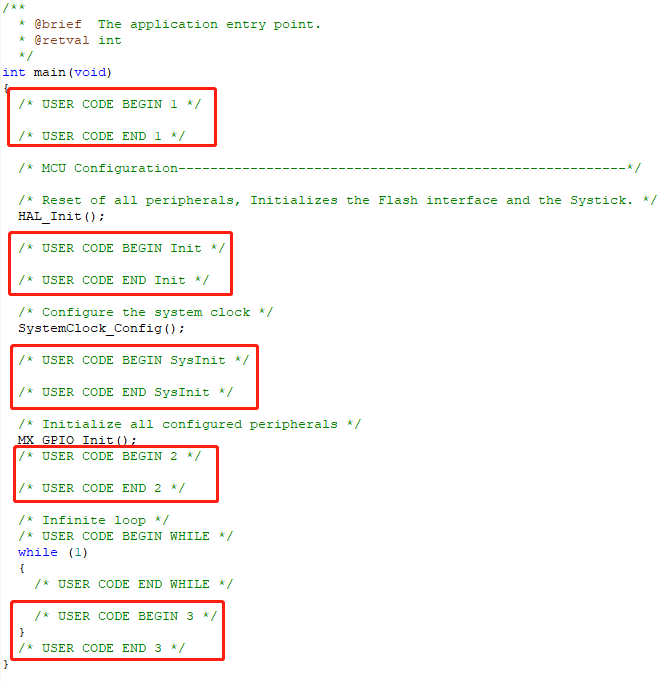
修改 lv_port_indev_init() 函数,这里是初始化输入设备驱动和在LVGL中注册一个输入设备。输入设备可以是触摸屏、鼠标、键盘、编码器、按键,这里我们只使用触摸屏,其余的删除。 void lv_port_indev_init(void) { static lv_indev_drv_t indev_drv; /*------------------ * Touchpad * -----------------*/ /*Initialize your touchpad if you have*/ touchpad_init(); /*Register a touchpad input device*/ // 注册输入设备 lv_indev_drv_init(&indev_drv); indev_drv.type = LV_INDEV_TYPE_POINTER; indev_drv.read_cb = touchpad_read; indev_touchpad = lv_indev_drv_register(&indev_drv); }修改 touchpad_is_pressed() 和 touchpad_get_xy() 函数 /*Return true is the touchpad is pressed*/ static bool touchpad_is_pressed(void) // 判断是否触摸 { if(TOUCH_PRESSED == XPT2046_TouchDetect()) { return true; } return false; } /*Get the x and y coordinates if the touchpad is pressed*/ static void touchpad_get_xy(lv_coord_t * x, lv_coord_t * y) { /*Your code comes here*/ static strType_XPT2046_Coordinate info = {-1,-1,-1,-1}; XPT2046_Get_TouchedPoint(&info, strXPT2046_TouchPara);// 获取触摸坐标 (*x) = info.x; (*y) = info.y; } lv_port_indev.h 使能文件及声明函数 /*Copy this file as "lv_port_indev.h" and set this value to "1" to enable content*/ #if 1 ··· ··· /********************** * GLOBAL PROTOTYPES **********************/ void lv_port_indev_init(void); 八、修改main.c 8.1 包含头文件 /* USER CODE END Header */ /* Includes ------------------------------------------------------------------*/ #include "main.h" /* Private includes ----------------------------------------------------------*/ /* USER CODE BEGIN Includes */ #include #include "bsp_ili9341_lcd.h" #include "bsp_xpt2046_lcd.h" #include "lv_port_disp.h" #include "lv_port_indev.h" #include "lvgl.h" 8.2 初始化LVGL lv_init(); // lvgl初始化,如果这个没有初始化,那么下面的初始化会崩溃 lv_port_disp_init(); // 显示器初始化 lv_port_indev_init(); // 输入设备初始化(如果没有实现就注释掉) 8.3 配置LVGL心跳 8.3.1 配置LV_TICK_CUSTOM方式(推荐,选择其中一种)过 x 毫秒调用 lv_tick_inc(x) 函数一次(1 ≤ x ≤ 10),这个函数是LittlevGL运行所需的时钟源。 如果定义LV_TICK_CUSTOM为1的话,就无须在应用程序中主动调用 lv_tick_inc(x) 函数,而是需要定义一个获取当前系统已运行时间的函数(例如HAL_GetTick())并使用宏定义LV_TICK_CUSTOM_SYS_TIME_EXPR表示该函数,这个函数会在调用 lv_task_handler() 函数的时候自动调用并获取当前时间戳。 修改中断回调函数 打开 stm32f1xx_it.c 中断服务函数文件,找到 TIM6 中断的服务函数 TIM6_IRQHandler() 中断服务函数里面就调用了定时器中断处理函数 HAL_TIM_IRQHandler() 打开 stm32f1xx_hal_tim.c 文件,找到定时器中断处理函数原型 HAL_TIM_IRQHandler(),其主要作用就是判断是哪个定时器产生哪种事件中断,清除中断标识位,然后调用中断回调函数 HAL_TIM_PeriodElapsedCallback()。 /* NOTE: This function Should not be modified, when the callback is needed, the HAL_GPIO_EXTI_Callback could be implemented in the user file */ 这个函数不应该被改变,如果需要使用回调函数,请重新在用户文件中实现该函数。 HAL_TIM_PeriodElapsedCallback() 按照官方提示我们应该再次定义该函数,__weak 是一个弱化标识,带有这个的函数就是一个弱化函数,就是你可以在其他地方写一个名称和参数都一模一样的函数,编译器就会忽略这一个函数,而去执行你写的那个函数;而 UNUSED(htim) ,这就是一个防报错的定义,当传进来的定时器号没有做任何处理的时候,编译器也不会报出警告。其实我们在开发的时候已经不需要去理会中断服务函数了,只需要找到这个中断回调函数并将其重写即可而这个回调函数还有一点非常便利的地方这里没有体现出来,就是当同时有多个中断使能的时候,STM32CubeMX会自动地将几个中断的服务函数规整到一起并调用一个回调函数,也就是无论几个中断,我们只需要重写一个回调函并判断传进来的定时器号即可。 接下来我们就在 stm32f1xx_it.c 这个文件的最下面添加 HAL_TIM_PeriodElapsedCallback() /* USER CODE BEGIN 1 */ void HAL_TIM_PeriodElapsedCallback(TIM_HandleTypeDef *htim) { static uint32_t time = 0; if(htim->Instance == TIM6) // 定时器6基地址 { lv_tick_inc(1); lv_tick_inc(1);//lvgl 的 1ms 心跳 } } /* USER CODE END 1 */添加定时器启动函数 现在进入 main 函数并在 while 循环前加入开启定时器函数 HAL_TIM_Base_Start_IT(),这里所传入的 htim6 就是刚刚定时器初始化后的结构体。 /** * @brief The application entry point. * @retval int */ int main(void) { ··· ··· /* USER CODE BEGIN 2 */ HAL_TIM_Base_Start_IT(&htim6); /* USER CODE END 2 */ /* Infinite loop */ /* USER CODE BEGIN WHILE */ while (1) { lv_task_handler(); // 运行所有lvgl的timer /* USER CODE END WHILE */ /* USER CODE BEGIN 3 */ } /* USER CODE END 3 */ } 8.4 执行demo实现 btn_event_cb() 按键事件回调,实现 lvgl_first_demo_start() 并在 main() 中调用。 /* Private user code ---------------------------------------------------------*/ /* USER CODE BEGIN 0 */ static void btn_event_cb(lv_event_t * event) { lv_obj_t *btn = lv_event_get_target(event); //获得事件最初瞄准的对象。即使事件是冒泡的,也是一样的。 if(event->code == LV_EVENT_CLICKED) { static uint8_t cnt = 0; cnt++; /*Get the first child of the button which is the label and change its text*/ lv_obj_t * label = lv_obj_get_child(btn, NULL); lv_label_set_text_fmt(label, "Button: %d", cnt); } } static void lvgl_first_demo_start(void) { lv_obj_t * btn = lv_btn_create(lv_scr_act()); /*Add a button the current screen*/ lv_obj_set_pos(btn, 10, 10); /*Set its position*/ lv_obj_set_size(btn, 120, 50); /*Set its size*/ lv_obj_add_event_cb(btn, (lv_event_cb_t)btn_event_cb, LV_EVENT_CLICKED, NULL);/*Assign a callback to the button*/ lv_obj_t * label = lv_label_create(btn); /*Add a label to the button*/ lv_label_set_text(label, "Yeah"); /*Set the labels text*/ lv_obj_t * label1 = lv_label_create(lv_scr_act()); lv_label_set_text(label1, "Hello world!"); lv_obj_align(label1, LV_ALIGN_CENTER, 0, 0); lv_obj_align_to(btn, label1, LV_ALIGN_OUT_TOP_MID, 0, -10); } /* USER CODE END 0 */ /** * @brief The application entry point. * @retval int */ int main(void) { /* USER CODE BEGIN 1 */ /* USER CODE END 1 */ /* MCU Configuration--------------------------------------------------------*/ /* Reset of all peripherals, Initializes the Flash interface and the Systick. */ HAL_Init(); /* USER CODE BEGIN Init */ /* USER CODE END Init */ /* Configure the system clock */ SystemClock_Config(); /* USER CODE BEGIN SysInit */ /* USER CODE END SysInit */ /* Initialize all configured peripherals */ MX_GPIO_Init(); MX_DMA_Init(); MX_USART1_UART_Init(); MX_FSMC_Init(); MX_TIM6_Init(); /* USER CODE BEGIN 2 */ // HAL_TIM_Base_Start_IT(&htim6); lv_init(); //lvgl 系统初始化 lv_port_disp_init(); //lvgl 显示接口初始化,放在 lv_init()的后面 lv_port_indev_init(); //lvgl 输入接口初始化,放在 lv_init()的后面 //其中0、3、5、6 模式适合从左至右显示文字, //不推荐使用其它模式显示文字 其它模式显示文字会有镜像效果 //其中 6 模式为大部分液晶例程的默认显示方向 ILI9341_GramScan(3); lvgl_first_demo_start(); /* USER CODE END 2 */ /* Infinite loop */ /* USER CODE BEGIN WHILE */ while (1) { lv_timer_handler(); /* USER CODE END WHILE */ /* USER CODE BEGIN 3 */ } /* USER CODE END 3 */ }查看效果: 链接:https://pan.baidu.com/s/1mmcFnxAvYHJT-WxbNh3spQ?pwd=0htb 提取码:0htb 十、注意事项用户代码要加在 USER CODE BEGIN N 和 USER CODE END N 之间,否则下次使用 STM32CubeMX 重新生成代码后,会被删除。 • 由 Leung 写于 2022 年 1 月 27 日 • 参考:【LVGL学习之旅 01】移植LVGL到STM32 STM32移植LittleVgl(LVGL)嵌入式开源图形库 LittleVGL(LVGL) V8版本 干货入门教程一之移植到STM32并运行 野火指南者开发板移植 lvgl 库 |


 选择应用的 IDE 开发环境 MDK-ARM V5
 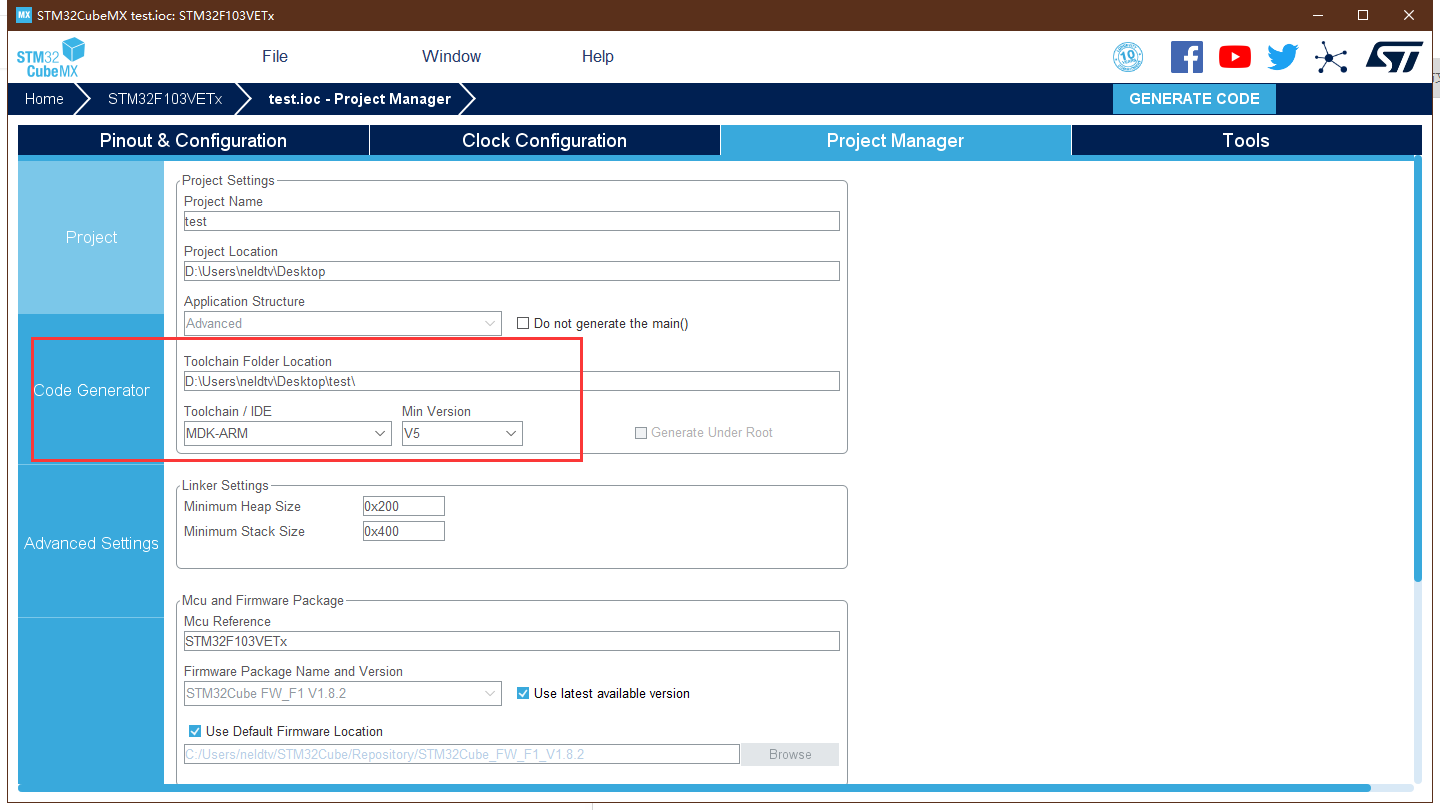 每个外设生成独立的 ’.c/.h’ 文件 不勾:所有初始化代码都生成在 main.c 勾选:初始化代码生成在对应的外设文件。 如 GPIO 初始化代码生成在 gpio.c 中。
  点击 GENERATE CODE 生成代码


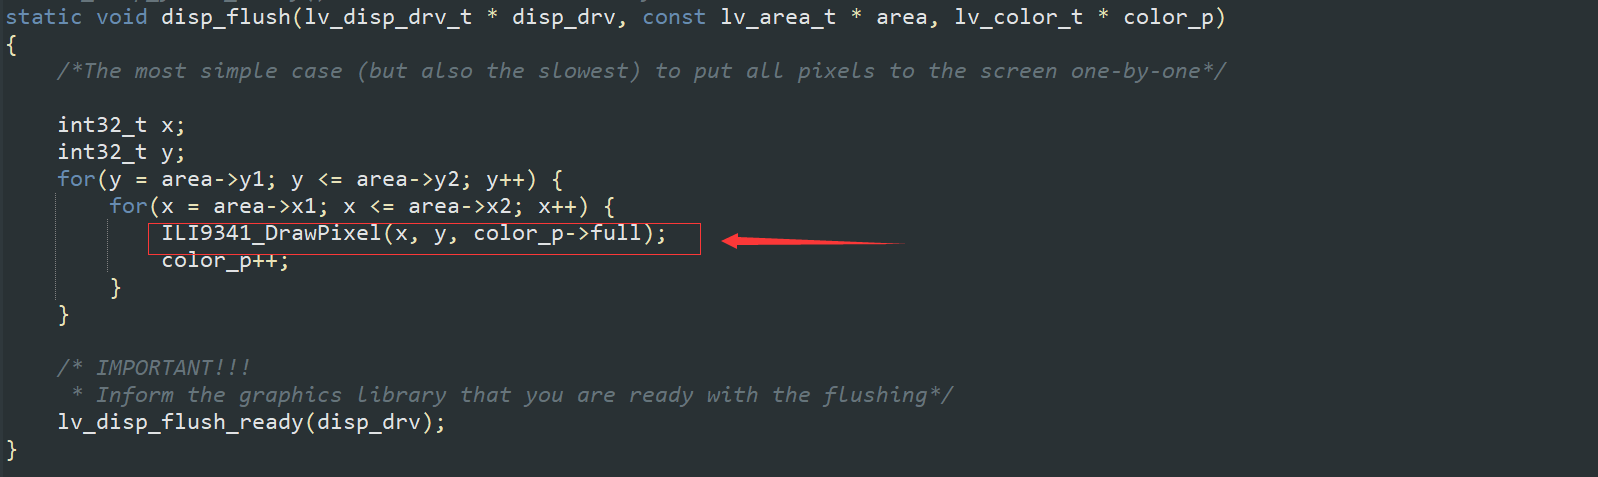 红色标注部分的函数也就是以单个像素点填充屏幕的函数,这个函数野火写的不满足调用要求,稍微将原来的驱动代码进行了更改,实现了如下所示的单个像素点填充函数:


【本文地址】