EasyExcel |
您所在的位置:网站首页 › 导出excel代码怎么写 › EasyExcel |
EasyExcel
|
文章目录
前言博客测试版本代码实现1、创建多个对象,用于不同指标数据接收2、编写代码模拟功能
扩展如果不想写数据对象,可以采取下列的方式资料参考
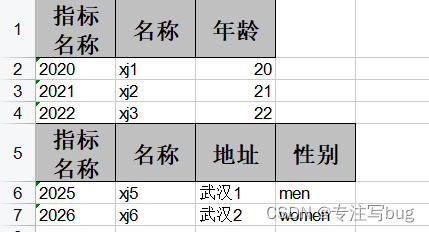
前言
最近碰见一个需求,需要将报表中的数据,按照对应的分类,组装成多个不同的导出数据对象体,并将集合数据导入显示在同一个Sheet中。 如下图所示: 本次使用的是com.alibaba.easyexcel 3.0.5。 com.alibaba easyexcel 3.0.5 代码实现 1、创建多个对象,用于不同指标数据接收 import com.alibaba.excel.annotation.ExcelProperty; import lombok.AllArgsConstructor; import lombok.Data; @Data @AllArgsConstructor public class DemoVo1 { @ExcelProperty("指标名称") private String indexName; @ExcelProperty("名称") private String name; @ExcelProperty("年龄") private Integer age; } import com.alibaba.excel.annotation.ExcelProperty; import lombok.AllArgsConstructor; import lombok.Data; @Data @AllArgsConstructor public class DemoVo2 { @ExcelProperty("指标名称") private String indexName; @ExcelProperty("名称") private String name; @ExcelProperty("地址") private String address; @ExcelProperty("性别") private String sex; } 2、编写代码模拟功能 import com.alibaba.excel.EasyExcel; import com.alibaba.excel.ExcelWriter; import com.alibaba.excel.write.metadata.WriteSheet; import com.alibaba.excel.write.metadata.WriteTable; import java.io.File; import java.io.IOException; import java.util.Arrays; import java.util.List; public class Test { public static void main(String[] args) throws IOException { // 当前项目的文件保存地址 String path = System.getProperty("user.dir") + File.separator+"springboot-excel"+File.separator+"doc"+File.separator; File file = new File(path); // 不存在目录 就创建目录 if(!file.getParentFile().exists()){ file.getParentFile().mkdirs(); } // if(!file.exists()){ // if(file.isFile()){ // file.createNewFile(); // }else{ // file.mkdir(); // } // } File file1 = new File(path + "1.xls"); if(!file1.exists()){ file1.createNewFile(); } List list1 = Arrays.asList(new DemoVo1("2020", "xj1", 20), new DemoVo1("2021", "xj2", 21), new DemoVo1("2022", "xj3", 22)); List list2 = Arrays.asList(new DemoVo2("2025", "xj5", "武汉1","men"), new DemoVo2("2026", "xj6", "武汉2","women")); ExcelWriter excelWriter = null; try { excelWriter = EasyExcel.write(file1).build(); // 把sheet设置为不需要头 不然会输出sheet的头 这样看起来第一个table 就有2个头了 WriteSheet writeSheet = EasyExcel.writerSheet().needHead(Boolean.FALSE).build(); // 这里必须指定需要头,table 会继承sheet的配置,sheet配置了不需要,table 默认也是不需要 WriteTable writeTable1 = EasyExcel.writerTable(0).head(DemoVo1.class).needHead(Boolean.TRUE).build(); // 第二个对象 读取对象的excel实体类中的标题 WriteTable writeTable2 = EasyExcel.writerTable(1).head(DemoVo2.class).needHead(Boolean.TRUE).build(); // 第一次写入会创建头 excelWriter.write(list1, writeSheet, writeTable1); // 第二次写如也会创建头,然后在第一次的后面写入数据 excelWriter.write(list2, writeSheet, writeTable2); }finally { if (excelWriter != null) { excelWriter.finish(); } } } }最终运行效果如前言中所示。 扩展当前只是两个不同对象,导入到同一个sheet中,如果有更多,只需要保证代码中有以下几点: // 1、多一个对象,就额外创建一个WriteTable WriteTable writeTable3 = EasyExcel.writerTable(2).head(ShortLoanReportVo3.class).needHead(Boolean.TRUE).build(); // 2、然后数据填充时,向对应已创建的table中填入 excelWriter.write(dataLists3, writeSheet, writeTable3); 如果不想写数据对象,可以采取下列的方式参考之前的博客:EasyExcel 3.0.5——动态导出excel头和数据内容 将测试类进行改造: import com.alibaba.excel.EasyExcel; import com.alibaba.excel.ExcelWriter; import com.alibaba.excel.util.ListUtils; import com.alibaba.excel.write.metadata.WriteSheet; import com.alibaba.excel.write.metadata.WriteTable; import java.io.File; import java.io.IOException; import java.util.List; public class Test2 { public static void main(String[] args) throws IOException { // 当前项目的文件保存地址 String path = System.getProperty("user.dir") + File.separator+"springboot-excel"+File.separator+"doc"+File.separator; File file = new File(path); // 不存在目录 就创建目录 if(!file.getParentFile().exists()){ file.getParentFile().mkdirs(); } // if(!file.exists()){ // if(file.isFile()){ // file.createNewFile(); // }else{ // file.mkdir(); // } // } File file1 = new File(path + "2.xls"); if(!file1.exists()){ file1.createNewFile(); } List headLists = ListUtils.newArrayList(); List head1 = ListUtils.newArrayList(); head1.add("指标名称"); headLists.add(head1); List head2 = ListUtils.newArrayList(); head2.add("名称"); headLists.add(head2); List head3 = ListUtils.newArrayList(); head3.add("年龄"); headLists.add(head3); List dataLists = ListUtils.newArrayList(); List list1 = ListUtils.newArrayList(); list1.add("2020"); list1.add("xj1"); list1.add(20); dataLists.add(list1); List list2 = ListUtils.newArrayList(); list2.add("2021"); list2.add("xj2"); list2.add(21); dataLists.add(list2); List list3 = ListUtils.newArrayList(); list3.add("2022"); list3.add("xj3"); list3.add(22); dataLists.add(list3); ExcelWriter excelWriter = null; try { excelWriter = EasyExcel.write(file1).build(); // 把sheet设置为不需要头 不然会输出sheet的头 这样看起来第一个table 就有2个头了 WriteSheet writeSheet = EasyExcel.writerSheet().needHead(Boolean.FALSE).build(); // 这里必须指定需要头,table 会继承sheet的配置,sheet配置了不需要,table 默认也是不需要 WriteTable writeTable1 = EasyExcel.writerTable(0).head(headLists).needHead(Boolean.TRUE).build(); WriteTable writeTable2 = EasyExcel.writerTable(1).head(headLists).needHead(Boolean.TRUE).build(); // 第一次写入会创建头 excelWriter.write(dataLists, writeSheet, writeTable1); excelWriter.write(dataLists, writeSheet, writeTable2); // 用同一个 对象集合,但是不同的 table,只是为了测试方便 }finally { if (excelWriter != null) { excelWriter.finish(); } } } } 资料参考easyExcel 实现不同对象写入到同一个sheet中 |
【本文地址】
今日新闻 |
推荐新闻 |