Android:Fragment详细介绍 & 使用方法解析 |
您所在的位置:网站首页 › 安卓默认布局是什么 › Android:Fragment详细介绍 & 使用方法解析 |
Android:Fragment详细介绍 & 使用方法解析
|
Fragment
Fragment一、什么是Fragment?二、为什么要有Fragment?三、Fragment的特点四、Fragment的生命周期五、将fragment添加到Activity的两种方式5.1 在Activity的layout.xml布局文件中静态添加5.2 在Activity的.java文件中动态添加
六、碎片的最佳实践-简易版的新闻应用
参考
Fragment
一、什么是Fragment?
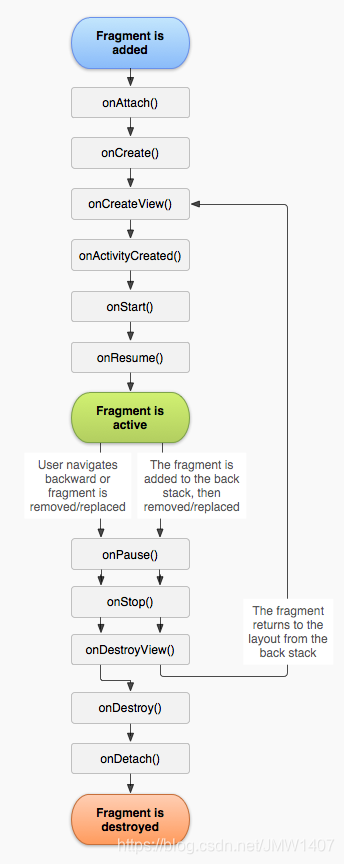
Fragment:是Android3.0开始新增的概念,意为碎片。Fragment是依赖于Activity的,不能独立存在的。 Activity界面中的一部分,可理解为模块化的Activity Fragment不能独立存在,必须嵌入到Activity中 Fragment具有自己的生命周期,接收它自己的事件,并可以在Activity运行时被添加或删除 Fragment的生命周期直接受所在的Activity的影响。如:当Activity暂停时,它拥有的所有Fragment们都暂停 二、为什么要有Fragment?Android运行在各种各样的设备中,有小屏幕的手机,还有大屏幕的平板,电视等。同样的界面在手机上显示可能很好看,在大屏幕的平板上就未必了,手机的界面放在平板上可能会有过分被拉长、控件间距过大等情况。针对屏幕尺寸的差距,Fragment的出现能做到一个App可以同时适应手机和平板。这就是为什么要有Fragment的原因。 在手机效果: Fragment是一种可以嵌入在Activity当中的UI片段 用来组建Activity界面的局部模块, 也可以说一个Actiivty界面可以由多个Fragment组成 其行为与Activity很相似, 有自己对应的布局(包含具体的View), 它有自己的生命周期,接收自己的输入事件,并且可以从运行中的activity中添加或移除 一个fragment必须总是嵌入在一个activity中,同时fragment的生命周期受activity的影响 本质上会产生一个FrameLayout,它加载的布局为其子布局 优势: 模块化:我们不必把所有代码全部写在Activity中,而是把代码写在各自的Fragment中。可重用:多个Activity可以重用一个Fragment。可适配:根据硬件的屏幕尺寸、屏幕方向,能够方便地实现不同的布局,这样用户体验更好。 四、Fragment的生命周期Fragment的生命周期和Activity类似,但比Activity的生命周期复杂一些,基本的生命周期方法如下图:
onAttach():Fragment和Activity相关联时调用。可以通过该方法获取Activity引用,还可以通过getArguments()获取参数。 onCreate():Fragment被创建时调用。 onCreateView():创建Fragment的布局。 onActivityCreated():当Activity完成onCreate()时调用。 onStart():当Fragment可见时调用。 onResume():当Fragment可见且可交互时调用。 onPause():当Fragment不可交互但可见时调用。 onStop():当Fragment不可见时调用。 onDestroyView():当Fragment的UI从视图结构中移除时调用。 onDestroy():销毁Fragment时调用。 onDetach():当Fragment和Activity解除关联时调用。 Fragment生命周期解析 当一个fragment被创建的时候: onAttach() onCreate() onCreateView() onActivityCreated()当这个fragment对用户可见的时候,它会经历以下状态。 onStart() onResume()当这个fragment进入“后台模式”的时候,它会经历以下状态。 onPause() onStop()当这个fragment被销毁了(或者持有它的activity被销毁了): onPause() onStop() onDestroyView() onDestroy() onDetach()就像Activity一样,在以下的状态中,可以使用Bundle对象保存一个fragment的对象。 onCreate() onCreateView() onActivityCreated()其他场景的调用 屏幕灭掉onPause() onSaveInstanceState() onStop() 屏幕解锁onStart() onResume() 切换到其他FragmentonPause() onStop() onDestroyView() 切换回本身的FragmentonCreateView() onActivityCreated() onStart() onResume() 回到桌面onPause() onSaveInstanceState() onStop() 回到应用onStart() onResume() 退出应用onPause() onStop() onDestroyView() onDestroy() onDetach() 五、将fragment添加到Activity的两种方式由于Fragment作为Activity一部分,所以Fragment的使用一般是添加到Activity中 将Fragment添加到Activity中一般有2种方法: 在Activity的layout.xml布局文件中静态添加在Activity的.java文件中动态添加 5.1 在Activity的layout.xml布局文件中静态添加Activity的布局文件:fragment_layout_test.xml // 该fragment类定义在包名为"com.skywang.app"中的FragmentLayoutTest类的内部类ExampleFragment中Fragment的布局文件:example_fragment.xml Activity的.java文件:FragmentLayoutTest.java // 在Activity使用Fragment时,需要考虑版本兼容问题 // 1. Android 3.0后,Activity可直接继承自Activity,并且在其中嵌入使用Fragment // 2. Android 3.0前,Activity需FragmentActivity(其也继承自Activity),同时需要导入android-support-v4.jar兼容包,这样在Activity中才能嵌入Fragment public class FragmentLayoutTest extends Activity { @Override protected void onCreate(Bundle savedInstanceState) { super.onCreate(savedInstanceState); setContentView(R.layout.fragment_layout_test); // 设置上述布局文件 } // 继承自Fragment // 布局文件中的Fragment通过该FragmentLayoutTest的内部类ExampleFragment实现 public static class ExampleFragment extends Fragment { @Override public View onCreateView(LayoutInflater inflater, ViewGroup container, Bundle savedInstanceState) { return inflater.inflate(R.layout.example_fragment, container, false); // 将example_fragment.xml作为该Fragment的布局文件 // 即相当于FragmentLayoutTest直接调用example_fragment.xml来显示到Fragment中 } } }onCreateView()中container参数代表该Fragment在Activity中的父控件;savedInstanceState提供了上一个实例的数据。 inflate()方法的三个参数: 第一个是resource ID,指明了当前的Fragment对应的资源文件;第二个参数是父容器控件;第三个布尔值参数表明是否连接该布局和其父容器控件,在这里的情况设置为false,因为系统已经插入了这个布局到父控件,设置为true将会产生多余的一个View Group。 5.2 在Activity的.java文件中动态添加当Activity处于Running状态下的时候,可以在Activity的布局中动态地加入Fragment,只需要指定加入这个Fragment的父View Group即可。 步骤1:在Activity的布局文件定义1占位符(FrameLayout) 这样做的好处是:可动态在Activity中添加不同的 Fragment,更加灵活 fragment_transaction_test.xml 步骤2:设置Fragment的布局文件 example_fragment.xml 步骤3:在Activity的.java文件中动态添加Fragment FragmentTransactionTest 动态添加碎片主要分为 5 步: ```cpp 1. 创建待添加的碎片实例 2. 获取 FragmentManager,在活动中可以直接调用 getSupportFragmentManager()方法得到 3. 开启一个事务,通过调用 beginTransaction()方法开启 4. 向容器内添加或替换碎片,使用 replace() 方法实现,需要传入容器的 id 和待添加的碎片实例。 5. 提交事务,调用 commit()方法来完成 public class FragmentTransactionTest extends Activity { @Override protected void onCreate(Bundle savedInstanceState) { super.onCreate(savedInstanceState); setContentView(R.layout.fragment_transaction_test); // 步骤1:获取FragmentManager FragmentManager fragmentManager = getFragmentManager(); // 步骤2:获取FragmentTransaction FragmentTransaction fragmentTransaction = fragmentManager.beginTransaction(); // 步骤3:创建需要添加的Fragment :ExampleFragment ExampleFragment fragment = new ExampleFragment(); // 步骤4:动态添加fragment // 即将创建的fragment添加到Activity布局文件中定义的占位符中(FrameLayout) fragmentTransaction.add(R.id.about_fragment_container, fragment); fragmentTransaction.commit(); } // 继承与Fragment public static class ExampleFragment extends Fragment { @Override public View onCreateView(LayoutInflater inflater, ViewGroup container, Bundle savedInstanceState) { return inflater.inflate(R.layout.example_fragment, container, false); // 将example_fragment.xml作为该Fragment的布局文件 } } }动态添加fragment常用的类: FragmentManager:用来管理Activity中的fragmentFragmentTransaction:事务,用来添加,移除,替换fragment, FragmentTransaction transaction = fm.benginTransatcion();//开启一个事务 transaction.add() ://往Activity中添加一个Fragment transaction.remove() ://从Activity中移除一个Fragment,如果被移除的Fragment没有添加到回退栈, //这个Fragment实例将会被销毁。 transaction.replace()://使用另一个Fragment替换当前的,实际上就是remove()然后add()的合体~ transaction.hide()://隐藏当前的Fragment,仅仅是设为不可见,并不会销毁 transaction.show()://显示之前隐藏的Fragment transaction.commit()://提交一个事务 detach():会将view从UI中移除,和remove()不同,此时fragment的状态依然由FragmentManager维护。注意:在用fragment的时候,可能会经常遇到这样Activity状态不一致:State loss这样的错误。主要是因为:commit方法一定要在Activity.onSaveInstance()之前调用。 值得注意的是:如果你喜欢使用Fragment,一定要清楚这些方法,哪个会销毁视图,哪个会销毁实例,哪个仅仅只是隐藏,这样才能更好的使用它们。 attach():重建view视图,附加到UI上并显示。a、比如:我在FragmentA中的EditText填了一些数据,当切换到FragmentB时,如果希望会到A还能看到数据,则适合你的就是hide和show;也就是说,希望保留用户操作的面板,你可以使用hide和show,当然了不要使劲在那new实例,进行下非null判断。 b、再比如:我不希望保留用户操作,你可以使用remove(),然后add();或者使用replace()这个和remove,add是相同的效果。 c、remove和detach有一点细微的区别,在不考虑回退栈的情况下,remove会销毁整个Fragment实例,而detach则只是销毁其视图结构,实例并不会被销毁。那么二者怎么取舍使用呢?如果你的当前Activity一直存在,那么在不希望保留用户操作的时候,你可以优先使用detach。 六、碎片的最佳实践-简易版的新闻应用在写代码之前想好自己的需求是什么那是非常重要的,需求:1. 分清楚双页模式和单页模式。让项目可以一套代码运行; 2. 单页模式下,有一个新闻列表,点击里面的新闻标题跳转到新闻详情页; 3. 双页模式下,左边是新闻列表,右边是新闻详情,点击左边的新闻列表,右边的新闻详情随之更新。 步骤如下: 1、创建项目,添加后面需要用到的 RecyclerView 依赖库: 2、新建完项目后,在activity_main里面放一个碎片,作为单页模式的新闻列表 : Manifest.xml activity_main 接下来,准备好一个新闻的实体类,新建类 News,代码如下所示: /** * 新闻实体类 */ public class News { private String title; // 新闻标题 private String content; // 新闻内容 public String getTitle() { return title; } public void setTitle(String title) { this.title = title; } public String getContent() { return content; } public void setContent(String content) { this.content = content; } }接着新建一个 news_content_frag.xml 布局,作为新闻内容的布局: 新闻内容的布局主要分为两个部分,头部显示新闻标题,正文显示新闻内容,中间使用一条细线分隔开; 然后再新建一个 NewsContentFragment 类,如下: /** * 新闻内容Fragment */ public class NewsContentFragment extends Fragment { private View view; public View onCreateView(LayoutInflater inflater, ViewGroup container, Bundle savedInstanceState) { //加载新闻布局 view = inflater.inflate(R.layout.news_content_frag,container,false); return view; } /** * 将新闻标题和新闻内容显示在界面上 用来刷新新闻详情 */ public void refresh(String newsTitle,String newsContent){ View visibilityLayout = view.findViewById(R.id.visibility_layout); visibilityLayout.setVisibility(View.VISIBLE);//把visibilityLayout设置成可见 TextView newsTitleText = (TextView) view.findViewById (R.id.news_title);//获取新闻标题控件 TextView newsContentText = (TextView) view.findViewById(R.id.news_content);//获取新闻正文控件 newsTitleText.setText(newsTitle);//刷新新闻标题 newsContentText.setText(newsContent);//刷新新闻内容 } }这样就把新闻内容的碎片和布局创建好了 但它们都是在双页模式下使用的,若要在单页模式中使用 还需创建一个活动 NewsContentActivity,其布局 news_content.xml 中的代码如下: 这里直接在布局中引入了 NewsContentFragment,相当于把 news_content_frag 布局的内容自动加了进来, 然后编写 NewsContentActivity 的代码,如下: /** * 单页模式 */ public class NewsContentActivity extends AppCompatActivity { /** * 构建Intent,传递所需数据 */ public static void actionStart(Context context,String newsTitle,String newsContent){ Intent intent = new Intent(context,NewsContentActivity.class); intent.putExtra("news_title",newsTitle); intent.putExtra("news_content",newsContent); context.startActivity(intent); } @Override protected void onCreate(Bundle savedInstanceState) { super.onCreate(savedInstanceState); setContentView(R.layout.news_content); //获取传入的新闻标题、新闻内容 String newsTitle = getIntent().getStringExtra("news_title"); String newsContent = getIntent().getStringExtra("news_content"); //获取NewsContentFragment 实例 NewsContentFragment newsContentFragment = (NewsContentFragment) getSupportFragmentManager().findFragmentById(R.id.news_content_fragment); //刷新NewsContentFragment 显示数据 newsContentFragment.refresh(newsTitle,newsContent); } }在 onCreate() 方法中通过 Intent 获取传入的新闻标题和内容 然后调用 FragmentManager 的 findFragmentById() 方法得到 NewsContentFragment 的实例 接着调用它的 refresh() 方法,并将新闻的标题和内容传入,显示数据 接下来还需再创建显示新闻列表的布局 news_title_frag.xml,如下: 新建 news_item.xml 作为 上述 RecyclerView 子项的布局: 子项的布局就只有一个 TextView 新闻列表和子项布局都创建好了,接下来就需要一个用于展示新闻列表的地方 这里新建 NewsTitleFragment 作为展示新闻列表的碎片: /** * 新闻列表fragment */ public class NewsTitleFragment extends Fragment{ private boolean isTowPane; @Override public View onCreateView(LayoutInflater inflater, ViewGroup container, Bundle savedInstanceState) { View view = inflater.inflate(R.layout.news_content_frag, container, false); return view; } @Override public void onActivityCreated(@Nullable Bundle savedInstanceState) { super.onActivityCreated(savedInstanceState); if (getActivity().findViewById(R.id.news_content_layout)!= null){ // 可以找到 news_content_layout 布局时,为双页模式 isTowPane = true; }else { // 找不到 news_content_layout 布局时,为单页模式 isTowPane = false; } } }为实现上述 onActivityCreated() 方法中判断当前时双页还是单页模式 接下来在 NewsTitleFragemt 中新建一个内部类 NewsAdapter 来作为 RecyclerView 的适配器 如下: public class NewsTitleFragment extends Fragment{ private boolean isTowPane; . . . /** * RecyclerViews适配器 * */ class NewsAdapter extends RecyclerView.Adapter { private List mNewsList; class ViewHolder extends RecyclerView.ViewHolder { TextView newsTitleText; public ViewHolder(View view) { super(view); newsTitleText = (TextView) view.findViewById(R.id.news_title);//新闻标题 } } public NewsAdapter(List newsList) { mNewsList = newsList; } @Override public ViewHolder onCreateViewHolder(ViewGroup parent, int viewType) { //加载布局 View view = LayoutInflater.from(parent.getContext()).inflate(R.layout.news_item, parent, false); //每个Item的点击事件 final ViewHolder holder = new ViewHolder(view); view.setOnClickListener(new View.OnClickListener() { @Override public void onClick(View v) { News news = mNewsList.get(holder.getAdapterPosition()); //如果是双页模式,则刷新NewsContentActivity中的数据 if (isTwoPane) { NewsContentFragment newsContentFragment = (NewsContentFragment) getFragmentManager().findFragmentById(R.id.news_content_fragment); newsContentFragment.refresh(news.getTitle(), news.getContent()); } else { //如果是单页模式,则直接启动NewsContentActivity NewsContentActivity.actionStart(getActivity(), news.getTitle(), news.getContent()); } } }); return holder; } @Override public void onBindViewHolder(ViewHolder holder, int position) { News news = mNewsList.get(position); holder.newsTitleText.setText(news.getTitle()); } @Override public int getItemCount() { return mNewsList.size(); } }需要注意的是,这里把适配器写成内部类是为了直接访问 NewsTitleFragment 的变量 比如:isTowPane 现在还剩最后一步收尾工作,就是向 RecyclerView 中填充数据了 修改 NewsTitleFragment 中的代码,如下所示: public class NewsTitleFragment extends Fragment{ . . . @Override public View onCreateView(LayoutInflater inflater, ViewGroup container, Bundle savedInstanceState) { View view = inflater.inflate(R.layout.news_title_frag, container, false); //RecyclerView实例 RecyclerView newsTitleRecyclerView = (RecyclerView) view.findViewById(R.id.news_title_recycler_view); LinearLayoutManager layoutManager = new LinearLayoutManager(getActivity()); newsTitleRecyclerView.setLayoutManager(layoutManager);//指定布局为线性布局 NewsAdapter adapter = new NewsAdapter(getNews());//把模拟新闻数据传入到NewsAdapter构造函数中 newsTitleRecyclerView.setAdapter(adapter);//完成适配器设置 return view; } @Override public void onActivityCreated(Bundle savedInstanceState) { super.onActivityCreated(savedInstanceState); if (getActivity().findViewById(R.id.news_content_layout) != null) { // 可以找到news_content_layout布局时,为双页模式 isTwoPane = true; } else { // 找不到news_content_layout布局时,为单页模式 isTwoPane = false; } } /** * 初始化50条模拟新闻数据 * @return */ private List getNews() { //创建集合 List newsList = new ArrayList(); //实例化数据 for (int i = 1; i |
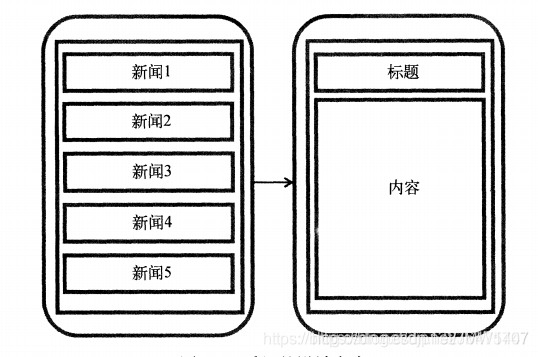 没用碎片在平板效果:
 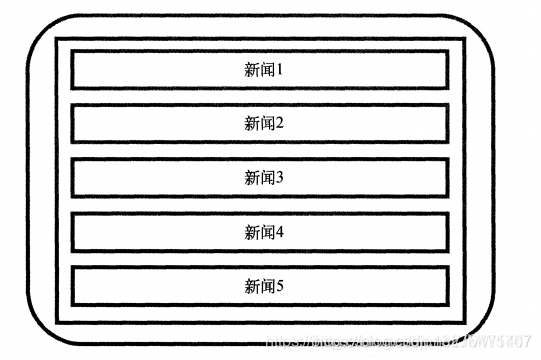 用碎片在平板效果:
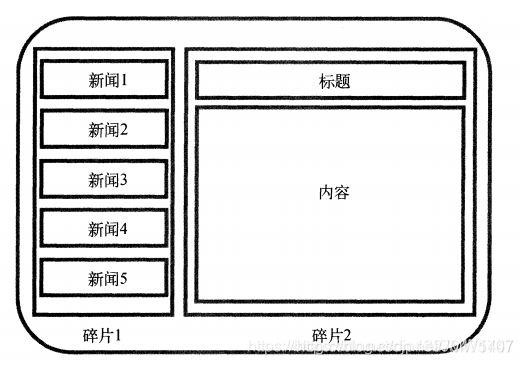
【本文地址】
今日新闻 |
推荐新闻 |