arcgis for javascript TileLayer 自定义高德地图图层 |
您所在的位置:网站首页 › 如何修改高德地图上的公司地址 › arcgis for javascript TileLayer 自定义高德地图图层 |
arcgis for javascript TileLayer 自定义高德地图图层
|
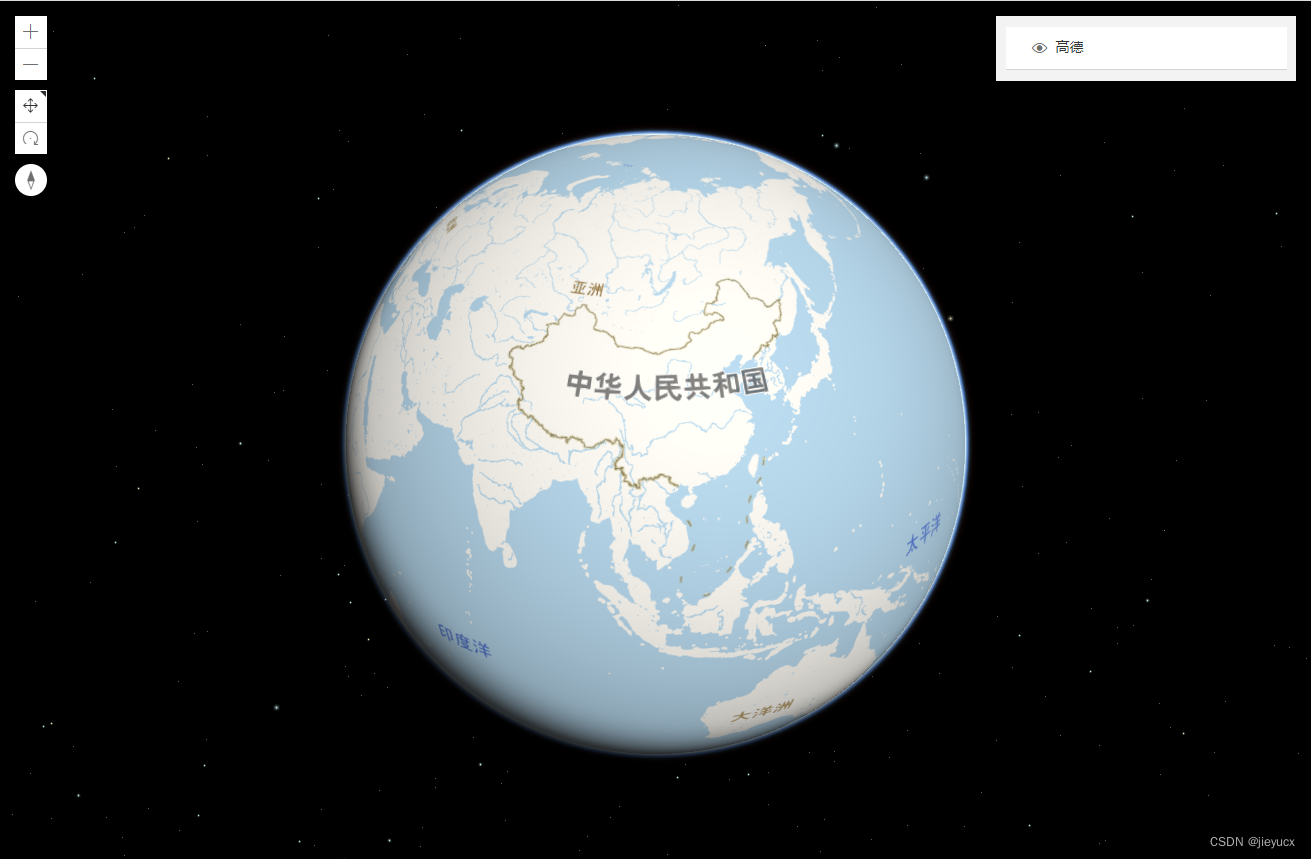
效果如图: 要创建自定义图块层,您必须调用BaseTileLayer类的createSubclass()方法。命名自定义层为TintLayer 由于这一层需要知道在哪里访问预定义的图块,我们将创建一个属性。应用程序将为图层提供值,图层将从生成的 URL 中获取切片。然后在显示每个图像之前将差异混合操作应用于 Stamen 块。我们将在该层上创建一个属性,以便应用程序可以指定一种颜色,该颜色将用于混合操作 const TintLayer = BaseTileLayer.createSubclass({ // 设置特定于此图层的特性 properties: { // tile的url,由应用程序提供 urlTemplate: null, // 更改图层颜色 tint: { value: null, type: Color } } });可以通过两种不同的方式扩展 BaseTileLayer: 请求图块,因为它们是从数据源预定义的图像或数据需要在视图中显示之前进行预处理 二、请求图块要请求从数据源预定义的图像,请覆盖getTileUrl()方法,以便它返回给定级别、行和列的所请求图块的 URL。 const MyCustomTileLayer = BaseTileLayer.createSubclass({ properties: { urlTemplate: null }, // 重写getTileUrl() // 为LayerView提供的给定级别、行和列生成tile url getTileUrl: function(level, row, col) { return this.urlTemplate .replace("{z}", level) .replace("{x}", col) .replace("{y}", row); } }); 三. 图像或数据在视图中显示之前需要进行预处理如果数据或图块需要在显示前进行预处理,则覆盖fetchTile()方法。图像和颜色混合后,最终结果将显示在视图中 const TintLayer = BaseTileLayer.createSubclass({ properties: { urlTemplate: null, tint: { value: null, type: Color, }, }, //为LayerView提供的给定级别、行和列生成tile url getTileUrl: function (level, row, col) { return this.urlTemplate.replace("{z}", level).replace("{x}", col).replace("{y}", row); }, // 此方法获取指定级别和大小的瓦片 // 重写此方法以处理从服务器返回的数据 fetchTile: function (level, row, col, options) { // 调用getTileUrl()方法来构造tiles的URL // 对于LayerView提供的给定级别、行和列 const url = this.getTileUrl(level, row, col); // 基于生成的url请求平铺 // the signal option 确保废弃的请求被中止 return esriRequest(url, { responseType: "image", signal: options && options.signal, }).then( function (response) { // esri请求解析成功时 // 从响应中获取图像 const image = response.data; const width = this.tileInfo.size[0]; const height = this.tileInfo.size[0]; // 使用二维渲染上下文创建画布 const canvas = document.createElement("canvas"); const context = canvas.getContext("2d"); canvas.width = width; canvas.height = height; // 将应用程序提供的色调应用于画布 if (this.tint) { // 获取一个rgba形式的CSS颜色字符串,表示tint color实例. context.fillStyle = this.tint.toCss(); context.fillRect(0, 0, width, height); // 在画布和steman平铺之间应用“差异”混合操作。差值混合操作从顶层(瓦片)中减去底层(画布),或者反过来总是得到一个正值 context.globalCompositeOperation = "difference"; } //将混合图像绘制到画布上。 context.drawImage(image, 0, 0, width, height); return canvas; }.bind(this) ); }, }); 四、使用自定义切片层 // 创建TintLayer的新实例并设置其属性 let jianyueTileLayer = new TintLayer({ urlTemplate: "http://webst01.is.autonavi.com/appmaptile?style=7&x={x}&y={y}&z={z}", title: "高德", }); // 将自定义平铺层的新实例添加到地图 const map = new Map({ layers: [jianyueTileLayer], }); // 创建新的场景视图并添加贴图 const view = new SceneView({ container: "viewDiv", map: map, center: [0, 30], zoom: 3, environment: { lighting: { type: "virtual", }, }, }); 五、完整代码如下: Custom TileLayer html, body, #viewDiv { padding: 0; margin: 0; height: 100%; width: 100%; } require([ "esri/Map", "esri/request", "esri/Color", "esri/views/SceneView", "esri/widgets/LayerList", "esri/layers/BaseTileLayer", ], (Map, esriRequest, Color, SceneView, LayerList, BaseTileLayer) => { // ******************************************************* // 自定义图层类代码 // 创建一个BaseTileLayer的子类 // ******************************************************* const TintLayer = BaseTileLayer.createSubclass({ properties: { urlTemplate: null, tint: { value: null, type: Color, }, }, //为LayerView提供的给定级别、行和列生成tile url getTileUrl: function (level, row, col) { return this.urlTemplate.replace("{z}", level).replace("{x}", col).replace("{y}", row); }, // 此方法获取指定级别和大小的瓦片 // 重写此方法以处理从服务器返回的数据 fetchTile: function (level, row, col, options) { // 调用getTileUrl()方法来构造tiles的URL // 对于LayerView提供的给定级别、行和列 const url = this.getTileUrl(level, row, col); // 基于生成的url请求平铺 // the signal option 确保废弃的请求被中止 return esriRequest(url, { responseType: "image", signal: options && options.signal, }).then( function (response) { // esri请求解析成功时 // 从响应中获取图像 const image = response.data; const width = this.tileInfo.size[0]; const height = this.tileInfo.size[0]; // 使用二维渲染上下文创建画布 const canvas = document.createElement("canvas"); const context = canvas.getContext("2d"); canvas.width = width; canvas.height = height; // 将应用程序提供的色调应用于画布 if (this.tint) { // 获取一个rgba形式的CSS颜色字符串,表示tint color实例. context.fillStyle = this.tint.toCss(); context.fillRect(0, 0, width, height); // 在画布和steman平铺之间应用“差异”混合操作。差值混合操作从顶层(瓦片)中减去底层(画布),或者反过来总是得到一个正值 context.globalCompositeOperation = "difference"; } //将混合图像绘制到画布上。 context.drawImage(image, 0, 0, width, height); return canvas; }.bind(this) ); }, }); let jianyueTileLayer = new TintLayer({ urlTemplate: "http://webst01.is.autonavi.com/appmaptile?style=7&x={x}&y={y}&z={z}", title: "高德", }); // 将自定义平铺层的新实例添加到地图 const map = new Map({ layers: [jianyueTileLayer], }); // 创建新的场景视图并添加贴图 const view = new SceneView({ container: "viewDiv", map: map, center: [0, 30], zoom: 3, environment: { lighting: { type: "virtual", }, }, }); // 创建图层列表小部件 const layerList = new LayerList({ view: view, }); view.ui.add(layerList, "top-right"); }); |
【本文地址】
今日新闻 |
推荐新闻 |