【JDBC从入门到实战】JDBC基础通关教程(全面总结上篇) |
您所在的位置:网站首页 › 外汇实战操作视频讲解大全 › 【JDBC从入门到实战】JDBC基础通关教程(全面总结上篇) |
【JDBC从入门到实战】JDBC基础通关教程(全面总结上篇)
|
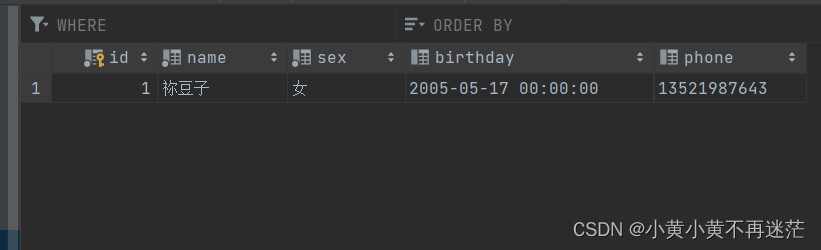
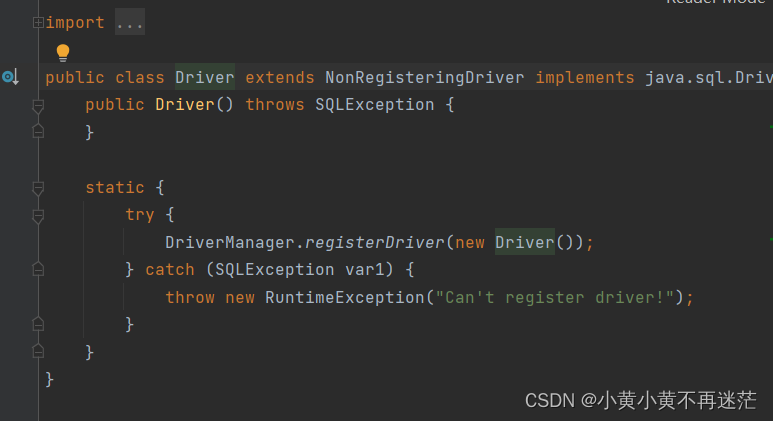
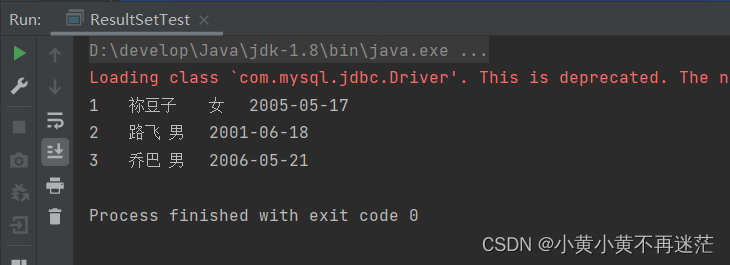
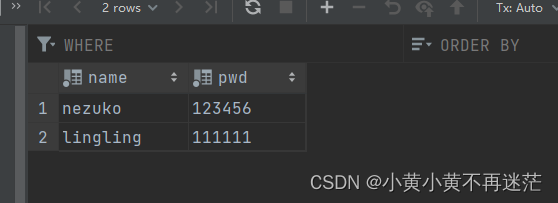
💁 个人主页:黄小黄的博客主页 ❤️ 支持我:👍 点赞 🌷 收藏 🤘关注 🎏 格言:一步一个脚印才能承接所谓的幸运 本文来自专栏:JDBC从入门到实战 欢迎点击支持订阅专栏 ❤️ 🆔 简介: JDBC为 访问不同的数据库 提供了统一的接口,为使用者屏蔽了很多细节问题;Java程序员通过使用JDBC,可以 连接任何提供了JDBC驱动程序的数据库系统,从而可以完成对数据库的各种操作。🐰 JDBC原理示意图: 下面我们通过JDBC对表 student 进行添加,删除和修改操作,以下为创建表结构的相关代码: CREATE DATABASE mysqlforjdbctest; USE mysqlforjdbctest; CREATE TABLE student ( -- 学生表 id INT PRIMARY KEY AUTO_INCREMENT, -- 学号 name VARCHAR(20) NOT NULL DEFAULT '', -- 姓名 sex CHAR(1) NOT NULL DEFAULT '', -- 性别 birthday DATETIME, -- 生日 phone VARCHAR(12) -- 手机号 );然后,我们先打开 idea 进行操作准备,将 mysql对应的连接驱动导入到项目目录下,具体见博主这篇文章的第一节内容: 如何通过JDBC访问Mysql数据库? 🐱 JDBCtest01代码: 对于代码中的 url 几点说明: jdbc:mysql 表示协议,通过jdbc的方式连接mysql;localhost 主机,也可以是ip地址;3306 表示 mysql 监听的端口;mysqlforjdbctest 连接到 mysql 具体哪个数据库。其余见代码注释: package com.hxh.jdbc; import com.mysql.jdbc.Driver; import java.sql.Connection; import java.sql.SQLException; import java.sql.Statement; import java.util.Properties; /** * @author 小黄小黄不再迷茫 * @version 1.0 */ public class JDBC01 { public static void main(String[] args) throws SQLException { // 1. 注册驱动 Driver driver = new Driver(); // 创建driver对象 // 2. 得到连接 // jdbc:mysql 表示协议,通过jdbc的方式连接mysql // localhost 主机,也可以是ip地址 // 3306 表示 mysql 监听的端口 // mysqlforjdbctest 连接到 mysql 具体哪个数据库 String url = "jdbc:mysql://localhost:3306/mysqlforjdbctest"; // 将 用户名和密码放入 Properties 对象中 Properties properties = new Properties(); properties.setProperty("user", "root"); // 用户 properties.setProperty("password", "111"); // 密码(填入自己用户名对应的密码) // 根据给定的 url 连接数据库 Connection connect = driver.connect(url, properties); // 3. 执行 sql String sql = "INSERT INTO student VALUES(null, '祢豆子', '女', '2005-05-17', '13521987643')"; // statement 用于执行静态SQL语句并返回其生成结果的对象 Statement statement = connect.createStatement(); int rows = statement.executeUpdate(sql); // 如果是 DML 语句,则返回影响的行数 System.out.println(rows > 0 ? "操作成功!" : "操作失败!"); // 4. 关闭连接 statement.close(); connect.close(); } }🍑 运行结果及表的变化: 方式 1️⃣ 获取 Driver 实现类对象 Driver driver = new com.mysql.jdbc.Driver(); String url = "jdbc:mysql://localhost:3306/mysqlforjdbctest"; Properties properties = new Properties(); properties.setProperty("user", "root"); // 用户 properties.setProperty("password", "111"); // 密码 Connection connection = driver.connect(url, properties);代码中使用了 com.mysql.jdbc.Driver(), 属于静态加载,灵活性较差,依赖性强, 因此推出方式二。 方式 2️⃣ 使用反射机制获取 Class clazz = Class.forName("com.mysql.jdbc.Driver"); Driver driver = (Driver)clazz.newInstance(); String url = "jdbc:mysql://localhost:3306/mysqlforjdbctest"; Properties properties = new Properties(); properties.setProperty("user", "root"); // 用户 properties.setProperty("password", "111"); // 密码 Connection connection = driver.connect(url, properties);方式 3️⃣ 使用 DriverManager 替换 Driver 进行统一管理, 相对来说,扩展性更强 Class clazz = Class.forName("com.mysql.jdbc.Driver"); Driver driver = (Driver)clazz.newInstance(); String url = "jdbc:mysql://localhost:3306/mysqlforjdbctest"; String user = "root"; String password = "111"; DriverManager.registerDriver(driver); // 注册Driver驱动 Connection connection = DriverManager.getConnection(url, user, password);方式 4️⃣ 使用 Class.forName 自动完成注册驱动,代码更加简洁 Class clazz = Class.forName("com.mysql.jdbc.Driver"); String url = "jdbc:mysql://localhost:3306/mysqlforjdbctest"; String user = "root"; String password = "111"; Connection connection = DriverManager.getConnection(url, user, password); 下图为 Driver 类的源码,可以看出,静态代码块中进行了异常处理,在类加载的时候会执行一次。而在 DriverManager.register(new Driver()) 实际上就是在注册驱动,由于代码的简洁性,方式四也是实际开发中使用最多的方式。 方式 5️⃣ 使用配置文件,实际上为方式四的优化,使连接数据库更加灵活~ 首先,在 src 目录下新建文件mysql.properties; mysql.properties 配置文件中存入用户名、密码、url与driver信息,并保存。如下图: 在对应类中,编写相应的代码 // 通过 Properties 对象获取配置文件的信息 Properties properties = new Properties(); properties.load(new FileInputStream("src\\mysql.properties")); // 获取相关的值 String user = properties.getProperty("user"); String password = properties.getProperty("password"); String url = properties.getProperty("url"); String driver = properties.getProperty("driver"); Class.forName(driver); Connection connection = DriverManager.getConnection(url, user, password); 3 ResultSet结果集 3.1 ResultSet结果集说明🆔 简介: 表示 数据库结果集的数据表, 通常通过执行查询数据库的语句生成;ResultSet 对象 保持一个光标指向其当前的数据行。最初,光标位于第一行之前;next 方法将光标移动到下一行,并且由于 ResultSet 对象中 没有更多行时返回 false, 结合 while 循环可以遍历结果集。 3.2 ResultSet结果集案例🐰 首先,先执行下面的代码,为 student 表添加数据,便于测试。 INSERT INTO student VALUES (NULL, '路飞', '男', '2001-06-18', '13624567845'); INSERT INTO student VALUES (NULL, '乔巴', '男', '2006-05-21', '13824063845');⌨️ 示例代码如下: 代码中,statement的方法executeQuery(sql)返回单个ResultSet的对象。 具体见代码的注释: package com.hxh.jdbc; import java.io.FileInputStream; import java.io.FileNotFoundException; import java.io.IOException; import java.sql.*; import java.util.Date; import java.util.Properties; /** * @author 小黄小黄不再迷茫 * @version 1.0 */ public class ResultSetTest { public static void main(String[] args) throws IOException, ClassNotFoundException, SQLException { Properties properties = new Properties(); properties.load(new FileInputStream("src\\mysql.properties")); // 获取相关的值 String user = properties.getProperty("user"); String password = properties.getProperty("password"); String url = properties.getProperty("url"); String driver = properties.getProperty("driver"); // 1. 注册驱动 Class.forName(driver); // 2. 得到连接 Connection connection = DriverManager.getConnection(url, user, password); // 3. 得到Statement Statement statement = connection.createStatement(); // 4. 组织Sql String sql = "SELECT id, name, sex, birthday FROM student"; // 执行给定的SQL语句,该语句返回单个 ResultSet 对象 ResultSet resultSet = statement.executeQuery(sql); // 5. 使用while取出数据 while (resultSet.next()){ // 让光标向后移动,如果没有更多行,则退出循环 int id = resultSet.getInt(1); // 获取该行的第一列 String name = resultSet.getString(2); // 获取该行第二列 String sex = resultSet.getString(3); // 获取该行第三列 Date date = resultSet.getDate(4); // 获取该行第四列 System.out.println(id + "\t" + name + "\t" + sex + "\t" + date); } // 6. 关闭连接 resultSet.close(); statement.close(); connection.close(); } }🍑 实现结果: 🆔 简介: Statement对象用于执行静态SQL语句并返回其生成结果的对象;在连接建立后,需要对数据库进行访问。无论是执行命令还是SQL语句,都可以通过Statement(存在sql注入)、PreparedStatement(预处理)、CallableStatement(存储过程) 来进行;通过Statement对象执行SQL语句,存在SQL注入风险! 要防范SQL注入,通过使用Statement扩展而来的PreparedStatement取代Statement即可。🐰 何为SQL注入? 答:SQL注入是利用某些系统没有对用户输入的数据进行充分的检查,而在用户输入数据中注入非法的SQL语句段或者命令,恶意攻击数据库! 🐰 首先,通过下面的语句,在数据库中创建一个新表,admin,存储用户名和密码: CREATE TABLE admin ( -- 管理员表 name VARCHAR(20) NOT NULL DEFAULT '', -- 用户名 pwd VARCHAR(20) NOT NULL DEFAULT '' -- 密码 ); INSERT INTO admin VALUES ('nezuko', '123456'); INSERT INTO admin VALUES ('lingling', '111111');
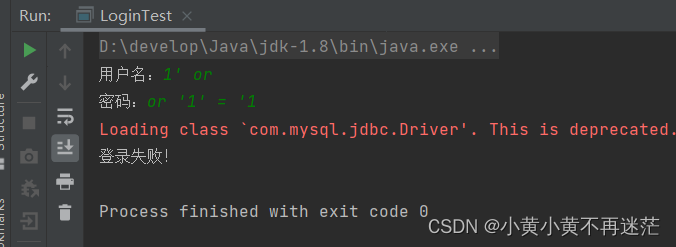
⌨️ 示例代码如下: package com.hxh.jdbc; import java.io.FileInputStream; import java.io.FileNotFoundException; import java.io.IOException; import java.sql.*; import java.util.Date; import java.util.Properties; import java.util.Scanner; /** * @author 小黄小黄不再迷茫 * @version 1.0 */ public class LoginTest { public static void main(String[] args) throws IOException, SQLException, ClassNotFoundException { Scanner scanner = new Scanner(System.in); // 用户输入用户名和密码 System.out.print("用户名:"); String admin_name = scanner.nextLine(); System.out.print("密码:"); String admin_pwd = scanner.nextLine(); // 通过Properties对象获取配置文件信息 Properties properties = new Properties(); properties.load(new FileInputStream("src\\mysql.properties")); // 获取相关的值 String user = properties.getProperty("user"); String password = properties.getProperty("password"); String url = properties.getProperty("url"); String driver = properties.getProperty("driver"); // 1. 注册驱动 Class.forName(driver); // 2. 得到连接 Connection connection = DriverManager.getConnection(url, user, password); // 3. 得到Statement Statement statement = connection.createStatement(); // 4. 组织Sql String sql = "SELECT name, pwd FROM admin WHERE name ='" + admin_name + "' AND pwd = '" + admin_pwd + "'"; // 执行给定的SQL语句,该语句返回单个 ResultSet 对象 ResultSet resultSet = statement.executeQuery(sql); if(resultSet.next()){// 如果查询到一条记录,则说明用户存在 System.out.println("登录成功!"); }else { System.out.println("登录失败!"); } // 5. 关闭连接 resultSet.close(); statement.close(); connection.close(); } }🍎 演示环节: 尝试 输入正确的用户名和密码: 尝试 输入错误用户名和密码: 尝试 输入错误用户名和密码:  用户恶意SQL注入: 用户恶意SQL注入: 
由于 Statement 没有对用户的输入进行预处理,而判断是否登录的逻辑恰巧又是用户输入的用户名和密码的拼接,导致了用户恶意注入万能用户名和密码,检验通过的情况~~ 4.3 PreparedStatement 预处理查询🆔 简介: PreparedStatement 类图: PreparedStatement 执行的 SQL 语句中的参数用(?)来表示,调用PreparedStatement对象的setXxx()方法设置参数。第一个参数是要设置的 SQL 语句中的参数索引(从1开始),第二个是设置的SQL语句中的参数的值;executeQuery(),返回 ResultSet结果集对象;executeUpdate(),执行更新,比如增删改操作。 PreparedStatement 执行的 SQL 语句中的参数用(?)来表示,调用PreparedStatement对象的setXxx()方法设置参数。第一个参数是要设置的 SQL 语句中的参数索引(从1开始),第二个是设置的SQL语句中的参数的值;executeQuery(),返回 ResultSet结果集对象;executeUpdate(),执行更新,比如增删改操作。
🐱 PreparedStatement 带来的好处: 不再需要使用 + 来拼接 sql 语句,可以一定程度上减少语法错误;有效解决了sql注入问题;大大减少了编译次数,效率较高。 4.4 使用预处理解决SQL注入🐱 还是之前登录的例子,只不过使用的是PreparedStatement,具体代码如下,步骤可见注释: package com.hxh.jdbc; import java.io.FileInputStream; import java.io.FileNotFoundException; import java.io.IOException; import java.sql.*; import java.util.Date; import java.util.Properties; import java.util.Scanner; /** * @author 小黄小黄不再迷茫 * @version 1.0 */ public class LoginTest { public static void main(String[] args) throws IOException, SQLException, ClassNotFoundException { Scanner scanner = new Scanner(System.in); // 用户输入用户名和密码 System.out.print("用户名:"); String admin_name = scanner.nextLine(); System.out.print("密码:"); String admin_pwd = scanner.nextLine(); // 通过Properties对象获取配置文件信息 Properties properties = new Properties(); properties.load(new FileInputStream("src\\mysql.properties")); // 获取相关的值 String user = properties.getProperty("user"); String password = properties.getProperty("password"); String url = properties.getProperty("url"); String driver = properties.getProperty("driver"); // 1. 注册驱动 Class.forName(driver); // 2. 得到连接 Connection connection = DriverManager.getConnection(url, user, password); // 3. 得到 PreparedStatement // 3.1 组织Sql, ? 相当于占位符 String sql = "SELECT name, pwd FROM admin WHERE name = ? AND pwd = ?"; // 3.2 preparedStatement 对象实现了 PreparedStatement接口 PreparedStatement preparedStatement = connection.prepareStatement(sql); // 3.3 给 ? 赋值 preparedStatement.setString(1, admin_name); preparedStatement.setString(2, admin_pwd); // 4. 执行 select 使用 executeQuery, 如果执行的是 dml语句, 则使用 executeUpdate ResultSet resultSet = preparedStatement.executeQuery(); if(resultSet.next()){// 如果查询到一条记录,则说明用户存在 System.out.println("登录成功!"); }else { System.out.println("登录失败!"); } // 5. 关闭连接 resultSet.close(); preparedStatement.close(); connection.close(); } }🍎 实现结果: 🌟以上便是本文的全部内容啦,后续内容将会持续免费更新,如果文章对你有所帮助,麻烦动动小手点个赞 + 关注,非常感谢 ❤️ ❤️ ❤️ ! 如果有问题,欢迎私信或者评论区! 共勉:“你间歇性的努力和蒙混过日子,都是对之前努力的清零。” |

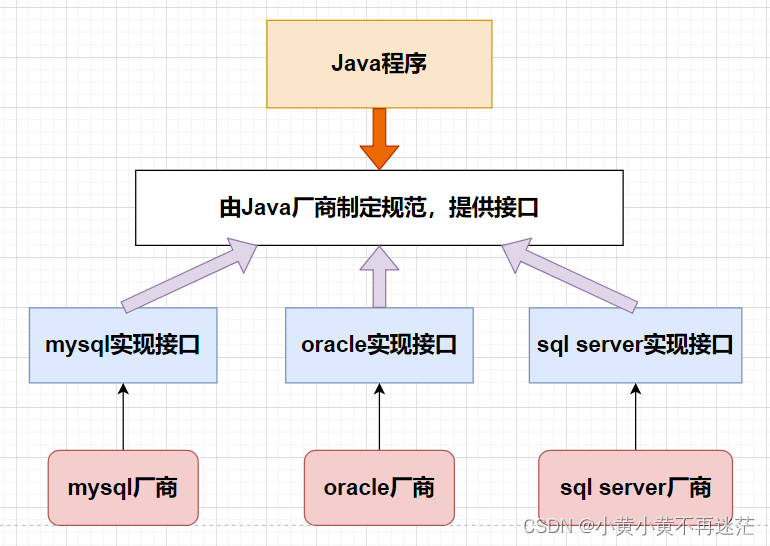 说明: JDBC归根到底是让开发者能够通过Java程序访问到各类支持的数据库系统。然而,各数据库的厂商可能不同,比如甲骨文公司、微软公司… … 由于我们并不清楚各厂商数据库系统的底层结构,且如果操作不同的数据库,我们使用的方法不统一,这样很不利于程序管理。 试想一下,假如你是 Java厂商的开发者,好不容易掉头发编写完了支持 Mysql的代码,但是 Mysql版本迭代升级了… … 你必须重新编写代码,来支持高版本的数据库! 为了解决上述问题,可以 由 Java程序公司制定一系列的规范,提供一些接口供数据库厂商实现。支持的数据库厂商可以通过实现相应的接口,使得Java程序能够访问、操作数据库。
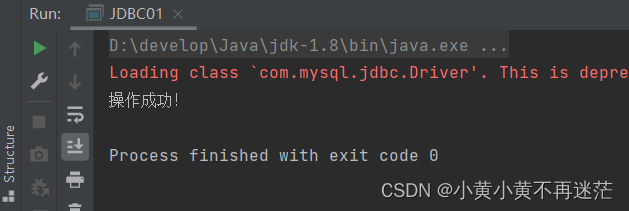


 解决了sql注入问题!

【本文地址】