python基于OpenCV预测图片中目标的实际尺寸(计算机视觉) |
您所在的位置:网站首页 › 图片中物体的尺寸测量 › python基于OpenCV预测图片中目标的实际尺寸(计算机视觉) |
python基于OpenCV预测图片中目标的实际尺寸(计算机视觉)
|
摘要
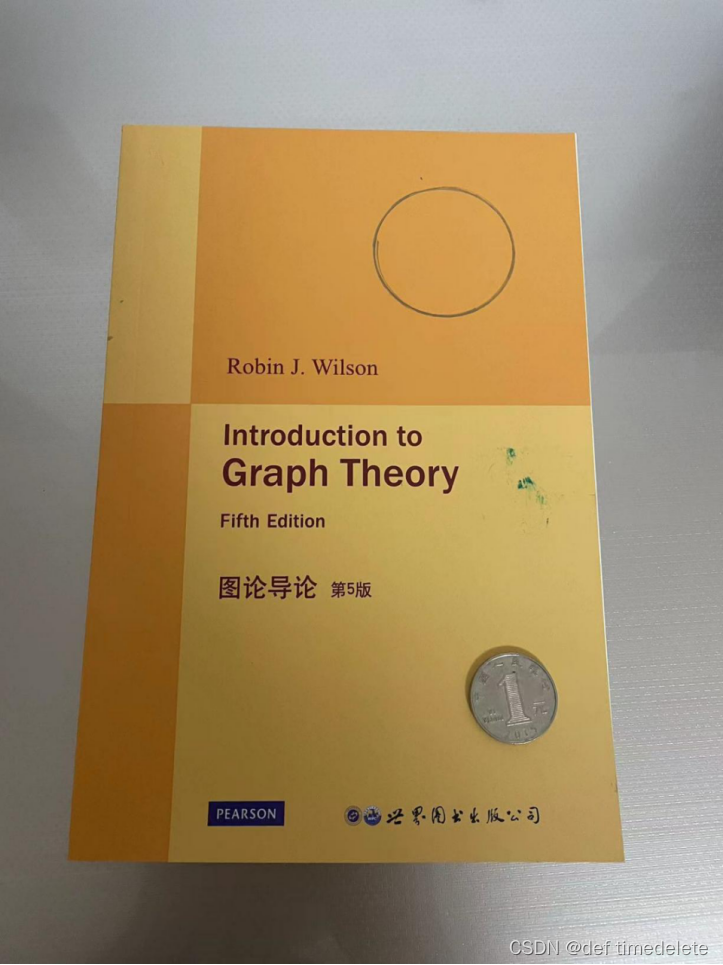
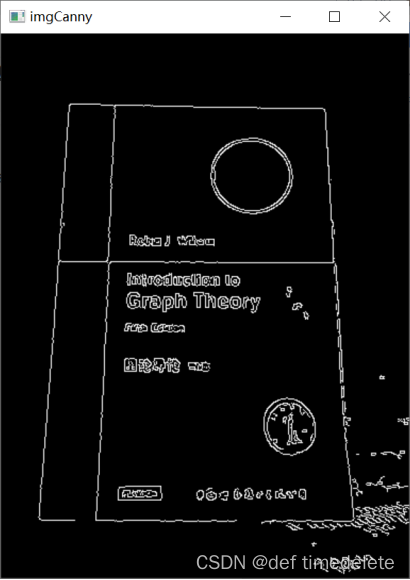
本次实验需要根据已知的硬币的直径,预测图片中书本的长与宽以及书本右上方用铅笔画的圆圈的外圆直径。可以先对图片进行矫正,找到硬币的轮廓并计算硬币直径占据的像素大小,进而得到实际尺寸和像素的比例系数,然后找到书本和铅笔绘制的圆圈的轮廓,再根据它们的轮廓占据的像素大小和比例系数估计出二者的实际尺寸大小。预测的书书本的长为:20.150000厘米,书本的宽为:15.250000厘米,书本右上方用铅笔画的圆圈的外圆直径为:4.100000厘米。 1、引言问题重述:已知书本上右下角放一枚一元人民币(直径2.5厘米),请利用计算机视觉技术预测图片中目标的实际尺寸。 1.预测图片中书本的长与宽(单位:厘米)。 2预测书本右上方用铅笔画的圆圈的外圆直径(单位:厘米)。 本次实验我先根据已有的相关解决办法,参照已有的代码,进行修改。 其中,首先修改的部分就是Canny算子边缘检测的阈值。 imgCanny = cv2.Canny(imgBlur, 35, 70)我发现上述的结果为最佳。 其次修改的就是定义形状检测函数部分。在测试过程中,我发现书本、手动绘制的圆圈、硬币的轮廓边缘都被当成圆处理(可能是书本的轮廓边缘没有完全闭合的缘故),于是我定义一个Circle列表存储这些轮廓,而且从绘制的轮廓图可知书本、手动绘制的圆圈、硬币刚好是面积最大的几个轮廓。 于是可以先获取书本轮廓占据的像素大小,再把书本轮廓从Circle中删去。以此类推,分别得到铅笔绘制的圆圈和硬币轮廓占据的像素大小。最后代入硬币的实际尺寸2.5厘米,得到实际尺寸和像素的比例系数,再分别与书本、铅笔绘制的圆圈轮廓占据的像素大小相乘,得到书本和铅笔绘制的圆圈估计的实际尺寸大小。运行过程中,因为拍摄角度、反光、阴影等问题绘制边框时会有误差,导致硬币和铅笔绘制的圆圈的边界框不是正方形进而产生估计的误差。我采用长和宽的平均值代替直径,去计算比例系数和铅笔绘制的圆圈的估计的实际尺寸大小。 # 定义查找书本、手绘圆圈、硬币轮廓并绘制边界框 def draw_Shape(image, counters): max_area = 0 shape_contour = None for contour in counters: area = cv2.contourArea(contour) if max_area < area: max_area = area shape_contour = contour cv2.drawContours(image, shape_contour, -1, (255, 0, 0), 4) # 绘制轮廓线 perimeter = cv2.arcLength(shape_contour, True) # 计算轮廓周长 approx = cv2.approxPolyDP(shape_contour, 0.02 * perimeter, True) # 获取轮廓角点坐标 CornerNum = len(approx) # 轮廓角点的数量 x, y, w, h = cv2.boundingRect(approx) # 获取坐标值和宽度、高度 cv2.rectangle(image, (x, y), (x + w, y + h), (0, 0, 255), 2) # 绘制边界框 return shape_contour, w, h # 定义轮廓集合删去最大的轮廓 def del_max_contours(contours, contour): new_contours = [] for circle in contours: if np.array_equal(circle, contour): continue else: new_contours.append(circle) return new_contours # 定义形状检测函数 def ShapeDetection(img): contours, hierarchy = cv2.findContours(img, cv2.RETR_EXTERNAL, cv2.CHAIN_APPROX_NONE) # 寻找轮廓点 Circle = [] for obj in contours: area = cv2.contourArea(obj) # 计算轮廓内区域的面积 cv2.drawContours(imgContour, obj, -1, (255, 0, 0), 4) # 绘制轮廓线 perimeter = cv2.arcLength(obj, True) # 计算轮廓周长 approx = cv2.approxPolyDP(obj, 0.02 * perimeter, True) # 获取轮廓角点坐标 CornerNum = len(approx) # 轮廓角点的数量 x, y, w, h = cv2.boundingRect(approx) # 获取坐标值和宽度、高度 if CornerNum > 4: Circle.append(obj)最终结果:
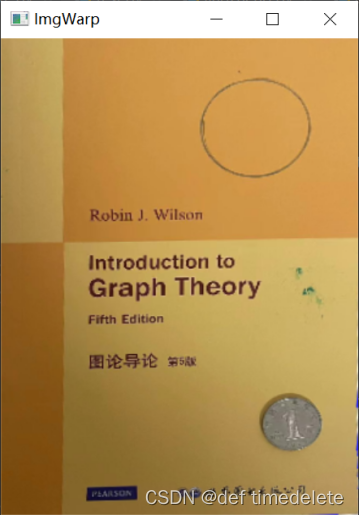
但是,因为图片没有得到矫正的缘故,所以预测的数值会有部分误差。于是,我上网查询如何对图片矫正,再进行测量。通过反复测试,以下参数进行轮廓的完整绘制。 # 高斯模糊 imgBlur = cv2.GaussianBlur(imgGray, (9, 9), 0) # Canny算子边缘检测 imgCanny = cv2.Canny(imgBlur, 20, 52) kernel = np.ones((5, 5)) imgDial = cv2.dilate(imgCanny, kernel, iterations=6) # 膨胀 imgThre = cv2.erode(imgDial, kernel, iterations=5) # 腐蚀然后通过书本边缘点对书本进行矫正,并且在矫正过程中已经能够得到书本的轮廓的尺寸(像素)。 # 将轮廓拐点重新排列的方法 def reorder(myPoints): myPointsNew = np.zeros_like(myPoints) myPoints = myPoints.reshape((4, 2)) add = myPoints.sum(1) myPointsNew[0] = myPoints[np.argmin(add)] myPointsNew[3] = myPoints[np.argmax(add)] diff = np.diff(myPoints, axis=1) myPointsNew[1] = myPoints[np.argmin(diff)] myPointsNew[2] = myPoints[np.argmax(diff)] return myPointsNew # 图像矫正的方法 def warpImg(img, points, w, h, pad=6): points = reorder(points) pts1 = np.float32(points) pts2 = np.float32([[0, 0], [w, 0], [0, h], [w, h]]) matrix = cv2.getPerspectiveTransform(pts1, pts2) imgWrap = cv2.warpPerspective(img, matrix, (w, h)) imgWrap = imgWrap[pad:imgWrap.shape[0] - pad, pad:imgWrap.shape[1] - pad] return imgWrap # 定义形状检测函数 def ShapeDetection(img): contours, hierarchy = cv2.findContours(img, cv2.RETR_EXTERNAL, cv2.CHAIN_APPROX_NONE) # 寻找轮廓点 Rectangle = [] for obj in contours: area = cv2.contourArea(obj) # 计算轮廓内区域的面积 cv2.drawContours(imgContour, obj, -1, (255, 0, 0), 4) # 绘制轮廓线 perimeter = cv2.arcLength(obj, True) # 计算轮廓周长 approx = cv2.approxPolyDP(obj, 0.02 * perimeter, True) # 获取轮廓角点坐标 CornerNum = len(approx) # 轮廓角点的数量 x, y, w, h = cv2.boundingRect(approx) # 获取坐标值和宽度、高度 if CornerNum == 4: Rectangle.append([obj, area, approx, h, w]) Rectangle = sorted(Rectangle, key=lambda x: x[1], reverse=True) book_approx = Rectangle[0][2] w = Rectangle[0][4] h = Rectangle[0][3] img_warp = warpImg(imgContour, book_approx, w, h) return img_warp, h, w矫正后图片:
矫正之后的任务就是找出硬币的轮廓以及大圆的轮廓。这个步骤我本来是用刚开始的形状识别的方式去寻找轮廓点大于四个的形状,但是绘制后的结果并不理想,圆的形状近似椭圆,所以采用霍夫变换——霍夫圆检测。 # 高斯模糊 imgBlur = cv2.GaussianBlur(imgGray, (7, 7), 0) # 霍夫变换 circles = cv2.HoughCircles(imgBlur, cv2.HOUGH_GRADIENT, 1, 50, param1=20, param2=54, minRadius=10, maxRadius=1000) print(circles[0]) if circles is not None: circles = np.round(circles[0, :]).astype("int") for (x, y, r) in circles: cv2.circle(imgWarpContour, (x, y), r, (0, 255, 0), 2)绘制结果:
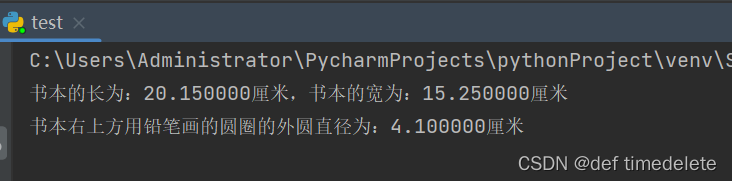
最后就是根据霍夫变换检测出来的硬币的轮廓的直径,与实际的直径尺寸得到比例系数,进而得到预测的书本长和宽,铅笔绘制的圆的直径。 3、实验结果
我认为本次的实验结果已经符合预期。 在没有对图片进行矫正前,我所绘制的轮廓会因为图片反光、阴影、倾斜角度等的干扰而导致有较大误差。图片矫正后,排除了一些干扰因素,比如减小倾斜角度、反光等,使得得到的轮廓的误差减小了。 但是矫正后的图片仍然存在一些干扰因素,比如铅笔绘制的圆以及硬币的边界线都存在重影问题,导致绘制的轮廓仍有误差。 4、结论本次实验,主要的问题就是如何提取书本、硬币、铅笔绘制的圆的轮廓,未矫正的图片绘制的轮廓会有很大误差,矫正后的图片绘制的轮廓误差明显减小。我提出了一个基于OpenCV实现检测的方法,并通过Python代码展示了具体实现过程。该方法可用于检测图片中图形物体的位置和半径,进而预测物体尺寸。 先对书本进行高斯滤波,Canny算子检测边缘,再通过膨胀和腐蚀连接用来填充物体内的小空洞,连接断开的轮廓线。然后可以得到书本的四个边缘点,再根据这些边缘点进行透视变换,得到图片矫正的效果。接着利用霍夫变换进行圆检测,得到硬币和大圆的半径,最后得到结果。 因为已经消除大部分的干扰因素,所以我觉得预测结果符合预期。 完整代码 import cv2 import numpy as np # 将轮廓拐点重新排列的方法 def reorder(myPoints): myPointsNew = np.zeros_like(myPoints) myPoints = myPoints.reshape((4, 2)) add = myPoints.sum(1) myPointsNew[0] = myPoints[np.argmin(add)] myPointsNew[3] = myPoints[np.argmax(add)] diff = np.diff(myPoints, axis=1) myPointsNew[1] = myPoints[np.argmin(diff)] myPointsNew[2] = myPoints[np.argmax(diff)] return myPointsNew # 图像矫正的方法 def warpImg(img, points, w, h, pad=6): points = reorder(points) pts1 = np.float32(points) pts2 = np.float32([[0, 0], [w, 0], [0, h], [w, h]]) matrix = cv2.getPerspectiveTransform(pts1, pts2) imgWrap = cv2.warpPerspective(img, matrix, (w, h)) imgWrap = imgWrap[pad:imgWrap.shape[0] - pad, pad:imgWrap.shape[1] - pad] return imgWrap # 定义形状检测函数--书本 def ShapeDetection(img): contours, hierarchy = cv2.findContours(img, cv2.RETR_EXTERNAL, cv2.CHAIN_APPROX_NONE) # 寻找轮廓点 Rectangle = [] for obj in contours: area = cv2.contourArea(obj) # 计算轮廓内区域的面积 cv2.drawContours(imgContour, obj, -1, (255, 0, 0), 4) # 绘制轮廓线 perimeter = cv2.arcLength(obj, True) # 计算轮廓周长 approx = cv2.approxPolyDP(obj, 0.02 * perimeter, True) # 获取轮廓角点坐标 CornerNum = len(approx) # 轮廓角点的数量 x, y, w, h = cv2.boundingRect(approx) # 获取坐标值和宽度、高度 if CornerNum == 4: Rectangle.append([obj, area, approx, h, w]) Rectangle = sorted(Rectangle, key=lambda x: x[1], reverse=True) book_approx = Rectangle[0][2] w = Rectangle[0][4] h = Rectangle[0][3] img_warp = warpImg(imgContour, book_approx, w, h) return img_warp, h, w # 定义形状检测函数--圆 def new_ShapeDetection(img): contours, hierarchy = cv2.findContours(img, cv2.RETR_EXTERNAL, cv2.CHAIN_APPROX_NONE) # 寻找轮廓点 Rectangle = [] circle = [] for obj in contours: area = cv2.contourArea(obj) # 计算轮廓内区域的面积 cv2.drawContours(imgContour, obj, -1, (255, 0, 0), 4) # 绘制轮廓线 perimeter = cv2.arcLength(obj, True) # 计算轮廓周长 approx = cv2.approxPolyDP(obj, 0.02 * perimeter, True) # 获取轮廓角点坐标 CornerNum = len(approx) # 轮廓角点的数量 x, y, w, h = cv2.boundingRect(approx) # 获取坐标值和宽度、高度 if CornerNum == 4: Rectangle.append([obj, area, approx, x, y, w, h]) elif CornerNum > 4: circle.append([obj, area, approx, x, y, w, h]) circle = sorted(circle, key=lambda x: x[1], reverse=True) # 绘制大圆 cv2.drawContours(imgWarpContour, circle[1][0], -1, (255, 0, 0), 4) # 绘制小圆 cv2.drawContours(imgWarpContour, circle[2][0], -1, (255, 0, 0), 4) cv2.imshow("IMG", imgWarpContour) return circle path = 'D:\\fzu\\task.jpg' img = cv2.imread(path) # 调整图像大小,显示全部 img = cv2.resize(img, (0, 0), fx=0.3, fy=0.3) imgContour = img.copy() # 转灰度图 imgGray = cv2.cvtColor(img, cv2.COLOR_RGB2GRAY) # 高斯模糊 imgBlur = cv2.GaussianBlur(imgGray, (9, 9), 0) # Canny算子边缘检测 imgCanny = cv2.Canny(imgBlur, 20, 52) kernel = np.ones((5, 5)) imgDial = cv2.dilate(imgCanny, kernel, iterations=6) # 膨胀 imgThre = cv2.erode(imgDial, kernel, iterations=5) # 腐蚀 cv2.imshow("imgThre", imgThre) imgWarp, book_h, book_w = ShapeDetection(imgThre) # 形状检测 cv2.imshow("ImgWarp", imgWarp) imgWarpContour = imgWarp.copy() imgGray = cv2.cvtColor(imgWarp, cv2.COLOR_RGB2GRAY) # 高斯模糊 imgBlur = cv2.GaussianBlur(imgGray, (7, 7), 0) circles = cv2.HoughCircles(imgBlur, cv2.HOUGH_GRADIENT, 1, 50, param1=20, param2=54, minRadius=10, maxRadius=1000) # print(circles[0]) if circles is not None: circles = np.round(circles[0, :]).astype("int") for (x, y, r) in circles: cv2.circle(imgWarpContour, (x, y), r, (0, 255, 0), 2) cv2.imshow("IMG", imgWarpContour) coin_diameter_px = circles[1][2] * 2 coin_size_cm = 2.5 # 假设硬币直径为25毫米 scale_factor = coin_size_cm / coin_diameter_px draw_circle_diameter_px = circles[0][2] * 2 draw_circle_diameter_cm = draw_circle_diameter_px * scale_factor book_w_cm = book_w * scale_factor book_h_cm = book_h * scale_factor print("书本的长为:%f" % book_h_cm + "厘米,书本的宽为:%f" % book_w_cm + "厘米") print("书本右上方用铅笔画的圆圈的外圆直径为:%f" % draw_circle_diameter_cm + "厘米") cv2.waitKey(0) |


【本文地址】
今日新闻 |
推荐新闻 |