使用HTML5实现上传图片预览功能 – 业余草 |
您所在的位置:网站首页 › 图片上传实现实时预览的方式 › 使用HTML5实现上传图片预览功能 – 业余草 |
使用HTML5实现上传图片预览功能 – 业余草
公告:“业余草”微信公众号提供免费CSDN下载服务(只下Java资源),关注业余草微信公众号,添加作者微信:xttblog2,发送下载链接帮助你免费下载!
本博客日IP超过2000,PV 3000 左右,急需赞助商。
极客时间所有课程通过我的二维码购买后返现24元微信红包,请加博主新的微信号:xttblog2,之前的微信号好友位已满,备注:返现
受密码保护的文章请关注“业余草”公众号,回复关键字“0”获得密码
所有面试题(java、前端、数据库、springboot等)一网打尽,请关注文末小程序
 腾讯云】1核2G5M轻量应用服务器50元首年,高性价比,助您轻松上云
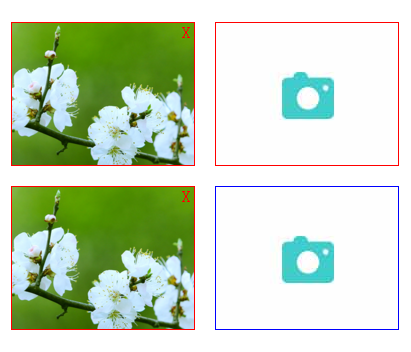
这在以前,想要web实现上传图片时进行预览是很困难的。主要也是借助一些插件,flash等去实现。有的做法是在选择图片后,立刻上传,再将图片展现出来,做到预览效果;如果上传者不满意或者选错了,重新上传,则还需要删除原来的。看起来要做到图片预览是非常麻烦的。 但是在html5来临之后,这一切问题都是变得那么的简单了。先看看我的效果图吧:
源代码如下: 使用HTML5实现上传图片预览功能 .imgbox,.imgbox1{ float: left; margin-right: 20px; margin-top: 20px; position: relative; width: 182px; height: 142px; border: 1px solid red; overflow: hidden; } .imgbox1{border: 1px solid blue;} .imgnum{ left: 0px; top: 0px; margin: 0px; padding: 0px; } .imgnum input,.imgnum1 input { position: absolute; width: 182px; height: 142px; opacity: 0; } .imgnum img,.imgnum1 img { width: 100%; height: 100%; } .close,.close1 { color: red; position: absolute; left: 170px; top: 0px; display: none; } X '+
'
'+
'原文地址:http://www.xttblog.com/?p=293
最后,欢迎关注我的个人微信公众号:业余草(yyucao)!可加作者微信号:xttblog2。备注:“1”,添加博主微信拉你进微信群。备注错误不会同意好友申请。再次感谢您的关注!后续有精彩内容会第一时间发给您!原创文章投稿请发送至[email protected]邮箱。商务合作也可添加作者微信进行联系! 本文原文出处:业余草: » 使用HTML5实现上传图片预览功能 |

【本文地址】