商城三级分类的设计与开发 |
您所在的位置:网站首页 › 商品类别分类三级标准有哪些 › 商城三级分类的设计与开发 |
商城三级分类的设计与开发
|
数据库的结构设计
三级分类的sql如下,要有三级分类,那就需要两层的父类id(cat_id,parent_cid)需要有商品的名称和层级及其显示状态,还需要有各自的优先级,单位,每层的数量,还有图片信息。 DROP TABLE IF EXISTS `pms_category`; CREATE TABLE `pms_category` ( `cat_id` bigint(20) NOT NULL AUTO_INCREMENT COMMENT '分类id', `name` char(50) DEFAULT NULL COMMENT '分类名称', `parent_cid` bigint(20) DEFAULT NULL COMMENT '父分类id', `cat_level` int(11) DEFAULT NULL COMMENT '层级', `show_status` tinyint(4) DEFAULT NULL COMMENT '是否显示[0-不显示,1显示]', `sort` int(11) DEFAULT NULL COMMENT '排序', `icon` char(255) DEFAULT NULL COMMENT '图标地址', `product_unit` char(50) DEFAULT NULL COMMENT '计量单位', `product_count` int(11) DEFAULT NULL COMMENT '商品数量', PRIMARY KEY (`cat_id`) ) ENGINE=InnoDB AUTO_INCREMENT=1433 DEFAULT CHARSET=utf8mb4 COMMENT='商品三级分类';如下为京东的主页三级分类
修改项目发送请求的url地址,让给后台配置的网关发送请求 首先对mall-product微服务配置服务发现与注册,还有配置中心相关内容 编写bootstrap.properties并添加配置信息 spring.application.name=mall-product spring.cloud.nacos.config.server-addr=127.0.0.1:8848 spring.cloud.nacos.config.namespace=e0f2063f-fdeb-4b7f-a728-41451d323ebe在以前的基础上添加服务发现与注册 spring: datasource: username: root password: root url: jdbc:mysql://192.168.142.3:3306/gulimall_pms driver-class-name: com.mysql.cj.jdbc.Driver cloud: nacos: discovery: server-addr: 127.0.0.1:8848 application: name: mall-product # 配置xml映射文件 设置id-type auto 自增主键 mybatis-plus: mapper-locations: classpath*:/mapper/**/*.xml global-config: db-config: id-type: auto server: port: 10001在启动类上添加开启服务发现 @MapperScan("com.wrial.mall.product.dao") @EnableDiscoveryClient @SpringBootApplication public class MallProductApplication { public static void main(String[] args) { SpringApplication.run(MallProductApplication.class, args); } }将product注册完成后,在controller中编写对应的API package com.wrial.mall.product.controller; /** * 商品三级分类 * * @author wrial * @email [email protected] * @date 2020-05-01 17:11:57 */ @RestController @RequestMapping("product/category") public class CategoryController { @Autowired private CategoryService categoryService; /** * 查询所有分类及其子分类,分类树 */ @RequestMapping("/list/tree") public R list(){ List tree = categoryService.listWithTree(); return R.ok().put("data", tree); } }对CategoryEntity进行扩展 package com.wrial.mall.product.entity; import com.baomidou.mybatisplus.annotation.TableField; import com.baomidou.mybatisplus.annotation.TableId; import com.baomidou.mybatisplus.annotation.TableName; import java.io.Serializable; import java.util.Date; import java.util.List; import lombok.Data; /** * 商品三级分类 * * @author wrial * @email [email protected] * @date 2020-05-01 17:11:57 */ @Data @TableName("pms_category") public class CategoryEntity implements Serializable { private static final long serialVersionUID = 1L; /** * 分类id */ @TableId private Long catId; /** * 分类名称 */ private String name; /** * 父分类id */ private Long parentCid; /** * 层级 */ private Integer catLevel; /** * 是否显示[0-不显示,1显示] */ private Integer showStatus; /** * 排序 */ private Integer sort; /** * 图标地址 */ private String icon; /** * 计量单位 */ private String productUnit; /** * 商品数量 */ private Integer productCount; /** * 当前分类下的子分类,不是数据库中有的,所以进行标记 (扩展) */ @TableField(exist = false) private List children; }在service层中调用dao层查出所有category,然后使用streamAPI完成组装 package com.wrial.mall.product.service.impl; @Service("categoryService") public class CategoryServiceImpl extends ServiceImpl implements CategoryService { @Override public PageUtils queryPage(Map params) { IPage page = this.page( new Query().getPage(params), new QueryWrapper() ); return new PageUtils(page); } @Override public List listWithTree() { // 1.查询出所有 List all = baseMapper.selectList(null); // 2.查询出所有一级分类(parentId=0) 然后递归查询下面的分类信息,并按照sort进行排序 List level1 = all.stream() .filter(categoryEntity -> categoryEntity.getParentCid() == 0) .map((currentCategory) -> { currentCategory.setChildren(getChildren(currentCategory, all)); return currentCategory; }) .sorted(Comparator.comparingInt(cat -> (cat.getSort() == null ? 0 : cat.getSort()))) .collect(Collectors.toList()); return level1; } private List getChildren(CategoryEntity parentCategory, List all) { List children = all.stream().filter(currentCategory -> parentCategory.getCatId().equals(currentCategory.getParentCid())) .map(currentCategory -> { currentCategory.setChildren(getChildren(currentCategory, all)); return currentCategory; }).sorted(Comparator.comparingInt(cat -> (cat.getSort() == null ? 0 : cat.getSort()))) .collect(Collectors.toList()); return children; } }编写完逻辑代码,接下来进对网关进行设置,在前面已经对网关服务发现与注册,以及配置中心都进行了配置,下面主要是对网关的路由进行配置,添加一条路由(一定要放在renren-fast前,因为最左前缀匹配原则) # 可以配多个route spring: cloud: gateway: routes: - id: product_route uri: lb://mall-product predicates: - Path=/api/product/** filters: - RewritePath=/api/(?/?.*), /$\{segment} - id: admin_route uri: lb://renren-fast predicates: - Path=/api/** filters: - RewritePath=/api(?/?.*), /renren-fast/$\{segment} # 前端项目都带一个api就转给renren-fast # http://localhost:88/api/captcha.jpg => http://localhost:8080/renren-fast/captcha.jpg nacos: discovery: server-addr: 127.0.0.1:8848 application: name: mall-gateway也可以通过配置类的方式来给容器中放入一个路由的Bean实例 @Bean public RouteLocator rewritePath(RouteLocatorBuilder builder) { return builder.routes() .route("admin_route", r -> r.path("/api/**").filters(f -> f.rewritePath("/api/(?.*)","/renren-fast/$\\{segment}")) .uri("lb://renren-fast")) .build(); }这样,启动服务进行测试,发现还是不能通过,因为还未进行跨域处理 下面编写了一个针对跨域的配置类,当然方法有很多不局限于这一种 启动项目 |
 淘宝的三级分类
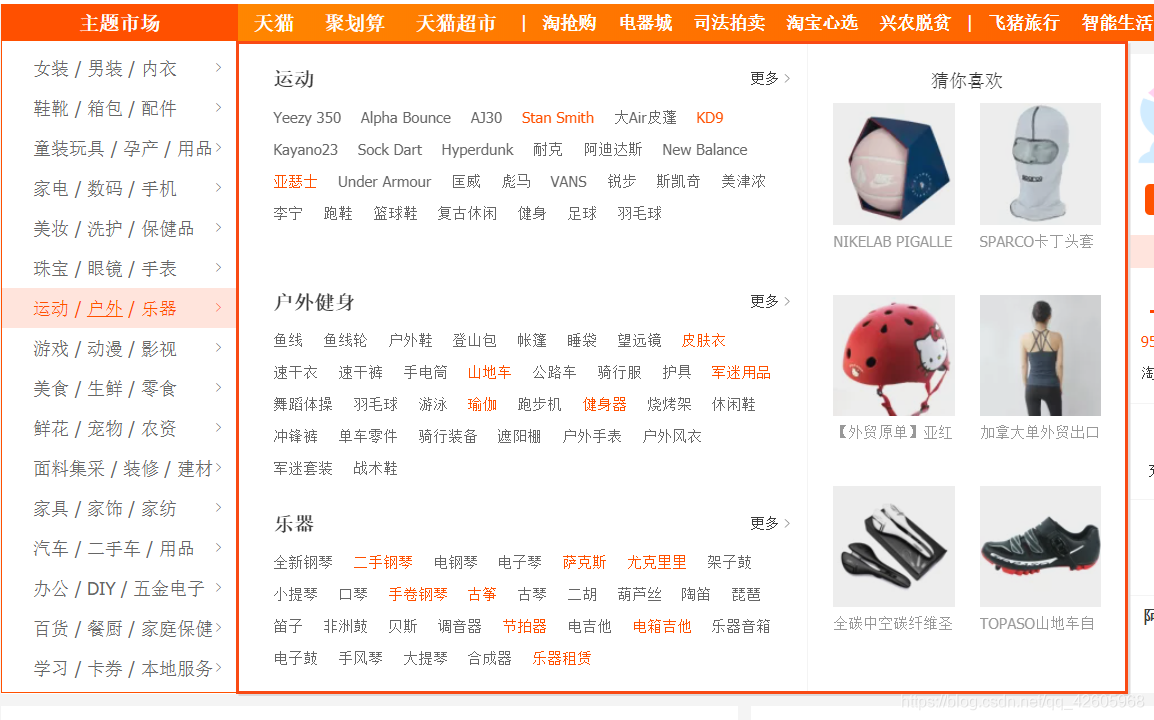

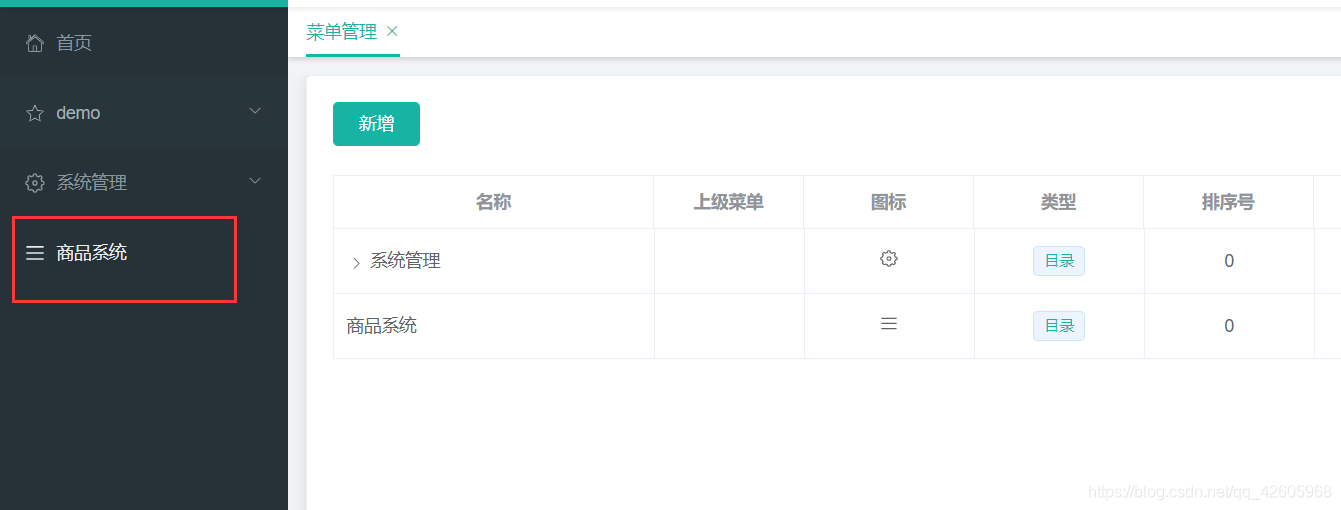
 上图中创建的菜单路由也就是vue模块之间的路由信息,在后台管理面板创建的内容,都应该在对于路径下编写一个自定义模块(菜单路由的- 就相当于目录的/)
  创建category.vue,参照官方文档的分类tree组件很简单的就可以完成功能


 一个简单的三级分类这样就展示了出来,后边就再完成其增删改以及其他优化
【本文地址】
今日新闻 |
推荐新闻 |