|
matlab常用画图操作
1.设置坐标轴2.设置figure大小3.matlab线条设置4.子图设置5.颜色查询6.colorbar设置7.线条透明度设置8.设置坐标轴刻度形式(对数刻度)9.图例设置10 文件保存11 消除白色边框12 添加子标题13 调换y轴递增顺序
1.设置坐标轴
%设置坐标轴格式
title('Title','fontsize',12,'fontname','Times'); %设置标题字体
xlabel('Times(s)','fontsize',12,'fontname','Times','FontWeight','bold') %设置x轴字体
ylabel('Value','fontsize',12,'fontname','Times') %设置y轴字体
set(gca,'FontName','Times New Roman','FontSize',11,'FontWeight','bold'); %设置坐标刻度字体
axis off; % 去掉坐标轴
set(gca,'looseInset',[0 0 0 0]) %去掉白色边框
2.设置figure大小
figure(1)
set(gcf,'position',[180,60,960,480]);%设置画图的大小
四个数分别代表距y轴的距离、距x轴的距离、图宽、图长
3.matlab线条设置
%绘制一条横线
plot(xlim,[0.32,0.32],'k-','LineWidth',1)
4.子图设置

%子图代码
subplot(2,2,[1 2])
plot(x)
subplot(2,2,3)
plot(y)
subplot(2,2,4)
plot(z)
5.颜色查询
 如果想要查看清晰版的可以去这个网页去查:matlab颜色对照图 如果想要查看清晰版的可以去这个网页去查:matlab颜色对照图
%设置灰度图,查上方的表格
% c=plot(x1,'LineWidth',0.2);
% set(c,'color',[0.41, 0.41, 0.41]);
6.colorbar设置
%不显示colorbar
colorbar off;
colorbar ('off')
colorbar (' hide')
colorbar ('delete')
%设置colorbar标题及色阶范围
caxis([-150,-40])%设置colorbar色阶范围
h=colorbar('fontname','Times')
set(get(h,'title'),'string','dB');
以下是设置色阶范围和设置标题的示例截图: 
7.线条透明度设置
%设置线条透明度
c=plot(x1,'k','LineWidth',0.3);
c.Color(4) = 0.5;
样例: 
8.设置坐标轴刻度形式(对数刻度)
%设置坐标轴刻度
set(gca,'Yscale','log')
yticks([0 0.064 0.128 0.256 0.512 1.024 2.048 4.096 8.192]) %具体的y轴刻度
yticklabels({'0','64','128','256','512','1024','2048','4096','8192'}) %这是上一行的标签
样例展示: 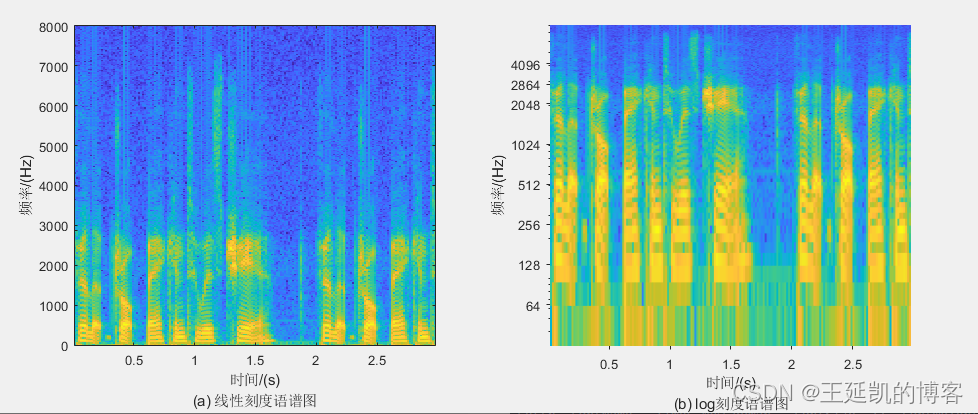
9.图例设置
%设置图例位置
legend('\alpha_1','\alpha_1','\alpha_1',1)
0——图例尽量不与数据冲突,自动放置在最佳位置
1——放置在放置在图形的右上角 top right
2——放置在图形的左上角 top left
3——放置在图形的左下角 bottom left
4——放置在图形的右下角 bottom right
-1——放置在图形视窗的外右边
%设置图例字体及大小
h=legend('Before DRC','After DRC');
set(h,'FontName','Times New Roman','FontSize',11,'FontWeight','normal')
%也或者这样设置图例的位置
h=legend('Before DRC','After DRC');
set(h,'FontName','Times New Roman','FontSize',11,'FontWeight','normal','Location','northeast')
%其中location的选项有:
'north' | 'south' | 'east' | 'west' | 'northeast' | 'northwest' | 'southeast' | 'southwest' | 'northoutside' | 'southoutside' | 'eastoutside' | 'westoutside' | 'northeastoutside' | 'northwestoutside' | 'southeastoutside' | 'southwestoutside' | 'best' | 'bestoutside' | 'none'
10 文件保存
fig = figure; % 新建一个figure,并将图像句柄保存到fig
plot(x,y) % 使用plot绘制图片,当然也可以
frame = getframe(fig); % 获取frame
img = frame2im(frame); % 将frame变换成imwrite函数可以识别的格式
imwrite(img,'a.png'); % 保存到工作目录下,名字为"a.png"
11 消除白色边框
%消除白色边框
ax = gca;
outerpos = ax.OuterPosition; % [0, 0, 1, 1]
ti = ax.TightInset;
left = outerpos(1) + ti(1);
bottom = outerpos(2) + ti(2);
ax_width = outerpos(3) - ti(1) - ti(3);
ax_height = outerpos(4) - ti(2) - ti(4);
ax.Position = [left bottom ax_width*0.99 ax_height];
未去除边框去除白色边框  12 添加子标题
clc;
clear all;
filename='./babble/clean/english.1snoke-20120412-hge-a0413.wav';
[x,fs]=audioread(filename);%读取wav文件
% x=x(1:33000);
times=0:length(x)-1;
times=(times/fs)';
set(gcf,'position',[180,60,800,300]);%设置画图的大小
%不添加子标题
subplot(1,2,1)
spectrogram(x,512,256,512,16000,'yaxis');
xlabel('t/s')
ylabel('Frequency/Hz')
colorbar('off')%取消colorbar
%添加子标题
subplot(1,2,2)
spectrogram(x,512,256,512,16000,'yaxis');
xlabel({'t/s',['(a) clean'],'(a) 纯净语音'})
ylabel('Frequency/Hz')
colorbar('off')%取消colorbar
12 添加子标题
clc;
clear all;
filename='./babble/clean/english.1snoke-20120412-hge-a0413.wav';
[x,fs]=audioread(filename);%读取wav文件
% x=x(1:33000);
times=0:length(x)-1;
times=(times/fs)';
set(gcf,'position',[180,60,800,300]);%设置画图的大小
%不添加子标题
subplot(1,2,1)
spectrogram(x,512,256,512,16000,'yaxis');
xlabel('t/s')
ylabel('Frequency/Hz')
colorbar('off')%取消colorbar
%添加子标题
subplot(1,2,2)
spectrogram(x,512,256,512,16000,'yaxis');
xlabel({'t/s',['(a) clean'],'(a) 纯净语音'})
ylabel('Frequency/Hz')
colorbar('off')%取消colorbar

13 调换y轴递增顺序
在我们使用imagesc()函数对矩阵进行绘制图像的时候,经常会出现y轴刻度并不是我们所需要的顺序,例如我们需要从下向上依次递增,而我们绘制的图片却是从上 向下递增,不符合我们需求,于是有如下解决方案。
操作前操作后  axis xy %改变y轴顺序
|