Design a children's picture book • tips for fonts, images, color, and more |
您所在的位置:网站首页 › 各种季节钓什么鱼 › Design a children's picture book • tips for fonts, images, color, and more |
Design a children's picture book • tips for fonts, images, color, and more
|
Design a children’s picture book
March 9, 2020 By Fiona Raven 81 Comments
To design a children’s picture book, you’ll need to consider lots of factors: book size, page count, quality of images, flow of text, color, and more. Let’s take a look at those factors. First steps to design a children’s picture bookStart by doing some research. Look at lots of children’s picture books and board books to get a feel for what type of book you’ll be designing. Will it be a large book with big illustrations? Or a small one with few words and simple images? Here are some steps to get you started. Assess the text and illustrationsThe word count for children’s picture books is usually somewhere between 250 and 1,000 words (the younger the audience, the shorter the story). Some books have only a word or two per page. The text should already be edited before you begin designing. Start by familiarizing yourself with both the story and the author’s vision for the book. Read the story several times and note where natural pauses occur (for example, where a page might be turned). Also note which paragraphs lend themselves to an illustration. If you’ve already been supplied with illustrations, you’ll be designing the book around the illustrations. Check their size and resolution, and make sure the illustrations are high enough resolution to print. If you’re working with an illustrator or creating the illustrations yourself, you’ll need to plan how to divide the story among the pages and how best to illustrate each 2-page spread. Creating a storyboard or mockup is helpful, and that’s discussed below. Choose a trim size
It’s always best to use a standard size. That way, the book can be printed almost anywhere in the world by offset press, digital printing, and/or print-on-demand (POD). Will the book be a paperback, hardcover, or a board book? Some printers only produce paperbacks, while others offer hardcovers in limited sizes. Board books are most often printed offset but can be produced on digital and POD printers. Regardless of what type of book you’re designing, stick to standard sizes and you’ll have lots of options for printing. Popular mid-sized children’s picture books are: 8″ × 8″ (square) 8″ × 10″ (portrait) 10″ × 8″ (landscape)Be aware that sizes and shapes are quite limited for POD printing. Here are the standard trim sizes and shapes offered by Amazon KDP and IngramSpark (two large POD printers): 7″ × 10″ (portrait) 7.25″ × 9.25″ (portrait, same size as Book Design Made Simple) 8″ × 8″ (square) 8″ × 10″ (portrait) 8.5″ × 8.5″ (square) 8.5″ × 11″ (portrait)Note that Amazon KDP and IngramSpark print paperbacks and hardcovers. Also note that neither printer offers the landscape format. Board book sizes generally range from 5″ × 5″ to 10″ × 10″. Offset printers offer a large variety of sizes. Pint Size Productions offers POD printing for board books (5.625″ × 5.625″ square, 16 pages). There are lots of digital and offset printers to choose from, and they all offer a variety of sizes and shapes for color printing. Don’t hesitate to go online and learn what sizes and formats are available at various book printers. Also browse your local bookstore and library to see what sizes and shapes will best suit your children’s picture book. Choose a page countThe standard page count for a children’s picture book is 24 or 32. In fact, 24 is often the minimum page count for perfect binding (slimmer books can be saddle-stitched). Multiples of 8 or 12 are most cost effective for offset printing, and POD printers require multiples of 4. The standard page count for a board book is 16. Remember that the book will include non-story pages too, such as the title page and copyright page. You might also include some back matter, including a page about the author and illustrator, and info about social media. #Designing a #childrensbook? Get tips on book size, page count, quality of images, flow of text, fonts, color, and more. https://bit.ly/3aD6c9V Click To TweetNow that you’ve narrowed down the trim size, format, and page count of the book, it’s time to plan out the pages. An easy way to do this is to make a storyboard or mockup of all the pages using the text and rough illustrations. There’s a great template for a 32-page storyboard that you can download for free from Inky Girl. She also shows examples of how the storyboard can be used to explore illustration ideas. Remember that the images don’t have to illustrate exactly what is said in the story, but rather they can embellish and fill in gaps. Make sure the illustrations leave enough space to add the text to the pages. Ideas for formats of illustrationsYou’ll want to discuss with the illustrator not only the subject but also the format of each illustration. You can use one or more formats throughout the book. Here are some examples of various formats: 2-page spreads. Children’s books often include illustrations that fill two facing pages. Here are a few things to consider when using this format: Leave enough space in the illustrations for the text. Provide either a light background for dark text or a dark background for light text. Make sure nothing crucial is down the center of the illustrations (in the gutter), as that area will be bound into the spine. If an illustration bleeds off the outside edges of the spread (top, bottom, left, and right), the illustration should be 0.25″ wider and 0.25″ taller than the book pages to allow for a 0.125″ bleed on four sides.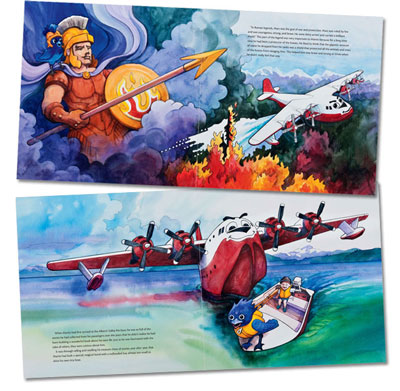 Children’s picture book showing 2-page spreads. From Martin Mars, the Mighty Water Bomber written by Suzan Coulson and illustrated by Dianne Bersea.  Children’s picture book showing 2-page spreads with a white (paper) background. From The Tale of Miss Spider Who Spun Her Web written by Mieke Blommestein and illustrated by Diane Perruzzi. Full-page illustrations. Some children’s books include just a few full-page illustrations (say, four or six) placed strategically throughout the book. And some have a full-page illustration on every right-hand page, and text on every left-hand page. Full-page illustrations can also be used opposite spot (small) illustrations, so they’re very versatile. Here are a few things to consider when using full-page illustrations: Full-page illustrations usually bleed off three edges (top, bottom, and outside edge), so you’ll need to add 0.125″ to each of those edges for the bleed. The inside edge simply aligns with the gutter (spine) with no bleed. If your full-page illustrations don’t bleed off the edges, then make sure the edges all line up with the margins used throughout the book for a consistent size and look. If an illustration has some interesting content next to the gutter, consider not aligning it in the gutter but instead to an inside margin (as shown below). Children’s picture book showing full-page illustrations. From Millennium Shakespeare: The Merry Wives of Windsor adapted by Michael J. Stewart and illustrated by Lesley Buckingham. Spot illustrations. Sometimes a sentence or paragraph in the story doesn’t warrant a full-page illustration or 2-page spread. In that case, a spot illustration will do just fine. Spot illustrations can be placed alone on a page, or grouped with other spot illustrations if space is a concern. Here are a few things to consider when using spot illustrations: Vary the placement of spot illustrations so they aren’t always in the center of the page. Make sure any background color in the illustration blends well with the rest of the page. If a spot illustration bleeds off any edge of the page, add an extra 0.125″ of the artwork on that edge. If two or three spot illustrations are placed on the same page, make sure it’s clear to the reader in which order they should be read, and which text goes with each illustration. Pages with spot illustrations can face pages with full-page illustrations. Children’s picture book showing spot illustrations and a full-page illustration. From Mr. Barker & the Zoopremes written by Tim Whalen and illustrated by Anne Gavitt. Ideas for incorporating non-story pagesWhen you create a mockup or storyboard for the book, you’ll see how many pages are needed for the story and illustrations. Often the first and last pages of the book are the only ones not being used for two-page spreads. So where does your title page, copyright info, and anything else you want to include go? The first page of the book is a right-hand page, and it’s your title page. The title page often duplicates the info on the front cover, including the book title and author’s and illustrator’s names. The copyright info usually goes on page 2 (the back of the title page) and can be combined with an optional dedication. In children’s books, the story sometimes starts on page 2 with a 2-page spread…what to do with the copyright info in this case? Try creatively incorporating it into an illustration on page 2 (for example, set it in small type on the side of a building). Or, you could add it to the last page of the book instead. The last page of the book can include everything that didn’t fit on the cover or in the front pages of the book: author and illustrator bios with photos, social media info, and even acknowledgements, if you plan to include them. 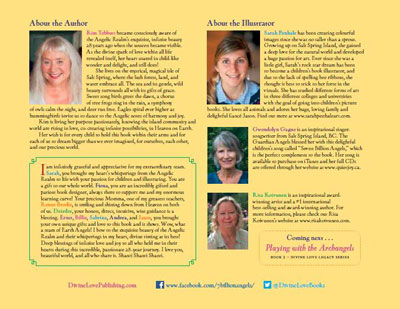 This last page includes author and illustrator bios with photos, acknowledgements (in the box), notice of an upcoming book in the series, website URL, and social media info. From 7 Billion Angels Whispering We Love You written by Kim Tebbutt and illustrated by Sarah Penhale. There are several ways the design of a children’s picture book can sell the story and support the flow of the story through the pages. Book coverThe book cover should appeal to its market, in other words, to its potential buyers and readers (i.e., adults) as well as kids. The front cover illustration will reflect the story, yet doesn’t need to include every character or action that appears inside the book. Keep it simple. The front cover includes the book title and the author’s and illustrator’s names. If you choose to use a display font for the title, make sure it’s easy to read from a distance and on a small thumbnail. The back cover should include a minimum of bar code and price, but can also include things that don’t fit inside the book, such as author and illustrator photos and bios, social media info, and so on. FontsFor the pages, choose an easy-to-read font (serif or sans serif) at a largish size (such as 16 pt). It can be tempting to use a display font, perhaps one that’s used on the cover, but it’s best to use a very readable serif or sans serif. Look for a font that has a friendly or playful feel to it. Here are a couple of examples:
Often children’s picture books only include a couple of sentences, a line or two of a rhyme, or a short paragraph per page or spread, so make sure all the text fits into the spaces in the illustrations at the font size you’ve chosen. You may have to adjust the size of all the text to make one specific paragraph fit nicely into an illustration. Create a paragraph style and apply it to all of the text so you can experiment with font size and leading (linespacing) throughout the book. Make sure the text is easy to read on top of the illustrations. There should be an area of dark or light color where you can add the text to an illustration. You may need to lighten the area so that dark or black text is easy to read, or darken the area so that white or light text is easy to read. MarginsIt’s helpful to add margins to the pages even if the illustrations are 2-page spreads with a full bleed. Consider adding margins to all four sides (say 0.5″ to the top, bottom, inside, and outside). That way you’ll be sure not to place any text too close to the edges of the pages or the gutter. You can also align your paragraphs to the top and/or bottom margins to create a consistent look throughout the book. Don’t place important elements of the illustrations (faces, for example) in the gutter. Sometimes an illustration that covers a 2-page spread might have the most important character or action in the middle of the artwork, so you may have to enlarge or shrink the artwork so that part can be seen. If you didn’t work with the illustrator directly to avoid issues like this, you’ll need permission to modify the artwork. ColorsChildren’s picture books look best with a consistent color palette throughout. The illustrations contain the artist’s colors, and this is your starting point. Create a color palette using the Color Theme tools in InDesign, and select colors directly from the illustrations (see chapter 58 of Book Design Made Simple, Second Edition). Aside from color contained in the illustrations, color can also be added to text, page backgrounds, and even specific words. Maintain a consistent flow of color throughout the book by adding color to any pages without illustrations (perhaps at the front and back of the book). Stick to the same intensity of color used in the illustrations (i.e., bold colors or soft colors). For hardcover books, you’ll have the option of adding colored endsheets inside the front and back covers (for an extra cost). You can print on the endsheets also for an extra treat for readers. If your book involves a treasure hunt, for instance, you could put a map of the hunt area for the readers to refer to. Naturally, this will be another extra cost. You might assume that children’s picture books are quick to design because they contain so few words and pages. You’ll find, however, that because they are so short, every single word and image is important! Children’s picture books offer designers an opportunity to collaborate with authors and illustrators in a unique way, and to have an influence on the flow of the story with text and image placement, and use of color. Have fun and enjoy the design process! Read more: POD book publishing » explore options of printing at Amazon KDP and IngramSpark. Read more: Book bar code » where to get one and what to encode in it. Book Design Made Simple. You can do it yourself. Filed Under: Book Design Tagged With: Amazon, children's books, color, images, typesetting |
 Children’s picture books are fun to design! They’re colorful, full of images, and everything is packed into a small number of words and pages.
 The trim sizes available for children’s color picture books and board books are practically unlimited, ranging from very small to large. So how can you narrow your choices down?
【本文地址】
今日新闻 |
推荐新闻 |