使用台式机安装VMWare ESXI 7.0.2过程分享 |
您所在的位置:网站首页 › 台式电脑显卡怎么安装 › 使用台式机安装VMWare ESXI 7.0.2过程分享 |
使用台式机安装VMWare ESXI 7.0.2过程分享
|
一、概述
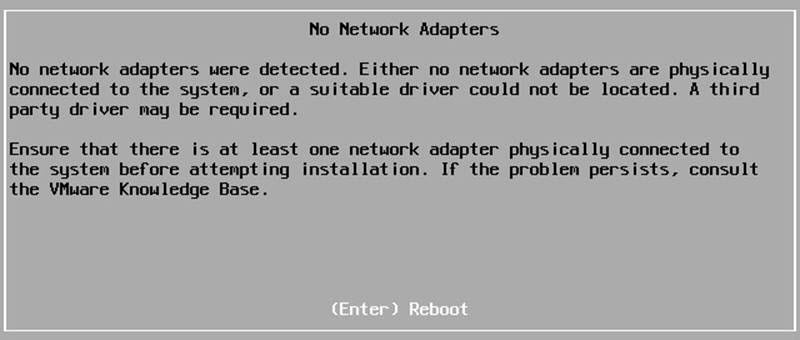
记录一次使用台式机安装vmware esxi7.0.2的过程,期间也是搜索了很多博客,整理一下,希望能够给大家提供点参考。 首先,说明一下,如果台式机的网卡是Realtek 8168/8111/8411/8118这些的话,ESXI 7.0版本以上是没有相应的网卡驱动的。使用官方的ESXI镜像安装就会提示如下图的问题,并无法继续安装。(查看自己网卡型号方法:windows的设备管理->网络适配器->找到相应网卡->右键选择“属性”->详细信息->属性栏选择“硬件ID”,就能看出网络的大致型号)
所有,要继续在台式机安装该怎么办呢,还有个方法就是使用USB网卡。下面就简要介绍下如果使用USB网卡和台式机安装VMWare ESXI 7.0.2的过程。 二、下载镜像和USB网卡驱动1. 下载VMWare ESXI7.0.2镜像,我是在: VMware-Esxi7.0各个版本镜像文件iso下载链接_esxi下载_China_yuqin_work的博客-CSDN博客 下载的,选择的版本是7.0U2a。 2. 下载USB网卡驱动,是在:USB Network Native Driver for ESXi | VMware FlingsUSB Network Native Driver for ESXi 如何确定自己的USB网卡是否和上面的驱动匹配呢? 可以通过USB Network Native Driver for ESXi | VMware FlingsUSB Network Native Driver for ESXi 页面可查看。我的USB网卡是ASIX AX88179(是绿联的一个USB网卡),是在支持列表中的。(查看USB网卡的信息,可以将其插入到Windows电脑中,然后在“更改适配器”界面查到) 三、将USB网卡驱动添加到Esxi安装镜像中我是参考了Adding Drivers into VMWare ESXi Installation Image | Windows OS Hub 该博客中提供了三种方法,我选择的是Inject Custom Drivers to ESXi Image with ESXi-Customizer GUI,也就是使用ESXi-Customizer GUI这个工具去做。内容如下: ESXi-Customizer (GUI) is a small graphical tool with a simple interface that allows you to automate the process of integrating drivers and .vib files into an ESXi ISO image. The ESXi-Customizer has not been updated since 2016. The developer reports that only ESXi versions 4.1, 5.0, 5.1, and 5.5 are supported. However, below is a small trick that allows you to use the ESXi-Customize GUI even for new ESXi versions (6.5, 6.7, and 7.0). Download ESXi-Customizer-v2.7.2.exe (VMware Front Experience: ESXi-Customizer), extract the archive, and run the tool (ESXi-Customizer.cmd). ESXi-Customizer doesn’t officially support modern Windows versions, so when started in Windows 10 or 11, an error appears: --------------------------- ESXi-Customizer v2.7.2 - Message --------------------------- FATAL ERROR: Unsupported Windows Version: 10.0. At least Windows XP is required!
To fix it, edit the ESXi-Customizer.cmd file and comment out the following line (add REM in the beginning): if "!WinVer!" LSS "5.1" call :earlyFatal Unsupported Windows Version: !WinVer!. At least Windows XP is required & exit /b 1
Save ESXi-Customizer.cmd file and run it. In the next window, specify the path to the source ESXi ISO image, the driver file (VIB file or TGZ archive with drivers), and the folder, to which the resulting image with the integrated driver must be saved. Uncheck the automatic update option.
Click the Run button and n a few minutes a new ESXi ISO image will appear in the target directory. You can use this image to install ESXi on your hardware. If you are trying to add drivers into an ISO image with ESXi 6.7 or 7.0, an error will appear: FATAL ERROR: Error un-taring IMGDB.tar!
In order to fix this fatal error, you need to manually modify the ESXi image: Extract your VMware ESXi installation ISO to a directory on disk;Install the 7zip archiver on your computer (you can quickly install apps on your computer using the winget package manager: winget install 7zip.7zip );Open the file IMGDB.TGZ with 7ZIP and rename the file inside to IMGDB.tar;
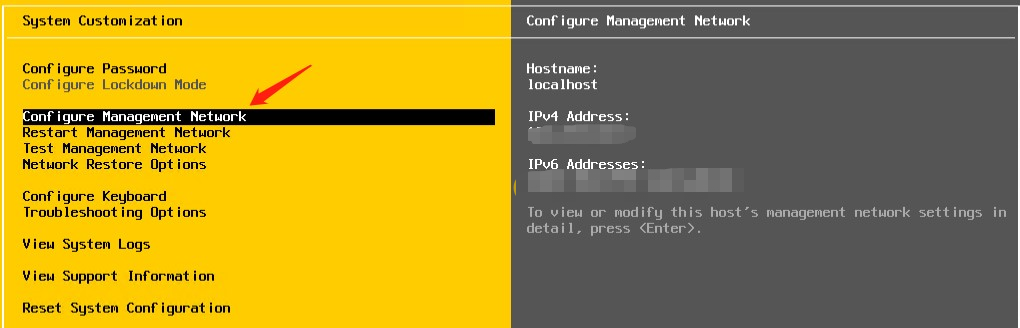
Now you can use your ISO image to deploy ESXi on your target host. 四、制作镜像将上一步制作好的镜像,使用工具rufus-4.2_x86烧制U盘启动盘。下载地址: Rufus 4.2 - Download 五、在台式机安装ESXI7.0.2正常情况下是能够安装成功的,如果出现某种设备不识别的情况,大概率是没有相应的驱动,只能自己去查找,然后通过第三步将驱动添加到镜像中。可以在下面的链接中查找是否有你需要的驱动: List of currently available ESXi packages - V-Front VIBSDepot Wiki 如果出现USB网卡插入是正常的,但是又不能联网,这时就需要检查一下配置了(前提:网线是好的,USB网卡是好的,网络能够正常使用)。通过F2本地登陆ESXi主机,选择“Configure Management NetWork”
选择网络适配器“Network Adapters”, 因为我们是使用的USB网卡,应该会有一个vusb0之类的网络的适配器(如果没有,看后面)。需要选择为我们的USB网卡。
再检查IPv4 这些是否配置正确。 如果都检查完成,可以在“Configure Management NetWork”的同级页面中选择"Test Management NetWork"测试网络是否正常。 如果适配器选择界面没有发现USB卡怎么办? 可以参照: Tips for using USB Network Adapters with VMware ESXi | virten.net 同时可参考: USB Network Native Driver for ESXi | VMware FlingsUSB Network Native Driver for ESXi 此处需要注意一点: 如果执行了命令: # esxcli system module parameters set -p "vusb0_mac=00:23:54:8c:43:45" -m vmkusb_nic_fling 再去执行: #esxcli system module parameters set -p "usbBusFullScanOnBootEnabled=1" -m vmkusb_nic_fling 那么上面的配置会被覆盖,因此如果两项参数都要配置,最好是执行如下命令: #esxcli system module parameters set -p "usbBusFullScanOnBootEnabled=1 vusb0_mac=00:23:54:8c:43:45" -m vmkusb_nic_fling参数之间用空格隔开即可。 当按照上述方法设置后,重启台式机,在配置界面应该就能够找到USB网卡适配器了。 这是我安装过程中遇到的一些问题,希望对你们有用。 |


【本文地址】
今日新闻 |
推荐新闻 |