双目视觉目标追踪及三维坐标获取 |
您所在的位置:网站首页 › 双目立体视频 › 双目视觉目标追踪及三维坐标获取 |
双目视觉目标追踪及三维坐标获取
|
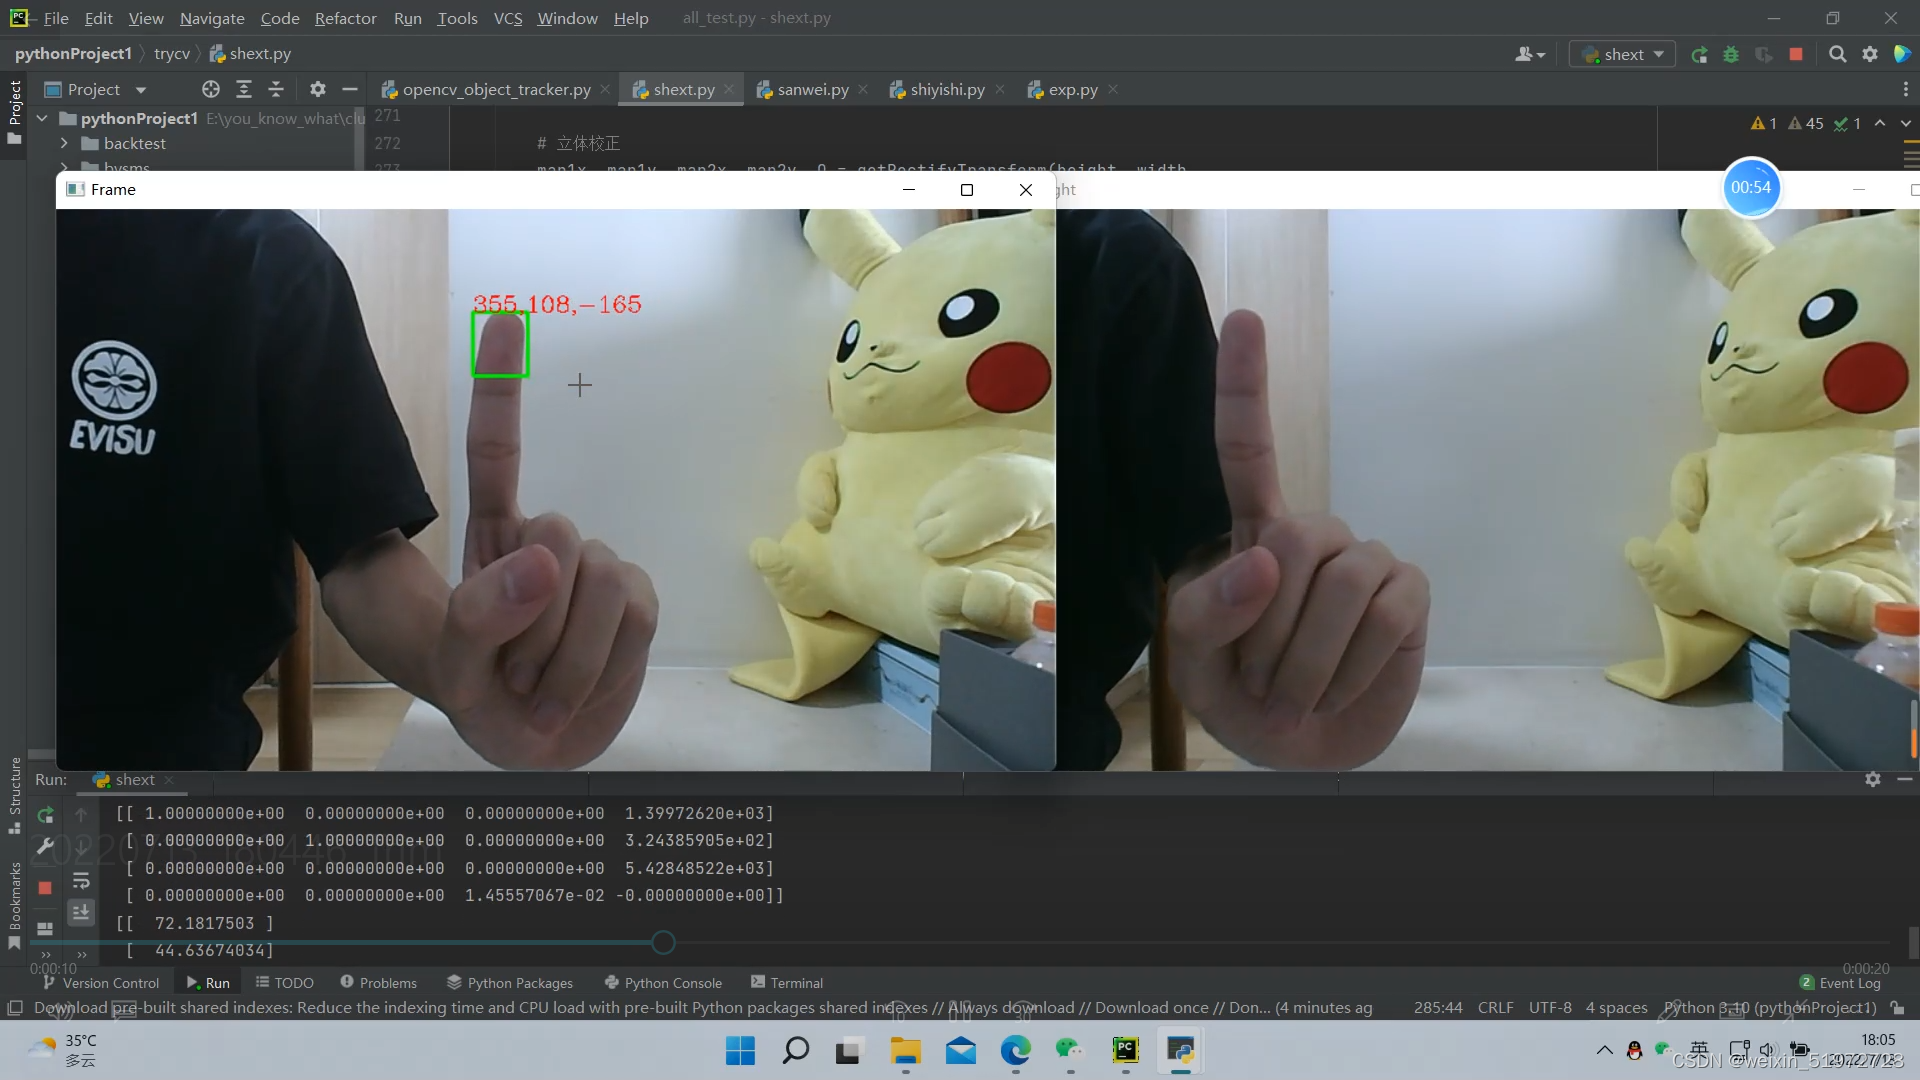
2022年九月更新: 在原来的基础上,我使用了yolov5代替了opencv的目标检测算法辅助相机进行三维坐标的获取,并成功用获取的坐标实时控制机械臂,感兴趣的话可以看我b站里的视频,视频下方也有开源的链接:【软核】我给自己开发了一条机械臂 双目视觉 目标检测_哔哩哔哩_bilibili 以下为原答案: 对着csdn和b站研究了几天双目视觉,算是能粗略的实现一些功能了。在这里记录一下思路,顺便记录一下遇到的坑。 先看一下最终成果吧,实现对物体的追踪和显示三维像素坐标:
一、相机标定 使用双目相机的前提都是先获取相机的内参和外参,有些贵一点的相机出厂时会把这些参数一起给你,比较普通的相机就需要我们自己标定了。我是通过matlab标定的,具体步骤可以看这篇博客:Matlab双目相机标定_indigo love的博客-CSDN博客_matlab双目相机标定 里面讲的都很详细了,给的代码都可以直接运行,但是要注意一个细节。在matlab标定的界面,这个选项默认是给2个参数的,我们要手动勾选到三个参数,不然最后输出的相机参数就会不太一样
这里我们先把标定的结果放到一个叫stereoconfig.py的文件里,方便后面使用 import numpy as np class stereoCamera(object): def __init__(self): # 左相机内参 self.cam_matrix_left = np.array([[684.8165, 0, 637.2704], [0, 685.4432, 320.5347], [0, 0, 1]]) # 右相机内参 self.cam_matrix_right = np.array([[778.2081, 0, 602.9231], [0, 781.9883, 319.6632], [0, 0, 1]]) # 左右相机畸变系数:[k1, k2, p1, p2, k3] self.distortion_l = np.array([[0.1342, -0.3101, 0, 0, 0.1673]]) self.distortion_r = np.array([[0.4604, -2.3963, 0, 0, 5.2266]]) # 旋转矩阵 self.R = np.array([[0.9993, -0.0038, -0.0364], [0.0033, 0.9999, -0.0143], [0.0365, 0.0142, 0.9992]]) # 平移矩阵 self.T = np.array([[-44.8076], [5.7648], [51.7586]]) # 主点列坐标的差 self.doffs = 0.0 # 指示上述内外参是否为经过立体校正后的结果 self.isRectified = False def setMiddleBurryParams(self): self.cam_matrix_left = np.array([[684.8165, 0, 637.2704], [0, 685.4432, 320.5347], [0, 0, 1]]) self.cam_matrix_right = np.array([[778.2081, 0, 602.9231], [0, 781.9883, 319.6632], [0, 0, 1]]) self.distortion_l = np.array([[0.1342, -0.3101, 0, 0, 0.1673]]) self.distortion_r = np.array([[0.4604, -2.3963, 0, 0, 5.2266]]) self.R = np.array([[0.9993, -0.0038, -0.0364], [0.0033, 0.9999, -0.0143], [0.0365, 0.0142, 0.9992]]) self.T = np.array([[-44.8076], [5.7648], [51.7586]]) self.doffs = 131.111 self.isRectified = True二、关于如何用python打开两个摄像头 其实这应该不算是重点,但是真的卡了我很久......所以还是说一说。 首先,双目摄像头虽然有两个摄像头,但他们用的是同一个串口号,也就是说camera = cv2.VideoCapture(0),给的id是0,那么它已经是打开了两个摄像头了,但是如果你只运行这一行代码你只能看到左摄像头,为什么呢?其实不是另一个摄像头没打开,而是你默认的窗口大小不够大,所以只能看到一个摄像头,对于2560×720的摄像头用下面的代码可以切割窗口,开两个窗口让两个摄像头都显示。1480的摄像头可以参考这篇博客,反正我主要也是复制的他的OpenCV 打开双目摄像头(python版)_一颗小树x的博客-CSDN博客_opencv打开双目摄像头 我建议还是一个开两个窗口,分别显示左摄像头和右摄像头,当然你也可以让两个摄像头显示在一个窗口里,用相应的方法切割窗口就行,不细说。 # -*- coding: utf-8 -*- import cv2 import time AUTO = False # 自动拍照,或手动按s键拍照 INTERVAL = 2 # 自动拍照间隔 cv2.namedWindow("left") cv2.namedWindow("right") camera = cv2.VideoCapture(0) # 设置分辨率左右摄像机同一频率,同一设备ID;左右摄像机总分辨率2560x720;分割为两个1280x720 camera.set(cv2.CAP_PROP_FRAME_WIDTH,2560) camera.set(cv2.CAP_PROP_FRAME_HEIGHT,720) counter = 0 utc = time.time() folder = "./SaveImage/" # 拍照文件目录 def shot(pos, frame): global counter path = folder + pos + "_" + str(counter) + ".jpg" cv2.imwrite(path, frame) print("snapshot saved into: " + path) while True: ret, frame = camera.read() print("ret:",ret) # 裁剪坐标为[y0:y1, x0:x1] HEIGHT * WIDTH left_frame = frame[0:720, 0:1280] right_frame = frame[0:720, 1280:2560] cv2.imshow("left", left_frame) cv2.imshow("right", right_frame) now = time.time() if AUTO and now - utc >= INTERVAL: shot("left", left_frame) shot("right", right_frame) counter += 1 utc = now key = cv2.waitKey(1) if key == ord("q"): break elif key == ord("s"): shot("left", left_frame) shot("right", right_frame) counter += 1 camera.release() cv2.destroyWindow("left") cv2.destroyWindow("right")三、目标追踪的实现 本文的思路是先实现单目相机(即左相机)的目标追踪,实现目标追踪后左相机目标处的二维像素坐标就得到了,再把左相机目标处的二维像素坐标加上 “视差” 就得到了右相机目标处的像素二维坐标。得到两个坐标后再利用最小二乘法得到第三维的像素坐标。 总之,先贴出单目相机的目标追踪代码: import cv2 vs = cv2.VideoCapture(0) # 参数0表示第一个摄像头 cv2.namedWindow("Frame") # 判断视频是否打开 if (vs.isOpened()): print('camera Opened') else: print('摄像头未打开') OPENCV_OBJECT_TRACKERS = { "csrt": cv2.TrackerCSRT_create, "kcf": cv2.TrackerKCF_create, "boosting": cv2.TrackerBoosting_create, "mil": cv2.TrackerMIL_create, "tld": cv2.TrackerTLD_create, "medianflow": cv2.TrackerMedianFlow_create, "mosse": cv2.TrackerMOSSE_create } trackers=cv2.MultiTracker_create() while True: frame=vs.read() frame=frame[1] if frame is None: break # 设置摄像头尺寸 (h,w) = frame.shape[:2] width = 800 r = width / float(w) dim = (width, int(h * r)) frame = cv2.resize(frame, dim, interpolation = cv2.INTER_AREA) # 对做摄像头做目标识别初始化 (success,boxes)=trackers.update(frame) # 画图的循环 for box in boxes: (x,y,w,h)=[int(v) for v in box] cv2.rectangle(frame, (x, y), (x + w, y + h), (0, 255, 0), 2) cv2.imshow('Frame', frame) # 按键判断是否设置了新的目标 key=cv2.waitKey(10) & 0xFF if key == ord('s'): box=cv2.selectROI('Frame', frame, fromCenter=False, showCrosshair=True) tracker=cv2.TrackerCSRT_create() print(type(box),type(box[0]),box[1],box) trackers.add(tracker, frame, box) elif key == 27: break vs.release() cv2.destroyAllWindows()运行之后弹出一个Frame窗口,按下按键“s”图像就会静止,可以用鼠标画一个框,然后再按空格就会开始目标追踪了。 四、z轴坐标的获取 这应该是比较核心的部分了,思路就是我在第三部分开头里说的。 (1)计算视差 这个函数会返回一个值disp,就是视差(disparity),视差的定义是disparity=ul-ur,即左图的像素坐标减去右图的像素坐标。视差越大,说明该点距离摄像头越近,这很好理解啊,把双目相机想象成你的眼睛,当你不停的闭一只眼,睁开另一只眼,你会发现视线里的物体会移动,且越近的物体移动的距离越大。是吧? # 视差计算 def stereoMatchSGBM(left_image, right_image, down_scale=False): # SGBM匹配参数设置 if left_image.ndim == 2: img_channels = 1 else: img_channels = 3 blockSize = 3 paraml = {'minDisparity': 0, 'numDisparities': 64, 'blockSize': blockSize, 'P1': 8 * img_channels * blockSize ** 2, 'P2': 32 * img_channels * blockSize ** 2, 'disp12MaxDiff': 1, 'preFilterCap': 63, 'uniquenessRatio': 15, 'speckleWindowSize': 100, 'speckleRange': 1, 'mode': cv2.STEREO_SGBM_MODE_SGBM_3WAY } # 构建SGBM对象 left_matcher = cv2.StereoSGBM_create(**paraml) paramr = paraml paramr['minDisparity'] = -paraml['numDisparities'] right_matcher = cv2.StereoSGBM_create(**paramr) # 计算视差图 size = (left_image.shape[1], left_image.shape[0]) if down_scale == False: disparity_left = left_matcher.compute(left_image, right_image) disparity_right = right_matcher.compute(right_image, left_image) else: left_image_down = cv2.pyrDown(left_image) right_image_down = cv2.pyrDown(right_image) factor = left_image.shape[1] / left_image_down.shape[1] disparity_left_half = left_matcher.compute(left_image_down, right_image_down) disparity_right_half = right_matcher.compute(right_image_down, left_image_down) disparity_left = cv2.resize(disparity_left_half, size, interpolation=cv2.INTER_AREA) disparity_right = cv2.resize(disparity_right_half, size, interpolation=cv2.INTER_AREA) disparity_left = factor * disparity_left disparity_right = factor * disparity_right # 真实视差(因为SGBM算法得到的视差是×16的) trueDisp_left = disparity_left.astype(np.float32) / 16. trueDisp_right = disparity_right.astype(np.float32) / 16. return trueDisp_left, trueDisp_right(2)目标处的左右像素点计算 得到了视差大小之后,就可以根据视差计算两边像素点的坐标了。disp是我们之前求出的视差的参数。注意这里是disp(yy,xx)而不是disp(xx,yy) ,你看下disp的长度和宽度就知道了 # 画图的循环,(x,y)和(x+w,y+h)是你画的框的左上角和右下角的两个坐标哈 for box in boxes: (x, y, w, h)=[int(v) for v in box] cv2.rectangle(left_frame, (x, y), (x + w, y + h), (0, 255, 0), 2) # 转化成框框中点的坐标 xx = round((2*x+w)/2) yy = round((2*y+h)/2) # xr和yr是右相机相应点的像素坐标 xr = xx+disp[yy, xx] yr = yy(3)z轴坐标计算 我只知道视差越小,深度越深。视差转化为现实坐标的我也不太懂原理,这个是其他人的代码。 def getDepthMapWithConfig(config : stereoconfig.stereoCamera) -> np.ndarray: fb = config.cam_matrix_left[0, 0] * (-config.T[0]) doffs = config.doffs disparity=dot_disp depth = fb/(disparity + doffs) return depth五、最终结果 我把所有代码都贴一下吧 import cv2 import argparse import numpy as np import stereoconfig # 左相机内参 leftIntrinsic = np.array([[684.8165, 0, 637.2704], [0, 685.4432, 320.5347], [0, 0, 1]]) # 右相机内参 rightIntrinsic = np.array([[778.2081, 0, 602.9231], [0, 781.9883, 319.6632], [0, 0, 1]]) # 旋转矩阵 leftRotation = np.array([[1, 0, 0], # 旋转矩阵 [0, 1, 0], [0, 0, 1]]) rightRotation = np.array([[0.9993, -0.0038, -0.0364], [0.0033, 0.9999, -0.0143], [0.0365, 0.0142, 0.9992]]) # 平移矩阵 rightTranslation = np.array([[-44.8076], [5.7648], [51.7586]]) leftTranslation = np.array([[0], # 平移矩阵 [0], [0]]) def getDepthMapWithConfig(config : stereoconfig.stereoCamera) -> np.ndarray: fb = config.cam_matrix_left[0, 0] * (-config.T[0]) doffs = config.doffs disparity=dot_disp depth = fb/(disparity + doffs) return depth # 预处理 def preprocess(img1, img2): # 彩色图->灰度图 if (img1.ndim == 3): img1 = cv2.cvtColor(img1, cv2.COLOR_BGR2GRAY) # 通过OpenCV加载的图像通道顺序是BGR if (img2.ndim == 3): img2 = cv2.cvtColor(img2, cv2.COLOR_BGR2GRAY) # 直方图均衡 img1 = cv2.equalizeHist(img1) img2 = cv2.equalizeHist(img2) return img1, img2 # 消除畸变 def undistortion(image, camera_matrix, dist_coeff): undistortion_image = cv2.undistort(image, camera_matrix, dist_coeff) return undistortion_image # 获取畸变校正和立体校正的映射变换矩阵、重投影矩阵 # @param:config是一个类,存储着双目标定的参数:config = stereoconfig.stereoCamera() def getRectifyTransform(height, width, config): # 读取内参和外参 left_K = config.cam_matrix_left right_K = config.cam_matrix_right left_distortion = config.distortion_l right_distortion = config.distortion_r R = config.R T = config.T # 计算校正变换 R1, R2, P1, P2, Q, roi1, roi2 = cv2.stereoRectify(left_K, left_distortion, right_K, right_distortion, (width, height), R, T, alpha=0) map1x, map1y = cv2.initUndistortRectifyMap(left_K, left_distortion, R1, P1, (width, height), cv2.CV_32FC1) map2x, map2y = cv2.initUndistortRectifyMap(right_K, right_distortion, R2, P2, (width, height), cv2.CV_32FC1) return map1x, map1y, map2x, map2y, Q # 畸变校正和立体校正 def rectifyImage(image1, image2, map1x, map1y, map2x, map2y): rectifyed_img1 = cv2.remap(image1, map1x, map1y, cv2.INTER_AREA) rectifyed_img2 = cv2.remap(image2, map2x, map2y, cv2.INTER_AREA) return rectifyed_img1, rectifyed_img2 # 视差计算 def stereoMatchSGBM(left_image, right_image, down_scale=False): # SGBM匹配参数设置 if left_image.ndim == 2: img_channels = 1 else: img_channels = 3 blockSize = 3 paraml = {'minDisparity': 0, 'numDisparities': 64, 'blockSize': blockSize, 'P1': 8 * img_channels * blockSize ** 2, 'P2': 32 * img_channels * blockSize ** 2, 'disp12MaxDiff': 1, 'preFilterCap': 63, 'uniquenessRatio': 15, 'speckleWindowSize': 100, 'speckleRange': 1, 'mode': cv2.STEREO_SGBM_MODE_SGBM_3WAY } # 构建SGBM对象 left_matcher = cv2.StereoSGBM_create(**paraml) paramr = paraml paramr['minDisparity'] = -paraml['numDisparities'] right_matcher = cv2.StereoSGBM_create(**paramr) # 计算视差图 size = (left_image.shape[1], left_image.shape[0]) if down_scale == False: disparity_left = left_matcher.compute(left_image, right_image) disparity_right = right_matcher.compute(right_image, left_image) else: left_image_down = cv2.pyrDown(left_image) right_image_down = cv2.pyrDown(right_image) factor = left_image.shape[1] / left_image_down.shape[1] disparity_left_half = left_matcher.compute(left_image_down, right_image_down) disparity_right_half = right_matcher.compute(right_image_down, left_image_down) disparity_left = cv2.resize(disparity_left_half, size, interpolation=cv2.INTER_AREA) disparity_right = cv2.resize(disparity_right_half, size, interpolation=cv2.INTER_AREA) disparity_left = factor * disparity_left disparity_right = factor * disparity_right # 真实视差(因为SGBM算法得到的视差是×16的) trueDisp_left = disparity_left.astype(np.float32) / 16. trueDisp_right = disparity_right.astype(np.float32) / 16. return trueDisp_left, trueDisp_right # 将h×w×3数组转换为N×3的数组 def hw3ToN3(points): height, width = points.shape[0:2] points_1 = points[:, :, 0].reshape(height * width, 1) points_2 = points[:, :, 1].reshape(height * width, 1) points_3 = points[:, :, 2].reshape(height * width, 1) points_ = np.hstack((points_1, points_2, points_3)) return points_ def getDepthMapWithQ(disparityMap: np.ndarray, Q: np.ndarray) -> np.ndarray: points_3d = cv2.reprojectImageTo3D(disparityMap, Q) depthMap = points_3d[:, :, 2] reset_index = np.where(np.logical_or(depthMap < 0.0, depthMap > 65535.0)) depthMap[reset_index] = 0 return depthMap.astype(np.float32) def getDepthMapWithConfig(config : stereoconfig.stereoCamera) -> np.ndarray: fb = config.cam_matrix_left[0, 0] * (-config.T[0]) doffs = config.doffs disparity=dot_disp depth = fb/(disparity + doffs) return depth vs = cv2.VideoCapture(0) # 参数0表示第一个摄像头 cv2.namedWindow("Frame") # 分配摄像头分辨率 vs.set(cv2.CAP_PROP_FRAME_WIDTH, 2560) vs.set(cv2.CAP_PROP_FRAME_HEIGHT, 720) # 判断视频是否打开 if (vs.isOpened()): print('camera Opened') else: print('摄像头未打开') OPENCV_OBJECT_TRACKERS = { "csrt": cv2.TrackerCSRT_create, "kcf": cv2.TrackerKCF_create, "boosting": cv2.TrackerBoosting_create, "mil": cv2.TrackerMIL_create, "tld": cv2.TrackerTLD_create, "medianflow": cv2.TrackerMedianFlow_create, "mosse": cv2.TrackerMOSSE_create } trackers=cv2.MultiTracker_create() # 读取相机内参和外参 # 使用之前先将标定得到的内外参数填写到stereoconfig.py中的StereoCamera类中 config = stereoconfig.stereoCamera() config.setMiddleBurryParams() print(config.cam_matrix_left) while True: frame=vs.read() frame=frame[1] if frame is None: break # 设置右摄像头尺寸 right_frame = frame[0:720, 1280:2560] (h,w) = right_frame.shape[:2] width = 800 r = width / float(w) dim = (width, int(h * r)) right_frame = cv2.resize(right_frame, dim, interpolation = cv2.INTER_AREA) # 设置左摄像头尺寸 left_frame = frame[0:720, 0:1280] (h,w) = left_frame.shape[:2] width = 800 r = width / float(w) dim = (width, int(h * r)) left_frame = cv2.resize(left_frame, dim, interpolation = cv2.INTER_AREA) # 对做摄像头做目标识别初始化 (success,boxes)=trackers.update(left_frame) # 画图的循环 for box in boxes: (x, y, w, h)=[int(v) for v in box] cv2.rectangle(left_frame, (x, y), (x + w, y + h), (0, 255, 0), 2) # 转化成框框中点的坐标 xx = round((2*x+w)/2) yy = round((2*y+h)/2) # 读取一帧图片 iml = left_frame # 左图 imr = right_frame # 右图 height, width = iml.shape[0:2] # 立体校正 map1x, map1y, map2x, map2y, Q = getRectifyTransform(height, width, config) # 获取用于畸变校正和立体校正的映射矩阵以及用于计算像素空间坐标的重投影矩阵 iml_rectified, imr_rectified = rectifyImage(iml, imr, map1x, map1y, map2x, map2y) print(Q) # 立体匹配 iml_, imr_ = preprocess(iml, imr) # 预处理,一般可以削弱光照不均的影响,不做也可以 disp, _ = stereoMatchSGBM(iml, imr, False) # 这里传入的是未经立体校正的图像,因为我们使用的middleburry图片已经是校正过的了 dot_disp=disp[yy][xx] cv2.imwrite('disaprity.jpg', disp * 4) # xr和yr是右相机相应点的像素坐标 z=getDepthMapWithConfig(config) text = str(xx)+','+str(yy)+','+str(z) cv2.putText(left_frame, text, (x, y), cv2.FONT_HERSHEY_COMPLEX, 0.6, (0, 0, 255), 1) # 显示两个框 cv2.imshow("right", right_frame) cv2.imshow('Frame', left_frame) # 按键判断是否设置新的目标 key=cv2.waitKey(10) & 0xFF if key == ord('s'): box=cv2.selectROI('Frame', left_frame, fromCenter=False, showCrosshair=True) tracker=cv2.TrackerCSRT_create() print(type(box),type(box[0]),box[1],box) trackers.add(tracker, left_frame, box) elif key == 27: break vs.release() cv2.destroyAllWindows() |

 再说一下具体的步骤
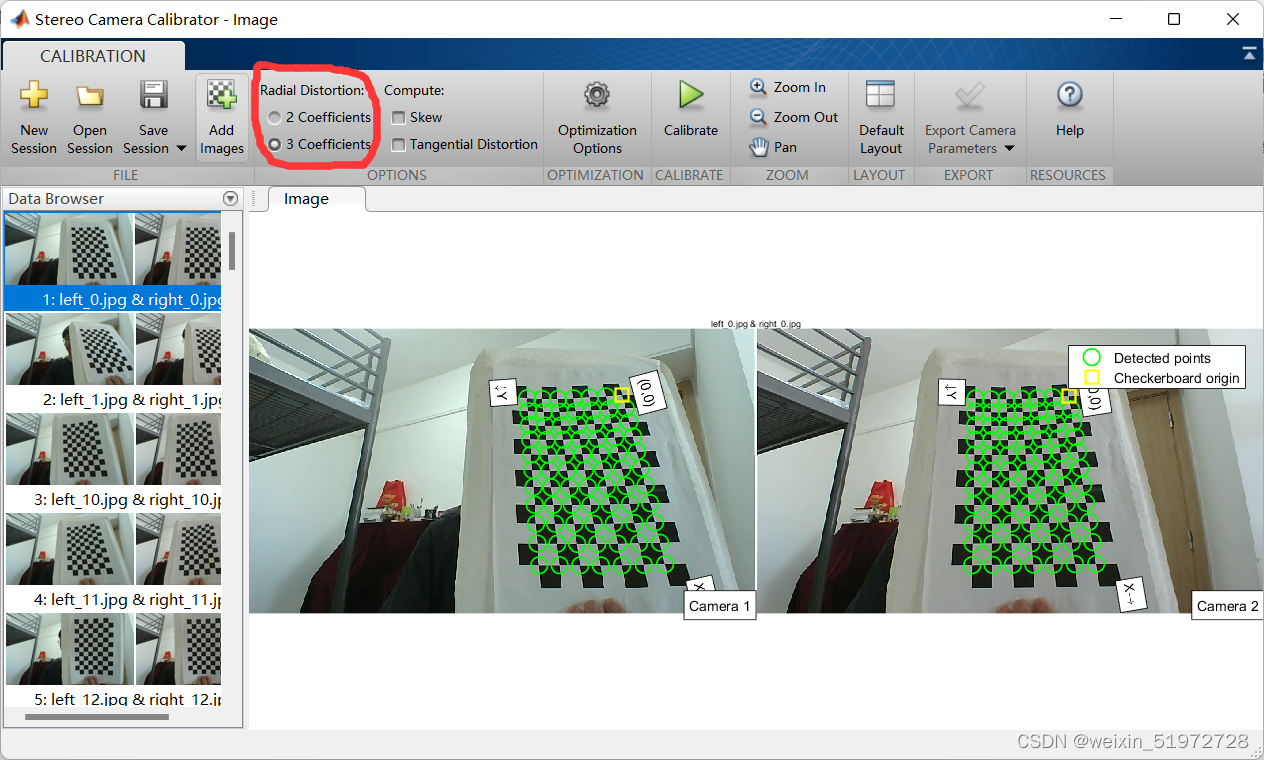
【本文地址】
今日新闻 |
推荐新闻 |