项目四 无线网络配置(使用华为模拟器eNSP) |
您所在的位置:网站首页 › 华为ac如何配置 › 项目四 无线网络配置(使用华为模拟器eNSP) |
项目四 无线网络配置(使用华为模拟器eNSP)
|
任务一 无线网络的基本配置
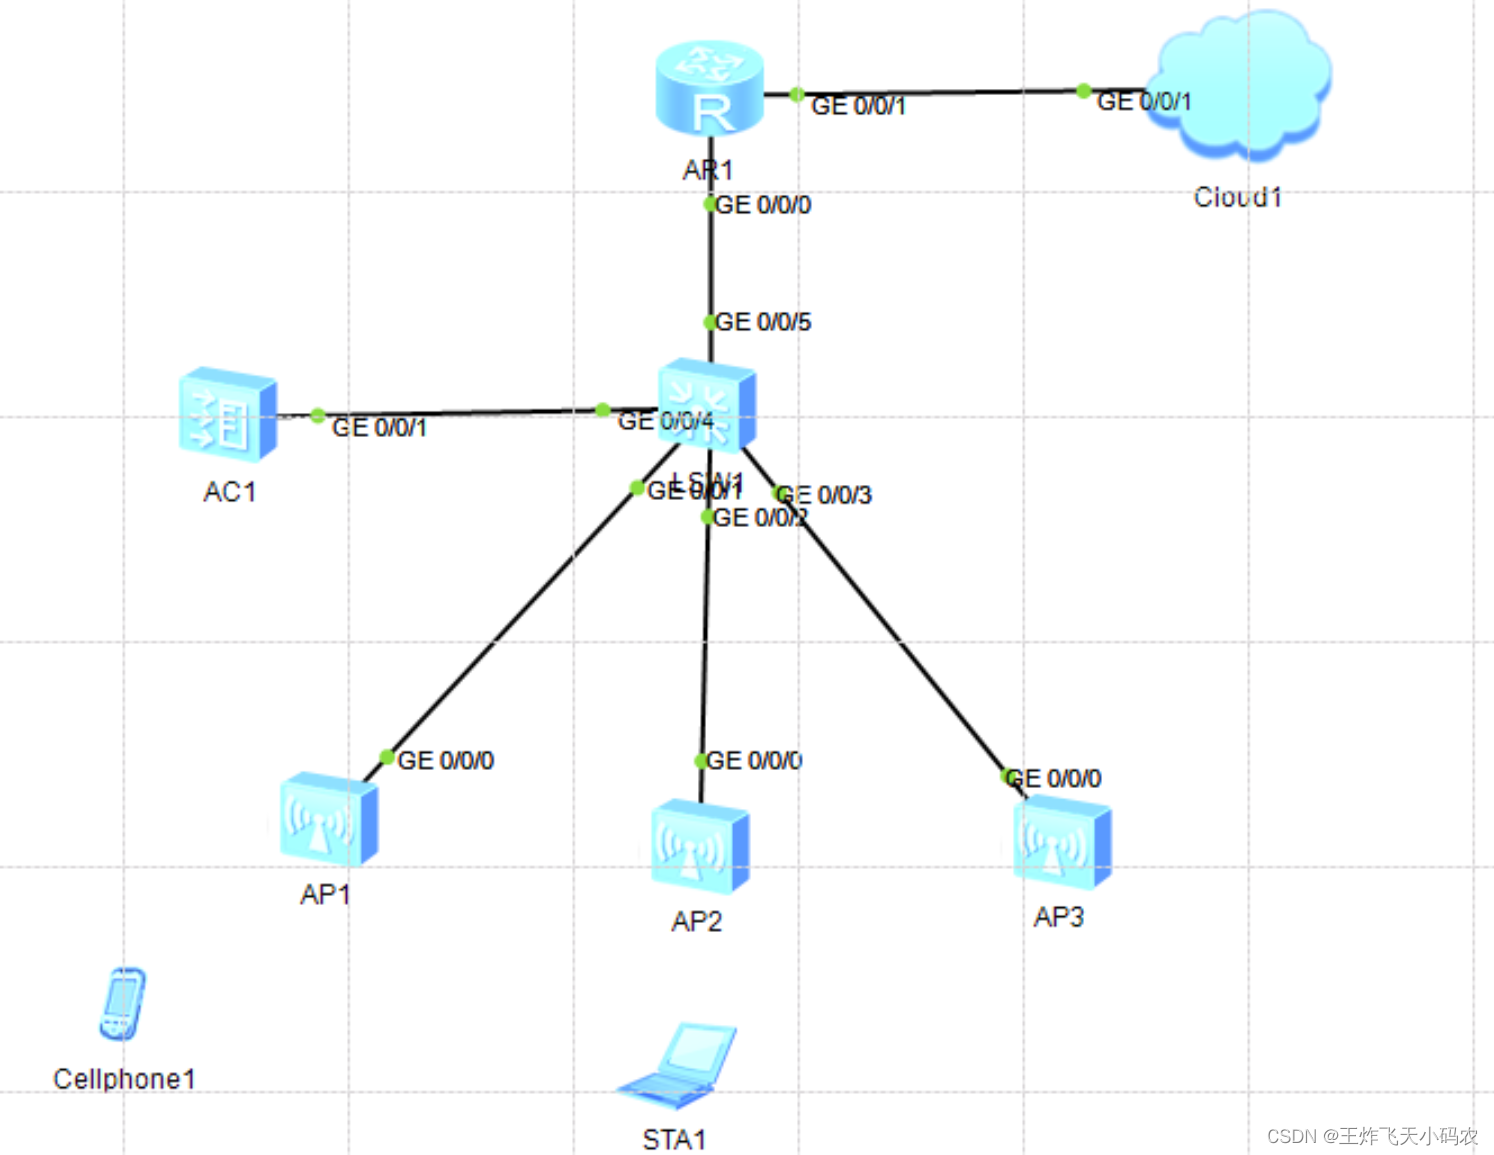
信科公司的WLAN集群管理采用AC+FitAP的模式。在AC上面可以对AP进行基本的配置管理操作,包括向Valided AP表中添加AP、配置AP的位置信息。本任务介绍了在AC上配置AP的具体操作,网络拓扑图如图4-1所示。
步骤1 安装无线路由器和无线AP,连接方式如下网络拓扑图 进行终端登录,Windows XP可以使用系统自带的管理终端进行登录,Windows 7可下载软件“SecureCRT”进行登录。登录前在“快速连接”对话框中设置软件参数并点击“连接”,如图4-3所示。 步骤2 在AC上面对与之关联的AP进行配置。配置AP的位置信息为“cn”,代码如下: sys /*进入系统视图/ wlan /*进入到wlan视图下/ regulatory-domain-profile name domain1 /*创建域管理的模板,名称为domain1/ country-code cn /*国家编码为cn(中国)/ quit /*返回到wlan视图下/ ap-group name apg-lhh /*创建ap管理组,组名为apg-lhh/ regulatory-domain-profile domain1 /*将域管理模板引入到apg-lhh组里/ /返回系统视图下/ wlan /*进入到wlan视图下/ ap auth-mode mac-auth /*ap的认证方式为mac认证/ ap-id 1 ap-mac 00e0-fcc6-2a10 /*ap序号为1,mac地址为00e0-fcc6-2a10 / ap-name ap-wifi1 /*将此ap命名为ap-wifi1 / ap-group apg-lhh /*将此ap放入到apg-lhh组里/ /返回系统视图下/ 任务二 无线网络的接入信科公司部署无线网络之后,陆续因无线接入出现网络故障,影响了网络的稳定。经过分析研究,公司决定把办公无线接入和来宾接入隔离,使用两个SSID标识,负载均衡,提高网络安全,网络拓扑图如图4-4所示。具体操作如下:
图4-4 网络拓扑图 注:云端开启步骤: (1)双击“云朵”,使用端口选项选择GE
(2)端口映射设置 (1)配置出口路由器端口 (2)配置AC
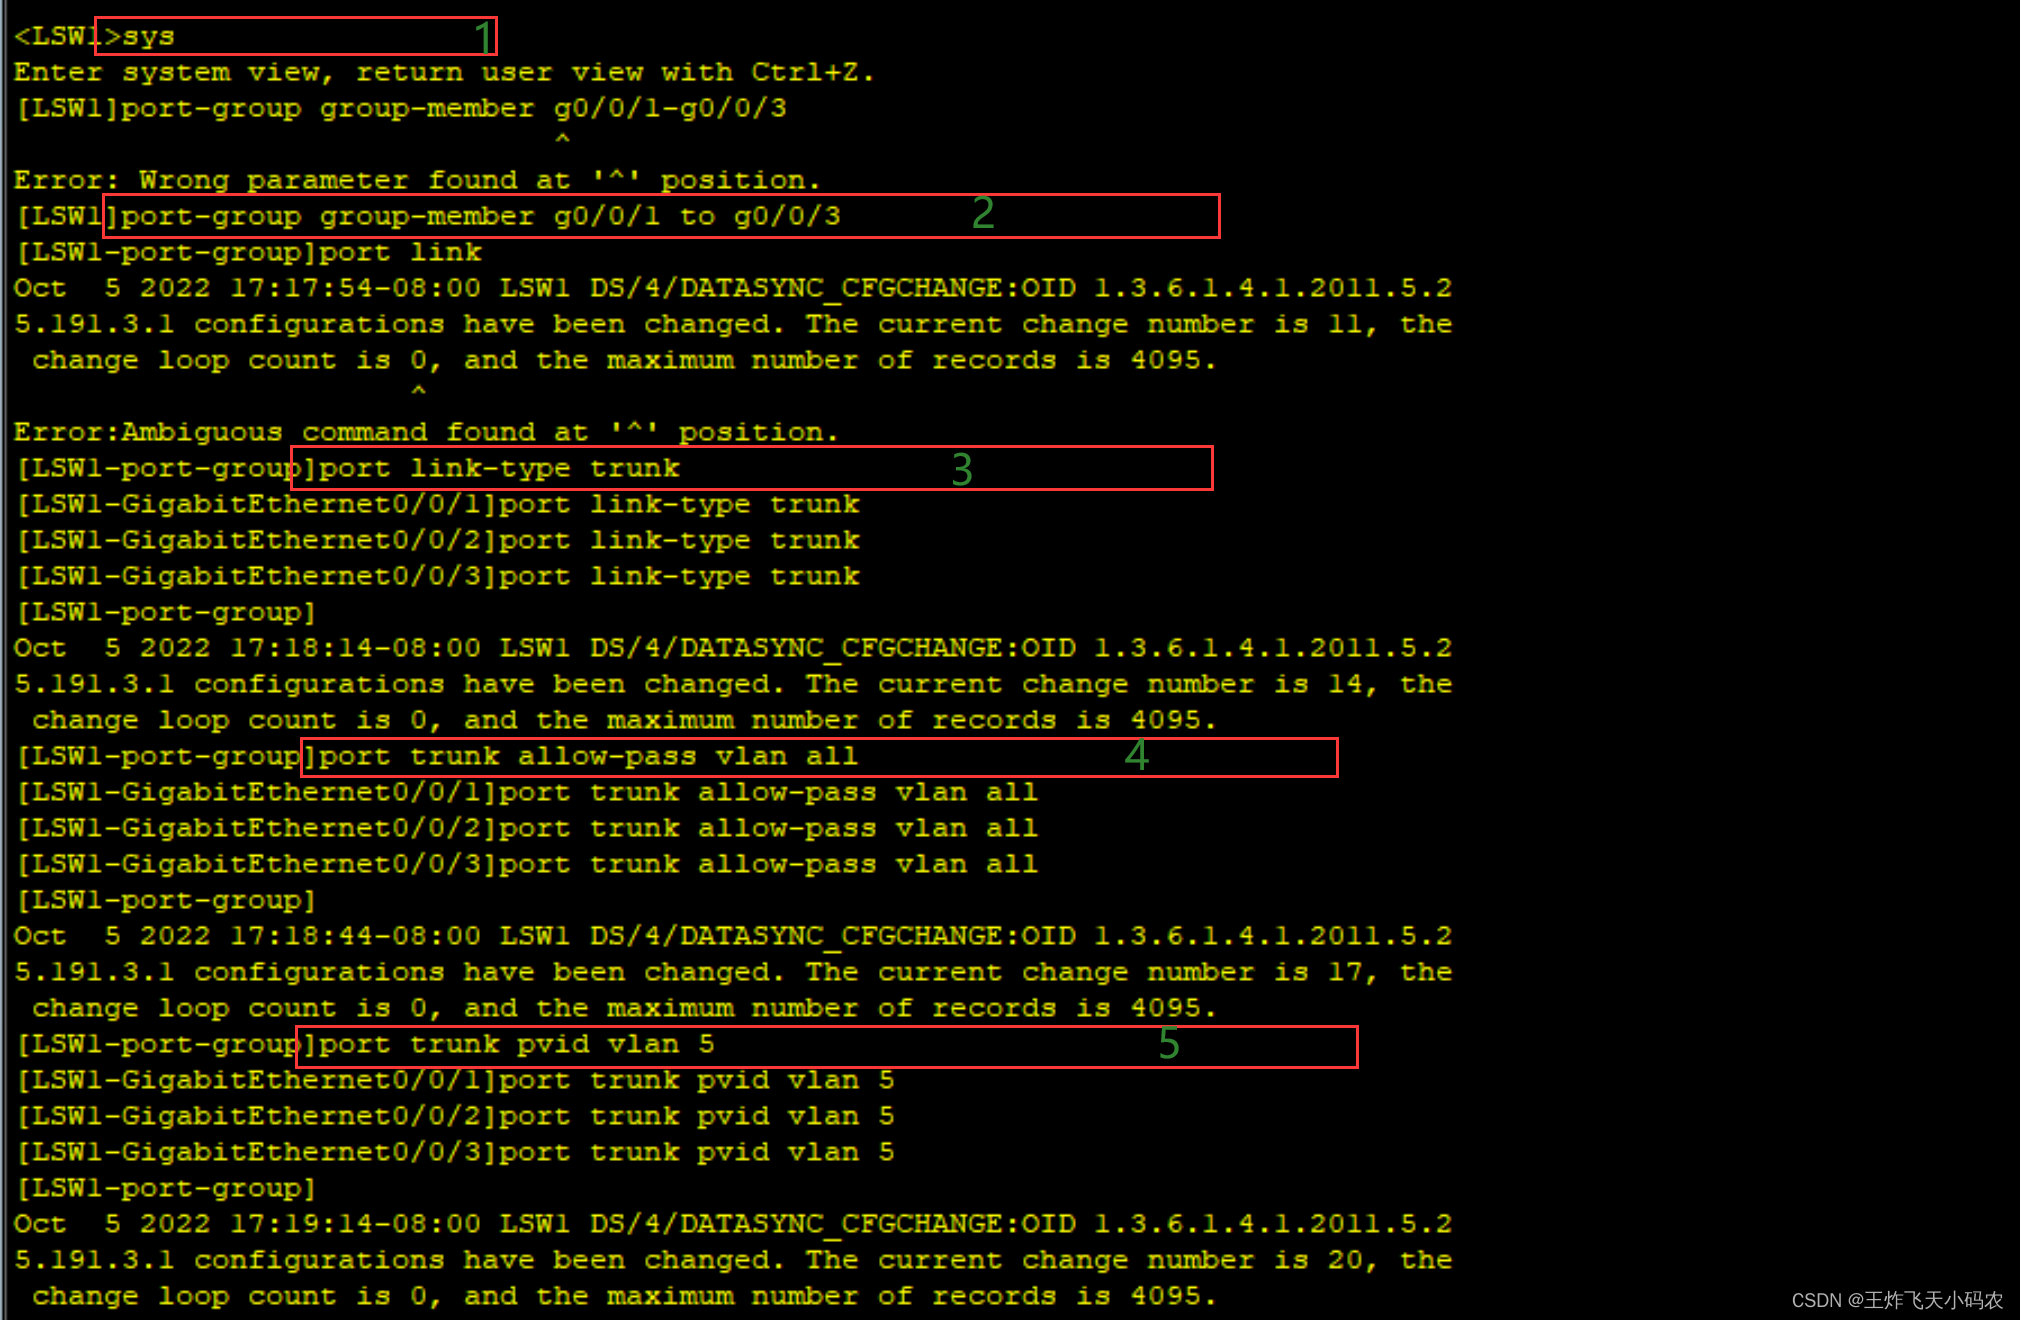
(3) 配置核心交换机 sys [Huawei]sysname LSW1 [LSW1]vlan batch 5 10 [LSW1]int vlanif 1 [LSW1-Vlanif1]ip add 10.0.0.1 24 [LSW1-Vlanif1]int vlanif 5 [LSW1-Vlanif5]ip add 192.168.0.1 24 [LSW1-Vlanif5]int vlanif 10 [LSW1-Vlanif10]ip add 172.16.1.1 24 [LSW1-Vlanif10]int g0/0/4 [LSW1-GigabitEthernet0/0/4]port link-type trunk [LSW1-GigabitEthernet0/0/4]port trunk allow-pass vlan all
(1)首先AC设置静态路由 (2)其次 路由器设置静态路由 sys Enter system view, return user view with Ctrl+Z. [AR]ip route-static 0.0.0.0 0 10.0.0.1 [AR]
查看AP的地址有没有上来;以AP1为例,双击AP设备,输入以下代码: dis ip int bri
ping一下AC看看通不通
确认无误,进行下一步 步骤4 注册AP注:以下配置,可能会弹出的警告,都选Y。 sys Enter system view, return user view with Ctrl+Z. #指定capwap协议的信令源地址 [AC1]capwap source interface Vlanif 10 [AC1]wlan # 进入wlan视图 [AC1-wlan-view]ap auth-mode mac-auth # 配置AC的验证方式为MAC验证 ## 创建域配置并配置国家码,使AP的射频特性符合国家的法律法规要求 [AC1-wlan-view]regulatory-domain-profile name CN # 创建域配置 [AC1-wlan-regulate-domain-CN]country-code CN # 国家码:中国 Info: The current country code is same with the input country code. [AC1-wlan-regulate-domain-CN]q ## 创建AP-group [AC1-wlan-view]ap-group name guest # 创建guest组 [AC1-wlan-ap-group-guest]regulatory-domain-profile CN # 关联刚才的域配置 Warning: Modifying the country code will clear channel, power and antenna gain c onfigurations of the radio and reset the AP. Continue?[Y/N]:y [AC1-wlan-ap-group-guest]q [AC1-wlan-view]ap-group name work # 创建work组 Info: This operation may take a few seconds. Please wait for a moment.done. [AC1-wlan-ap-group-work]regulatory-domain-profile CN # 关联刚才的域配置 Warning: Modifying the country code will clear channel, power and antenna gain c onfigurations of the radio and reset the AP. Continue?[Y/N]:y [AC1-wlan-ap-group-work]q
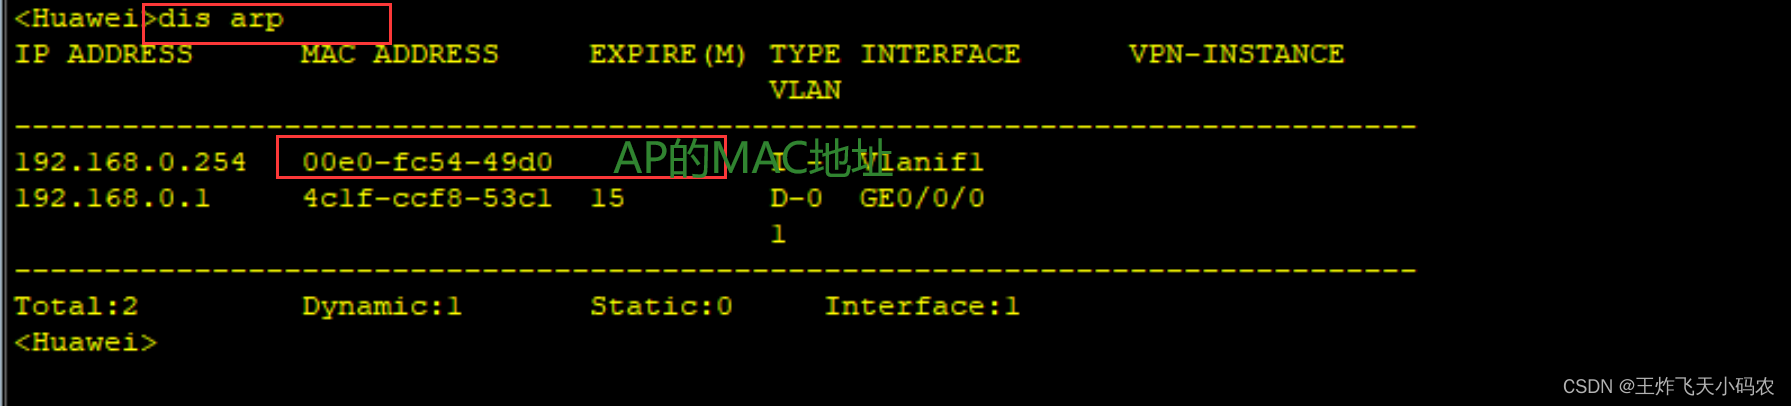
查看AP的MAC地址如下: (1)依次双击AP1,AP2,AP3,输入指令:
将mac地址复制备用: AP1:00e0-fc54-49d0 AP2: 00e0-fc4d-4a80 AP3: 00e0-fc15-5570 ## 基于mac地址注册AP sys Enter system view, return user view with Ctrl+Z. [AC1]wlan [AC1-wlan-view]ap-id 1 ap-mac 00e0-fc54-49d0 # 加入AP。mac地址可以通过查看核心交换机的mac地址表,或者右键AP打开设置查看 [AC1-wlan-ap-1]ap-name guest1 # 将AP名字更改为guest1 [AC1-wlan-ap-1]ap-group guest # 将AP加入刚才配置的guest组 Warning: This operation may cause AP reset. If the country code changes, it will clear channel, power and antenna gain configurations of the radio, Whether to c ontinue? [Y/N]:y Info: This operation may take a few seconds. Please wait for a moment.. done. [AC1-wlan-ap-1]q [AC1-wlan-view]ap-id 2 ap-mac 00e0-fc4d-4a80 [AC1-wlan-ap-2]ap-name guest2 [AC1-wlan-ap-2]ap-group guest Warning: This operation may cause AP reset. If the country code changes, it will clear channel, power and antenna gain configurations of the radio, Whether to c ontinue? [Y/N]:y Info: This operation may take a few seconds. Please wait for a moment.. done. [AC1-wlan-ap-2]q [AC1-wlan-view]ap-id 3 ap-mac 00e0-fc15-5570 [AC1-wlan-ap-3]ap-name work1 [AC1-wlan-ap-3]ap-group work Warning: This operation may cause AP reset. If the country code changes, it will clear channel, power and antenna gain configurations of the radio, Whether to c ontinue? [Y/N]:y Info: This operation may take a few seconds. Please wait for a moment.. done. [AC1-wlan-ap-3]q [AC1-wlan-view]
可以看到state为nor,说明注册成功; 等三台设备全部上线,确认无误再进行下一步 步骤5 分配无线参数 [AC1]vlan pool sta-pool101 # 新建vlan地址池,名称为sta-pool101 [AC1-vlan-pool-sta-pool101]vlan 101 [AC1-vlan-pool-sta-pool101]quit [AC1]vlan pool sta-pool102 [AC1-vlan-pool-sta-pool102]vlan 102 [AC1-vlan-pool-sta-pool102]quit ## 安全配置(WIFI密码) [AC1]wlan [AC1-wlan-view]security-profile name guest # 新建安全配置,名称为guest [AC1-wlan-sec-prof-guest]security wpa2 psk pass-phrase a12345678 aes # 配置加密方式为wpa2-psk,aes密文存放 [AC1-wlan-sec-prof-guest]quit [AC1-wlan-view]security-profile name work [AC1-wlan-sec-prof-work]security wpa2 psk pass-phrase a12345678 aes [AC1-wlan-sec-prof-work]quit ## SSID配置(WIFI名称) [AC1-wlan-view]ssid-profile name guest # 新建SSID配置,名称为guest [AC1-wlan-ssid-prof-guest]ssid guest # 配置SSID名为guest [AC1-wlan-ssid-prof-guest]quit [AC1-wlan-view]ssid-profile name work [AC1-wlan-ssid-prof-work]ssid work [AC1-wlan-ssid-prof-work]quit ## 虚拟接入点(vpa)配置 [AC1-wlan-view]vap-profile name guest # 新建vap配置,名称为guest [AC1-wlan-vap-prof-guest]service-vlan vlan-pool sta-pool101 # 应用vlan地址池 [AC1-wlan-vap-prof-guest]security-profile guest # 应用安全配置 [AC1-wlan-vap-prof-guest]ssid-profile guest # 应用SSID [AC1-wlan-vap-prof-guest]quit [AC1-wlan-view]vap-profile name work [AC1-wlan-vap-prof-work]service-vlan vlan-pool sta-pool102 [AC1-wlan-vap-prof-work]security-profile work [AC1-wlan-vap-prof-work]ssid-profile work [AC1-wlan-vap-prof-work]quit ## 开启无线电信号 [AC1-wlan-view]ap-group name guest [AC1-wlan-ap-group-guest]vap-profile guest wlan 1 radio 0 # 应用虚拟接入点配置,wlanid为1,radio 0意思是使用2.4GHz的频段 [AC1-wlan-ap-group-guest]vap-profile guest wlan 1 radio 1 # 配置双射频,radio 1=5GHz [AC1-wlan-ap-group-guest]quit [AC1-wlan-view]ap-group name work [AC1-wlan-ap-group-work]vap-profile work wlan 1 radio 0 [AC1-wlan-ap-group-work]vap-profile work wlan 1 radio 1
此时 网络拓扑图显示信号覆盖范围,如下图所示:
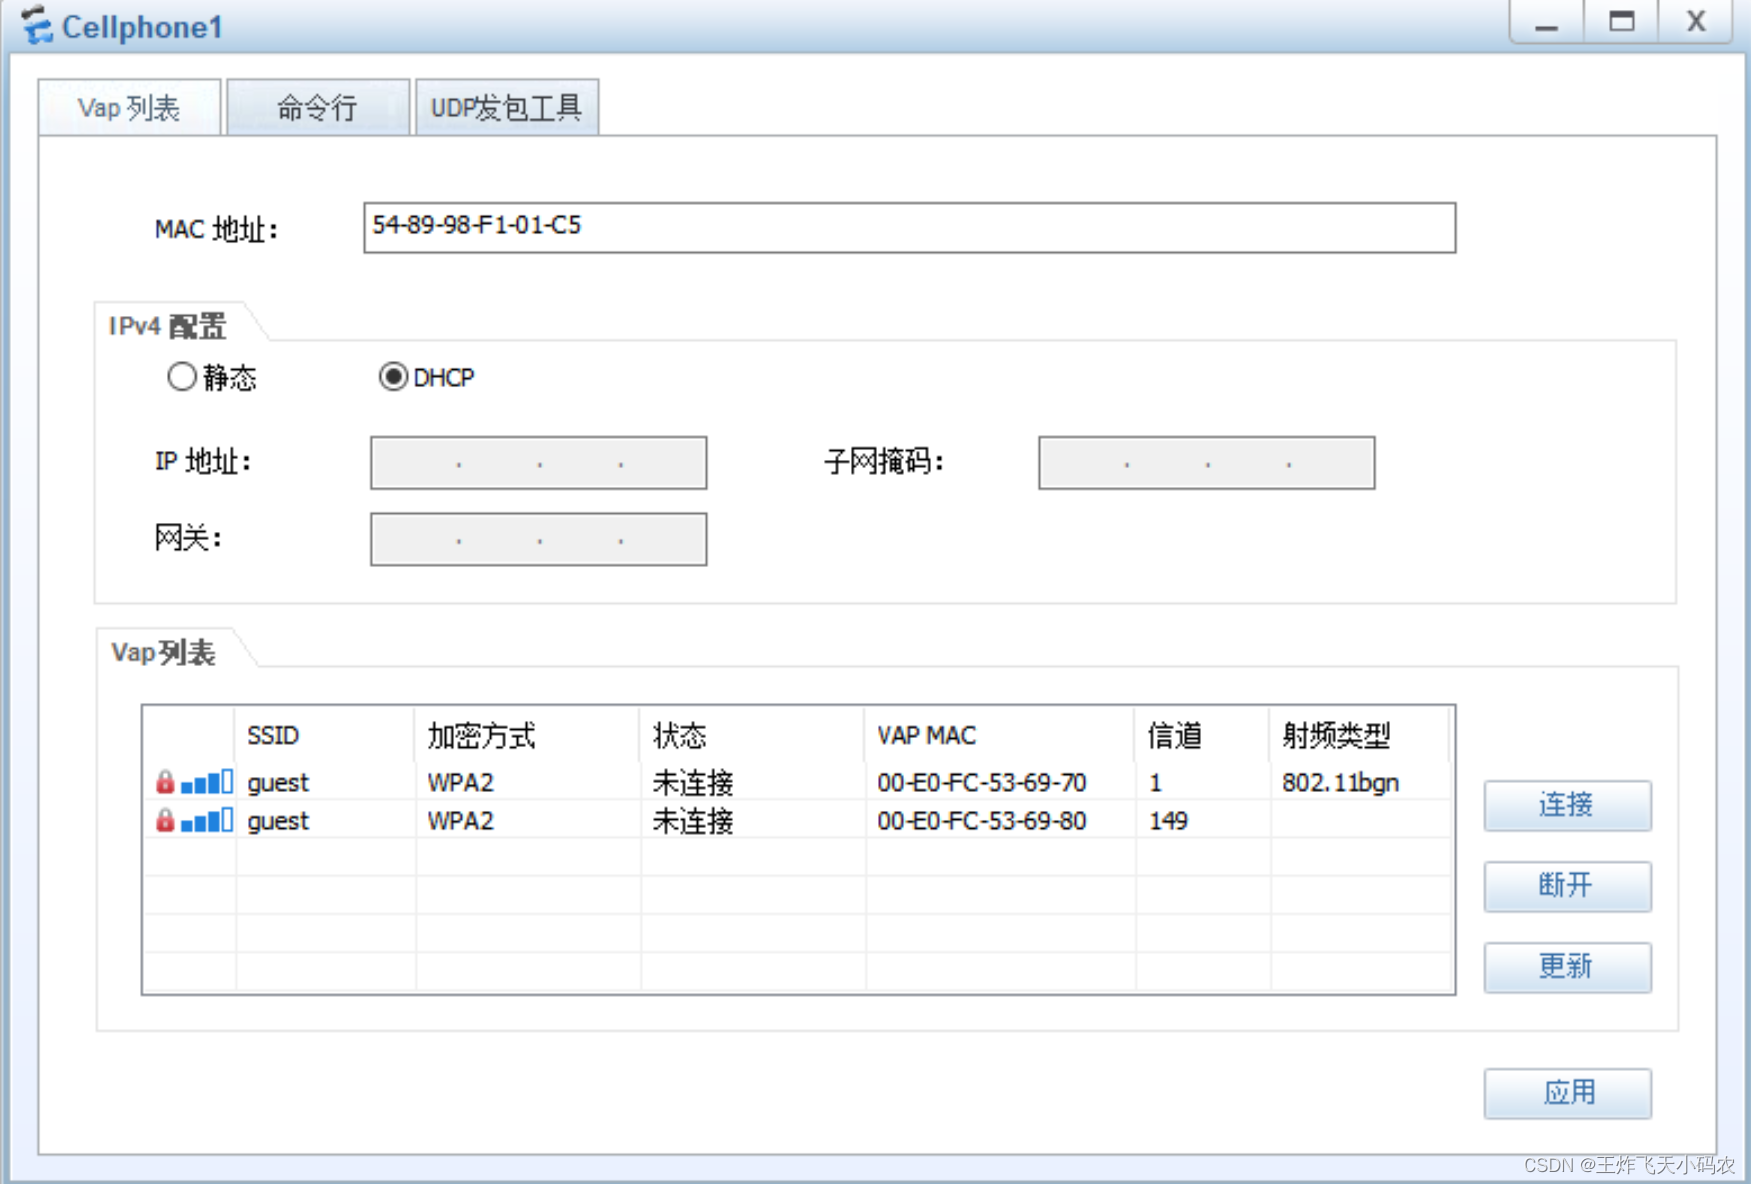
步骤7 在终端设备连接AP,并输入密码 双击 phone,具体链接过程如下图:
笔记本联网模拟:
笔记本单独联通后拓扑图如下图:
|


 (3)最后 在AC上测试连通性
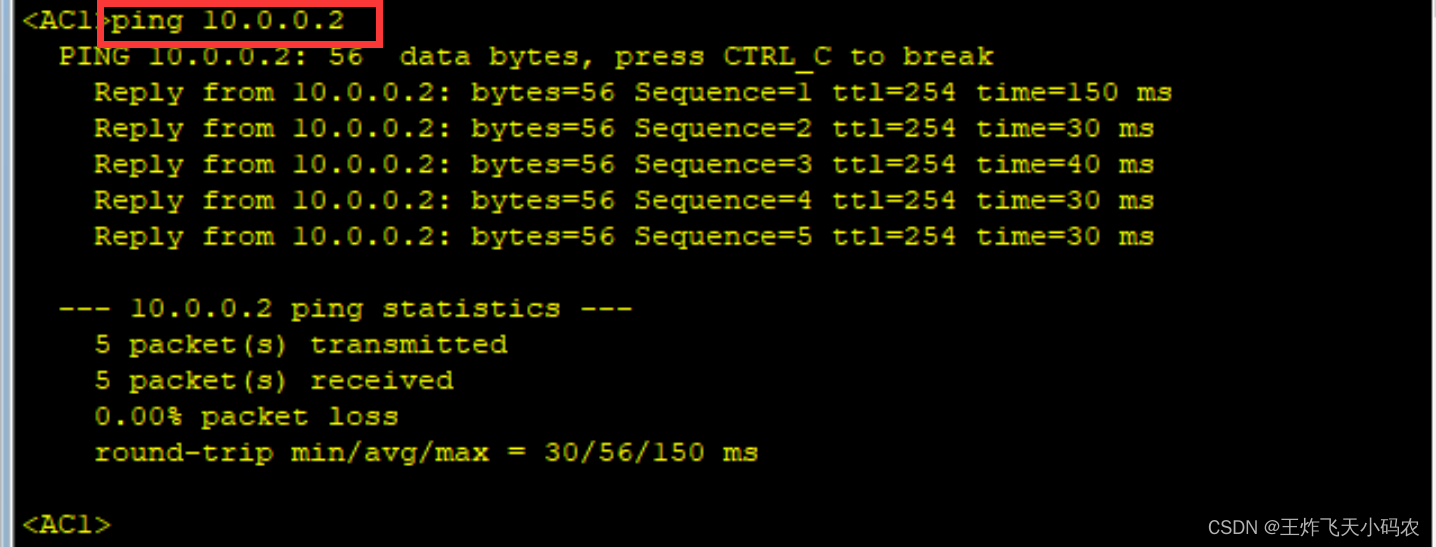


 注: 到此处AP会自动重启,且AP名字会被更改(如果没有自动重启,可以自己手动重启) ; 重启完在AC上查看AP是否注册成功:


 有时间的话可以测试一下网络连通性:
【本文地址】
今日新闻 |
推荐新闻 |