前端自动化部署项目到服务器 |
您所在的位置:网站首页 › 前端怎么部署项目 › 前端自动化部署项目到服务器 |
前端自动化部署项目到服务器
|
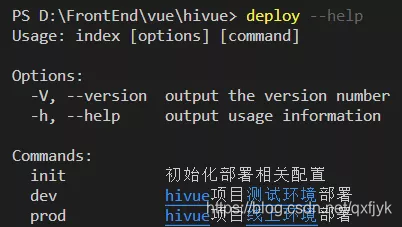
传统的前端代码手工部署流程如下: 1.打包,本地运行npm run build打包生成dist文件夹。 2.ssh连接服务器,切换路径到web对应目录下。 3.上传代码到web目录,一般通过xshell或者xftp完成。 传统的手工部署存在以下缺点: 1.每次都需要打开xshell软件与服务器建立连接。 2.当负责多个项目且每个项目都具有测试环境和线上环境时,容易引起部署错误。 (个人之前非常悲剧地遇到过一次,由于同时负责四个项目,八个环境。一天同时可能修改多个项目,头晕脑胀,将测试环境代码部署到线上环境了,欲哭无泪) 全自动化的部署其实可以采用jenkins实现,jenkins可以根据gitlab push或者merge事件自动打包代码到web目录,可以参考: Jenkins+Docker自动化部署vue项目 采用jenkins部署是很方便,但是也存在安装配置麻烦、打包占用服务器资源等缺点。 由于我们的服务器常年高负载运行,曾出现jenkeins打包把服务器打崩的情况,因此只能逼着博主采用轻量部署的方案来实现自动化部署了(果然技术方案都是被逼出来的,哈哈)。1.方案调研 思考: 能不能运行类似npm run deploy一个脚本就直接将我们的代码打包、部署到服务器上的web目录? 经过一番调研:发现node-ssh、archiver可以满足我们的需求。 1.1.node-sshnode-ssh是一个基于ssh2的轻量级npm包,主要用于ssh连接服务器、上传文件、执行命令。 使用指南: const node_ssh = require('node-ssh') const ssh = new node_ssh() 用到的api:1.ssh.connect:连接服务器 ssh.connect({ host: 'localhost', username: 'steel', privateKey: '/home/steel/.ssh/id_rsa' }) 2.ssh.putFile:上传文件 ssh.putFile('/home/steel/Lab/localPath', '/home/steel/Lab/remotePath').then(function() { console.log("The File thing is done") }, function(error) { console.log("Something's wrong") console.log(error) }) 3.ssh.execCommand:执行远端服务器命令 ssh.execCommand('hh_client --json', { cwd:'/var/www' }).then(function(result) { console.log('STDOUT: ' + result.stdout) console.log('STDERR: ' + result.stderr) }) 1.2.archiver archiver是一个用于生成存档的npm包,主要用于打包生成zip、rar等。使用指南: const archiver = require('archiver'); // 设置压缩类型及级别 const archive = archiver('zip', { zlib: { level: 9 }, }).on('error', err => { throw err; }); // 创建文件输出流 const output = fs.createWriteStream(__dirname + '/dist.zip'); // 通过管道方法将输出流存档到文件 archive.pipe(output); // 从subdir子目录追加内容并重命名 archive.directory('subdir/', 'new-subdir'); // 完成打包归档 archive.finalize(); 1.3.部署方案部署方案设计如下: 问题: 上面的方案已经可以完成一个项目的自动化部署,但是再有一个新的项目要接入自动化部署,是不是又得把整个文件拷贝过去,是不是非常麻烦? 因此可以将自动化部署做成一个脚手架fe-deploy-cli,支持生成部署配置模板、脚本部署,只需一条命令即可部署到对应环境中。 与脚手架相关的npm包: commander:node.js命令行界面的完整解决方案 download-git-repo:git仓库代码下载 ora:显示加载中的效果 inquirer:用户与命令交互的工具 child_process:npm内置模块,用于执行package.json中的打包script 2.1.初始化初始化需要在github上新建一个部署配置git仓库,执行deploy init通过download-git-repo从git上拉取配置模板。 // init.js #!/usr/bin/env node const fs = require('fs'); const path = require('path'); const download = require('download-git-repo'); const ora = require('ora'); const { successLog, infoLog, errorLog } = require('../utils/index'); let tmp = 'deploy'; const deployPath = path.join(process.cwd(), './deploy'); const deployConfigPath = `${deployPath}/deploy.config.js`; const deployGit = 'dadaiwei/fe-deploy-cli-template'; // 检查部署目录及部署配置文件是否存在 const checkDeployExists = () => { if (fs.existsSync(deployPath) && fs.existsSync(deployConfigPath)) { infoLog('deploy目录下的deploy.config.js配置文件已经存在,请勿重新下载'); process.exit(1); return; } downloadAndGenerate(deployGit); }; // 下载部署脚本配置 const downloadAndGenerate = templateUrl => { const spinner = ora('开始生成部署模板'); spinner.start(); download(templateUrl, tmp, { clone: false }, err => { if (err) { console.log(); errorLog(err); process.exit(1); } spinner.stop(); successLog('模板下载成功,模板位置:deploy/deploy.config.js'); infoLog('请配置deploy目录下的deploy.config.js配置文件'); process.exit(0); }); }; module.exports = () => { checkDeployExists(); }; 2.2.设定配置 通过修改deploy.config.js,设定dev(测试环境)和prod(线上环境)的配置。 // deploy.config.js module.exports = { privateKey: '', // 本地私钥地址,位置一般在C:/Users/xxx/.ssh/id_rsa,非必填,有私钥则配置 passphrase: '', // 本地私钥密码,非必填,有私钥则配置 projectName: '', // 项目名称 dev: { // 测试环境 name: '测试环境', script: "npm run build", // 测试环境打包脚本 host: '', // 测试服务器地址 port: 22, // ssh port,一般默认22 username: '', // 登录服务器用户名 password: '', // 登录服务器密码 distPath: 'dist', // 本地打包dist目录 webDir: '', // // 测试环境服务器地址 }, prod: { // 线上环境 name: '线上环境', script: "npm run build", // 线上环境打包脚本 host: '', // 线上服务器地址 port: 22, // ssh port,一般默认22 username: '', // 登录服务器用户名 password: '', // 登录服务器密码 distPath: 'dist', // 本地打包dist目录 webDir: '' // 线上环境web目录 } // 再还有多余的环境按照这个格式写即可 } 2.3.注册部署命令 注册部署命令就是从deploy.config.js中读取dev和prod配置,然后通过program.command注册dev和prod command,运行deploy dev或者deploy prod即进入1.3节的部署流程。 // 部署流程 function deploy() { // 检测部署配置是否合理 const deployConfigs = checkDeployConfig(deployConfigPath); if (!deployConfigs) { process.exit(1); } // 注册部署命令,注册后支持deploy dev和deploy prod deployConfigs.forEach(config => { const { command, projectName, name } = config; program .command(`${command}`) .description(`${underlineLog(projectName)}项目${underlineLog(name)}部署`) .action(() => { inquirer.prompt([ { type: 'confirm', message: `${underlineLog(projectName)}项目是否部署到${underlineLog(name)}?`, name: 'sure' } ]).then(answers => { const { sure } = answers; if (!sure) { process.exit(1); } if (sure) { const deploy = require('../lib/deploy'); deploy(config); } }); }); }); } 3.使用指南 前提条件:能通过ssh连上服务器即可。 适用对象:目前还在采用手工部署又期望快速实现轻量化部署的小团队或者个人项目,毕竟像阿里这种大公司都有完善的前端部署平台。使用指南:http://note.youdao.com/s/YiQ861Tv 3.1.安装 npm i fe-deploy-cli -g查看版本,安装成功
具体配置信息请参考配置文件注释: module.exports = { privateKey: '', // 本地私钥地址,位置一般在C:/Users/xxx/.ssh/id_rsa,非必填,有私钥则配置 passphrase: '', // 本地私钥密码,非必填,有私钥则配置 projectName: 'hivue', // 项目名称 dev: { // 测试环境 name: '测试环境', script: "npm run build-dev", // 测试环境打包脚本 host: '10.240.176.99', // 测试服务器地址 port: 22, // ssh port,一般默认22 username: 'root', // 登录服务器用户名 password: '123456', // 登录服务器密码 distPath: 'dist', // 本地打包dist目录 webDir: '/var/www/html/dev/hivue', // // 测试环境服务器地址 }, prod: { // 线上环境 name: '线上环境', script: "npm run build", // 线上环境打包脚本 host: '10.240.176.99', // 线上服务器地址 port: 22, // ssh port,一般默认22 username: 'root', // 登录服务器用户名 password: '123456', // 登录服务器密码 distPath: 'dist', // 本地打包dist目录 webDir: '/var/www/html/prod/hivue' // 线上环境web目录 } // 再还有多余的环境按照这个格式写即可 } 3.4.查看部署命令(该步可省略)配置好deploy.config.js,运行 deploy --help
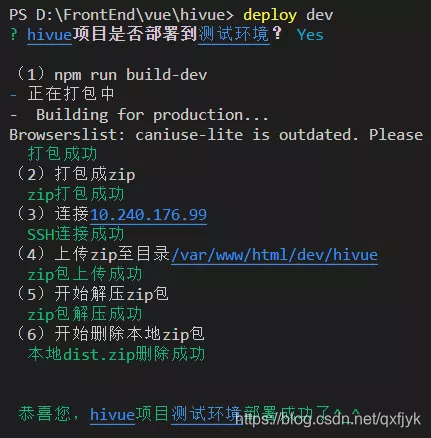
测试环境部署采用的是dev的配置 deploy dev先有一个确认,确认后进入部署流程,脚本自动完成6步操作后,恭喜您,部署成功!!!
线上环境部署采用的是prod的配置 deploy prod部署流程和测试环境部署相同: 上面已经实现了脚手架自动化部署,部署核心代码deploy.js采用async await替换Promise优化了下。 // deploy.js const path = require('path'); const fs = require('fs'); const childProcess = require('child_process'); const ora = require('ora'); const node_ssh = require('node-ssh'); const archiver = require('archiver'); const { successLog, errorLog, underlineLog } = require('../utils/index'); const projectDir = process.cwd(); let ssh = new node_ssh(); // 生成ssh实例 // 部署流程入口 async function deploy(config) { const { script, webDir, distPath, projectName, name } = config; try { execBuild(script); await startZip(distPath); await connectSSH(config); await uploadFile(webDir); await unzipFile(webDir); await deleteLocalZip(); successLog(`\n 恭喜您,${underlineLog(projectName)}项目${underlineLog(name)}部署成功了^_^\n`); process.exit(0); } catch (err) { errorLog(` 部署失败 ${err}`); process.exit(1); } } // 第一步,执行打包脚本 function execBuild(script) { try { console.log(`\n(1)${script}`); const spinner = ora('正在打包中'); spinner.start(); console.log(); childProcess.execSync(script, { cwd: projectDir }); spinner.stop(); successLog(' 打包成功'); } catch (err) { errorLog(err); process.exit(1); } } // 第二部,打包zip function startZip(distPath) { return new Promise((resolve, reject) => { distPath = path.resolve(projectDir, distPath); console.log('(2)打包成zip'); const archive = archiver('zip', { zlib: { level: 9 }, }).on('error', err => { throw err; }); const output = fs.createWriteStream(`${projectDir}/dist.zip`); output.on('close', err => { if (err) { errorLog(` 关闭archiver异常 ${err}`); reject(err); process.exit(1); } successLog(' zip打包成功'); resolve(); }); archive.pipe(output); archive.directory(distPath, '/'); archive.finalize(); }); } // 第三步,连接SSH async function connectSSH(config) { const { host, port, username, password, privateKey, passphrase, distPath } = config; const sshConfig = { host, port, username, password, privateKey, passphrase }; try { console.log(`(3)连接${underlineLog(host)}`); await ssh.connect(sshConfig); successLog(' SSH连接成功'); } catch (err) { errorLog(` 连接失败 ${err}`); process.exit(1); } } // 第四部,上传zip包 async function uploadFile(webDir) { try { console.log(`(4)上传zip至目录${underlineLog(webDir)}`); await ssh.putFile(`${projectDir}/dist.zip`, `${webDir}/dist.zip`); successLog(' zip包上传成功'); } catch (err) { errorLog(` zip包上传失败 ${err}`); process.exit(1); } } // 运行命令 async function runCommand(command, webDir) { await ssh.execCommand(command, { cwd: webDir }); } // 第五步,解压zip包 async function unzipFile(webDir) { try { console.log('(5)开始解压zip包'); await runCommand(`cd ${webDir}`, webDir); await runCommand('unzip -o dist.zip && rm -f dist.zip', webDir); successLog(' zip包解压成功'); } catch (err) { errorLog(` zip包解压失败 ${err}`); process.exit(1); } } // 第六步,删除本地dist.zip包 async function deleteLocalZip() { return new Promise((resolve, reject) => { console.log('(6)开始删除本地zip包'); fs.unlink(`${projectDir}/dist.zip`, err => { if (err) { errorLog(` 本地zip包删除失败 ${err}`, err); reject(err); process.exit(1); } successLog(' 本地dist.zip删除成功\n'); resolve(); }); }); } module.exports = deploy; |
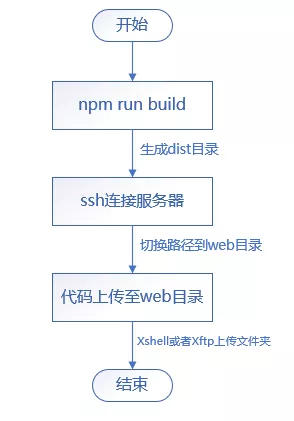 传统的手工部署需要经历:
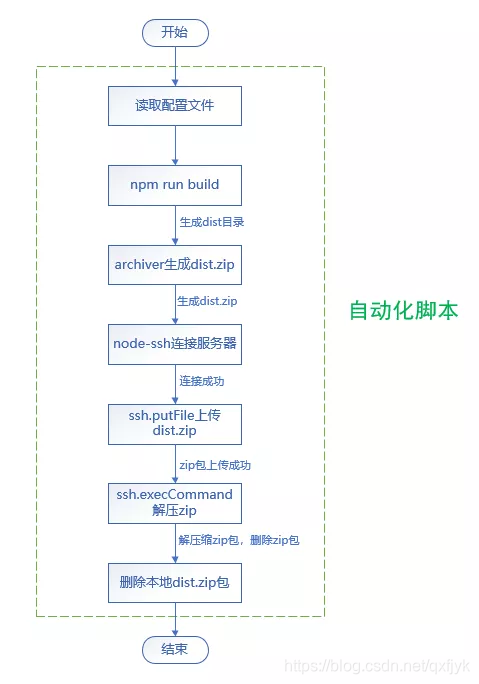

 在当前项目下生成了deploy.config.js
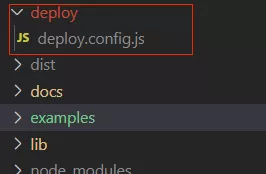

【本文地址】
今日新闻 |
推荐新闻 |