uniapp开发微信小程序/h5完整流程,含vant/uview(h5适配vw) |
您所在的位置:网站首页 › 公众号h5页面制作 › uniapp开发微信小程序/h5完整流程,含vant/uview(h5适配vw) |
uniapp开发微信小程序/h5完整流程,含vant/uview(h5适配vw)
|
theme: smartblue highlight: dark
创建项目
创建后的项目 此处插入一个坑 亦可以使用uniapp vue-cli 创建项目 vue create -p dcloudio/uni-preset-vue my-project 使用vue3/vite 创建项目(如命令行创建失败,请直接访问 gitee 下载模板) npx degit dcloudio/uni-preset-vue#vite my-vue3-project 创建后的目录如下 (uview框架不支持vue3) 运行项目使用 yarn dev:mp-weixin 打开小程序开发工具引入打包后的dist包下weixin 包即可在开发工具中使用,打包发布同样 HubilderX 已经支持vue3创建模板了
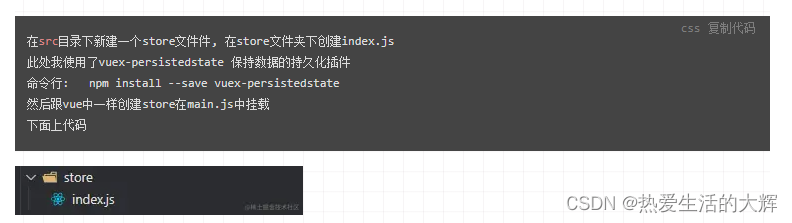
** 控制台信息如下得知使用vite编译,意味着我们能更快启动编译以及打包,具体webpack与vite对比请自行查阅官网** [外链图片转存失败,源站可能有防盗链机制,建议将图片保存下来直接上传(img-cHDfH4Bn-1660528771028)(https://p1-juejin.byteimg.com/tos-cn-i-k3u1fbpfcp/118e6b32b2ae4a84915d911c6c1562a5~tplv-k3u1fbpfcp-watermark.image?)] 使用u-view 框架(uview框架暂时不支持vue3)1.打开终端 输入代码npm install uview-ui 具体参考官网 u-view 2.引入全局uView import uView from 'uview-ui' Vue.use(uView) //使用rpx uni.$u.config.unit = 'rpx'3.在uni.scss 中引用 @import 'uview-ui/theme.scss'; 4.在pages.json配置easycom组件模式 "easycom": { // npm安装的方式不需要前面的"@/",下载安装的方式需要"@/" "^u-(.*)": "uview-ui/components/u-$1/u-$1.vue" // "^u-(.*)": "@/uview-ui/components/u-$1/u-$1.vue" },重启一下HBuilderX后该UI框架已经引入该项目中了 使用vuex 在uniapp中使用vuex 在src目录下新建一个store文件件, 在store文件夹下创建index.js 此处我使用了vuex-persistedstate 保持数据的持久化插件 命令行: npm install --save vuex-persistedstate 然后跟vue中一样创建store在main.js中挂载 下面上代码
1.安装pinia插件 npm install pinia 2.创建store/user.js import { defineStore } from 'pinia' export const useUserStore = defineStore({ id: 'user', // id必填,且需要唯一 state: () => { return { userId: uni.getStorageSync('userId') || '', } }, actions: { set(type, code) { this[type] = code; uni.setStorageSync(type, code); } }, getters: { } })3.在main.js中引入 import { createApp } from 'vue' import { createPinia } from 'pinia' import App from './App.vue' const pinia = createPinia() const app = createApp(App) app.use(pinia) app.mount('#app') 正式开发 配置页面创建新的页面,并在page.json注册,并且设置状态栏等信息(具体参考uniapp官网) { "path": "pages/index/index", "style": { "navigationBarTitleText": "主页", "navigationBarBackgroundColor":"#fff", "navigationStyle":"default", "navigationBarTextStyle":"black", "enablePullDownRefresh":false, } }配置tarbar官网tarbar "tabBar": { "list": [{ "pagePath": "pages/index/index", "text": "home" }] }, 使用ui框架uview已知uview 有两种安装方式(npm配置,### Hbuilder配置)方法大同小异 此处不在展示 npmp配置 下载方式配置 使用vant下载vant小程序源码 地址vant-weapp: 轻量、可靠的小程序 UI 组件库vant-weapp: 轻量、可靠的小程序 UI 组件库 首先在src目录下创建wxcomponents/vant目录 再次把下载的源码dist包"内容"放在vant目录下即可(注意不是dist文件夹而是dist包内的组件文件夹) 此处是为了使用uniapp的easycom的机制,自动引入组件 注意目录结构 这样就不需用使用usingCompoents了,编译后会帮我们自动注册
在app.vue中添加 /*每个页面公共css */ @import "/wxcomponents/vant/common/index.wxss";在page.json中添加 "easycom": { "custom": { "^van-(.*)": "@/wxcomponents/vant/$1/index" } },最后在需要的页面中直接使用组件即可 危险按钮 最后发布小程序如果未使用的组件可以删除 减小包的体积 自定义tarbart,导航栏1-1.需要在App.vue onShow中隐藏原有的tarbar uni.hideTabBar()1-2.创建通用组件 可以使用u-view中的tarbar组件也可以自定义组件的样式,直接在页面中使用 easycom是自动开启的,不需要手动开启。 只需要在components目录下创建相同的名称,且是components/组件名称/组件名称.vue目录结构,就不需要在页面引用注册点我查看官网地址 u-view tarbar组件
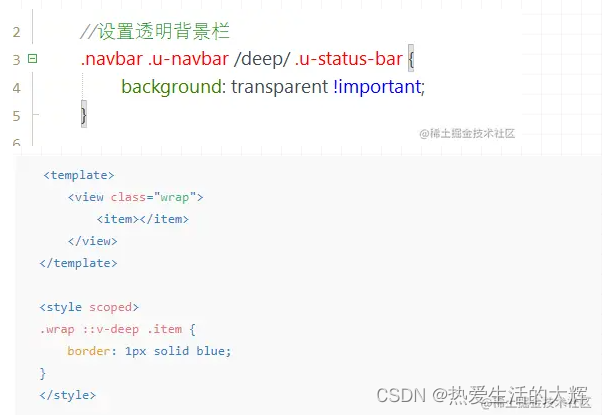
具体业务逻辑,页面UI 我就不在此展示了 2-1.在page.json中 设置页面style "navigationStyle": "custom",去除原生的样式 2-2.在页面中引入自定义导航栏组件即可使用,如上图所示 u-view navbar组件) 使用自定义组件需要注意iphonex 以上机型的底部高度 .box { padding-bottom: constant(safe-area-inset-bottom); padding-bottom: env(safe-area-inset-bottom); }如果改变u-view 组件样式 则需要重点注意一下两点 点击查看官网详情 3-1.在app和h5 中一般通过v-deep或/deep/指令修改
3-2.在微信小程序中则需要在父组件的类名下更改
组件类名为.navbar 微信小程序必须使用 /deep/
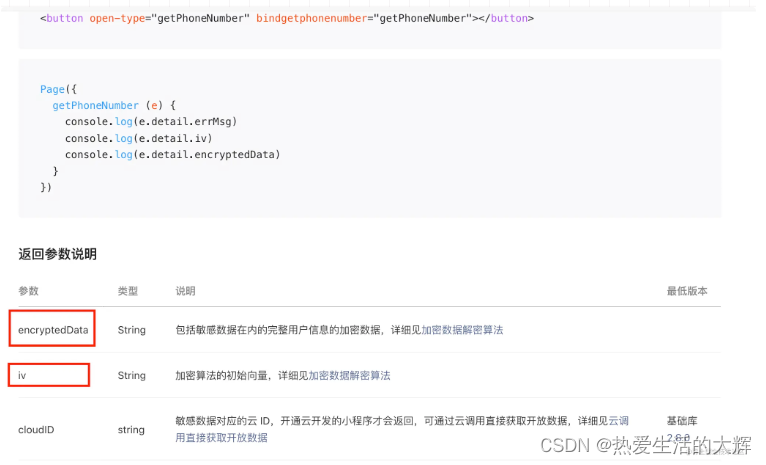
上图为微信小程序官方登陆示意图 使用uni.login 由上图可得知我们需要拿uni.login()返回的code获取登陆状态 打开manifest.json 打开微信小程序 设置appid且该appid需要与后端的appid一致 后端与微信服务器请求得到openid与session_key,这时后端可自定义登陆状态 讲一下我的登陆页面流程 在home页面中判断有无登陆后存在本地的信息,如用户信息,token等,我使用的是用户手机存在本地, 本地无信息的情况跳转到登陆页面,用户点击button登陆且更新用户信息,然后返回home页面加载其他信息 本地已有信息,执行uni.login()更新token,防止用户token过期,最好写在onload()中,不用每次都登陆 获取用户信息 使用uni.getUserProfile()必须是点击事件下获取 getUserInfo获取的是匿名数据,无法使用 且只能获取到用户昵称头像信息,其他获取不到 每次点击都需要用户授权 获取手机号码 两种方法 我都使用过 目前使用的是第一种方法 第二种方法需要单独去获取uni.login的code一块传值给后端1.使用getPhoneNumber的接口 此方法必须是小程序已经认证过了地址
通过getphonenumber方法返回的值 如下图所示
后端可以获取code(动态令牌)实现登录并且在后端解密手机号码 具体方法如下地址
使用button组件 open-type=“getPhoneNumber” @getPhoneNumber = getPhoneNumber 的点击事件获取加密的手机号码,在此推荐使用后端解密 可以获取uni.login 返回的code后一块传给后端既完成登陆也获取手机注册等信息 地址
可以使用uview 封装好的方法,也可以自己封装 多数据请求loading处理同时发起多个数据请求,判断上个请求是否结束,如果上个请求结束&& 本次请求结束 关闭loading 参考其他loading封装的思路 `// const baseUrl = xxxx; var num = 0; export default function requset(url, data = {}, method = "GET", getToken = true,isShowLoading = true, ) { if (isShowLoading) { num++; uni.showLoading({ title: '加载中...', mask: true }) } let token = uni.getStorageSync('token') const header = { 'content-type': 'application/json', } if (getToken) { header.Authorization = token } return new Promise((resolve, reject) => { uni.request({ url: baseUrl + url, data, method, timeout: 10000, header, success(res) { resolve(res) }, fail(err) { if (err.errMsg == 'request:fail timeout') { uni.showToast({ title: '请求超时,请重试!', duration: 2000, icon: "none" }); } else if (err.errMsg == 'request:fail ') { uni.showToast({ title: '无网络!', duration: 2000, icon: "none" }); } else { uni.showToast({ title: '服务器错误', duration: 2000, icon: "none" }); } reject(err) }, complete() { if (isShowLoading) { setTimeout(() => { num--; console.log('第几次', num) if (num === 0) { uni.hideLoading() } }, 200) } } }) }) } //在api.js中引入次方法 并且暴露出去 import requset from './requset.js' export function getLoginUserInfo() { return requset('/wx/mini/getLoginUserInfo') } 第二种使用uview的封装方法uni官方是没有路由拦截的此处使用uview的路由拦截 const request = (Vue) => { Vue.prototype.$u.http.setConfig((config) => { config = configs return config }); // 请求拦截 Vue.prototype.$u.http.interceptors.request.use((config) => { uni.showLoading({ title: '加载中', mask: true, }); //设置token config.header.Authorization = uni.getStorageSync('Authorization') || ''; return config }) // 响应拦截 Vue.prototype.$u.http.interceptors.response.use((response) => { if (response.data.status != 200) { uni.hideLoading(); uni.showToast({ title: response.data.msg, icon: 'none', duration: 2000 }) } return response; }, (err) => { uni.hideLoading(); // 对响应错误做点什么 if (err.errMsg == 'request:fail timeout') { uni.showToast({ title: '请求超时,请重试!', duration: 2000, icon: "none" }); } else if (err.errMsg == 'request:fail ') { uni.showToast({ title: '无网络!', duration: 2000, icon: "none" }); } else { uni.showToast({ title: '服务器错误', duration: 2000, icon: "none" }); } return err }) } export default request;接口请求(此处用的uview已封装的api 直接拿来使用) const http = uni.$u.http; const api = '/api'; //get请求 export const getUserInfo = (params) => http.get(api + '/xxx', {params}) //post 请求 export const login = (data) => http.post('/xxx', data)获取地址 使用uni.getLocation()获取经纬度,再次之前需要判断用户是否授权,如未授权配合uni.openSeting()引导用户授权 使用uni.authorize()判断用户是否授权,未授权调用uni.openSeting,授权则调用uni.getLocation uni.authorize({ scope: 'scope.userLocation', success(res) { uni.getLocation({ type: 'gcj02 ', success(res) { const latitude = res.latitude; const longitude = res.longitude; } )}, fail(err) { uni.showModal({ title: '是否开启', content: '当前需要获取您的地理位置', showCancel:false, success: function(res) { if (res.confirm) { uni.openSetting({ success(res) { if (res.authSetting['scope.userLocation']) { //执行你需要的请求操作 } else { uni.showToast({ title: '无法获取最近电站信息', duration: 2000, icon: "none" })}} }) } } }); } }) 付款流程使用微信小程序付款 uni.requestPayment() 官网地址 通常微信付款所需要的数据都由后端返回,你只需要调用这个api就行 // 仅作为示例,非真实参数信息。 uni.requestPayment({ provider: 'wxpay',//微信付款 appid:'', timeStamp: String(Date.now()), //时间戳 nonceStr: 'A1B2C3D4E5', //随机字符串 package: 'prepay_id=wx20180101abcdefg',//统一下单接口返回的 prepay_id 参数值 signType: 'MD5',//加密方式 paySign: '',//寄吗数据 success: function (res) { console.log('success:' + JSON.stringify(res)); }, fail: function (err) { console.log('fail:' + JSON.stringify(err)); } }); 发布hubilder 点击发行到微信小程序 打包后如果提示
在mainfest.json 打开源码视图 配置如下
单个分包的大小是2m 微信小程序规定不能超过20m uniapp中使用微信小程序分包,需要在mainifest.json中开启分包官网地址如下图所示
此时已经配置完毕,运行到微信开发者工具,点击详情,此时已经显示我们添加分包完成
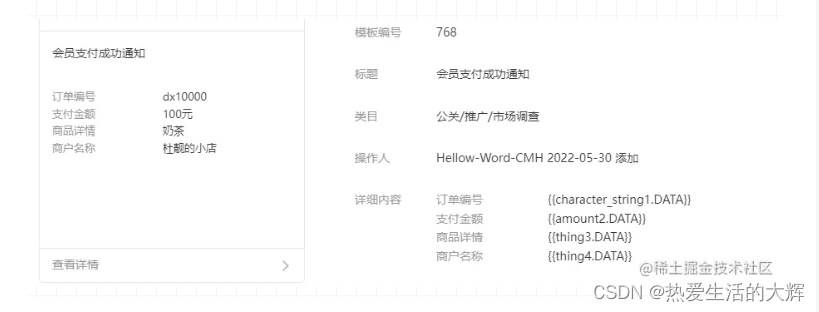
目前消息订阅常用的有一次性订阅与长期订阅:长期订阅主要开发给公众单位,所以我们本次是使用一次性订阅 微信官方链接 uniapp官方链接 [外链图片转存失败,源站可能有防盗链机制,建议将图片保存下来直接上传(img-nG6DbAab-1660528771037)(https://p6-juejin.byteimg.com/tos-cn-i-k3u1fbpfcp/d3da72aeb52e4edfb979841d6e3c413e~tplv-k3u1fbpfcp-watermark.image?)] 消息订阅前我们必须在小程序后台设置消息模板点击跳转到微信公众平台登录在订阅消息一栏中设置消息模板
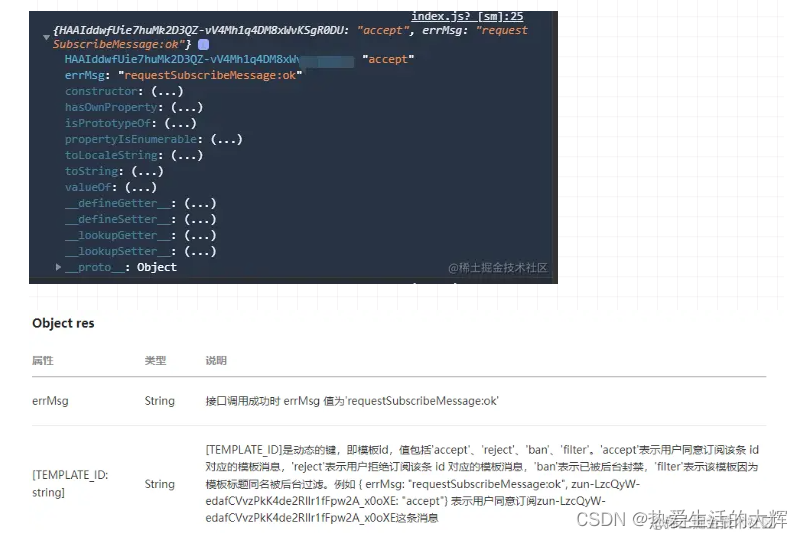
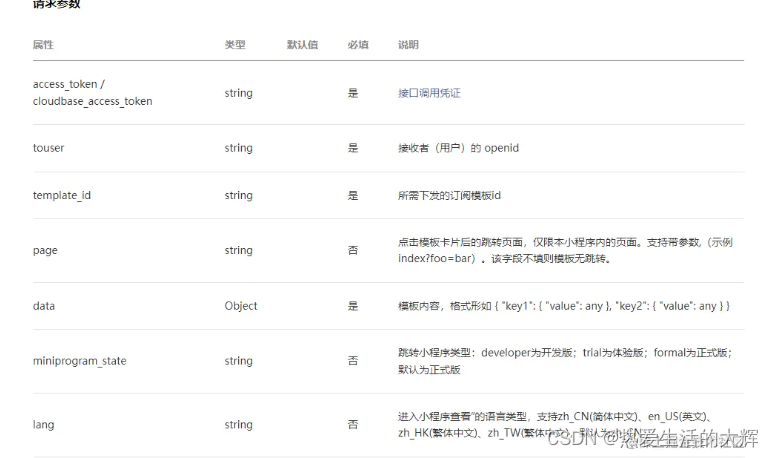
消息模板官方提供很多种,可以自行搭配.也可以申请消息模板 下面介绍如何在项目中使用订阅消息 uni.requestSubscribeMessage({ tmplIds: ['HAAIddwfUie7huMk2D3QZ-xxxxxxxxxxxxx', '2zDrf9SNpGq6hU1vSbfLQganFnQE_xxxxxxxxxxxxx' ], success(res) { console.log(res); // 值包括'accept'、'reject'、'ban'。 // 'accept'表示用户同意订阅该条id对应的模板消息, // 'reject'表示用户拒绝订阅该条id对应的模板消息, // 'ban'表示已被后台封禁 // if (res.errMsg == 'requestSubscribeMessage:ok') { // console.log('订阅成功'); // uni.showToast({ // title: '订阅成功' // }) // } }, })打印事件图片
1. 点击事件后调用该api即可,tmplIds为消息订阅模板id,可以是多个,但是一次调用最多可订阅3条消息; 2. TEMPLATE_ID 是动态的模板id,每个消息都是独立存在的,如果有需要 则要对单个进行判断; 3. 如果勾选了总是保持以上选择,则不会再弹窗提示;如果只勾选了一个,并选中不在询问还会弹窗提示; 4. 如果选中取消按钮,则默认一直都是拒绝状态且不会弹窗提示,此时需要uni.getSetting中引导用户打开消息提示;withSubscriptions:是否同时获取用户订阅消息的订阅状态,默认不获取 (提示:在真机测试中打开消息通知之后再次点击订阅消息并没有弹窗;正确做法:在开发者工具中清楚缓存,并重新编译到真机中,此时再次点击订阅消息正常唤起弹窗事件)
此时我们已经完成了一半,后面则需要消息推送 消息推送地址 消息推送可以是服务端推送也可以是云函数推送 消息推送一般由后端完成,我们可以把前端的参数通过接口的方式传递给服务端,服务端在合适的机会推送给给用户; 注意data值要与消息模板的key值对应上;
关于h5适配问题相信很多人都有解决方案了 分享我一下解决的办法,有更好的方法欢迎提出 remrem 我没用过 vw vw : 相对于视口的宽度,1vw 等于视口宽度的1%(总视口宽度为100vw)vh : 相对于视口的高度, 1vh 等于视口高度的1%(总视口高度为100vh)vmin : 选取 vw 和 vh 中最小的那个vmax : 选取 vw 和 vh 中最大的那个 h5适配解决方案uniapp官网提供的解决方案rpx转px 既然rpx可以转px 我们也可以用px 转vw vw安装第三方插件postcss-px-to-viewport 正常uniapp创建的项目都已经安装了 在项目中创建一个postcss.config.js 文件 在文件中写入一下内容 viewportWidth: 375, // 视窗的宽度,对应的是我们设计稿的宽度,iPhone 6s 一般是37 viewportHeight: 667, // 视窗的高度,iPhone 6s 一般是667 unitPrecision: 3, // 指定`px`转换为视窗单位值的小数位数(很多时候无法整除) viewportUnit: "vw", // 指定需要转换成的视窗单位,建议使用vw selectorBlackList: [".ignore", ".hairlines"], // 指定不转换为视窗单位的类,可以自定义,可以无限添加,建议定义一至两个通用的类名 minPixelValue: 1, // 小于或等于`1px`不转换为视窗单位,你也可以设置为你想要的值 mediaQuery: false, // 允许在媒体查询中转换`px` fontViewportUnit: "vw", //字体使用的视口单位 exclude: [/node_modules/], vite构建的项目中使用postcss-px-to-viewport // vite.config.js import { defineConfig } from 'vite' import uni from '@dcloudio/vite-plugin-uni' // https://vitejs.dev/config/ export default defineConfig({ base: '/', plugins: [ uni(), ], css: { postcss: { plugins: [ require("postcss-px-to-viewport")({ unitToConvert: 'px',//需要转换的单位,默认为"px" viewportWidth: 750, // 视窗的宽度,对应的是我们设计稿的宽度,iPhone 6s 一般是375 viewportHeight: 667, // 视窗的高度,iPhone 6s 一般是667 unitPrecision: 3, // 指定`px`转换为视窗单位值的小数位数(很多时候无法整除) viewportUnit: 'vw', // 指定需要转换成的视窗单位,建议使用vw selectorBlackList: ['.ignore', '.hairlines'], // 指定不转换为视窗单位的类,可以自定义,可以无限添加,建议定义一至两个通用的类名 minPixelValue: 1, // 小于或等于`1px`不转换为视窗单位,你也可以设置为你想要的值 mediaQuery: false, // 允许在媒体查询中转换`px` fontViewportUnit: 'vw',//字体使用的视口单位 exclude: [/node_modules/] }) ] } }, server: { host: "0.0.0.0", port: "3000", proxy: { }, }, }) 后续新增项目中使用到的功能:tailwind,关于微信小程序上线流程(2023.4.25) 单点登录(url传值)顾名思义,接入第三方时候做免登陆处理,在当前页面获取到第三方页面传过来的值,多种方法(可以url传值,本地传值等) 在onLoad 生命周期中拿到需要值(userId),通过调用后端接口做到免登陆处理,登录成功后返回的值存在本地或者store里面,完成免登陆处理,跳转到首页 图片压缩做h5项目必定离不开图片压缩,网上也有很多插件处理, 我项目中使用canvas处理,借助uniapp的pai处理 compressionIamge(that, imageURL) { // 等比例压缩图片 可指定图片宽高 兼容性:微信小程序端正常,其他端未测试 uni.showLoading({ title: "正在压缩图片", }); let result = null; const promise = new Promise((resolve, reject) => { uni.getImageInfo({ src: imageURL, success: (res) => { let originHeight = res.height; let originWidth = res.width; let maxWidth = 480; // 最大宽 let maxHeight = 640; // 最大高 let targetWidth = originWidth; let targetHeight = originHeight; if (originWidth > maxWidth || originHeight > maxHeight) { if (originWidth / originHeight > maxWidth / maxHeight) { targetWidth = maxWidth; targetHeight = Math.round( maxWidth * (originHeight / originWidth) ); } else { targetHeight = maxHeight; targetWidth = Math.round( maxHeight * (originWidth / originHeight) ); } } that.cWidth = targetWidth; that.cHeight = targetHeight; let ctx = uni.createCanvasContext("canvas", that); ctx.clearRect(0, 0, targetWidth, targetHeight); ctx.drawImage(imageURL, 0, 0, targetWidth, targetHeight); ctx.draw( false, () => { setTimeout(() => { uni.canvasToTempFilePath( { canvasId: "canvas", success: (res) => { resolve(res.tempFilePath); }, fail: (err) => { console.log(err); }, complete: () => { uni.hideLoading(); }, }, that ) }, 1000) } ); }, }); }); return promise.then((res) => (result = res)); } webViewSDK引入 在index.html中引入sdk地址 判断是否处在webView的环境中 const ua = navigator.userAgent.toLowerCase(); const isWeixin = /MicroMessenger/i.test(ua); const isAndroid = /android/i.test(ua); const isIos = /iphone|ipad|ipod/i.test(ua); const isApp = isInApp && !isWeixin; const isPc = !isWeixin && !isAndroid && !isIos && !isApp; 如果是webView环境在中可以注入window(也可以跳过此步骤)if(isAndroid || isiOS ){ window.la=la } 然后再其他页面直接使用window.la.xxx() 地图处理(腾讯地图)注册地图获取key(自行百度) 在index.html 引入地图key 初始化地图事件 import { ref, onMounted, watch } from "vue"; import { onLoad } from "@dcloudio/uni-app"; import { transformFromGCJToWGS, transformFromWGSToGCJ, } from "../../utils/gps.js"; onLoad((e) => { initData(); }); //初始化数值 const MapData = { markerLayer: null, Map: null, }; // 记录当前gps坐标 const emitsData = ref({ longitude: "", latitude: "", }); const initData = (latitude = "", longitude = "") => { //微信小程序需要判断是否授权位置信息 //授权成功后可以获取当前的gps坐标 uni.getLocation({ type: "gcj02", isHighAccuracy: true, highAccuracyExpireTime: 500000, altitude: true, success: function (res) { //拿到当前的经纬度信息 emitsData.value.longitude = longitude || res.longitude; emitsData.value.latitude = latitude || res.latitude; getMapData(); }, fail: function (e) { console.log(e); }, }); }; // 初始化地图 const getMapData = () => { let lng, lat; //如果没有获取到经纬度信息手动赋值 if (MapData.latitude == "" && MapData.longitude == "") { lat = xxxxx; lng = xxxx; } else { lng = emitsData.value.longitude; lat = emitsData.value.latitude; } //设置中心点 let center = new TMap.LatLng(lat, lng); //定义map变量,调用 TMap.Map() 构造函数创建地图 MapData.Map = new TMap.Map(document.getElementById("mapID"), { center: center, //设置地图中心点坐标 zoom: 14, //设置地图缩放级别 pitch: 0, //设置俯仰角 rotation: 0, //设置地图旋转角度 }); //初始化marker图层 MapData.markerLayer = new TMap.MultiMarker({ map: MapData.Map, //点标记数据数组 styles: { //创建一个styleId为"myStyle"的样式(styles的子属性名即为styleId) myStyle: new TMap.MarkerStyle({ width: 25, // 点标记样式宽度(像素) height: 35, // 点标记样式高度(像素) // "src": '../img/marker.png', //图片路径 //焦点在图片中的像素位置,一般大头针类似形式的图片以针尖位置做为焦点,圆形点以圆心位置为焦点 anchor: { x: 16, y: 32 }, }), }, geometries: [ { id: "makerId", //点标记唯一标识,后续如果有删除、修改位置等操作,都需要此id styleId: "myStyle", //指定样式id position: center, //点标记坐标位置 }, ], }); //地图点击切换坐标点 MapData.Map.on("click", (e) => { MapData.markerLayer.updateGeometries([ { id: "makerId", styleId: "myStyle", //指定样式id position: e.latLng, //点标记坐标位置 }, ]); // https://segmentfault.com/a/1190000042204050?sort=votes GCJ-02(高德) BD-09(百度) WGS-84(谷歌)坐标系之间的转换 //此处使用了坐标系转换 let obj = transformFromGCJToWGS(e.latLng.lat, e.latLng.lng); emitsData.value.longitude = obj.longitude; emitsData.value.latitude = obj.latitude; }); }; // gps/js /** * 判断经纬度是否超出中国境内 */ export function isLocationOutOfChina(latitude, longitude) { if (longitude < 72.004 || longitude > 137.8347 || latitude < 0.8293 || latitude > 55.8271) return true; return false; } /** * 将WGS-84(国际标准)转为GCJ-02(火星坐标): */ export function transformFromWGSToGCJ(latitude, longitude) { var lat = ""; var lon = ""; var ee = 0.00669342162296594323; var a = 6378245.0; var pi = 3.14159265358979324; if (isLocationOutOfChina(latitude, longitude)) { lat = latitude; lon = longitude; } else { var adjustLat = transformLatWithXY(longitude - 105.0, latitude - 35.0); var adjustLon = transformLonWithXY(longitude - 105.0, latitude - 35.0); var radLat = latitude / 180.0 * pi; var magic = Math.sin(radLat); magic = 1 - ee * magic * magic; var sqrtMagic = Math.sqrt(magic); adjustLat = (adjustLat * 180.0) / ((a * (1 - ee)) / (magic * sqrtMagic) * pi); adjustLon = (adjustLon * 180.0) / (a / sqrtMagic * Math.cos(radLat) * pi); latitude = latitude; longitude = longitude; } return { latitude: latitude, longitude: longitude }; } /** * 将GCJ-02(火星坐标)转为百度坐标(DB-09): */ export function transformFromGCJToBaidu(latitude, longitude) { var pi = 3.14159265358979324 * 3000.0 / 180.0; var z = Math.sqrt(longitude * longitude + latitude * latitude) + 0.00002 * Math.sin(latitude * pi); var theta = Math.atan2(latitude, longitude) + 0.000003 * Math.cos(longitude * pi); var a_latitude = (z * Math.sin(theta) + 0.006); var a_longitude = (z * Math.cos(theta) + 0.0065); return { latitude: a_latitude, longitude: a_longitude }; } /** * 将百度坐标(DB-09)转为GCJ-02(火星坐标): */ export function transformFromBaiduToGCJ(latitude, longitude) { var xPi = 3.14159265358979323846264338327950288 * 3000.0 / 180.0; var x = longitude - 0.0065; var y = latitude - 0.006; var z = Math.sqrt(x * x + y * y) - 0.00002 * Math.sin(y * xPi); var theta = Math.atan2(y, x) - 0.000003 * Math.cos(x * xPi); var a_latitude = z * Math.sin(theta); var a_longitude = z * Math.cos(theta); return { latitude: a_latitude, longitude: a_longitude }; } /** * 将GCJ-02(火星坐标)转为WGS-84(国际标准): */ export function transformFromGCJToWGS(latitude, longitude) { var threshold = 0.00001; // The boundary var minLat = latitude - 0.5; var maxLat = latitude + 0.5; var minLng = longitude - 0.5; var maxLng = longitude + 0.5; var delta = 1; var maxIteration = 30; while (true) { var leftBottom = transformFromWGSToGCJ(minLat, minLng); var rightBottom = transformFromWGSToGCJ(minLat, maxLng); var leftUp = transformFromWGSToGCJ(maxLat, minLng); var midPoint = transformFromWGSToGCJ((minLat + maxLat) / 2, (minLng + maxLng) / 2); delta = Math.abs(midPoint.latitude - latitude) + Math.abs(midPoint.longitude - longitude); if (maxIteration-- |


![[外链图片转存失败,源站可能有防盗链机制,建议将图片保存下来直接上传(img-oatFC9je-1660528771029)(https://p6-juejin.byteimg.com/tos-cn-i-k3u1fbpfcp/c05977c1ff564718a3020bbf9a75d3d9~tplv-k3u1fbpfcp-watermark.image?)]](https://img-blog.csdnimg.cn/ebd9ab3392b34700afa43761c4f07276.png)
![[外链图片转存失败,源站可能有防盗链机制,建议将图片保存下来直接上传(img-zq7mVouE-1660528771029)(https://p1-juejin.byteimg.com/tos-cn-i-k3u1fbpfcp/12df1da9da7a4c7f8cb4b8331cb65546~tplv-k3u1fbpfcp-watermark.image?)]](https://img-blog.csdnimg.cn/14cba6a112e34d39935f9f978cfce560.png)
![[外链图片转存失败,源站可能有防盗链机制,建议将图片保存下来直接上传(img-Dye1ImUM-1660528771029)(https://p9-juejin.byteimg.com/tos-cn-i-k3u1fbpfcp/c8f6e03051064791855399943707509b~tplv-k3u1fbpfcp-watermark.image?)]](https://img-blog.csdnimg.cn/dc1f596ae32a4a7cab60da1a4844ed5e.png)
![[外链图片转存失败,源站可能有防盗链机制,建议将图片保存下来直接上传(img-BLX0gm6Z-1660528771030)(https://p3-juejin.byteimg.com/tos-cn-i-k3u1fbpfcp/7946096585654940b9e878f39d0833e2~tplv-k3u1fbpfcp-watermark.image?)]](https://img-blog.csdnimg.cn/eb443e93bc3247a0a94edeb0b467b2d5.png)
![[外链图片转存失败,源站可能有防盗链机制,建议将图片保存下来直接上传(img-6gMe53nw-1660528771031)(https://p3-juejin.byteimg.com/tos-cn-i-k3u1fbpfcp/446333657a1743c7abd8d32d39d8fe40~tplv-k3u1fbpfcp-watermark.image?)]](https://img-blog.csdnimg.cn/805077ae548a43c39894cd6a4057df60.png)
![[外链图片转存失败,源站可能有防盗链机制,建议将图片保存下来直接上传(img-pRUOI3Cm-1660528771031)(https://p9-juejin.byteimg.com/tos-cn-i-k3u1fbpfcp/025156c673f844a693cb0a1ed20dfd6d~tplv-k3u1fbpfcp-watermark.image?)]](https://img-blog.csdnimg.cn/01b3e815066549d58af110454ac6dba7.png)
![[外链图片转存失败,源站可能有防盗链机制,建议将图片保存下来直接上传(img-NnGlE3wf-1660528771033)(https://p3-juejin.byteimg.com/tos-cn-i-k3u1fbpfcp/858ef93a4c4749058623b898d76c3331~tplv-k3u1fbpfcp-watermark.image?)]](https://img-blog.csdnimg.cn/efeb8bb78fac4cbb8dbf3ca1593e9610.png)

![[外链图片转存失败,源站可能有防盗链机制,建议将图片保存下来直接上传(img-XKZw4NkY-1660528771034)(https://p3-juejin.byteimg.com/tos-cn-i-k3u1fbpfcp/5203afd9f5334f8489343114b43e43dc~tplv-k3u1fbpfcp-watermark.image?)]](https://img-blog.csdnimg.cn/6621a73df80d497493acd328d85e8801.png)
![[外链图片转存失败,源站可能有防盗链机制,建议将图片保存下来直接上传(img-VNO1keHI-1660528771034)(https://p9-juejin.byteimg.com/tos-cn-i-k3u1fbpfcp/b8bac9100447414fae248cf58e81d90a~tplv-k3u1fbpfcp-watermark.image?)]](https://img-blog.csdnimg.cn/471a819706894cdabc97ab1d06dd03d5.png)
![[外链图片转存失败,源站可能有防盗链机制,建议将图片保存下来直接上传(img-Fdmrv5pa-1660528771035)(https://p6-juejin.byteimg.com/tos-cn-i-k3u1fbpfcp/adbae2a008d041f2aa8eca8e0dfd28cc~tplv-k3u1fbpfcp-watermark.image?)]](https://img-blog.csdnimg.cn/6539007c05134a739a37e859fa5d6061.png)
![[外链图片转存失败,源站可能有防盗链机制,建议将图片保存下来直接上传(img-sMcaZN2z-1660528771035)(https://p3-juejin.byteimg.com/tos-cn-i-k3u1fbpfcp/aa7b7f31b5764547bef684b3454716bb~tplv-k3u1fbpfcp-watermark.image?)]](https://img-blog.csdnimg.cn/a7285165127c4d738e3de8cd1f7da3e0.png)
![[外链图片转存失败,源站可能有防盗链机制,建议将图片保存下来直接上传(img-3bsYd54m-1660528771035)(https://p3-juejin.byteimg.com/tos-cn-i-k3u1fbpfcp/0d35cc98a71544e4a7907ca2a67eff2d~tplv-k3u1fbpfcp-watermark.image?)]](https://img-blog.csdnimg.cn/9e2be7e0dbc2478db86219d7fb4dcc40.png)
![[外链图片转存失败,源站可能有防盗链机制,建议将图片保存下来直接上传(img-MZYdiKKj-1660528771036)(https://p9-juejin.byteimg.com/tos-cn-i-k3u1fbpfcp/03ccca0065ef42449f9af59be0ae0347~tplv-k3u1fbpfcp-watermark.image?)]](https://img-blog.csdnimg.cn/2801c510980341d3a219f31d8df3ffff.png)
![[外链图片转存失败,源站可能有防盗链机制,建议将图片保存下来直接上传(img-QeO1frZQ-1660528771036)(https://p1-juejin.byteimg.com/tos-cn-i-k3u1fbpfcp/f5e745cb0a45457193124a81371d8bc1~tplv-k3u1fbpfcp-watermark.image?)]](https://img-blog.csdnimg.cn/d1dd0d25d9854750917269e11b4b7700.png)
![[外链图片转存失败,源站可能有防盗链机制,建议将图片保存下来直接上传(img-ItdOeJP1-1660528771036)(https://p1-juejin.byteimg.com/tos-cn-i-k3u1fbpfcp/4ec0d8fc6b844926b96e11ca989898af~tplv-k3u1fbpfcp-watermark.image?)]](https://img-blog.csdnimg.cn/1eb42f8f6cf240edbf055007c5131043.png)
![[外链图片转存失败,源站可能有防盗链机制,建议将图片保存下来直接上传(img-oD0QXRsi-1660528771037)(https://p9-juejin.byteimg.com/tos-cn-i-k3u1fbpfcp/fa8fb7e922bc4395be29bf9fd89836aa~tplv-k3u1fbpfcp-watermark.image?)]](https://img-blog.csdnimg.cn/889bf090805e4b5892b7ffc83f1f7ddd.png)
![[外链图片转存失败,源站可能有防盗链机制,建议将图片保存下来直接上传(img-yPk1K1lv-1660528771037)(https://p9-juejin.byteimg.com/tos-cn-i-k3u1fbpfcp/44519f8ff743416fb811180ab2e09c46~tplv-k3u1fbpfcp-watermark.image?)]](https://img-blog.csdnimg.cn/ebe6f308b4c74a8995126bef2140ef39.png)
![[外链图片转存失败,源站可能有防盗链机制,建议将图片保存下来直接上传(img-YGNxDS4p-1660528771038)(https://p9-juejin.byteimg.com/tos-cn-i-k3u1fbpfcp/cf0ac3524db44fe68dc4bd468187444a~tplv-k3u1fbpfcp-watermark.image?)]](https://img-blog.csdnimg.cn/103bcaf22c2d429894815f69226c9ca1.png)
![[外链图片转存失败,源站可能有防盗链机制,建议将图片保存下来直接上传(img-hZOVcl6p-1660528771039)(https://p6-juejin.byteimg.com/tos-cn-i-k3u1fbpfcp/6f36dd5fc05a4479b6ad50caa7042bbe~tplv-k3u1fbpfcp-watermark.image?)]](https://img-blog.csdnimg.cn/194bd706d7c441a0992d40c601f9fda6.png)
【本文地址】
今日新闻 |
推荐新闻 |