一文教你快速修改ubuntu终端显示的主机名和用户名 |
您所在的位置:网站首页 › 修改linux用户名称 › 一文教你快速修改ubuntu终端显示的主机名和用户名 |
一文教你快速修改ubuntu终端显示的主机名和用户名
|
1 前言
为了让终端的显示更加简洁,清爽,在此记录一下。心急的读者可以直接跳到第四节。 快捷键 alt+ctrl+t 打开终端,首先它是这样的,如下图所示; 现在如何这些花里胡哨的字符串消失呢? 2 开始动手首先,在系统启动bash终端的时候,会为用户读取一个文件名为.bashrc的文件,这个文件保存了用户一些个性化的设置,包括终端颜色,显示的用户名之类的东西; 现在打开.bashrc文件,具体如下: # ~/.bashrc: executed by bash(1) for non-login shells. # see /usr/share/doc/bash/examples/startup-files (in the package bash-doc) # for examples # If not running interactively, don't do anything case $- in *i*) ;; *) return;; esac # don't put duplicate lines or lines starting with space in the history. # See bash(1) for more options HISTCONTROL=ignoreboth # append to the history file, don't overwrite it shopt -s histappend # for setting history length see HISTSIZE and HISTFILESIZE in bash(1) HISTSIZE=1000 HISTFILESIZE=2000 # check the window size after each command and, if necessary, # update the values of LINES and COLUMNS. shopt -s checkwinsize # If set, the pattern "**" used in a pathname expansion context will # match all files and zero or more directories and subdirectories. #shopt -s globstar # make less more friendly for non-text input files, see lesspipe(1) [ -x /usr/bin/lesspipe ] && eval "$(SHELL=/bin/sh lesspipe)" # set variable identifying the chroot you work in (used in the prompt below) if [ -z "${debian_chroot:-}" ] && [ -r /etc/debian_chroot ]; then debian_chroot=$(cat /etc/debian_chroot) fi # set a fancy prompt (non-c阿里通olor, unless we know we "want" color) case "$TERM" in xterm-color|*-256color) color_prompt=yes;; esac # uncomment for a colored prompt, if the terminal has the capability; turned # off by default to not distract the user: the focus in a terminal window # should be on the output of commands, not on the prompt #force_color_prompt=yes if [ -n "$force_color_prompt" ]; then if [ -x /usr/bin/tput ] && tput setaf 1 >&/dev/null; then # We have color support; assume it's compliant with Ecma-48 # (ISO/IEC-6429). (Lack of such support is extremely rare, and such # a case would tend to support setf rather than setaf.) color_prompt=yes else color_prompt= fi fi if [ "$color_prompt" = yes ]; then PS1='${debian_chroot:+($debian_chroot)}\[\033[01;32m\]\u@\h\[\033[00m\]:\[\033[01;34m\]\w\[\033[00m\]\$ ' else PS1='${debian_chroot:+($debian_chroot)}\u@\h:\w\$ ' fi unset color_prompt force_color_prompt # If this is an xterm set the title to user@host:dir case "$TERM" in xterm*|rxvt*) PS1="\[\e]0;${debian_chroot:+($debian_chroot)}\u@\h: \w\a\]$PS1" ;; *) ;; esac # enable color support of ls and also add handy aliases if [ -x /usr/bin/dircolors ]; then test -r ~/.dircolors && eval "$(dircolors -b ~/.dircolors)" || eval "$(dircolors -b)" alias ls='ls --color=auto' #alias dir='dir --color=auto' #alias vdir='vdir --color=auto' alias grep='grep --color=auto' alias fgrep='fgrep --color=auto' alias egrep='egrep --color=auto' fi # colored GCC warnings and errors #export GCC_COLORS='error=01;31:warning=01;35:note=01;36:caret=01;32:locus=01:quote=01' # some more ls aliases alias ll='ls -alF' alias la='ls -A' alias l='ls -CF' # Add an "alert" alias for long running commands. Use like so: # sleep 10; alert alias alert='notify-send --urgency=low -i "$([ $? = 0 ] && echo terminal || echo error)" "$(history|tail -n1|sed -e '\''s/^\s*[0-9]\+\s*//;s/[;&|]\s*alert$//'\'')"' # Alias definitions. # You may want to put all your additions into a separate file like # ~/.bash_aliases, instead of adding them here directly. # See /usr/share/doc/bash-doc/examples in the bash-doc package. if [ -f ~/.bash_aliases ]; then . ~/.bash_aliases fi # enable programmable completion features (you don't need to enable # this, if it's already enabled in /etc/bash.bashrc and /etc/profile # sources /etc/bash.bashrc). if ! shopt -oq posix; then if [ -f /usr/share/bash-completion/bash_completion ]; then . /usr/share/bash-completion/bash_completion elif [ -f /etc/bash_completion ]; then . /etc/bash_completion fi fi 3 PS1变量这里暂时不分析这个脚本了,因为我们要快速解决问题; 直接搜索PS1找到关键代码如下: if [ "$color_prompt" = yes ]; then PS1='${debian_chroot:+($debian_chroot)}\[\033[01;32m\]\u@\h\[\033[00m\]:\[\033[01;34m\]\w\[\033[00m\]\$ ' else PS1='${debian_chroot:+($debian_chroot)}\u@\h:\w\$ ' fi unset color_prompt force_color_prompt # If this is an xterm set the title to user@host:dir case "$TERM" in xterm*|rxvt*) PS1="\[\e]0;${debian_chroot:+($debian_chroot)}\u@\h: \w\a\]$PS1" ;; *) ;; esac解释一下,这里的PS1是一个全局变量,用于显示用户主机名称工作目录,所以只要修改这个变量即可; 再打开一个终端,输入以下指令; echo $PS1具体输出如下所示; 打开文件; sudo vi ~/.bashrc如果单纯只是消失的话,在.bashrc的最后一行加上 PS1='\[\e]0;#: \w\a\]${debian_chroot:+($debian_chroot)}\[\033[01;32m\]#\[\033[00m\]:\[\033[01;34m\]\w\[\033[00m\]\$'直接删除\u和\h,另外我不喜欢@,所以这里加了一个#。 输入以下指令让修改生效; sudo source ~/.bashrc再次启动终端;
那如果我们没有那么残忍,只是希望修改显示的主机名和用户名,又该怎么做呢? OK!!! sudo vi /etc/hostname这里将hostname改成unclemac,并且需要重启一下电脑; 然后打开.bashrc,在文件最后添加下面这行代码; PS1='\[\e]0;\h@\h: \w\a\]${debian_chroot:+($debian_chroot)}\[\033[01;32m\]\h@\h\[\033[00m\]:\[\033[01;34m\]\w\[\033[00m\]\$'这里已经将\u全都替换为\h,所以最终会显示新的主机名@主机名的格式; 打开终端,发现,生效了; 原文地址:一文教你快速修改ubuntu终端显示的主机名和用户名 - 小麦大叔 - 博客园 (cnblogs.com) Linux命令之ethtool命令 版权声明:原创作品,谢绝转载!否则将追究法律责任。 ————— 作者:kirin 前几天老大让查一下物理机光模块网卡的SN序列号,百度了一会儿没有找到。打浪潮厂家的电话,厂家也说没有相关的命令。我知道可以在交换机上用dis命令查,物理机上还真是不清楚。最后老大说是用ethtool 1、查看网卡速率等信息 ethtool eth0 ethtool eth2 2、查看光模块网卡SN序列号,厂商信息、光功率、光纤长度等信息 ethtool -m eth2 ethtool -m eth2|grep -i sn ethtool -m eth2|grep Vendor 3、ethtool命令详解 -a 查看网卡中 接收模块RX、发送模块TX和Autonegotiate模块的状态:启动on 或 停用off。 -A 修改网卡中 接收模块RX、发送模块TX和Autonegotiate模块的状态:启动on 或 停用off。 -c display the Coalesce information of the specified ethernet card。 -C Change the Coalesce setting of the specified ethernet card。 -g Display the rx/tx ring parameter information of the specified ethernet card。 -G change the rx/tx ring setting of the specified ethernet card。 -i 显示网卡驱动的信息,如驱动的名称、版本等。 -d 显示register dump信息, 部分网卡驱动不支持该选项。 -e 显示EEPROM dump信息,部分网卡驱动不支持该选项。 -E 修改网卡EEPROM byte。 -k 显示网卡Offload参数的状态:on 或 off,包括rx-checksumming、tx-checksumming等。 -K 修改网卡Offload参数的状态。 -p 用于区别不同ethX对应网卡的物理位置,常用的方法是使网卡port上的led不断的闪;N指示了网卡闪的持续时间,以秒为单位。 -r 如果auto-negotiation模块的状态为on,则restarts auto-negotiation。 -S 显示NIC- and driver-specific 的统计参数,如网卡接收/发送的字节数、接收/发送的广播包个数等。 -t 让网卡执行自我检测,有两种模式:offline or online。 -s 修改网卡的部分配置,包括网卡速度、单工/全双工模式、mac地址等。 4、小例子 查看机器上网卡的速度:百兆还是千兆,请输入: ethool eth0 操作完毕后,输出信息中Speed:这一项就指示了网卡的速度。 停止网卡的发送模块TX,请输入: ethool eth0 操作完毕后,输出信息中Speed:这一项就指示了网卡的速度。 停止网卡的发送模块TX,请输入: ethtool -A tx off eth0 操作完毕后,可输入ethtool -a eth0,查看tx模块是否已被停止。 查看网卡eth0采用了何种驱动,请输入: ethtool -i eth0 操作完毕后,显示 driver: bnx2;version: 1.4.30 等信息。 关闭网卡对收到的数据包的校验功能,请输入: ethtool -K eth0 rx off 操作完毕后,可输入ethtool –k eth0,查看校验功能是否已被停止。 如果机器上安装了两块网卡,那么eth0对应着哪块网卡呢?输入: ethtool -p eth0 10 操作完毕后,看哪块网卡的led灯在闪,eth0就对应着哪块网卡。 查看网卡,在接收/发送数据时,有没有出错?请输入: ethtool –S eth0 将千兆网卡的速度降为百兆,请输入: ethtool -s eth0 speed 100 获取命令帮助 ethtool -h 查看命令版本 ethtool --version 安装命令 yum install -y ethtool原文地址:https://www.cnblogs.com/kirin365/p/17214326.html DNS的A、CNAME、MX、NS、TXT、言最近工作过程中需要设定邮件服务器,其中涉及到dns服务器的设定。 整理并且记录自己的理解。 种类A、CNAME、MX、NS、TXT、SPF 下面挨个介绍一下。 A记录/AAAA记录 IPv4: 示例:ns1.exmaple.com. IN A 198.51.100.2解释:【domain】 IN A 【IP地址】 IPv6: 示例:ns1.exmaple.com. IN AAAA 8fe0::8f61:ac8:30cd:a16e解释:【domain】 IN AAAA 【IP地址】 ※IN的意思是「Internet」,不是IN/OUT的「IN」。 干什么用呢?我们在浏览器输入域名后,需要向DNS服务器请求,找到这个域名对应的服务器IP。上面示例就是这么一条记录。 虽然域名和IP都可以变更,但是相比来说域名变更更加简单和随意。所以当网站更换自己域名的时候,就需要修改这条记录。 CNAME 示例:sub.example.com. IN CNAME hoge.example.com.解释:【別名】 IN CNAME 【原名】 干什么用呢?给某一个domain起多个名字。 类似于,jd.com,jd360.com,jingdong.com虽然是不同名字的域名,但是可以指向同一个原名jd.com。可以让企业的对外展示更加灵活。 举例: jd360.com IN CNAME jd.com jingdong.com IN CNAME jd.com jd.com IN A 123.123.123.123 (这条是A记录例子) MX记录 MX记录(Mail Exchange):邮件路由记录 在DNS上设定,用于将邮箱地址@符号后的域名指向邮件服务器。示例:example.com. IN MX 10 mail.example.com.解释:【domain】 IN MX 【优先度】 【邮件服务器】 干什么用呢?当发信侧服务器给受信侧发邮件时,首先会要求DNS服务器解析受信侧邮箱地址中@后面部分的域名对应的MX记录(DNS的写法可以理解成example.com 的A记录下面,有一行上面示例的MX记录,当然邮箱服务器也有对应的A记录)。 这样,邮件就直接发到对应的MX记录的A记录里的IP了。 例子:给[email protected]发邮件的话, DNS会返回给发信侧198.51.100.3这个IP exmaple.com. IN A 198.51.100.2 example.com. IN MX 10 mail.example.com. mail.example.com. IN A 198.51.100.3 ※如果是普通用户通过【exmaple.com】浏览主页,那么DNS继续返回 198.51.100.2 。这个其实也需要DNS判断请求服务器是邮件服务器还是普通的访问。 NS记录 指定域名解析服务器。示例:example.com. IN NS ns1.example.com.解释:【domain】 IN NS 【DNS服务器】 干什么用呢?指定该域名由哪个DNS服务器来进行解析。 TXT记录 示例:ns1.exmaple.com. IN TXT "联系电话:XXXX"解释:【domain】 IN TXT 【任意字符串】 干什么用呢?一般指某个主机名或域名的说明,或者联系方式,或者标注提醒等等。 SPF记录SPF记录是TXT记录的一个运用。后面的备注需要按照指定的格式才能有效。 示例:exmaple.com. IN TXT "v=spf1 ip4:198.51.100.1 ~all"解释:【domain】 IN TXT 【送信侧邮件服务器确认规则】 干什么用呢?从发信侧服务器设定到DNS上的这条记录中,读取信息,判断发信侧是否合法。 如果不符合规则,那么按照约定的规则处理掉。 跟MX记录正好相反。 MX:我是收件服务器,你找我时,请参考我设定到DNS服务器上的MX记录。 SPF:我是发信服务器,你接受邮件时,请参考我设定到DNS服务器上SPF规则。如果不是我发的信,你可以删掉或者接收。 SPF记录规则格式: 版本 空格 定义 空格 定义 (空格 定义的循环) 跟着例子看的话,比较好理解。 example.com. IN SPF "v=spf1 ip4:192.0.2.1 -all" v=spf1 是版本。只出现一次。ip4:192.0.2.1 第一个定义-all 第二个定义定义的格式。 种类 | all | ip4 | ip6 | a | mx | ptr | exists | include|前缀 "+" Pass(通过) "-" Fail(拒绝) "~" Soft Fail(软拒绝) "?" Neutral(中立)定义测试 测试时,将从前往后依次测试每个定义。 如果一个定义命中了要查询的 IP 地址,则由相应定义的前缀决定怎么处理。默认的前缀为+。 如果测试完所有的 定义也没有命中,则结果为 Neutral。 结果及处理方法一览 结果说明服务器处理办法Pass发件IP是合法的接受来信Fail发件 IP 是非法的退信Soft Fail发件 IP 非法,但是不采取强硬措施接受来信,但是做标记NeutralSPF 记录中没有关于发件 IP 是否合法的信息接受来信None服务器没有设定 SPF 记录接受来信PermError发生了严重错误(例如 SPF 记录语法错误)没有规定TempError发生了临时错误(例如 DNS 查询失败)接受或拒绝 后记有一个问题,调查后更新。 设定好SPF的记录之后怎么快速测试呢? 总不能每次都等DNS更新完再测试吧? 20210914更新: SPF测试方法很多,google一下的话可以找到很多网站。 我常用的是https://mxtoolbox.com/spf.aspx 原文地址:DNS的A、CNAME、MX、NS、TXT、SPF记录 - 简书 (jianshu.com) |
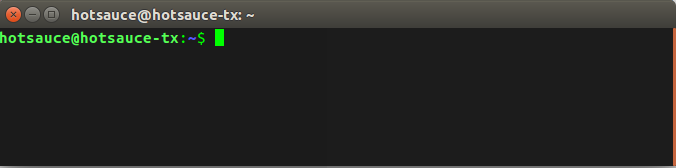 大概格式是这样子的:用户名@主机名hotsauce@hotsauce-tx
 这样我们大概知道具体是脚本里哪句代码生效了,下面是这些参数的作用,可以看一下,如下表所示;

【本文地址】
今日新闻 |
推荐新闻 |