Flume框架介绍 |
您所在的位置:网站首页 › 介绍Flume使用场景 › Flume框架介绍 |
Flume框架介绍
|
Flume框架介绍
文章目录
Flume框架介绍1,Flume概述1.1 Flume定义1.2 Flume 基础架构AgentSourceSinkChannelevent
2,Flume入门案例1)监控端口数据官方案例2)实时监控单个追加文件3)实时监控目录下多个文件4)实时监控目录下多个文件中追加内容
3,Flume进阶1)Flume流式处理图解2)Flume Agent 内部原理3)Flume拓扑结构
4,Flume企业开发案例1)复制和多路复用案例2)负载均衡和故障转移案例3)聚合案例
1,Flume概述
1.1 Flume定义
Flume是Cloudera提供的一个高可用的,高可靠的,分布式的海量日志采集、聚合和传输的系统。Flume基于流式架构,灵活简单。
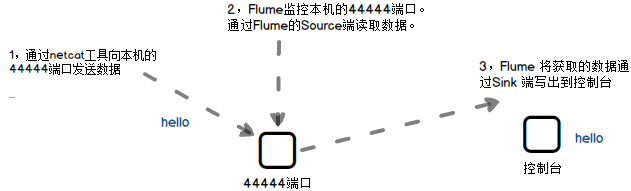
Agent 是JVM的一个进程,它以event的形式将数据从源头送至目的地,如上图所示 Agent 主要有3个部分组成,Source、Channel、Sink。 SourceSource 是接收外部数据到 Agent 的一个组件。该组件可以处理多种类型和多种格式的日志数据,包括 avro、thrift、exec、jms、spooling directory、netcat、 taildir 、sequence generator、syslog、http、legacy。 SinkSink 会不断轮询Channel中的 events 且批量地移出它们,并将这些 events 批量写入到存储中或外部索引系统,再者,被发送到另一个Flume Agent(用于聚合)。 ChannelChannel 是Source和Sink两者之间的缓冲区,Channel运行Source和Sink运作在两个不同的速率上。Channel是线程安全的组件,可以同时接收几个Source传入events和几个Sink读取events。 Flume自带两种Channel:Memory Channel和File Channel。 Memory Channel是内存中的队列。该Channel在不需要关心数据丢失的情况下使用,因为Memory Channel会因为程序死亡、机器宕机或机器重启等原因导致内存中数据还未写入磁盘从而发生数据丢失。 File Channel 将所有events写到了磁盘中,因此不会因为程序死亡等问题丢失数据。 eventevent是Flume中的基本数据传输单元。event由Header(用来存放event的一些属性,为K-V结构)和Body(用来存放该条数据,为字节数组)两部分组成。 2,Flume入门案例 1)监控端口数据官方案例案例需求: 使用Flume监听一个端口,收集该端口数据,并打印到控制台。 需求分析: 2 检查44444端口是否被占用 hadoop102 flume-telnet]$ sudo netstat -nlp | grep 444443 进入Flume目录下创建一个job文件夹,在该文件夹下创建并配置flume-netcat-logger.config文件 # Name the components on this agent a1.sources = r1 a1.sinks = k1 a1.channels = c1 # Describe/configure the source a1.sources.r1.type = netcat a1.sources.r1.bind = localhost a1.sources.r1.port = 44444 # Describe the sink a1.sinks.k1.type = logger # Use a channel which buffers events in memory a1.channels.c1.type = memory a1.channels.c1.capacity = 1000 a1.channels.c1.transactionCapacity = 100 # Bind the source and sink to the channel a1.sources.r1.channels = c1 a1.sinks.k1.channel = c1
第二种写法: [hadoop102 flume]$ bin/flume-ng agent -c conf/ -n a1 -f job/flume-netcat-logger.conf -Dflume.root.logger=INFO,console参数说明: –conf/-c:表示配置文件存储在conf/目录 –name/-n:表示给agent起名为a1 –conf-file/-f:flume本次启动读取的配置文件是在job文件夹下的flume-telnet.conf文件。 -Dflume.root.logger=INFO,console :-D表示flume运行时动态修改flume.root.logger参数属性值,并将控制台日志打印级别设置为INFO级别。日志级别包括:log、info、warn、error。 5 使用netcat工具向本机的44444端口发送内容 [hadoop102 ~]$ nc localhost 44444 hello ysy6 在Flume监听页面观察接收数据情况 2)实时监控单个追加文件1 案例需求:实时分析Hive日志,并上传到HDFS上 2 需求如下 (2)创建flume-file-hdfs.conf文件 创建文件 [@hadoop102 job]$ vim flume-file-hdfs.conf注:要想读取Linux系统中的文件,就得按照Linux命令的规则执行命令。由于Hive日志在Linux系统中所以读取文件的类型选择:exec即execute执行的意思。表示执行Linux命令来读取文件。 添加如下内容 # Name the components on this agent a2.sources = r2 a2.sinks = k2 a2.channels = c2 # Describe/configure the source a2.sources.r2.type = exec a2.sources.r2.command = tail -F /opt/module/hive/logs/hive.log # Describe the sink a2.sinks.k2.type = hdfs a2.sinks.k2.hdfs.path = hdfs://hadoop102:8020/flume/%Y%m%d/%H #上传文件的前缀 a2.sinks.k2.hdfs.filePrefix = logs- #是否按照时间滚动文件夹 a2.sinks.k2.hdfs.round = true #多少时间单位创建一个新的文件夹 a2.sinks.k2.hdfs.roundValue = 1 #重新定义时间单位 a2.sinks.k2.hdfs.roundUnit = hour #是否使用本地时间戳 a2.sinks.k2.hdfs.useLocalTimeStamp = true #积攒多少个Event才flush到HDFS一次 a2.sinks.k2.hdfs.batchSize = 100 #设置文件类型,可支持压缩 a2.sinks.k2.hdfs.fileType = DataStream #多久生成一个新的文件 a2.sinks.k2.hdfs.rollInterval = 60 #设置每个文件的滚动大小 a2.sinks.k2.hdfs.rollSize = 134217700 #文件的滚动与Event数量无关 a2.sinks.k2.hdfs.rollCount = 0 # Use a channel which buffers events in memory a2.channels.c2.type = memory a2.channels.c2.capacity = 1000 a2.channels.c2.transactionCapacity = 100 # Bind the source and sink to the channel a2.sources.r2.channels = c2 a2.sinks.k2.channel = c2注意: 对于所有与时间相关的转义序列,Event Header中必须存在以 “timestamp”的key(除非hdfs.useLocalTimeStamp设置为true,此方法会使用TimestampInterceptor自动添加timestamp)。 (3)运行Flume [hadoop102 flume]$ bin/flume-ng agent --conf conf/ --name a2 --conf-file job/flume-file-hdfs.conf(4)开启Hadoop和Hive并操作Hive产生日志 [hadoop102 hadoop-2.7.2]$ sbin/start-dfs.sh [hadoop103 hadoop-2.7.2]$ sbin/start-yarn.sh [hadoop102 hive]$ bin/hive hive (default)>(5)在HDFS上查看文件。 3)实时监控目录下多个文件案例需求:使用Flume监听一个目录下的文件,并上传监听结果到HDFS 需求分析 添加如下内容 a3.sources = r3 a3.sinks = k3 a3.channels = c3 # Describe/configure the source a3.sources.r3.type = spooldir a3.sources.r3.spoolDir = /opt/module/flume/upload a3.sources.r3.fileSuffix = .COMPLETED a3.sources.r3.fileHeader = true #忽略所有以.tmp结尾的文件,不上传 a3.sources.r3.ignorePattern = ([^ ]*\.tmp) # Describe the sink a3.sinks.k3.type = hdfs a3.sinks.k3.hdfs.path = hdfs://hadoop102:8020/flume/upload/%Y%m%d/%H #上传文件的前缀 a3.sinks.k3.hdfs.filePrefix = upload- #是否按照时间滚动文件夹 a3.sinks.k3.hdfs.round = true #多少时间单位创建一个新的文件夹 a3.sinks.k3.hdfs.roundValue = 1 #重新定义时间单位 a3.sinks.k3.hdfs.roundUnit = hour #是否使用本地时间戳 a3.sinks.k3.hdfs.useLocalTimeStamp = true #积攒多少个Event才flush到HDFS一次 a3.sinks.k3.hdfs.batchSize = 100 #设置文件类型,可支持压缩 a3.sinks.k3.hdfs.fileType = DataStream #多久生成一个新的文件 a3.sinks.k3.hdfs.rollInterval = 60 #设置每个文件的滚动大小大概是128M a3.sinks.k3.hdfs.rollSize = 134217700 #文件的滚动与Event数量无关 a3.sinks.k3.hdfs.rollCount = 0 # Use a channel which buffers events in memory a3.channels.c3.type = memory a3.channels.c3.capacity = 1000 a3.channels.c3.transactionCapacity = 100 # Bind the source and sink to the channel a3.sources.r3.channels = c3 a3.sinks.k3.channel = c3
(2)启动监控文件夹命令 [hadoop102 flume]$ bin/flume-ng agent --conf conf/ --name a3 --conf-file job/flume-dir-hdfs.conf说明:在使用Spooling Directory Source时,不要在监控目录中创建并持续修改文件;上传完成的文件会以.COMPLETED结尾;被监控文件夹每500毫秒扫描一次文件变动。 (3)向upload文件夹中添加文件 在/opt/module/flume目录下创建upload文件夹 [hadoop102 flume]$ mkdir upload向upload文件夹中添加文件 [hadoop102 upload]$ touch ysy.txt [hadoop102 upload]$ touch ysy.tmp [hadoop102 upload]$ touch ysy.log(4)查看HDFS上的数据 4)实时监控目录下多个文件中追加内容Exec source适用于监控一个实时追加的文件,不能实现断点续传;Spooldir Source适合用于同步新文件,但不适合对实时追加日志的文件进行监听并同步;而Taildir Source适合用于监听多个实时追加的文件,并且能够实现断点续传。 添加如下内容 a3.sources = r3 a3.sinks = k3 a3.channels = c3 # Describe/configure the source a3.sources.r3.type = TAILDIR a3.sources.r3.positionFile = /opt/module/flume/tail_dir.json a3.sources.r3.filegroups = f1 f2 a3.sources.r3.filegroups.f1 = /opt/module/flume/files/.*file.* a3.sources.r3.filegroups.f2 = /opt/module/flume/files2/.*log.* # Describe the sink a3.sinks.k3.type = hdfs a3.sinks.k3.hdfs.path = hdfs://hadoop102:8020/flume/upload2/%Y%m%d/%H #上传文件的前缀 a3.sinks.k3.hdfs.filePrefix = upload- #是否按照时间滚动文件夹 a3.sinks.k3.hdfs.round = true #多少时间单位创建一个新的文件夹 a3.sinks.k3.hdfs.roundValue = 1 #重新定义时间单位 a3.sinks.k3.hdfs.roundUnit = hour #是否使用本地时间戳 a3.sinks.k3.hdfs.useLocalTimeStamp = true #积攒多少个Event才flush到HDFS一次 a3.sinks.k3.hdfs.batchSize = 100 #设置文件类型,可支持压缩 a3.sinks.k3.hdfs.fileType = DataStream #多久生成一个新的文件 a3.sinks.k3.hdfs.rollInterval = 60 #设置每个文件的滚动大小大概是128M a3.sinks.k3.hdfs.rollSize = 134217700 #文件的滚动与Event数量无关 a3.sinks.k3.hdfs.rollCount = 0 # Use a channel which buffers events in memory a3.channels.c3.type = memory a3.channels.c3.capacity = 1000 a3.channels.c3.transactionCapacity = 100 # Bind the source and sink to the channel a3.sources.r3.channels = c3 a3.sinks.k3.channel = c3
(3)向files文件夹中追加内容 在/opt/module/flume目录下创建files文件夹 [hadoop102 flume]$ mkdir files向upload文件夹中添加文件 [hadoop102 files]$ echo hello >> file1.txt [hadoop102 files]$ echo Java >> file2.txt(4)查看HDFS上的数据 Taildir说明: Taildir Source维护了一个json格式的position File,其会定期的往position File中更新每个文件读取到的最新的位置,因此能够实现断点续传。Position File的格式如下: {"inode":2496272,"pos":12,"file":"/opt/module/flume/files/file1.txt"} {"inode":2496275,"pos":12,"file":"/opt/module/flume/files/file2.txt"}注:Linux中储存文件元数据的区域就叫做inode,每个inode都有一个号码,操作系统用inode号码来识别不同的文件,Unix/Linux系统内部不使用文件名,而使用inode号码来识别文件。 3,Flume进阶 1)Flume流式处理图解
2)SinkProcessor SinkProcessor共有三种类型,分别是DefaultSinkProcessor、LoadBalancingSinkProcessor和FailoverSinkProcessor DefaultSinkProcessor对应的是单个的Sink,LoadBalancingSinkProcessor和FailoverSinkProcessor对应的是Sink Group,LoadBalancingSinkProcessor可以实现负载均衡的功能,FailoverSinkProcessor可以错误恢复的功能。 3)Flume拓扑结构1)简单串联
4)聚合 案例需求 使用Flume-1监控文件变动,Flume-1将变动内容传递给Flume-2,Flume-2负责存储到HDFS。同时Flume-1将变动内容传递给Flume-3,Flume-3负责输出到Local FileSystem。 需求分析: 在/opt/module/datas/目录下创建flume3文件夹 [hadoop102 datas]$ mkdir flume3(2)创建flume-file-flume.conf 配置1个接收日志文件的source和两个channel、两个sink,分别输送给flume-flume-hdfs和flume-flume-dir。 编辑配置文件 [hadoop102 group1]$ vim flume-file-flume.conf添加如下内容 #Name the components on this agent a1.source = r1 a1.sinks = k1 k2 a1.channels = c1 c2 #将数据流复制给所有Channel a1.sources.r1.selector.type = replicating #Describe/configure the source a1.sources.r1.type = exec a1.sources.r1.command = tail -F /opt/module/hive/logs/hive.log a1.sources.r1.shell = /bin/bash -c #describe the sinks a1.sinks.k1.type = avro a1.sinks.k1.hostname = hadoop102 a1.sinks.k1.port = 4141 a1.sinks.k2.type = avro a1.sinks.k2.hostname = hadoop102 a1.sinks.k2.port = 4142 #describe the channels a1.channels.c1.type = memory a1.channels.c1.capacity = 1000 a1.channels.c1.transactionCapacity = 100 a1.channels.c2.type = memory a1.channels.c2.capacity = 1000 a1.channels.c2.transactionCapacity = 100 #bind the source and sink to the channel a1.sources.r1.channels = c1 c2 a1.sinks.k1.channel = c1 a1.sinks.k2.channel = c2(3)创建flume-flume-hdfs.conf 配置上级Flume输出的Source,输出是到HDFS的Sink。 编辑配置文件 [hadoop102 group1]$ vim flume-flume-hdfs.conf添加如下内容 # Name the components on this agent a2.sources = r1 a2.sinks = k1 a2.channels = c1 a2.sources.r1.type = avro a2.sources.r1.bind = hadoop102 a2.sources.r1.port = 4141 a2.sinks.k1.type = hdfs a2.sinks.k1.hdfs.path = hdfs://hadoop102:8020/flume2/%Y%m%d/%H #上传文件的前缀 a2.sinks.k1.hdfs.filePrefix = flume2- #是否按照时间滚动文件夹 a2.sinks.k1.hdfs.round = true #多少时间单位创建一个新的文件夹 a2.sinks.k1.hdfs.roundValue = 1 #重新定义时间单位 a2.sinks.k1.hdfs.roundUnit = hour #是否使用本地时间戳 a2.sinks.k1.hdfs.useLocalTimeStamp = true #积攒多少个Event才flush到HDFS一次 a2.sinks.k1.hdfs.batchSize = 100 #设置文件类型,可支持压缩 a2.sinks.k1.hdfs.fileType = DataStream #多久生成一个新的文件 a2.sinks.k1.hdfs.rollInterval = 600 #设置每个文件的滚动大小大概是128M a2.sinks.k1.hdfs.rollSize = 134217700 #文件的滚动与Event数量无关 a2.sinks.k1.hdfs.rollCount = 0 a2.channels.c1.type = memory a2.channels.c1.capacity = 1000 a2.channels.c1.transactionCapacity = 100 a2.sources.r1.channels = c1 a2.sinks.k1.channels = c1(4)创建flume-flume-dir.conf 配置上级Flume输出的Source,输出是到本地目录的Sink。 编辑配置文件 [hadoop102 group1]$ vim flume-flume-dir.conf添加如下内容 # Name the components on this agent a3.sources = r1 a3.sinks = k1 a3.channels = c2 # Describe/configure the source a3.sources.r1.type = avro a3.sources.r1.bind = hadoop102 a3.sources.r1.port = 4142 # Describe the sink a3.sinks.k1.type = file_roll a3.sinks.k1.sink.directory = /opt/module/data/flume3 # Describe the channel a3.channels.c2.type = memory a3.channels.c2.capacity = 1000 a3.channels.c2.transactionCapacity = 100 # Bind the source and sink to the channel a3.sources.r1.channels = c2 a3.sinks.k1.channel = c2提示:输出的本地目录必须是已经存在的目录,如果该目录不存在,并不会创建新的目录。 (5)执行配置文件 分别启动对应的flume进程:flume-flume-dir,flume-flume-hdfs,flume-file-flume。 [hadoop102 flume]$ bin/flume-ng agent --conf conf/ --name a3 --conf-file job/group1/flume-flume-dir.conf [hadoop102 flume]$ bin/flume-ng agent --conf conf/ --name a2 --conf-file job/group1/flume-flume-hdfs.conf [hadoop102 flume]$ bin/flume-ng agent --conf conf/ --name a1 --conf-file job/group1/flume-file-flume.conf(6)启动Hadoop和Hive [hadoop102 hadoop-2.7.2]$ sbin/start-dfs.sh [hadoop103 hadoop-2.7.2]$ sbin/start-yarn.sh [hadoop102 hive]$ bin/hive hive (default)>(7)检查HDFS上数据 (8)检查/opt/module/datas/flume3目录中数据 2)负载均衡和故障转移案例案例需求 使用Flume1监控一个端口,其sink组中的sink分别对接Flume2和Flume3,采用FailoverSinkProcessor,实现故障转移的功能。 需求分析: (2)创建flume-netcat-flume.conf 配置1个netcat source和1个channel、1个sink group(2个sink),分别输送给flume-flume-console1和flume-flume-console2。 编辑配置文件 [hadoop102 group2]$ vim flume-netcat-flume.conf添加如下内容 # Name the components on this agent a1.sources = r1 a1.channels = c1 a1.sinkgroups = g1 a1.sinks = k1 k2 # Describe/configure the source a1.sources.r1.type = netcat a1.sources.r1.bind = localhost a1.sources.r1.port = 44444 a1.sinkgroups.g1.processor.type = failover a1.sinkgroups.g1.processor.priority.k1 = 5 a1.sinkgroups.g1.processor.priority.k2 = 10 a1.sinkgroups.g1.processor.maxpenalty = 10000 # Describe the sink a1.sinks.k1.type = avro a1.sinks.k1.hostname = hadoop102 a1.sinks.k1.port = 4141 a1.sinks.k2.type = avro a1.sinks.k2.hostname = hadoop102 a1.sinks.k2.port = 4142 # Describe the channel a1.channels.c1.type = memory a1.channels.c1.capacity = 1000 a1.channels.c1.transactionCapacity = 100 # Bind the source and sink to the channel a1.sources.r1.channels = c1 a1.sinkgroups.g1.sinks = k1 k2 a1.sinks.k1.channel = c1 a1.sinks.k2.channel = c1(3)创建flume-flume-console1.conf 配置上级Flume输出的Source,输出是到本地控制台。 编辑配置文件 [hadoop102 group2]$ vim flume-flume-console1.conf添加如下内容 a2.sources = r1 a2.sinks = k1 a2.channels = c1 a2.sources.r1.type = avro a2.sources.r1.bind = hadoop102 a2.sources.r1.port = 4141 a2.sinks.k1.type = logger a2.channels.c1.type = memory a2.channels.c1.capacity = 1000 a2.channels.c1.transactionCapacity = 100 a2.sources.r1.channels = c1 a2.sinks.k1.channel = c14)创建flume-flume-console2.conf 配置上级Flume输出的Source,输出是到本地控制台。 编辑配置文件 [hadoop102 group2]$ vim flume-flume-console2.conf添加如下内容 # Name the components on this agent a3.sources = r1 a3.sinks = k1 a3.channels = c2 # Describe/configure the source a3.sources.r1.type = avro a3.sources.r1.bind = hadoop102 a3.sources.r1.port = 4142 # Describe the sink a3.sinks.k1.type = logger # Describe the channel a3.channels.c2.type = memory a3.channels.c2.capacity = 1000 a3.channels.c2.transactionCapacity = 100 # Bind the source and sink to the channel a3.sources.r1.channels = c2 a3.sinks.k1.channel = c2(5)执行配置文件 分别开启对应配置文件:flume-flume-console2,flume-flume-console1,flume-netcat-flume。 [hadoop102 flume]$ bin/flume-ng agent --conf conf/ --name a3 --conf-file job/group2/flume-flume-console2.conf -Dflume.root.logger=INFO,console [hadoop102 flume]$ bin/flume-ng agent --conf conf/ --name a2 --conf-file job/group2/flume-flume-console1.conf -Dflume.root.logger=INFO,console [hadoop102 flume]$ bin/flume-ng agent --conf conf/ --name a1 --conf-file job/group2/flume-netcat-flume.conf(6)使用netcat工具向本机的44444端口发送内容 $ nc localhost 44444(7)查看Flume2及Flume3的控制台打印日志 (8)将Flume2 kill,观察Flume3的控制台打印情况。 注:使用jps -ml查看Flume进程。 3)聚合案例案例需求: hadoop102上的Flume-1监控文件/opt/module/group.log, hadoop103上的Flume-2监控某一个端口的数据流, Flume-1与Flume-2将数据发送给hadoop104上的Flume-3,Flume-3将最终数据打印到控制台。 需求分析: 在hadoop102、hadoop103以及hadoop104的/opt/module/flume/job目录下创建一个group3文件夹。 [hadoop102 job]$ mkdir group3 [hadoop103 job]$ mkdir group3 [hadoop104 job]$ mkdir group3(2)创建flume1-logger-flume.conf 配置Source用于监控hive.log文件,配置Sink输出数据到下一级Flume。 在hadoop102上编辑配置文件 [hadoop102 group3]$ vim flume1-logger-flume.conf添加如下内容 # Name the components on this agent a1.sources = r1 a1.sinks = k1 a1.channels = c1 # Describe/configure the source a1.sources.r1.type = exec a1.sources.r1.command = tail -F /opt/module/group.log a1.sources.r1.shell = /bin/bash -c # Describe the sink a1.sinks.k1.type = avro a1.sinks.k1.hostname = hadoop104 a1.sinks.k1.port = 4141 # Describe the channel a1.channels.c1.type = memory a1.channels.c1.capacity = 1000 a1.channels.c1.transactionCapacity = 100 # Bind the source and sink to the channel a1.sources.r1.channels = c1 a1.sinks.k1.channel = c1(3)创建flume2-netcat-flume.conf 配置Source监控端口44444数据流,配置Sink数据到下一级Flume: 在hadoop103上编辑配置文件 [hadoop103 group3]$ vim flume2-netcat-flume.conf添加如下内容 # Name the components on this agent a2.sources = r1 a2.sinks = k1 a2.channels = c1 # Describe/configure the source a2.sources.r1.type = netcat a2.sources.r1.bind = hadoop103 a2.sources.r1.port = 44444 # Describe the sink a2.sinks.k1.type = avro a2.sinks.k1.hostname = hadoop104 a2.sinks.k1.port = 4141 # Use a channel which buffers events in memory a2.channels.c1.type = memory a2.channels.c1.capacity = 1000 a2.channels.c1.transactionCapacity = 100 # Bind the source and sink to the channel a2.sources.r1.channels = c1 a2.sinks.k1.channel = c1(4)创建flume3-flume-logger.conf 配置source用于接收flume1与flume2发送过来的数据流,最终合并后sink到控制台。 在hadoop104上编辑配置文件 [hadoop104 group3]$ touch flume3-flume-logger.conf [hadoop104 group3]$ vim flume3-flume-logger.conf添加如下内容 # Name the components on this agent a3.sources = r1 a3.sinks = k1 a3.channels = c1 # Describe/configure the source a3.sources.r1.type = avro a3.sources.r1.bind = hadoop104 a3.sources.r1.port = 4141 # Describe the sink # Describe the sink a3.sinks.k1.type = logger # Describe the channel a3.channels.c1.type = memory a3.channels.c1.capacity = 1000 a3.channels.c1.transactionCapacity = 100 # Bind the source and sink to the channel a3.sources.r1.channels = c1 a3.sinks.k1.channel = c1(5)执行配置文件 分别开启对应配置文件:flume3-flume-logger.conf,flume2-netcat-flume.conf,flume1-logger-flume.conf。 [hadoop104 flume]$ bin/flume-ng agent --conf conf/ --name a3 --conf-file job/group3/flume3-flume-logger.conf -Dflume.root.logger=INFO,console [hadoop102 flume]$ bin/flume-ng agent --conf conf/ --name a2 --conf-file job/group3/flume1-logger-flume.conf [hadoop103 flume]$ bin/flume-ng agent --conf conf/ --name a1 --conf-file job/group3/flume2-netcat-flume.conf(6)在hadoop103上向/opt/module目录下的group.log追加内容 [hadoop103 module]$ echo 'hello' > group.log(7)在hadoop102上向44444端口发送数据 [hadoop102 flume]$ telnet hadoop102 44444(8)检查hadoop104上数据 总结了一整天。。。 |


 实现步骤如下 1 安装netcat工具
 4 先开启flume监听端口 第一种写法:
 实现步骤: (1)Flume要想将数据输出到HDFS,依赖Hadoop相关jar包 检查/etc/profile.d/my_env.sh文件,确认Hadoop和Java环境变量配置正确
 实现步骤: (1)创建配置文件flume-dir-hdfs.conf 创建一个文件
 实现步骤: (1)创建配置文件flume-taildir-hdfs.conf 创建一个文件
 (2)启动监控文件夹命令
 重要组件: 1)ChannelSelector ChannelSelector的作用就是选出Event将要被发往哪个Channel。其共有两种类型,分别是Replicating(复制)和Multiplexing(多路复用)。 ReplicatingSelector会将同一个Event发往所有的Channel,Multiplexing会根据相应的原则,将不同的Event发往不同的Channel。
 2)复制和多路复用
  3)负载均衡和故障转移
 Flume支持使用将多个sink逻辑上分到一个sink组,sink组配合不同的SinkProcessor可以实现负载均衡和错误恢复的功能。
 这种模式是我们最常见的,也非常实用,日常web应用通常分布在上百个服务器,大者甚至上千个、上万个服务器。产生的日志,处理起来也非常麻烦。用flume的这种组合方式能很好的解决这一问题,每台服务器部署一个flume采集日志,传送到一个集中收集日志的flume,再由此flume上传到hdfs、hive、hbase等,进行日志分析。
 实现步骤: (1)准备工作 在/opt/module/flume/job目录下创建group1文件夹
 实现步骤 (1)准备工作 在/opt/module/flume/job目录下创建group2文件夹
 实现步骤: (1)准备工作 分发Flume
【本文地址】
今日新闻 |
推荐新闻 |