【猿知识】汉明距离(Hamming Distance) |
您所在的位置:网站首页 › 什么是最小码距的概念 › 【猿知识】汉明距离(Hamming Distance) |
【猿知识】汉明距离(Hamming Distance)
|
文章目录
汉明距离汉明重量汉明距离计算汉明距离应用例子参考
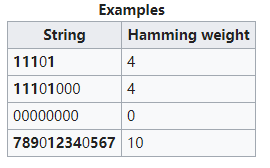
汉明距离是以理查德·卫斯里·汉明的名字命名的,汉明在误差检测与校正码的基础性论文中首次引入这个概念。在通信中累计定长二进制字中发生翻转的错误数据位,所以它也被称为信号距离。 汉明距离更多的用于信号处理,表明一个信号变成另一个信号需要的最小操作(替换位),实际中就是比较两个比特串有多少个位不一样,简洁的操作时就是两个比特串进行异或之后包含1的个数。汉明距在图像处理领域也有这广泛的应用,是比较二进制图像非常有效的手段。计算一个数字的比特位包含1的个数有个小技巧:value &= value - 1这个运算的结果就是把value最后一个1去掉,循环进行运算直到value等于0(所有的1都被去掉)就可以知道vaule拥有多少个1了。其在包括信息论、编码理论、密码学等领域都有应用。但是,如果要比较两个不同长度的字符串,不仅要进行替换,而且要进行插入与删除的运算,在这种场合下,通常使用更加复杂的编辑距离等算法。 汉明距离假如一组二进制数据为101,另外一组为111,那么显然把第一组的第二位数据0改成1就可以变成第二组数据111,所以两组数据的汉明距离就为1 简单点说,汉明距离就是一组二进制数据变成另一组数据所需的步骤数(它表示两个相同长度的字符串对应位置的不同字符的数量),显然,这个数值可以衡量两张图片的差异,汉明距离越小,则代表相似度越高。汉明距离为0,即代表两张图片完全一样 汉明重量是字符串相对于同样长度的零字符串的汉明距离,也就是说,它是字符串中非零的元素个数:对于二进制字符串来说,就是 1 的个数,所以 11101 的汉明重量是 4。 编写一个函数,输入是一个无符号整数,返回其二进制表达式中数字位数为 ‘1’ 的个数(也被称为汉明重量)。 public class Solution { public int hammingWeight(int n) { int ans = 0; while (n != 0) { ans++; n &= (n - 1); } return ans; } } 汉明距离计算C#语法 Brian Kernighan 算法计算汉明距离 //Brian Kernighan 算法计算汉明距离 public static void HammingDistance(int x, int y) { int s = x ^ y, ret = 0; while (s != 0) { s &= s - 1; ret++; } Console.WriteLine(ret); }Java语法 数组汉明距离计算 // 数组汉明距离计算 byte[] array1 = new byte[]{0,1,0,1,0,0,0,0,1,1,1,0,0}; byte[] array2 = new byte[]{1,1,0,1,1,0,0,1,0,1,0,1,0}; int count = 0; for (int i = 0; i count ++; } } System.out.println(count); // 字符串汉明距离计算,先转换成字符数组 String str1 = "abddfaerwerw"; String str2 = "abddfaerw大rw"; char[] arr1 = str1.toCharArray(); char[] arr2 = str2.toCharArray(); int count1 = 0; for (int i = 0; i count1 ++; } } System.out.println(count1); 汉明距离应用例子Google、Baidu 等搜索引擎相继推出了以图搜图的功能,测试了下效果还不错~ 那这种技术的原理是什么呢?计算机怎么知道两张图片相似呢? 这里的关键技术叫做"感知哈希算法"(Perceptual hash algorithm),它的作用是对每张图片生成一个"指纹"(fingerprint)字符串,然后比较不同图片的指纹。结果越接近,就说明图片越相似。 下面是一个最简单的实现: 第一步,缩小尺寸。 将图片缩小到8x8的尺寸,总共64个像素。这一步的作用是去除图片的细节,只保留结构、明暗等基本信息,摒弃不同尺寸、比例带来的图片差异。
第二步,简化色彩。 将缩小后的图片,转为64级灰度。也就是说,所有像素点总共只有64种颜色。 第三步,计算平均值。 计算所有64个像素的灰度平均值。 第四步,比较像素的灰度。 将每个像素的灰度,与平均值进行比较。大于或等于平均值,记为1;小于平均值,记为0。 第五步,计算哈希值。 将上一步的比较结果,组合在一起,就构成了一个64位的整数,这就是这张图片的指纹。组合的次序并不重要,只要保证所有图片都采用同样次序就行了。 用汉明距离进行图片相似度检测的Java实现 = 用汉明距离进行图片相似度检测的Java实现 得到指纹以后,就可以对比不同的图片,看看64位中有多少位是不一样的。在理论上,这等同于计算"汉明距离"(Hamming distance)。如果不相同的数据位不超过5,就说明两张图片很相似;如果大于10,就说明这是两张不同的图片。 具体的代码实现,可以参见Wote用python语言写的imgHash.py。代码很短,只有53行。使用的时候,第一个参数是基准图片,第二个参数是用来比较的其他图片所在的目录,返回结果是两张图片之间不相同的数据位数量(汉明距离)。 这种算法的优点是简单快速,不受图片大小缩放的影响,缺点是图片的内容不能变更。如果在图片上加几个文字,它就认不出来了。所以,它的最佳用途是根据缩略图,找出原图。 实际应用中,往往采用更强大的pHash算法和SIFT算法,它们能够识别图片的变形。只要变形程度不超过25%,它们就能匹配原图。这些算法虽然更复杂,但是原理与上面的简便算法是一样的,就是先将图片转化成Hash字符串,然后再进行比较。 下面我们来看下上述理论用java来做一个DEMO版的具体实现: import java.awt.Graphics2D; import java.awt.color.ColorSpace; import java.awt.image.BufferedImage; import java.awt.image.ColorConvertOp; import java.io.File; import java.io.FileInputStream; import java.io.FileNotFoundException; import java.io.InputStream; import javax.imageio.ImageIO; /* * pHash-like image hash. * Author: Elliot Shepherd ([email protected] * Based On: http://www.hackerfactor.com/blog/index.php?/archives/432-Looks-Like-It.html */ public class ImagePHash { private int size = 32; private int smallerSize = 8; public ImagePHash() { initCoefficients(); } public ImagePHash(int size, int smallerSize) { this.size = size; this.smallerSize = smallerSize; initCoefficients(); } public int distance(String s1, String s2) { int counter = 0; for (int k = 0; k counter++; } } return counter; } // Returns a 'binary string' (like. 001010111011100010) which is easy to do a hamming distance on. public String getHash(InputStream is) throws Exception { BufferedImage img = ImageIO.read(is); /* 1. Reduce size. * Like Average Hash, pHash starts with a small image. * However, the image is larger than 8x8; 32x32 is a good size. * This is really done to simplify the DCT computation and not * because it is needed to reduce the high frequencies. */ img = resize(img, size, size); /* 2. Reduce color. * The image is reduced to a grayscale just to further simplify * the number of computations. */ img = grayscale(img); double[][] vals = new double[size][size]; for (int x = 0; x vals[x][y] = getBlue(img, x, y); } } /* 3. Compute the DCT. * The DCT separates the image into a collection of frequencies * and scalars. While JPEG uses an 8x8 DCT, this algorithm uses * a 32x32 DCT. */ long start = System.currentTimeMillis(); double[][] dctVals = applyDCT(vals); System.out.println("DCT: " + (System.currentTimeMillis() - start)); /* 4. Reduce the DCT. * This is the magic step. While the DCT is 32x32, just keep the * top-left 8x8. Those represent the lowest frequencies in the * picture. */ /* 5. Compute the average value. * Like the Average Hash, compute the mean DCT value (using only * the 8x8 DCT low-frequency values and excluding the first term * since the DC coefficient can be significantly different from * the other values and will throw off the average). */ double total = 0; for (int x = 0; x total += dctVals[x][y]; } } total -= dctVals[0][0]; double avg = total / (double) ((smallerSize * smallerSize) - 1); /* 6. Further reduce the DCT. * This is the magic step. Set the 64 hash bits to 0 or 1 * depending on whether each of the 64 DCT values is above or * below the average value. The result doesn't tell us the * actual low frequencies; it just tells us the very-rough * relative scale of the frequencies to the mean. The result * will not vary as long as the overall structure of the image * remains the same; this can survive gamma and color histogram * adjustments without a problem. */ String hash = ""; for (int x = 0; x if (x != 0 && y != 0) { hash += (dctVals[x][y] > avg?"1":"0"); } } } return hash; } private BufferedImage resize(BufferedImage image, int width, int height) { BufferedImage resizedImage = new BufferedImage(width, height, BufferedImage.TYPE_INT_ARGB); Graphics2D g = resizedImage.createGraphics(); g.drawImage(image, 0, 0, width, height, null); g.dispose(); return resizedImage; } private ColorConvertOp colorConvert = new ColorConvertOp(ColorSpace.getInstance(ColorSpace.CS_GRAY), null); private BufferedImage grayscale(BufferedImage img) { colorConvert.filter(img, img); return img; } private static int getBlue(BufferedImage img, int x, int y) { return (img.getRGB(x, y)) & 0xff; } // DCT function stolen from http://stackoverflow.com/questions/4240490/problems-with-dct-and-idct-algorithm-in-java private double[] c; private void initCoefficients() { c = new double[size]; for (int i=1;i int N = size; double[][] F = new double[N][N]; for (int u=0;u double sum = 0.0; for (int i=0;i sum+=Math.cos(((2*i+1)/(2.0*N))*u*Math.PI)*Math.cos(((2*j+1)/(2.0*N))*v*Math.PI)*(f[i][j]); } } sum*=((c[u]*c[v])/4.0); F[u][v] = sum; } } return F; } public static void main(String[] args) { ImagePHash p = new ImagePHash(); String image1; String image2; try { image1 = p.getHash(new FileInputStream(new File("C:/Users/june/Desktop/1.jpg"))); image2 = p.getHash(new FileInputStream(new File("C:/Users/june/Desktop/1.jpg"))); System.out.println("1:1 Score is " + p.distance(image1, image2)); image1 = p.getHash(new FileInputStream(new File("C:/Users/june/Desktop/1.jpg"))); image2 = p.getHash(new FileInputStream(new File("C:/Users/june/Desktop/2.jpg"))); System.out.println("1:2 Score is " + p.distance(image1, image2)); image1 = p.getHash(new FileInputStream(new File("C:/Users/june/Desktop/1.jpg"))); image2 = p.getHash(new FileInputStream(new File("C:/Users/june/Desktop/3.jpg"))); System.out.println("1:3 Score is " + p.distance(image1, image2)); image1 = p.getHash(new FileInputStream(new File("C:/Users/june/Desktop/2.jpg"))); image2 = p.getHash(new FileInputStream(new File("C:/Users/june/Desktop/3.jpg"))); System.out.println("2:3 Score is " + p.distance(image1, image2)); image1 = p.getHash(new FileInputStream(new File("C:/Users/june/Desktop/4.jpg"))); image2 = p.getHash(new FileInputStream(new File("C:/Users/june/Desktop/5.jpg"))); System.out.println("4:5 Score is " + p.distance(image1, image2)); } catch (FileNotFoundException e) { e.printStackTrace(); } catch (Exception e) { e.printStackTrace(); } } }运行结果为: DCT: 163 DCT: 158 1:1 Score is 0 DCT: 168 DCT: 164 1:2 Score is 4 DCT: 156 DCT: 156 1:3 Score is 3 DCT: 157 DCT: 157 2:3 Score is 1 DCT: 157 DCT: 156 4:5 Score is 21 说明:其中1,2,3是3张非常相似的图片,图片分别加了不同的文字水印,肉眼分辨的不是太清楚,下面会有附图,4、5是两张差异很大的图,图你可以随便找来测试,这两张我就不上传了。 结果说明:汉明距离越大表明图片差异越大,如果不相同的数据位不超过5,就说明两张图片很相似;如果大于10,就说明这是两张不同的图片。从结果可以看到1、2、3是相似图片,4、5差异太大,是两张不同的图片。 附:图1、2、3 图1: 图2: 图3: 汉明距离的应用 汉明距离-百度百科 |

 例:
例: 根据Neal Krawetz博士的解释,原理非常简单易懂。我们可以用一个快速算法,就达到基本的效果。

 =
=  =8f373714acfcf4d0


【本文地址】
今日新闻 |
推荐新闻 |