React学习笔记(四) |
您所在的位置:网站首页 › 事件id1003 › React学习笔记(四) |
React学习笔记(四)
|
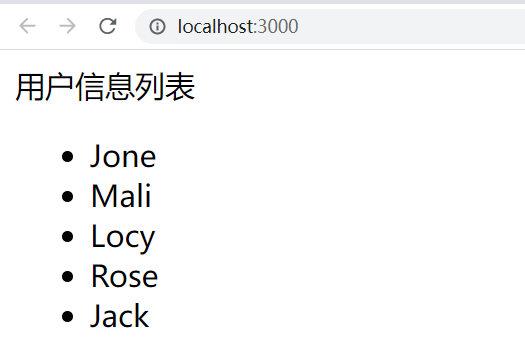
react管理状态的工具: 1、利用hooks进行状态管理; 2、利用Redux进行状态管理,这种方式的配套工具比较齐全,可以自定义各种中间件; 3、利用Mobx进行状态管理,它通过透明的函数响应式编程使得状态管理变得简单和可扩展。 2013 年 5 月 React 诞生。但 2015 年之前,大概都是 jQuery 的天下。2015 年 3 月 React 0.13.0 发布,带来了 class 组件写法。 在 React class 组件时代,状态就是 this.state,使用 this.setState 更新。 为避免一团乱麻,React 引入了 "组件" 和 "单向数据流" 的理念。有了状态与组件,自然就有了状态在组件间的传递,一般称为 "通信"。 父子通信较简单,而深层级、远距离组件的通信,则依赖于 "状态提升" + props 层层传递。 于是,React 引入了 Context,一个用于解决组件 "跨级" 通信的官方方案。 但 Context 其实相当于 "状态提升",并没有额外的性能优化,且写起来比较啰嗦。 为优化性能,一般会添加多个 Context,写起来就更啰嗦。在项目没那么复杂时,还不如层层传递简单。 Context 没那么好用,React 官方也没什么最佳实践,于是一个个社区库就诞生了。 目前比较常用的状态管理方式有hooks、redux、mobx三种。 一、组件通信(1).组件的特点 组件是独立且封闭的单元,默认情况下,只能使用组件自己的数据 在组件化过程中,通常会将一个完整的功能拆分成多个组件,以更好的完成整个应用的功能 (2).知道组件通讯意义 而在这个过程中,多个组件之间不可避免的要共享某些数据 为了实现这些功能,就需要打破组件的独立封闭性,让其与外界沟通、这个过程就是组件通讯 1.1、父传子父组件向子组件通信是通过父组件的props传递数据完成。 UserList.jsx接收父组件的数据,展示用户信息,子组件: import React, { Component } from 'react' export default class UserList extends Component { render() { return ( {this.props.users.map(user => {user.name} )} ) } }UserListContainer.jsx向子组件传递数据,父组件: import React, { Component } from 'react' import UserList from './UserList' export default class UserListContainer extends Component { state={users:[]} componentDidMount(){ const users=[ {id:"1001",name:"Jone"}, {id:"1002",name:"Mali"}, {id:"1003",name:"Locy"}, {id:"1004",name:"Rose"}, {id:"1005",name:"Jack"} ] this.setState({users:users}); } render() { return ( 用户信息列表 ) } }运行结果:
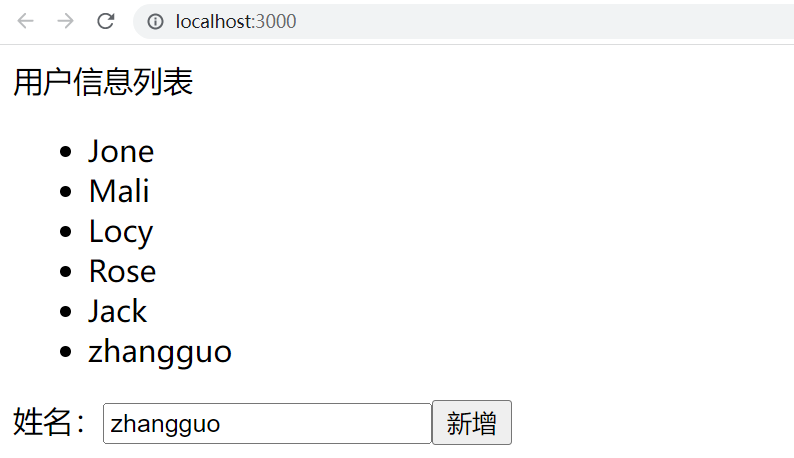
解释:数据users在父组件中通过属性传递给子组件UserList,在UserList中通过props接收父组件传入的数据,完成父传子,这是最简单,最基本的一个状态的传递方法,推荐常用。 1.2、子传父子传父依然使用props,父组件先给子组件传递一个回调函数,子组件调用父组件的回调函数传入数据,父组件处理数据即可。 在UserList中添加新增加功能: import React, { Component } from 'react' export default class UserList extends Component { state={newUser:""} handleChange=e=>{ this.setState({newUser:e.target.value}); } handleClick=e=>{ if(this.state.newUser&&this.state.newUser.length>0){ this.props.onAddUser(this.state.newUser); } } render() { return ( {this.props.users.map(user => {user.name} )} 姓名: 新增 ) } }在UserListContainer中添加onAddUser参数与函数: import React, { Component } from 'react' import UserList from './UserList' export default class UserListContainer extends Component { state={users:[]} componentDidMount(){ const users=[ {id:"1001",name:"Jone"}, {id:"1002",name:"Mali"}, {id:"1003",name:"Locy"}, {id:"1004",name:"Rose"}, {id:"1005",name:"Jack"} ] this.setState({users:users}); } onAddUser(newUser){ let users=this.state.users; this.setState({users:users.concat({ id:parseInt((users[users.length-1].id)+1)+"", name:newUser })}); } render() { return ( 用户信息列表 ) } }运行:
解释:在子组件中用户输入了一个新的姓名,调用props.addUser方法将新添加的用户信息发送给父组件完成添加功能,所以这里实现了子传父功能。 * UserListContainer中包含UserList组件,所以UserListContainer是父组件,而UserList是子组件 * 子组件通过调用父组件中的onAddUser方法将输入的用户添加到集合中,完成子传父功能 1.3、兄弟组件间通信兄弟组件不能直接相互传送数据,需要通过状态提升的方式实现兄弟组件的通信,即把组件之间需要共享的状态保存到距离它们最近的共同父组件内,任意一个兄弟组件都可以通过父组件传递的回调函数来修改共享状态,父组件中共享状态的变化也会通过props向下传递给所有兄弟组件,从而完成兄弟组件之间的通信。
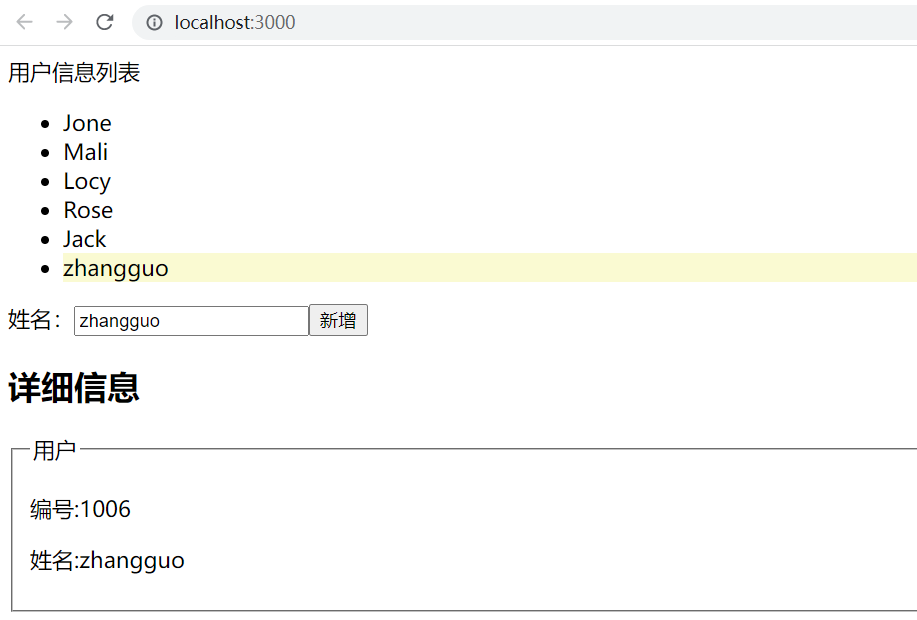
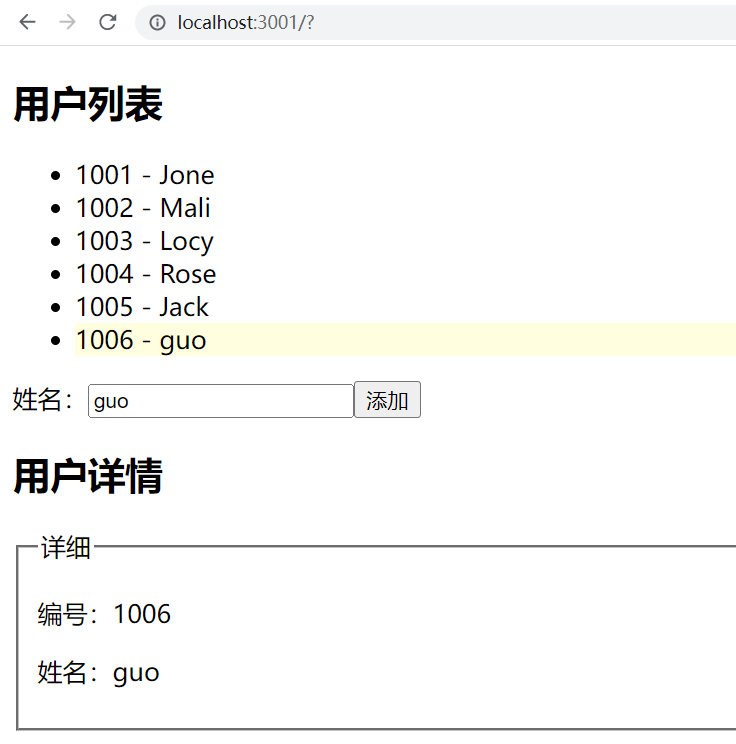
我们在UserListContainer中新增一个子组件UserDetail,用于显示当前选中用户的详细信息,比如用户的年龄、联系方式、家庭地址等。这时,UserList 和 UserDetail 就成了兄弟组件,UserListContainer是它们的共同父组件。当用户在 UserList中点击一条用户信息时,UserDetail需要同步显示该用户的详细信息,因此,可以把当前选中的用户 currentUser保存到UserListContainer的状态中。 UserList.jsx import React, { Component } from 'react' import "./css/userList.css" /** * 用户列表组件 */ export default class UserList extends Component { /** * 构造函数 * @param {*} props */ constructor(props) { super(props); this.state = { newUser: ""}; } /** * 输入框内容变化事件 * @param {*} e */ handleChange = e => { this.setState({ newUser: e.target.value }); } /** * 新增用户按钮点击事件 * @param {*} e */ handleClick = e => { if (this.state.newUser && this.state.newUser.length > 0) { this.props.onAddUser(this.state.newUser); } } /** * 用户列表项点击事件 * @param {*} userId */ handleSelect(userId) { this.props.onSetCurrentUser(userId); } /** * 渲染函数 */ render() { return ( {this.props.users.map(user => {user.name} )} 姓名: 新增 ) } }UserDetails.jsx import React, { Component } from 'react' export default class UserDetails extends Component { render() { return ( this.props.currentUser? 详细信息 用户{/* 用户编号 */} 编号:{this.props.currentUser.id} {/* 用户姓名 */} 姓名:{this.props.currentUser.name} :"" ) } }UserListContainer.jsx import React, { Component } from 'react' import UserList from './UserList' import UserDetails from './UserDetails' export default class UserListContainer extends Component { state={users:[],currentUserId:null} componentDidMount(){ const users=[ {id:"1001",name:"Jone"}, {id:"1002",name:"Mali"}, {id:"1003",name:"Locy"}, {id:"1004",name:"Rose"}, {id:"1005",name:"Jack"} ] this.setState({users:users}); } // 添加用户 onAddUser(username){ let users=this.state.users; let newUser={ id:(parseInt(users[users.length-1].id)+1)+"", name:username }; this.setState({users:users.concat(newUser),currentUserId:newUser.id}); } // 设置当前用户 onSetCurrentUser(userId){ this.setState({currentUserId:userId}); } render() { const users=this.state.users.filter(user=>user.id===this.state.currentUserId); const currentUser=users&&users.length>0&&users[0]; return ( 用户信息列表 ) } }运行效果:
解释:在子组件UserList中添加一个username,通过onAddUser将username传入父组件UserListContainer中,这里完成了状态提升,在UserListContainer中再将新添加的用户传入给UserDetail组件,实现从父传给子组件,整个过程实现了兄弟之间的数据传递功能。 UserListPro.jsx import React, { Component } from 'react' import "./css/userListPro.css" export default class UserListPro extends Component { state={username:""} usernameChange=(e)=>{ this.setState({username:e.target.value}) } handleSubmit=e=>{ const {username} = this.state; if(username&&username.length>0){ //调用父组件的onAddUser方法将值username传递给父组件 this.props.onAddUser(this.state.username); } e.preventDefault(); }; selectHandle=(e)=>{ //将当前选择的用户编号传给父组件 this.props.onSetCurrentId(e.target.id); }; render() { console.log(this); return ( {this.props.users.map(user=>{user.id} - {user.name})}姓名: 添加 ) } }UserListContainer.jsx import React, { Component } from 'react' import UserListPro from './UserListPro'; import UserDetail from './UserDetail'; /** * UserListContainer中包含UserList组件,所以UserListContainer是父组件,而UserList是子组件 * 子组件通过调用父组件中的onAddUser方法将输入的用户添加到集合中,完成子传父功能 */ export default class UserListContainer extends Component { //currentId用于记录当前用户的编号 state={users:[],currentId:null} componentDidMount(){ const users=[ {id:"1001",name:"Jone"}, {id:"1002",name:"Mali"}, {id:"1003",name:"Locy"}, {id:"1004",name:"Rose"}, {id:"1005",name:"Jack"} ]; this.setState({users:users}); } //新添加用户 onAddUser(username){ //生成新的编号 //let id=parseInt(this.state.users[this.state.users.length-1].id)+1; let id=this.state.users[this.state.users.length-1].id*1+1; //将添加的新用户 const user={id,name:username}; //将新用户添加到users状态中 this.setState({users:this.state.users.concat(user),currentId:id}); } //子组件通过该方法设置当前用户的编号 onSetCurrentId=(id)=>{ this.setState({currentId:id}); } render() { //根据用户编号从用户集合中获取用户集合 const users=this.state.users.filter(user => user.id === this.state.currentId); //当前用户 let currentUser=null; //如果查找了 if(users&&users.length>0){ //设置当前用户 currentUser=users[0]; } return ( 用户列表 ) } }UserDetail.jsx import React, { Component } from 'react' export default class UserDetail extends Component { render() { return ( this.props.currentUser? 用户详情 详细编号:{this.props.currentUser.id} 姓名:{this.props.currentUser.name} :"" ) } }css/userListPro.css .userDetail li{ cursor: pointer; } .userDetail li:hover{ background: lightyellow; } .active{ background: lightyellow; }运行结果:
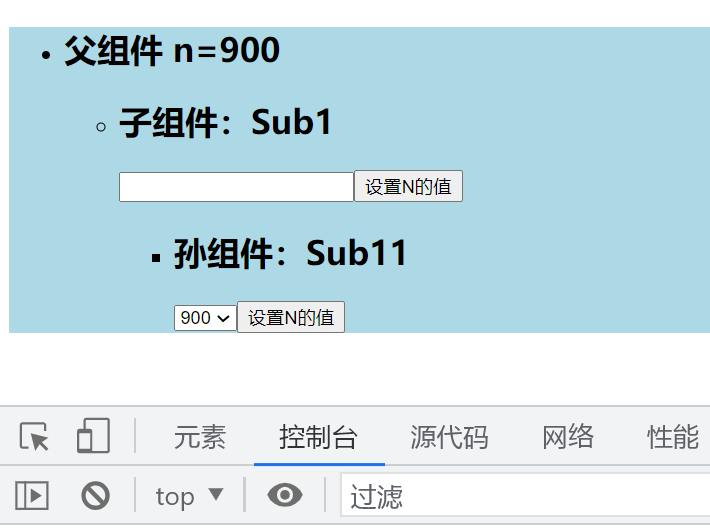
当组件所处层级太深时,往往需要经过很层的props传递才能将所需的数据或者回调函数传递给使用组件,所以props作为桥梁通信便会显得很麻烦。React提供了一个context上下文,让任意层级的子组件都可以获取父组件中的状态和方法。 Parent.jsx 父 import React, { Component } from 'react' import Sub1 from './Sub1'; export default class Parent extends Component { state={ n:100 } setN(n){ this.setState({n}); } render() { return ( 父组件 n={this.state.n} ) } }Sub1.jsx 子 import React, { Component } from 'react' import Sub11 from './Sub11'; export default class Sub1 extends Component { setNumber() { let n=parseInt(this.txtInput.value); this.props.onSetN(n); } render() { return ( 子组件:Sub1this.txtInput=input} type="text" /> 设置N的值 ) } }Sub11.jsx 孙 import React, { Component } from 'react' export default class Sub11 extends Component { setNumber() { let n=parseInt(this.txtInput.value); this.props.onSetN(n); } render() { return ( 孙组件:Sub11this.txtInput=input} type="text"> 300 600 900 设置N的值 ) } }结果:
解释:Parent组件将setN传递给Sub1,Sub1再传递给Sub11,Sub11调用SetN设置父组件的值,这样做可以实现组件间的多级传递,但非常麻烦,如果层级较多时。 1.5、Context当组件所处层级太深时,往往需要经过很层的props传递才能将所需的数据或者回调函数传递给使用组件,所以props作为桥梁通信便会显得很麻烦。React提供了一个context上下文,让任意层级的子组件都可以获取父组件中的状态和方法。 每个组件都拥有context属性,可以查看到:
getChildContext:与访问context属性需要通过contextTypes指定可访问的属性一样,getChildContext指定的传递给子组件的属性需要先通过childContextTypes来执行,不然会报错。 使用context改进后的示例如下: Parent.jsx 父 import React, { Component } from 'react' import {PropTypes} from 'prop-types' import Sub1 from './Sub1'; class Parent extends Component { state={ n:100 } setN=(n)=>{ this.setState({n}); } getChildContext(){ return {onSetN: this.setN} } render() { return ( 父组件 n={this.state.n} ) } } //声明context的属性的类型信息 Parent.childContextTypes = { onSetN:PropTypes.func } export default Parent;Sub1.jsx 子 import React, { Component } from 'react' import Sub11 from './Sub11'; import {PropTypes} from 'prop-types' class Sub1 extends Component { setNumber() { let n=parseInt(this.txtInput.value); this.context.onSetN(n); } render() { return ( 子组件:Sub1this.txtInput=input} type="text" /> 设置N的值 ) } } //声明要使用的context属性的类型信息 Sub1.contextTypes={ onSetN: PropTypes.func } export default Sub1;Sub11.jsx 孙 import React, { Component } from 'react' import {PropTypes} from 'prop-types' class Sub11 extends Component { setNumber() { let n=parseInt(this.txtInput.value); this.context.onSetN(n); console.log(this); } render() { return ( 孙组件:Sub11this.txtInput=input} type="text"> 300 600 900 设置N的值 ) } } //声明要使用的context属性的类型信息 Sub11.contextTypes={ onSetN: PropTypes.func } export default Sub11;结果:
解释:父组件通过getChildContext向自己的后代组件传递一个对象,使用childContextTypes声明属性的类型,在后代组件中使用this.context接收父组件传入的对象,不过所有的要使用父组件中传入对象的子组件都要声明contextTypes对象的属性类型信息。这样就实现了一次下发,多处使用,完成了组件间数据的传递。 二、Hooks 2.1、解构1、数组解构就是能快速提取数组中的指定成员(数组的某一项值或所有的值) 例如: 解构赋值都是一一对应的,按照顺序。 const arr = [200,300,400] const [a,b,c] = arr console.log(a,b,c) // 200,300,400也可以取数组的某一项值(结构必须保持一致) const arr = [200,300,400] const [, , c] = arr console.log(c) // 400还可在用“...”的方式提取所有的成员(注意的是这种...的写法只能在解构成员的最后一个成员使用)代码如下 const arr = [200,300,400] const [a,...all] = arr console.log(all) // [300,400] 会返回得到一个最后所有的数组如果提取的解构成员小于数组的长度,就会从前到后的顺序来提取,代码如 const arr = [200,300,400] const [a] = arr console.log(a) // 200 按顺序提取第一个如果提取成员大于数组长度,那么最后的提取的最后是undefined,代码如下 const arr = [200,300,400] const [a,b,c,d] = arr console.log(d) // undefined2、对象解构和数组解构基本类似,只不过对象解构的取值方式是根据对象的属性名来取值 例如: const obj = {name:'100',age:'30',size:'M'} const { name } = obj console.log(name) // 100顺便说一下,对象里面的属性名和其他自定义的变量名称如果重名的时候要怎么解决,一旦重名就会报错,看代码: const obj = {name:'100',age:'30',size:'M'} const name = 'lucy' const {name} = obj console.log(name) // 会报错// 要么重新命名,要么可以按照下面的写法来避免 const obj = {name:'100',age:'30',size:'M'} const name = 'lucy' const {name:nameObj} = obj // 对象属性名称的重新指定 console.log(nameObj) // 100思考题: 请问下面的代码是什么意思?控制台输出什么? function useBook() { return ["ES6高级编程", (bookname) => console.log(bookname + "!")]; } const [name, showBook] = useBook(); showBook(name);答案:   ES6高级编程!
View Code
2.2、Hooks基础
ES6高级编程!
View Code
2.2、Hooks基础
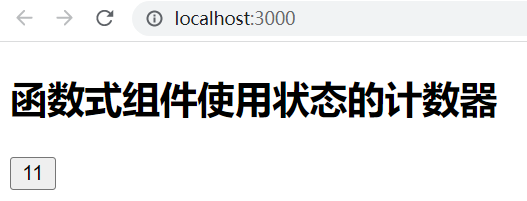
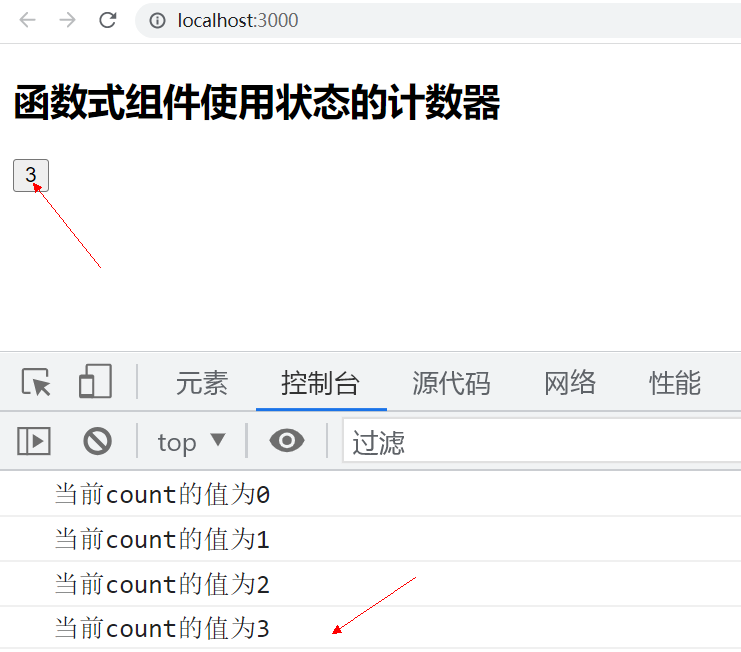
Hook 是 React 16.8 的新增特性。它可以让你在不编写 class 的情况下使用 state,一般搭配函数式组件使用。 在React 16.8之前,函数式组件只能作为无状态组件(只读组件),即不能进行状态管理。 函数式创建组件通常是无状态组件,这种方式没有办法在内部对状态统一管理,如果我们非要添加状态管理呢,那就只能借助redux啦~或者我们自己利用观察者模式实现一个发布订阅。 那么如果我们非要这么做,React版本在16.8.X以后增添了一个新特性就是hooks。 hooks涉及API有useState、 useEffect、 useCallback、 useRef、 useMemo、 Reacmo、 useReducer等,具体可以参考官方文档。 2.2.1、useState() hooks状态钩子搭配函数式组件,主要是可以进行组件的状态管理,好处是不像传统state需要注意this指向(函数式组件中没有this)。 一般用法 const [ a , setA ] = useState(初始值) a表示组件需要声明的变量a,setA允许你在组件其它的位置对a的数据进行改变setA(2),即a的值将为2 一个组件中可以声明多个useState() Counter3.jsx import React,{useState} from 'react'; export default function Counter3(props){ let [count,setCount]=useState(0); return ( {props.name}setCount(count+1)}>{count} ); }调用 const vnode = ( );结果:
setCount(count+1)}>{count} ); }运行时的初始状态:
解释: 点击时的效果:
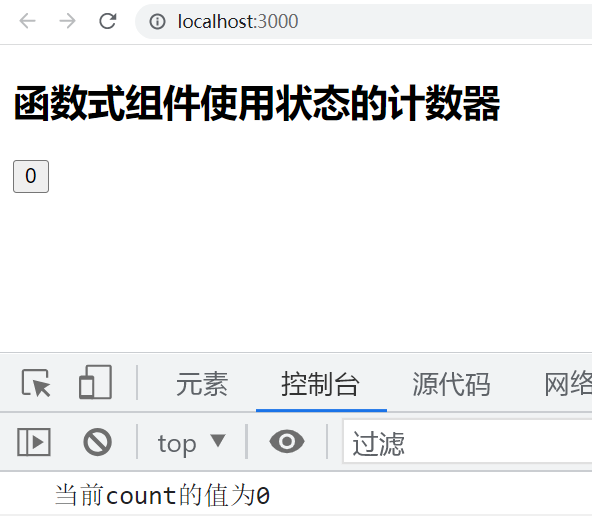
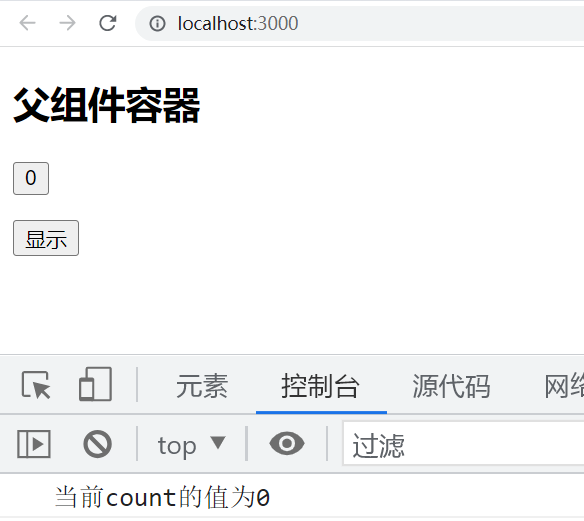
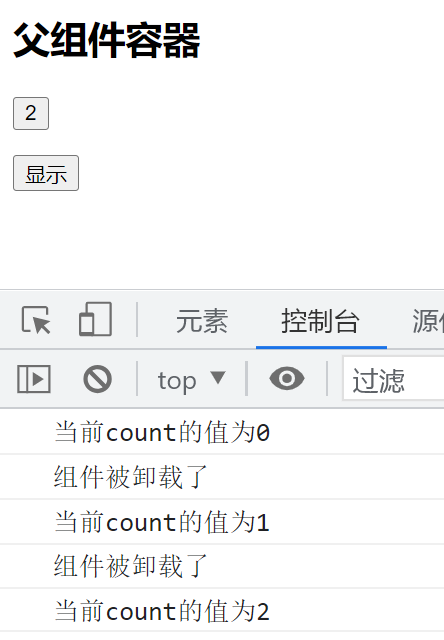
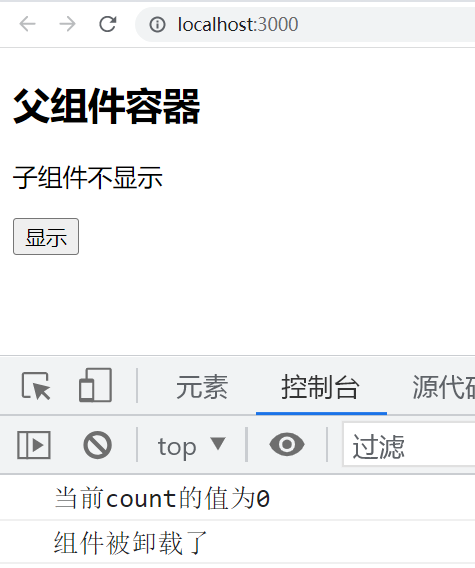
解释: 卸载时执行,在userEffect回调函数中返回一个函数将在组件卸载与更新阶段执行: Counter3.jsx import React,{useState,useEffect} from 'react'; export default function Counter3(props){ let [count,setCount]=useState(0); useEffect(()=>{ console.log(`当前count的值为${count}`); return ()=>{ console.log("组件被卸载了"); } }) return ( {props.name}setCount(count+1)}>{count} ); }Box.jsx import React, { Component } from "react"; import Counter3 from "./Counter3"; export default class Box extends Component { state = { isShow: true }; render() { return ( 父组件容器 {this.state.isShow ? : 子组件不显示}this.setState({ isShow: !this.state.isShow })} > {this.isShow ? "隐藏" : "显示"} ); } }初始效果:
点击时的效果
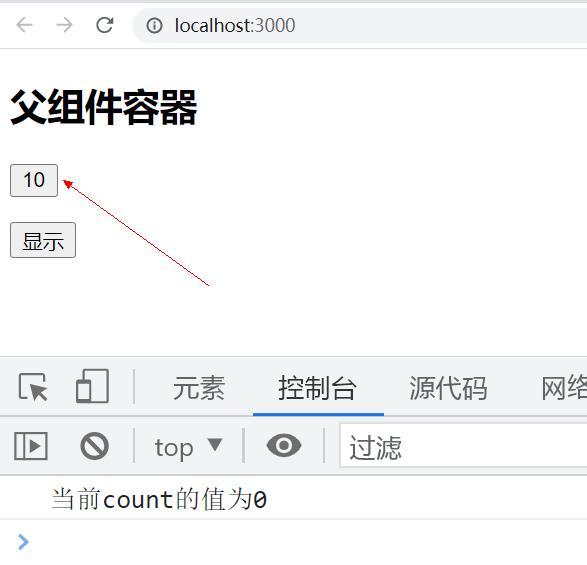
如果想仅在卸载时执行则可以指定第二个参数,声明要监视的成员,如: useEffect(()=>{ console.log(`当前count的值为${count}`); return ()=>{ console.log("组件被卸载了"); } },[]);这里使用的是一个空数组表明没有任何成员的变化会引起useEffect执行,再看看卸载时的效果:
点击时count的更新并没有触发useEffect执行,卸载将执行
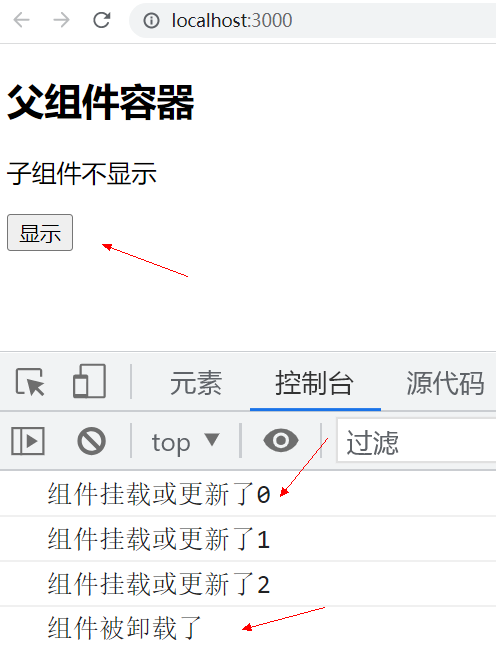
如果挂载、更新、卸载都需要处理,则可以这样: import React,{useState,useEffect} from 'react'; export default function Counter3(props){ let [count,setCount]=useState(0); useEffect(()=>{ console.log(`组件挂载或更新了${count}`); },[count]); useEffect(()=>{ return ()=>{ console.log("组件被卸载了"); } },[]); return ( {props.name}setCount(count+1)}>{count} ); }效果:
我们使用 useEffect 重写了上面的例子,useEffect 第一个参数接收一个函数,可以用来做一些副作用比如异步请求,修改外部参数等行为,而第二个参数称之为dependencies,是一个数组,如果数组中的值变化才会触发 执行useEffect 第一个参数中的函数。返回值(如果有)则在组件销毁或者调用函数前调用。 1.比如第一个 useEffect 中,理解起来就是一旦 count 值发生改变,则修改 documen.title 值; 2.而第二个 useEffect 中传递了一个空数组[],这种情况下只有在组件初始化或销毁的时候才会触发,用来代替 componentDidMount 和 componentWillUnmount,慎用; 3.还有另外一个情况,就是不传递第二个参数,也就是useEffect只接收了第一个函数参数,代表不监听任何参数变化。每次渲染DOM之后,都会执行useEffect中的函数。基于这个强大 Hooks,我们可以模拟封装出其他生命周期函数,比如 componentDidUpdate 代码十分简单 function useUpdate(fn) { // useRef 创建一个引用 const mounting = useRef(true); useEffect(() => { if (mounting.current) { mounting.current = false; } else { fn(); } }); }现在我们有了 useState 管理状态,useEffect 处理副作用,异步逻辑,学会这两招足以应对大部分类组件的使用场景。 2.2.3、useContext()获取上下文获取context 对象 用法:const value = useContext(MyContext); 上面介绍了 useState、useEffect 这两个最基本的 API,接下来介绍的 useContext 是 React 帮你封装好的,用来处理多层级传递数据的方式,在以前组件树种,跨层级祖先组件想要给孙子组件传递数据的时候,除了一层层 props 往下透传之外,我们还可以使用 React Context API 来帮我们做这件事,举个简单的例子:App.js import React from "react"; const { Provider, Consumer } = React.createContext(null); function Bar() { return {(color) => {color}}; } function Foo() { return ; } function App() { return ( ); } export default App;通过 React createContext 的语法,在 APP 组件中可以跨过 Foo 组件给 Bar 传递数据。而在 React Hooks 中,我们可以使用 useContext 进行改造。 import React, { useContext } from "react"; const colorContext = React.createContext("red"); function Bar() { const color = useContext(colorContext); return {color}; } function Foo() { return ; } function App() { return ( ); } export default App;传递给 useContext 的是 context 而不是 consumer,返回值即是想要透传的数据了。用法很简单,使用 useContext 可以解决 Consumer 多状态嵌套的问题。 function HeaderBar() { return ( {user => {notifications => Welcome back, {user.name}! You have {notifications.length} notifications. } } ); }而使用 useContext 则变得十分简洁,可读性更强且不会增加组件树深度。 function HeaderBar() { const user = useContext(CurrentUser); const notifications = useContext(Notifications); return ( Welcome back, {user.name}! You have {notifications.length} notifications. ); }示例: import React, { useState, createContext, useContext } from "react"; const CountContext = createContext(0); const Example = () => { const [count, setCount] = useState(0); return (父组件点击数量:{count} setCount(count + 1)}>{"点击+1"} ); }; const Counter = () => { const count = useContext(CountContext); return子组件获得的点击数量:{count} ; }; export default Example;运行效果:
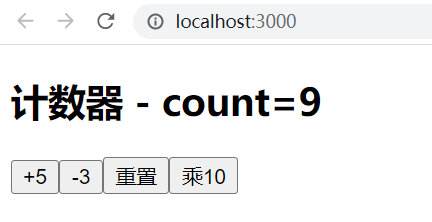
useReducer 这个 Hooks 在使用上几乎跟 Redux/React-Redux 一模一样,唯一缺少的就是无法使用 redux 提供的中间件。我们将上述的计时器组件改写为 useReducer, 作用:复杂状态管理,跟redux本质上是一样的 函数式组件如果涉及到状态管理,我们需要借助redux,那么hooks需要吗,答案也是一样的,简单的状态管理我们可以通过useState来进行管理,如果比较复杂的状态管理呢,react hook给我们提供了方法 useReducer 使用useReducer分四步 创建初始值initialState const reducer = (state, action) => {switch(action.type) {case:}}传入旧的数据state和创建所有操作action const [state,dispatch] = useReducer(reducer,initialState)传给useReducer,得到读和写API,必须写在函数里面 dispatch({type:'add '})调用写的类型总的来说,useReducer是useState的复杂版,所有useState的规则,useReducer都适用 useReducer(dispatch,state,init) import React, { useReducer } from 'react' function reducer(state,action){ switch(action.type){ case 'increment': return {count:state.count+action.payload}; case 'decrement': return {count:state.count-action.payload}; case 'reset': return {count:action.payload}; default: throw new Error('未知的action'); } } function Counter4(props){ const [state,dispatch]=useReducer(reducer,{count:0}); return ( 计数器 - count={state.count} {dispatch({type:"increment",payload:5})}}>+5 {dispatch({type:"decrement",payload:3})}}>-3 {dispatch({type:"reset",payload:0})}}>重置 {dispatch({type:"multiplication",payload:10})}}>乘10 ) } export default Counter4;运行结果:
用法跟 Redux 基本上是一致的,用法也很简单,算是提供一个 mini 的 Redux 版本。 用法与 useState 类似,从 useReducer 中得到读接口 state,写接口 dispatch。最后操作时传参给 dispatch 写接口。操作灵活多变,比 useState 好处就是能聚集所有的操作和各种状态量。着重理解这几行代码,读懂。 useReducer 算是 useState 的复杂版 使用 useReducer 分以下步骤: 创建初始值的状态initialState 创建所有对状态的操作reducer(state,action) 传给useReducer,得到读和写的接口 调用写({'type':'操作类型'}) 2.2.4、useCallback() 缓存回调函数避免传入的回调每次都是新的函数实例化而导致依赖组件重新渲染;用法:const memoizedCallback = useCallback(()=>{doSomething(a,b);},[a,b],);把内联回调函数及依赖项数组作为参数传入 useCallback,它将返回该回调函数的 memoized 版本,该回调函数仅在某个依赖项改变时才会更新; 2.2.5、useMemo()缓存每次传入的props,避免依赖的组件每次都重新渲染;用法:const memoizedValue = useMemo (()=>computeExpensiveValue(a,b),[a,b]);把“创建”函数和依赖项数组作为参数传入 useMemo,它仅会在某个依赖项改变时才重新计算 memoized 值。 2.2.6、useRef() 返回一个可变的 ref 对象获取组件的真实节点;用法:const refContainer = useRef(initialValue); 三、Redux四、Mobe 五、ref基础知识 不管在Vue中还是React,如果我们想使用一个元素的DOM,不需要通过JS中操纵DOM的方法,它们提供了一个专属的API就是ref。 而Vue中的ref可能比较简单,这一篇主要讲一下如何在React中使用ref,以及使用ref的场景。 5.1、ref的挂载在React中,ref可以挂载到html元素上,同时也可以挂载在React元素上,看下面的代码: import React, { Component } from 'react' // import { findDOMNode } from 'react-dom' import Child from './Child' export default class Father extends Component { componentDidMount(){ console.log(this.refs.refElement); console.log(this.refs.child); } render() { return ( 123 ) } } 控制台的打印为:
可以看到,在React中,ref是可以挂载到HTML元素和React元素上的。 (1)挂载HTML元素,返回真实的DOM (2)挂载React元素,返回render后的实例对象 同时React也提供了一个方法findDOMNode可以将React元素的ref返回变成真实的DOM元素。 import { findDOMNode } from 'react-dom' console.log(findDOMNode(this.refs.child));同时在上面的代码我们也可以看出来,ref的挂载是在componentDidMount等生命周期之前执行的。 5.2、使用ref的三种方式 5.2.1、字符串的方式import React, { Component } from 'react' export default class Father extends Component { componentDidMount(){ console.log(this.refs.refElement); } render() { return ( 123 ) } } 这种方式和Vue的ref比较相似,但是官方目前已经不推荐使用该方式,后续可能还会废弃。 5.2.2、函数的方式 import React, { Component } from 'react' export default class Father extends Component { componentDidMount(){ console.log(this.refElement); } render() { return ( this.refElement = ref }> 获取元素 ) } } 5.2.3、react.CreateRef的方式import React, { Component } from 'react' export default class Father extends Component { refElement = React.createRef(); componentDidMount(){ console.log(this.refElement.current); } render() { return ( 123 ) } } 记住这里面通过refElement中的current,获取真实的DOM元素。 六、作业6.1、使用多种方法实现页面加载完成时让搜索文本框获取焦点,侧重练习ref的使用。 6.2、完成所有的上课示例。 七、视频https://www.bilibili.com/video/BV1Vb411D7qa/?share_source=copy_web&vd_source=475a31f3c5d6353a782007cd4c638a8a |


【本文地址】
今日新闻 |
推荐新闻 |