基于深度学习的课堂举手人数统计系统 |
您所在的位置:网站首页 › 举手的意义 › 基于深度学习的课堂举手人数统计系统 |
基于深度学习的课堂举手人数统计系统
|
1.研究背景与意义
项目参考AAAI Association for the Advancement of Artificial Intelligence 研究背景与意义 随着信息技术的快速发展,教育领域也逐渐开始应用新技术来改善教学质量和效果。在传统的课堂教学中,教师通常需要手动记录学生的举手情况,以便了解学生的参与度和理解程度。然而,这种方式存在一些问题,例如记录不准确、效率低下等。因此,基于深度学习的课堂举手人数统计系统应运而生。 深度学习是一种机器学习的方法,通过模拟人脑神经网络的工作原理,可以从大量的数据中学习和提取特征,进而实现各种复杂的任务。在课堂教学中,深度学习可以被应用于识别学生的举手动作,从而实现自动统计学生的举手人数。 基于深度学习的课堂举手人数统计系统具有以下几个方面的意义: 提高教学效果:通过自动统计学生的举手人数,教师可以更准确地了解学生的参与度和理解程度。这样,教师可以根据学生的反馈情况及时调整教学内容和方法,提高教学效果。 提高教学效率:传统的手动记录学生举手情况需要耗费大量的时间和精力,而基于深度学习的课堂举手人数统计系统可以实现自动化,大大提高了教学效率。教师可以将更多的时间和精力放在教学内容的准备和讲解上,提高教学质量。 个性化教学:基于深度学习的课堂举手人数统计系统可以实时监测学生的参与度和理解程度,为教师提供了更多的信息来进行个性化教学。教师可以根据学生的反馈情况,有针对性地给予不同的辅导和指导,满足学生的个性化学习需求。 科学研究:基于深度学习的课堂举手人数统计系统可以为教育研究提供更多的数据支持。通过分析学生的举手情况和教学效果的关系,可以深入研究教学方法和策略的有效性,为教育改革和教学改进提供科学依据。 总之,基于深度学习的课堂举手人数统计系统在提高教学效果和效率的同时,也为个性化教学和科学研究提供了新的可能性。随着深度学习技术的不断发展和应用,相信这一系统将在教育领域发挥越来越重要的作用。 2.图片演示
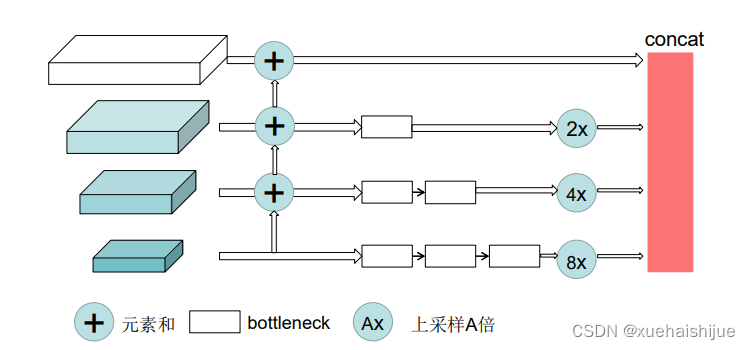
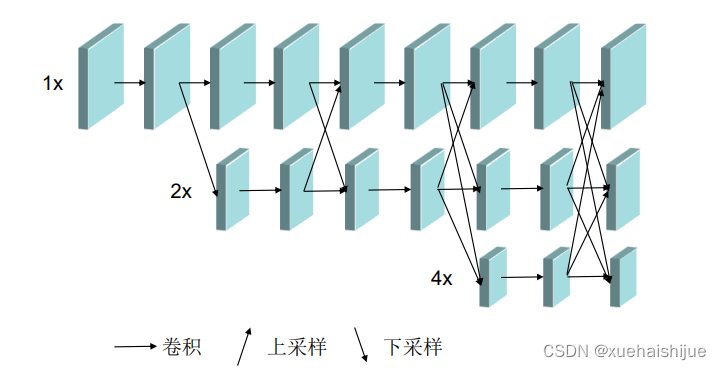
基于深度学习的课堂举手人数统计系统_哔哩哔哩_bilibili 4.姿态估计经典结构简介人体姿态估计又叫人体骨骼点检测,就是从一幅图像或一段视频中找出其中骨骼关键点位置的过程。 姿态估计根据输入的不同分为:基于RGB-D图的算法和基于RGB图像的算法。前者需要类似kinect的设备,不易于大规模的部署应用。而基于RGB图像的算法具有更广的应用前景,并且有大型的公开数据集供学术界研究和竞赛,是非常热门研究领域,达到了非常好的识别效果。 针对姿态估计的研究方法,则可以分为回归和检测。对于回归问题,我们希望直接回归出关键点的位置,对于检测问题,我们希望得到关键点的热度图。回归的缺点在于肢体的运动比较灵活,并且比较难以扩展到人数未知的场景下进行,因为这样输出不好控制,所以目前使用比较普遍的是通过热度图得到关节点的位置,如果某个像素点是关键点的话,该像素点在热度图上的响应就比其他地方大。 而针对姿态估计的网络结构的探索也主要围绕多尺度的信息融合来进行,因为如果我们只通过局部的视觉信息,很难看出某些部位是什么,并且也很难区分比如手肘和膝盖,手腕和脚踝等,如图所示。 2017年,Chen等人提出了Cascaded Pyramid Network(级联金字塔)[22结构,首先使用基于特征金字塔的GlobalNet学习一个好的特征表征,特征金字塔已经利用了深层的语义信息与浅层的纹理信息的结合,可以提供足够的语境信息,然后使用RefineNet 接受了来自所有金字塔层的特征信息,而不是类似Hourglass模块之间仅通过最后一个上采样特征进行信息传递,通过上采样到相同的尺寸,然后连接起来,结构如图所示。 然后通过在线困难点挖掘(Online hard example mining),选取一半损失值较大的关键点,进行梯度回传,来处理较难检测的关键点。 2019年,Sun等人提出的High-Resolution Netl34,能够在整个过程中保持高分辨率的特征表示,并行的生成分辨率由高到低的子网络,并且在高低分辨率子网络之间反复的交换信息。这种方法不是单纯的利用串行的连接,从高到低降低分辨率再由低到高恢复分辨率,也不是简单的将低层和高层融合起来,而是重复的多尺度融合,利用相同深度的低分辨率表示来提高高分辨率的表示,预测的热度图上会更加精确。目前在COCO关键点比赛3l中取得了最好的效果。该网络的结果如图所示。 除了在网络结构本身上的改进,也可以通过对人的整体或者各个部位引入注意力机制,或者利用人体结构化信息更好的预测最终的结果。本文的举手手势识别就是建立在姿态估计的基础上,通过得到学生身体关键点的信息来定位手臂和手掌的位置,然后进行进一步的分析。 5.核心代码讲解 5.1 detect.py class PoseDetector: def __init__(self, weight_path, cpu=False, track=1, smooth=1, height_size=256): self.net = PoseEstimationWithMobileNet() self.cpu = cpu self.track = track self.smooth = smooth self.height_size = height_size checkpoint = torch.load(weight_path, map_location='cpu') load_state(self.net, checkpoint) self.net = self.net.eval() if not self.cpu: self.net = self.net.cuda() def angle_between_points(self, pose, k1, k2, k3): x1, y1 = pose.keypoints[k1][0], pose.keypoints[k1][1] x2, y2 = pose.keypoints[k2][0], pose.keypoints[k2][1] x3, y3 = pose.keypoints[k3][0], pose.keypoints[k3][1] v1 = (x1 - x2, y1 - y2) v2 = (x3 - x2, y3 - y2) dot_product = v1[0] * v2[0] + v1[1] * v2[1] norm_v1 = math.sqrt(v1[0] ** 2 + v1[1] ** 2) norm_v2 = math.sqrt(v2[0] ** 2 + v2[1] ** 2) cos_theta = dot_product / (norm_v1 * norm_v2) theta = math.acos(cos_theta) angle = math.degrees(theta) return angle def infer_fast(self, img, stride, upsample_ratio, pad_value=(0, 0, 0), img_mean=np.array([128, 128, 128], np.float32), img_scale=np.float32(1/256)): height, width, _ = img.shape scale = self.height_size / height scaled_img = cv2.resize(img, (0, 0), fx=scale, fy=scale, interpolation=cv2.INTER_LINEAR) scaled_img = normalize(scaled_img, img_mean, img_scale) min_dims = [self.height_size, max(scaled_img.shape[1], self.height_size)] padded_img, pad = pad_width(scaled_img, stride, pad_value, min_dims) tensor_img = torch.from_numpy(padded_img).permute(2, 0, 1).unsqueeze(0).float() if not self.cpu: tensor_img = tensor_img.cuda() stages_output = self.net(tensor_img) stage2_heatmaps = stages_output[-2] heatmaps = np.transpose(stage2_heatmaps.squeeze().cpu().data.numpy(), (1, 2, 0)) heatmaps = cv2.resize(heatmaps, (0, 0), fx=upsample_ratio, fy=upsample_ratio, interpolation=cv2.INTER_CUBIC) stage2_pafs = stages_output[-1] pafs = np.transpose(stage2_pafs.squeeze().cpu().data.numpy(), (1, 2, 0)) pafs = cv2.resize(pafs, (0, 0), fx=upsample_ratio, fy=upsample_ratio, interpolation=cv2.INTER_CUBIC) return heatmaps, pafs, scale, pad def detect(self, img): stride = 8 upsample_ratio = 4 num_keypoints = Pose.num_kpts previous_poses = [] delay = 1 orig_img = img.copy() heatmaps, pafs, scale, pad = self.infer_fast(img, stride, upsample_ratio) total_keypoints_num = 0 all_keypoints_by_type = [] for kpt_idx in range(num_keypoints): total_keypoints_num += extract_keypoints(heatmaps[:, :, kpt_idx], all_keypoints_by_type, total_keypoints_num) pose_entries, all_keypoints = group_keypoints(all_keypoints_by_type, pafs) for kpt_id in range(all_keypoints.shape[0]): all_keypoints[kpt_id, 0] = (all_keypoints[kpt_id, 0] * stride / upsample_ratio - pad[1]) / scale all_keypoints[kpt_id, 1] = (all_keypoints[kpt_id, 1] * stride / upsample_ratio - pad[0]) / scale current_poses = [] for n in range(len(pose_entries)): if len(pose_entries[n]) == 0: continue pose_keypoints = np.ones((num_keypoints, 2), dtype=np.int32) * -1 for kpt_id in range(num_keypoints): if pose_entries[n][kpt_id] != -1.0: pose_keypoints[kpt_id, 0] = int(all_keypoints[int(pose_entries[n][kpt_id]), 0]) pose_keypoints[kpt_id, 1] = int(all_keypoints[int(pose_entries[n][kpt_id]), 1]) pose = Pose(pose_keypoints, pose_entries[n][18]) current_poses.append(pose) for pose in current_poses: pose.draw(img) if self.track: track_poses(previous_poses, current_poses, smooth=self.smooth) previous_poses = current_poses status = '' for pose in current_poses: try: angel = self.angle_between_points(pose, 10, 1, 13) except: angel = 0 x, y, w, h = pose.bbox sho_r = pose.keypoints[2] sho_l = pose.keypoints[5] sho_y = round((sho_l[1] + sho_r[1]) / 2) ank_r = pose.keypoints[10] ank_l = pose.keypoints[13] ank_y = round((ank_l[1] + ank_r[1]) / 2) status = "" color = [0,255,0] if (w 10: status = "walk" else: if (abs(ank_y - sho_y) > 0.5 * max(w, h) and w 0.5 * max(w, h) and w > h): status = "fall" color = [0, 0, 255] elif (w > 1.5 * h): status = "fall" color = [0, 0, 255] cv2.putText(img, status, (x, y), cv2.FONT_HERSHEY_SIMPLEX, 3, (0, 0, 255),3) cv2.rectangle(img, (pose.bbox[0], pose.bbox[1]), (pose.bbox[0] + pose.bbox[2], pose.bbox[1] + pose.bbox[3]), color,5) return status, img这个程序文件名为detect.py,主要功能是使用深度学习模型进行人体姿势检测和动作识别。 程序首先导入了必要的库和模块,包括argparse、cv2、numpy、torch等。然后定义了一些辅助函数,如计算两个关键点之间的夹角、快速推理函数等。 接下来进行了一些初始化操作,包括加载网络模型、设置是否使用CPU、设置是否进行目标跟踪等。 然后定义了一个detect函数,该函数接受一张图像作为输入,首先对图像进行预处理,然后使用网络模型进行推理,得到关键点的热图和关键点连接的矢量场。接着根据热图和矢量场提取关键点,并进行关键点的分组。然后根据关键点的位置和姿势信息进行动作识别,判断人体的状态(站立、跌倒、行走、蹲坐等),并在图像上绘制相应的文本和边界框。 最后返回人体状态和处理后的图像。 整个程序的主要功能是对输入图像进行人体姿势检测和动作识别,并在图像上进行可视化展示。 5.2 detector_CPU.py class Detector: def __init__(self): self.img_size = 640 self.threshold = 0.1 self.stride = 1 self.weights = './weights/output_of_small_target_detection.pt' self.device = '0' if torch.cuda.is_available() else 'cpu' self.device = select_device(self.device) model = attempt_load(self.weights, map_location=self.device) model.to(self.device).eval() model.float() self.m = model self.names = model.module.names if hasattr(model, 'module') else model.names def preprocess(self, img): img0 = img.copy() img = letterbox(img, new_shape=self.img_size)[0] img = img[:, :, ::-1].transpose(2, 0, 1) img = np.ascontiguousarray(img) img = torch.from_numpy(img).to(self.device) img = img.float() img /= 255.0 if img.ndimension() == 3: img = img.unsqueeze(0) return img0, img def detect(self, im): im0, img = self.preprocess(im) pred = self.m(img, augment=False)[0] pred = pred.float() pred = non_max_suppression(pred, self.threshold, 0.4) pedestrian = 0 boxes = [] for det in pred: if det is not None and len(det): det[:, :4] = scale_coords(img.shape[2:], det[:, :4], im0.shape).round() for *x, conf, cls_id in det: lbl = self.names[int(cls_id)] pass x1, y1 = int(x[0]), int(x[1]) x2, y2 = int(x[2]), int(x[3]) xm = x2 ym = y2 boxes.append((x1, y1, x2, y2, lbl, conf)) return boxes, pedestrian这个程序文件名为detector_CPU.py,它是一个目标检测器的类。这个类使用了PyTorch库和OpenCV库来进行目标检测。 在类的初始化方法中,定义了一些参数,如图像大小、阈值和步长。还定义了模型的权重文件路径和设备类型。然后加载模型并将其移动到指定的设备上。 preprocess方法用于对输入图像进行预处理,包括调整图像大小、转换颜色通道、转换为张量等操作。 detect方法用于对输入图像进行目标检测。首先调用preprocess方法对图像进行预处理,然后使用加载的模型对图像进行推理,得到预测结果。接着对预测结果进行非最大抑制处理,得到检测到的目标框。最后根据目标框的类别进行筛选,将符合条件的目标框和行人数量返回。 整个程序文件的功能是使用已训练好的模型对输入图像进行目标检测,并返回检测到的目标框和行人数量。 5.3 detector_GPU.py class Detector: def __init__(self): self.img_size = 640 self.threshold = 0.1 self.stride = 1 self.weights = './weights/Attention_mechanism.pt' self.device = '0' if torch.cuda.is_available() else 'cpu' self.device = select_device(self.device) model = attempt_load(self.weights, map_location=self.device) model.to(self.device).eval() model.half() self.m = model self.names = model.module.names if hasattr(model, 'module') else model.names def preprocess(self, img): img0 = img.copy() img = letterbox(img, new_shape=self.img_size)[0] img = img[:, :, ::-1].transpose(2, 0, 1) img = np.ascontiguousarray(img) img = torch.from_numpy(img).to(self.device) img = img.half() img /= 255.0 if img.ndimension() == 3: img = img.unsqueeze(0) return img0, img def detect(self, im): im0, img = self.preprocess(im) pred = self.m(img, augment=False)[0] pred = pred.float() pred = non_max_suppression(pred, self.threshold, 0.4) boxes = [] for det in pred: if det is not None and len(det): det[:, :4] = scale_coords(img.shape[2:], det[:, :4], im0.shape).round() for *x, conf, cls_id in det: lbl = self.names[int(cls_id)] x1, y1 = int(x[0]), int(x[1]) x2, y2 = int(x[2]), int(x[3]) xm = x2 ym = y2 if ym +0.797* xm -509.77 > 0: boxes.append((x1, y1, x2, y2, lbl, conf)) return boxes这个程序文件名为detector_GPU.py,它是一个目标检测器的类。该类具有以下功能: 初始化函数:设置图像大小、阈值和步长等参数,并加载模型权重。根据是否有GPU可用,选择设备进行计算。 预处理函数:对输入的图像进行预处理,包括调整图像大小、转换颜色通道顺序、转换为numpy数组和转换为torch张量等操作。 检测函数:对输入的图像进行目标检测。首先对图像进行预处理,然后使用加载的模型进行推理。根据阈值和非最大抑制算法,筛选出检测到的目标框,并将其存储在一个列表中返回。 总体来说,这个程序文件实现了一个基于GPU的目标检测器,可以用于检测自行车、汽车、公交车和卡车等目标。 5.4 mysql_connect.py class DatabaseConnection: def __init__(self): self.host = 'localhost' self.user = 'root' self.password = 'root' self.database = 'openpose_data' self.charset = 'utf8' self.con = None self.cur = None def connect(self): # 连接数据库 self.con = pymysql.connect( host=self.host, user=self.user, password=self.password, database=self.database, charset=self.charset ) # 创建游标 self.cur = self.con.cursor() def execute_query(self, sql): # 执行查询语句 self.cur.execute(sql) # 获取所有记录 all_records = self.cur.fetchall() return all_records def close(self): # 关闭游标 self.cur.close() # 关闭数据库连接 self.con.close()这是一个名为mysql_connect.py的程序文件,它使用pymysql库连接到MySQL数据库。代码中的connect()函数用于连接数据库,并执行一个查询语句,然后打印出查询结果。连接数据库时使用了本地主机(localhost)、用户名(root)、密码(root)、数据库名(openpose_data)和字符集(utf8)。代码中还创建了一个游标对象用于执行SQL语句,获取查询结果后关闭游标和数据库连接,以释放内存。 5.5 tracker.py class ObjectTracker: def __init__(self): cfg = get_config() cfg.merge_from_file("./deep_sort/configs/deep_sort.yaml") self.deepsort = DeepSort(cfg.DEEPSORT.REID_CKPT, max_dist=cfg.DEEPSORT.MAX_DIST, min_confidence=cfg.DEEPSORT.MIN_CONFIDENCE, nms_max_overlap=cfg.DEEPSORT.NMS_MAX_OVERLAP, max_iou_distance=cfg.DEEPSORT.MAX_IOU_DISTANCE, max_age=cfg.DEEPSORT.MAX_AGE, n_init=cfg.DEEPSORT.N_INIT, nn_budget=cfg.DEEPSORT.NN_BUDGET, use_cuda=True) def draw_bboxes(self, image, bboxes, line_thickness): line_thickness = line_thickness or round( 0.002 * (image.shape[0] + image.shape[1]) * 0.5) + 1 list_pts = [] point_radius = 4 for (x1, y1, x2, y2, cls_id, pos_id) in bboxes: color = (0, 255, 0) # 撞线的点 check_point_x = x1 check_point_y = int(y1 + ((y2 - y1) * 0.6)) c1, c2 = (x1, y1), (x2, y2) cv2.rectangle(image, c1, c2, color, thickness=line_thickness, lineType=cv2.LINE_AA) font_thickness = max(line_thickness - 1, 1) t_size = cv2.getTextSize(cls_id, 0, fontScale=line_thickness / 3, thickness=font_thickness)[0] c2 = c1[0] + t_size[0], c1[1] - t_size[1] - 3 cv2.rectangle(image, c1, c2, color, -1, cv2.LINE_AA) # filled cv2.putText(image, '{} ID-{}'.format(cls_id, pos_id), (c1[0], c1[1] - 2), 0, line_thickness / 3, [225, 255, 255], thickness=font_thickness, lineType=cv2.LINE_AA) list_pts.append([check_point_x - point_radius, check_point_y - point_radius]) list_pts.append([check_point_x - point_radius, check_point_y + point_radius]) list_pts.append([check_point_x + point_radius, check_point_y + point_radius]) list_pts.append([check_point_x + point_radius, check_point_y - point_radius]) ndarray_pts = np.array(list_pts, np.int32) cv2.fillPoly(image, [ndarray_pts], color=(0, 0, 255)) list_pts.clear() return image def update(self, bboxes, image): bbox_xywh = [] confs = [] bboxes2draw = [] if len(bboxes) > 0: for x1, y1, x2, y2, lbl, conf in bboxes: obj = [ int((x1 + x2) * 0.5), int((y1 + y2) * 0.5), x2 - x1, y2 - y1 ] bbox_xywh.append(obj) confs.append(conf) xywhs = torch.Tensor(bbox_xywh) confss = torch.Tensor(confs) outputs = self.deepsort.update(xywhs, confss, image) for x1, y1, x2, y2, track_id in list(outputs): # x1, y1, x2, y2, track_id = value center_x = (x1 + x2) * 0.5 center_y = (y1 + y2) * 0.5 label = self.search_label(center_x=center_x, center_y=center_y, bboxes_xyxy=bboxes, max_dist_threshold=20.0) bboxes2draw.append((x1, y1, x2, y2, label, track_id)) pass pass return bboxes2draw def search_label(self, center_x, center_y, bboxes_xyxy, max_dist_threshold): """ 在 yolov5 的 bbox 中搜索中心点最接近的label :param center_x: :param center_y: :param bboxes_xyxy: :param max_dist_threshold: :return: 字符串 """ label = '' # min_label = '' min_dist = -1.0 for x1, y1, x2, y2, lbl, conf in bboxes_xyxy: center_x2 = (x1 + x2) * 0.5 center_y2 = (y1 + y2) * 0.5 # 横纵距离都小于 max_dist min_x = abs(center_x2 - center_x) min_y = abs(center_y2 - center_y) if min_x |


 只看方框内的部分,很难看出这是人体身上的哪个部位。而加上全图上下文信息之后,识别起来就容易得多。下面介绍针对姿态估计问题的几种流行的网络结构。 2016年在 MPII数据集夺冠的Hourglass结构!17是一种串行的结构,先进行下采样,再进行上采样,同时把下采样过程中和上采样过程中大小相同的特征图做元素相加,以此来结合不同尺度下的图片特征。这样的一个模块形状就像沙漏一样,如图2.6所示。通过这样模块的堆叠,来组成一个更深的,由粗到精的表达能力更好的网络结构。
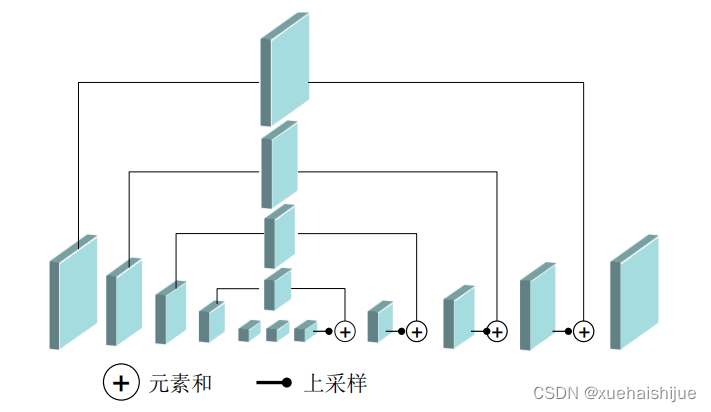
【本文地址】