Pytorch+Yolov3搭建自己的目标检测项目工程(带你从理论到实践) |
您所在的位置:网站首页 › yolov3先验框和真实框 › Pytorch+Yolov3搭建自己的目标检测项目工程(带你从理论到实践) |
Pytorch+Yolov3搭建自己的目标检测项目工程(带你从理论到实践)
|
学习目标
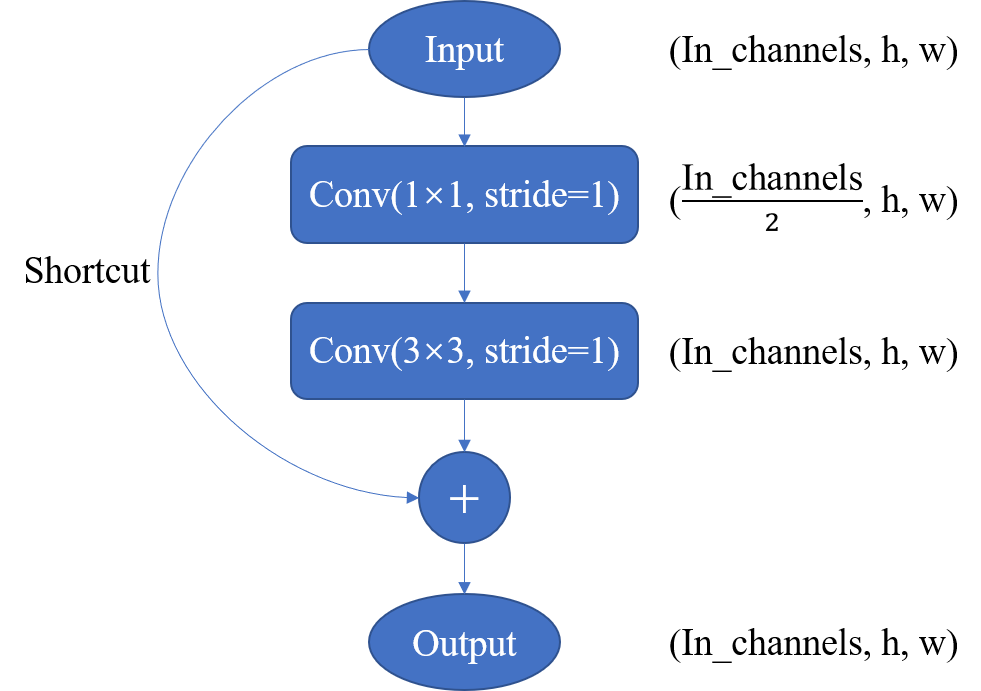
使用pytorch去构建一个Yolov3的项目工程。 参考的原作者的博客:睿智的目标检测26——Pytorch搭建yolo3目标检测平台 构建主干网络darknet53yolov3采用的主干网络是darknet53,借鉴了yolov2中的网络darknet19结构,相较于后者,前者加入了大量的残差模块,并且使用了步长为2,卷积核大小为3×3卷积层Conv2D替代池化层Maxpooling2D,在imagenet上分类测试上,darknet53在保证准确率的同时极大地提升了网络的运行速度,证明了darknet53在特征提取能力上的有效性。 残差块结构介绍
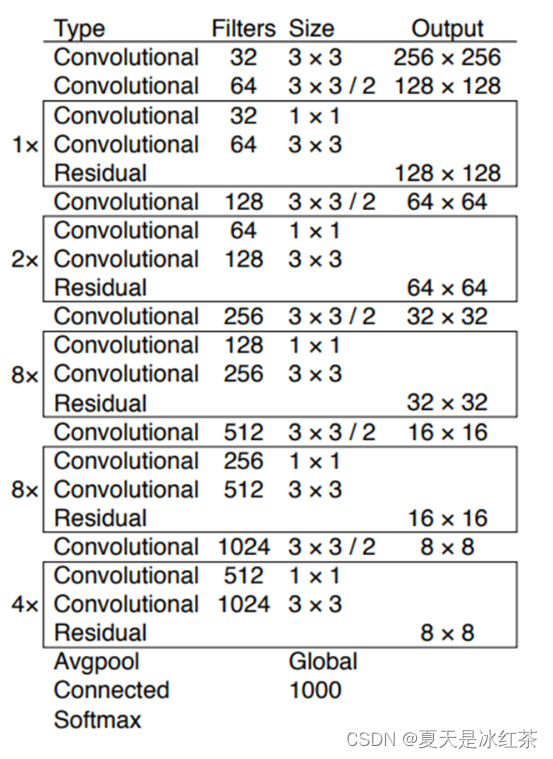
图1 残差块结构 Darknet53中的残差卷积就是先进行1x1卷积下降通道数,然后利用一个3x3卷积提取特征并且上升通道数,最后接上一个残差边。这样不仅保证了特征原本的通道数、长和宽,更是增加了深度提高准确率,这种跳跃连接的方式,也是有效的缓解了网络中增加深度带来的梯度消失问题。 darknet53网络结构下图2所示就是darknet53的网络结构,网络中堆叠了大量的残差结构Residual,而且每两个残差结构之间插着一个步长为2,卷积核大小为3×3卷积层,用于完成下采样的操作,减小特征图的空间大小,同时扩大通道数。
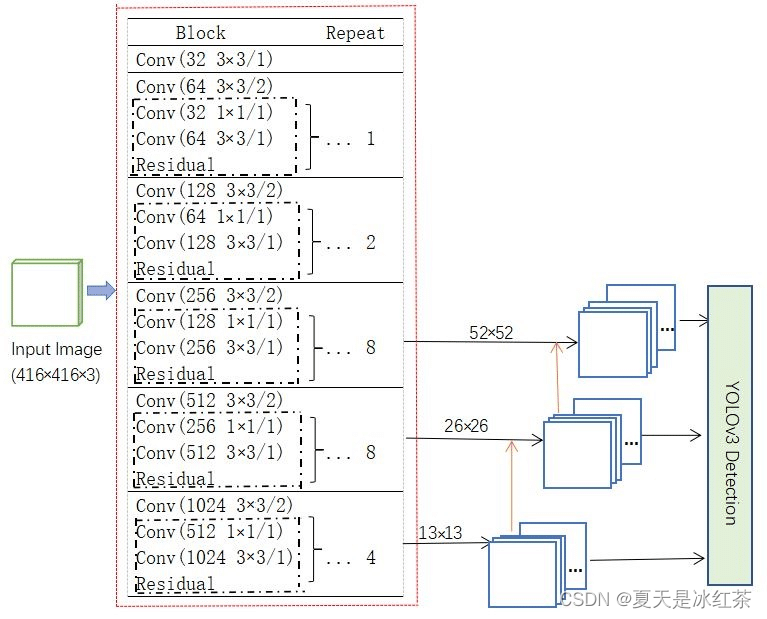
图2 darknet53网络结构 在源码中,Darknet-53网络的输入尺寸是 [416,416] ,最后卷积层输出的特征图尺寸为1313,通道数为1024。如果是分类任务,最后一个残差结构之后接入全局池化层Global Avgpool,1000个神经元的全连接层Connected,以及一个激活函数层Softmax。但在yolov3中,darknet53只用于提取特征,所以没有最后的这三层,只是输出了三种不同尺寸的特征图: 13 x 13、26 x 26、52 x 52 这样说可能还是不太形象,我们可以来看看下面这张图:
图3 darknet53输出三种不同尺寸的特征图 Conv2D替代池化层从作用上来说,步长为2的卷积替换池化层都可以完成下采样的工作,但其实现在的神经网络中,池化层已经比较少了,大家都开始尝试其他的下采样方法,比如步长为2的卷积。可这张替代有什么作用呢?我能想到的就是这样可以保持网络的平移不变性,因为卷积层在所有位置上都进行了卷积操作,而不像池化层只选择最大值或平均值。 使用Pytorch实现darknet53网络 import math from collections import OrderedDict import torch.nn as nn # CBLR -> Conv+BN+LeakyReLU class CBLR(nn.Sequential): def __init__(self, in_channels, out_channels, kernel_size=3, stride=1, padding=1, bias=False, negative_slope=0.1): super(CBLR, self).__init__( nn.Conv2d(in_channels, out_channels, kernel_size, stride, padding, bias=bias), nn.BatchNorm2d(out_channels), nn.LeakyReLU(negative_slope) ) class BasicBlock_with_darknet(nn.Module): def __init__(self, inplanes, planes): super(BasicBlock_with_darknet, self).__init__() # block1 降通道数,block2 再将通道数升回去,如 64->32->64 self.conv = nn.Sequential( CBLR(inplanes, planes[0], kernel_size=1, padding=0), CBLR(planes[0], planes[1]) ) def forward(self, x): residual = x out = self.conv(x) out += residual return out class DarkNet(nn.Module): def __init__(self, layers): super(DarkNet, self).__init__() self.inplanes = 32 self.layer0 = CBLR(3, self.inplanes) # (3, 416, 416) -> (32, 416, 416) self.layer1 = self._make_layer([32, 64], layers[0]) # (32, 416, 416) -> (64, 208, 208) self.layer2 = self._make_layer([64, 128], layers[1]) # (64, 208, 208) -> (128, 104, 104) self.layer3 = self._make_layer([128, 256], layers[2]) # (128, 104, 104) -> (256, 52, 52) self.layer4 = self._make_layer([256, 512], layers[3]) # (256, 52, 52) -> (512, 26, 26) self.layer5 = self._make_layer([512, 1024], layers[4]) # (512, 26, 26) -> (1024, 13, 13) self.layers_out_filters = [64, 128, 256, 512, 1024] for m in self.modules(): if isinstance(m, nn.Conv2d): n = m.kernel_size[0] * m.kernel_size[1] * m.out_channels m.weight.data.normal_(0, math.sqrt(2. / n)) elif isinstance(m, nn.BatchNorm2d): m.weight.data.fill_(1) m.bias.data.zero_() def _make_layer(self, planes, blocks): """ 每一个layer里面,首先利用一个步长为2的3x3卷积进行下采样,然后进行残差结构的堆叠 :param planes: 每个残差块的输入输出通道数 :param blocks: 重复的残差块数 :return: """ layers = [] # 下采样,步长为2,卷积核大小为3 layers.append(("ds_conv", nn.Conv2d(self.inplanes, planes[1], kernel_size=3, stride=2, padding=1, bias=False))) layers.append(("ds_bn", nn.BatchNorm2d(planes[1]))) layers.append(("ds_relu", nn.LeakyReLU(0.1))) # 加入残差结构,保持输入输出一致性 self.inplanes = planes[1] for i in range(0, blocks): layers.append(("residual_{}".format(i), BasicBlock_with_darknet(self.inplanes, planes))) return nn.Sequential(OrderedDict(layers)) def forward(self, x): x = self.layer0(x) x = self.layer1(x) x = self.layer2(x) out3 = self.layer3(x) out4 = self.layer4(out3) out5 = self.layer5(out4) return out3, out4, out5 cfgs={ "darknet53":[1, 2, 8, 8, 4] } def darknet53(mode="darknet53",pretrained=False): import torch model = DarkNet(cfgs[mode]) if pretrained: model.load_state_dict(torch.load("model_data/darknet53_backbone_weights.pth")) return model FPN特征金字塔如上图3,yolov3提取多特征层进行目标检测,一共提取三个特征层。其位于网络的中下层,三个特征层的shape分别为(52,52,256)、(26,26,512)、(13,13,1024)。从代码中理解就是前向传播中的out3、out4、out5,利用这三个有效特征层就可以进行FPN层的构建。
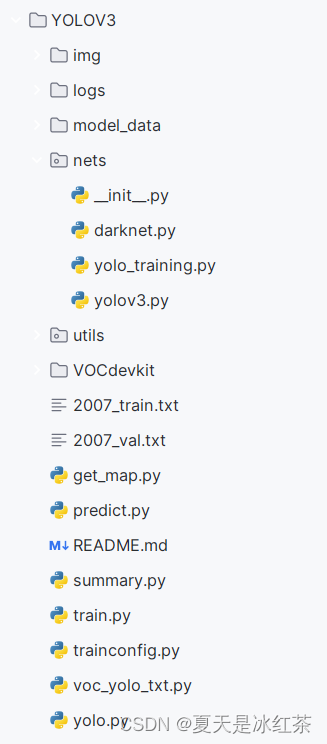
图4 yolov3网络总体框图 然后,我们就会利用这三有效特征层进行FPN层的构建,构建方式按照下方所示: 首先,对最底层的特征层(13x13x1024)应用5次1x1的卷积操作以减少通道数,得到一个调整后的特征层,一部分会用于YoloHead获得预测结果,另外一部分用于上采样后与(26x26x512)特征层进行结合,特征层的shape变为(26x26x768)。 结合后的特征层再次进行5次卷积处理,一部分用于YoloHead获得预测结果,另外一部分用于上采样后与(52x52x256)特征层进行结合,特征层的shape变为(52x52x384)。 结合特征层再次进行5次卷积处理,处理完后就用于YoloHead获得预测结果。 YoloHead获得预测结果经过上面FPN特征金字塔的加强特征提取,获取了三个加强特征,它们就是图4中的红框部分,这三个加强特征的shape分别为(13,13,512)、(26,26,256)、(52,52,128),然后我们利用这三个shape的特征层传入Yolo Head获得预测结果。 Yolo Head在Yolo算法中通常由一个3x3卷积层和一个1x1卷积层组成。这种结构的设计是为了在特征整合和通道调整之间实现平衡。 具体来说,3x3卷积层在空间上对特征图进行处理,以整合不同位置的信息,提取更高级的特征表示。而1x1卷积层则主要用于调整特征图的通道数,以适应后续处理和预测的需要。 对于预测结果的输出层,其形状(shape)可以根据所使用的数据集和先验框的数量而有所不同。在VOC数据集上,YoloV3针对每个特征点存在3个先验框,因此输出的通道数为3x25=75。所以对于三个特征层,它们的shape分别为(13,13,75),(26,26,75),(52,52,75)。 如果使用的是COCO训练集,其中类别数量为80,那么输出的通道数将为3x85=255。因此,对应三个特征层的shape将变为(13,13,255),(26,26,255),(52,52,255)。 使用pytorch实现FPN特征金字塔和YoloHead from collections import OrderedDict import torch import torch.nn as nn from yolo3.nets.darknet import darknet53 def conv2d(filter_in, filter_out, kernel_size): """ conv2d代替池化层 :param filter_in: 输入通道数 :param filter_out: 输出通道数 :param kernel_size: 卷积核大小 :return: 卷积块,包含卷积层、BN层和激活层 """ pad = (kernel_size - 1) // 2 if kernel_size else 0 return nn.Sequential(OrderedDict([ ("conv", nn.Conv2d(filter_in, filter_out, kernel_size=kernel_size, stride=1, padding=pad, bias=False)), ("bn", nn.BatchNorm2d(filter_out)), ("relu", nn.LeakyReLU(0.1)), ])) def make_last_layers(filters_list, in_filters, out_filter): """ FPN金字塔特征提取 前5个卷积层是用于特征提取: conv1:减小通道数 conv2:使用3x3卷积核提取特征 conv3:再次减小通道数 conv4:继续使用3x3卷积核提取特征 conv5:进一步减小通道数 这几层卷积的作用是聚集和提炼前面网络层输出的特征。 后2个卷积层是用于获得最终的预测结果: conv6:使用3x3卷积核提取特征 conv7:使用1x1卷积核进行分类预测,输出通道数等于类别数 """ m = nn.Sequential( conv2d(in_filters, filters_list[0], 1), conv2d(filters_list[0], filters_list[1], 3), conv2d(filters_list[1], filters_list[0], 1), conv2d(filters_list[0], filters_list[1], 3), conv2d(filters_list[1], filters_list[0], 1), conv2d(filters_list[0], filters_list[1], 3), nn.Conv2d(filters_list[1], out_filter, kernel_size=1, stride=1, padding=0, bias=True) ) return m class YoloBody(nn.Module): def __init__(self, anchors_mask, num_classes, pretrained = False): super(YoloBody, self).__init__() #---------------------------------------------------# # 生成darknet53的主干模型,获得三个有效特征层,他们的shape分别是: # 52,52,256 # 26,26,512 # 13,13,1024 # 实际就是前向传播当中的 out3, out4, out5 #---------------------------------------------------# self.backbone = darknet53(pretrained=pretrained) #---------------------------------------------------# # out_filters : [64, 128, 256, 512, 1024] #---------------------------------------------------# out_filters = self.backbone.layers_out_filters #------------------------------------------------------------------------# # 计算yolo_head的输出通道数,对于voc数据集而言(类别20),每个特征层预测3个边界框 # final_out_filter0 = final_out_filter1 = final_out_filter2 = 3*(20+5) = 75 # 对于coco数据集而言 # final_out_filter0 = final_out_filter1 = final_out_filter2 = 3*(80+5) = 255 #------------------------------------------------------------------------# self.last_layer0 = make_last_layers([512, 1024], out_filters[-1], len(anchors_mask[0]) * (num_classes + 5)) self.last_layer1_conv = conv2d(512, 256, 1) self.last_layer1_upsample = nn.Upsample(scale_factor=2, mode='nearest') self.last_layer1 = make_last_layers([256, 512], out_filters[-2] + 256, len(anchors_mask[1]) * (num_classes + 5)) self.last_layer2_conv = conv2d(256, 128, 1) self.last_layer2_upsample = nn.Upsample(scale_factor=2, mode='nearest') self.last_layer2 = make_last_layers([128, 256], out_filters[-3] + 128, len(anchors_mask[2]) * (num_classes + 5)) def forward(self, x): #---------------------------------------------------# # 获得三个有效特征层,他们的shape分别是: # 52,52,256;26,26,512;13,13,1024 #---------------------------------------------------# x2, x1, x0 = self.backbone(x) #---------------------------------------------------# # 第一个特征层 # out0 = (batch_size,final_out_filter0(255),13,13) #---------------------------------------------------# # 13,13,1024 -> 13,13,512 -> 13,13,1024 -> 13,13,512 -> 13,13,1024 -> 13,13,512 # 对前五个卷积层进行特征提取,后面的层进行预测输出 out0_branch = self.last_layer0[:5](x0) out0 = self.last_layer0[5:](out0_branch) # 13,13,512 -> 13,13,256 -> 26,26,256 x1_in = self.last_layer1_conv(out0_branch) x1_in = self.last_layer1_upsample(x1_in) # 26,26,256 + 26,26,512 -> 26,26,768 x1_in = torch.cat([x1_in, x1], 1) #---------------------------------------------------# # 第二个特征层 # out1 = (batch_size,255,26,26) #---------------------------------------------------# # 26,26,768 -> 26,26,256 -> 26,26,512 -> 26,26,256 -> 26,26,512 -> 26,26,256 out1_branch = self.last_layer1[:5](x1_in) out1 = self.last_layer1[5:](out1_branch) # 26,26,256 -> 26,26,128 -> 52,52,128 x2_in = self.last_layer2_conv(out1_branch) x2_in = self.last_layer2_upsample(x2_in) # 52,52,128 + 52,52,256 -> 52,52,384 x2_in = torch.cat([x2_in, x2], 1) #---------------------------------------------------# # 第一个特征层 # out3 = (batch_size,255,52,52) #---------------------------------------------------# # 52,52,384 -> 52,52,128 -> 52,52,256 -> 52,52,128 -> 52,52,256 -> 52,52,128 out2 = self.last_layer2(x2_in) return out0, out1, out2代码中写的注释很详细,对着网络图4结合着看就能明白了。 对Yolo模型预测结果的解码 voc举例接下来是对voc为例,分类有20种 我们可以获得三个特征层的预测结果,shape分别为: (N,13,13,75)(N,26,26,75)(N,52,52,75)在前面我们也了解过了目标检测YOLO算法,先从yolov1开始_夏天是冰红茶的博客-CSDN博客 拿第一个特征层举例,我们是将图像分割成了13x13的网格在每个网格中心建立先验框,这些是我们预先设定好的,网络的预测结果会判断这些框内是否包含物体,以及这个物体的种类。 每一个网格点都具有三个先验框,所以上述的预测结果可以reshape为: (N,13,13,3,25)(N,26,26,3,25)(N,52,52,3,25)这里的25是这样组成的: 首先你会得到5个信息[x,y,w,h,c],即为4+1+20,其中的4代表先验框的调整参数,1代表置信度,20代表的是这个先验框的种类。如果YoloV3只检测3类物体,那么这个85就变为了4+1+3 = 8。 根据先验框的信息就可以得到预测框。 在得到最终的预测框坐标和置信度后,还需要进行进一步的处理来生成最终检测结果: 对每个类别进行后处理 对该类进行置信度筛选,取出置信度大于阈值obj_threshold的预测框 对保留下来的预测框按照置信度排序 进行非极大抑制(NMS) 取出置信度最高的框,作为保留框,计算其余框与该框的IOU重合度,移除重合度大于nms_thres的框重复上述步骤,直到所有框都检测过 合并每个类别的结果 上述步骤确保了对每个类别都进行置信度筛选和NMS处理,可以有效去除冗余和重复的检测框,提高检测精度。 这套流程是目标检测任务的标准后处理方式,Yolo也遵循这样的流程,只是在详细实现上会有不同。但整体思路都是类似的,这对理解任何检测模型的结果产生过程都是很重要的。 代码参数讲解上面说得可能比较的浅显,还是要结合着代码来讲: anchors 先说说什么是anchors,它是 yolo 模型中先验检测边界框的尺寸和形状。 13x13的特征层对应的anchor是[116,90],[156,198],[373,326] 26x26的特征层对应的anchor是[30,61],[62,45],[59,119] 52x52的特征层对应的anchor是[10,13],[16,30],[33,23]先整体来看看这三个特征层,13x13特征层的感受野较大,一般用来检测大尺寸的目标,26x26特征层,感受野中等,用于检测中等大小目标,52x52特征层,感受野最小,用于检测小尺寸目标。所以这样看来它们所对应的anchor也是从较大到较小,这个值呢其实是研究人员通过不断试验比较,才确定出对特定模型和数据集效果较好的anchors设定。 咱们如果是初学者就最好不要去修改它了,你就默认它是这样就好了,因为要修改的话,不考虑效果如何,光是消耗的资源和时间就不值得了 anchors_mask 接着就是anchors_mask,它用于定义不同特征层对应哪些anchors先验框,Yolo通常有3个特征层,每个特征层需要选择一些anchors来生成检测框。anchors_mask就定义了这种映射关系。 举例anchors_mask = [[6,7,8], [3,4,5], [0,1,2]] 第一个特征层使用 anchors 中第[6,7,8]个先验框第二个特征层使用 anchors 中第[3,4,5]个先验框第三个特征层使用 anchors 中第[0,1,2]个先验框这样每个特征层就分配到了合适的anchors,用于生成不同尺寸的检测框。在网络预测时,根据anchors_mask可以将预测映射到对应特征层的anchors上,进行解码和后处理。 scaled_anchors 这一步是将预设的先验框(anchors)调整到当前特征层的尺度下,anchors 是相对于原图的绝对尺寸,而特征层进行了下采样,所以需要根据特征层的步长对 anchors 进行尺度转换,得到 scaled_anchors,如果不进行缩放,直接应用anchors会引起预测与实际目标的坐标偏差。 对预测进行解码的代码 import torch from torchvision.ops import nms import numpy as np class DecodeBox(): def __init__(self, anchors, num_classes, input_shape, anchors_mask = [[6,7,8], [3,4,5], [0,1,2]]): """ 13x13的特征层对应的anchor是[116,90],[156,198],[373,326] 26x26的特征层对应的anchor是[30,61],[62,45],[59,119] 52x52的特征层对应的anchor是[10,13],[16,30],[33,23] :param anchors: 先验框,对应不同特征层的大小 :param num_classes: 分类数量 :param input_shape: 输入图像尺寸 :param anchors_mask: 对应三个特征层的先验框掩码 """ super(DecodeBox, self).__init__() self.anchors = anchors self.num_classes = num_classes self.bbox_attrs = 5 + num_classes # bbox属性的数量 self.input_shape = input_shape self.anchors_mask = anchors_mask def decode_box(self, inputs): outputs = [] for i, input in enumerate(inputs): #-----------------------------------------------# # 输入的input一共有三个,他们的shape分别是 # batch_size, 255, 13, 13 # batch_size, 255, 26, 26 # batch_size, 255, 52, 52 #-----------------------------------------------# batch_size,input_height,input_width = input.size(0),input.size(2),input.size(3) #-----------------------------------------------# # 输入为416x416时 # stride_h = stride_w = 32、16、8 #-----------------------------------------------# stride_h = self.input_shape[0] / input_height stride_w = self.input_shape[1] / input_width #-------------------------------------------------# # 此时获得的scaled_anchors大小是相对于特征层的 #-------------------------------------------------# scaled_anchors = [(anchor_width / stride_w, anchor_height / stride_h) for anchor_width, anchor_height in self.anchors[self.anchors_mask[i]]] #-----------------------------------------------# # 输入的input一共有三个,他们的shape分别是 # batch_size, 3, 13, 13, 85 # batch_size, 3, 26, 26, 85 # batch_size, 3, 52, 52, 85 #-----------------------------------------------# prediction = input.view(batch_size, len(self.anchors_mask[i]), self.bbox_attrs, input_height, input_width).permute(0, 1, 3, 4, 2).contiguous() #-----------------------------------------------# # 先验框的中心位置的调整参数 #-----------------------------------------------# x = torch.sigmoid(prediction[..., 0]) y = torch.sigmoid(prediction[..., 1]) #-----------------------------------------------# # 先验框的宽高调整参数 #-----------------------------------------------# w = prediction[..., 2] h = prediction[..., 3] #-----------------------------------------------# # 获得置信度,是否有物体 #-----------------------------------------------# conf = torch.sigmoid(prediction[..., 4]) #-----------------------------------------------# # 种类置信度 #-----------------------------------------------# pred_cls = torch.sigmoid(prediction[..., 5:]) FloatTensor = torch.cuda.FloatTensor if x.is_cuda else torch.FloatTensor LongTensor = torch.cuda.LongTensor if x.is_cuda else torch.LongTensor #----------------------------------------------------------# # 生成网格,先验框中心,网格左上角 # batch_size,3,13,13 #----------------------------------------------------------# grid_x = torch.linspace(0, input_width - 1, input_width).repeat(input_height, 1).repeat( batch_size * len(self.anchors_mask[i]), 1, 1).view(x.shape).type(FloatTensor) grid_y = torch.linspace(0, input_height - 1, input_height).repeat(input_width, 1).t().repeat( batch_size * len(self.anchors_mask[i]), 1, 1).view(y.shape).type(FloatTensor) #----------------------------------------------------------# # 按照网格格式生成先验框的宽高 # batch_size,3,13,13 #----------------------------------------------------------# anchor_w = FloatTensor(scaled_anchors).index_select(1, LongTensor([0])) anchor_h = FloatTensor(scaled_anchors).index_select(1, LongTensor([1])) anchor_w = anchor_w.repeat(batch_size, 1).repeat(1, 1, input_height * input_width).view(w.shape) anchor_h = anchor_h.repeat(batch_size, 1).repeat(1, 1, input_height * input_width).view(h.shape) #----------------------------------------------------------# # 利用预测结果对先验框进行调整 # 首先调整先验框的中心,从先验框中心向右下角偏移 # 再调整先验框的宽高。 #----------------------------------------------------------# pred_boxes = FloatTensor(prediction[..., :4].shape) pred_boxes[..., 0] = x.data + grid_x pred_boxes[..., 1] = y.data + grid_y pred_boxes[..., 2] = torch.exp(w.data) * anchor_w pred_boxes[..., 3] = torch.exp(h.data) * anchor_h #----------------------------------------------------------# # 将输出结果归一化成小数的形式 #----------------------------------------------------------# _scale = torch.Tensor([input_width, input_height, input_width, input_height]).type(FloatTensor) output = torch.cat((pred_boxes.view(batch_size, -1, 4) / _scale, conf.view(batch_size, -1, 1), pred_cls.view(batch_size, -1, self.num_classes)), -1) outputs.append(output.data) return outputs def yolo_correct_boxes(self, box_xy, box_wh, input_shape, image_shape, letterbox_image): #-----------------------------------------------------------------# # 把y轴放前面是因为方便预测框和图像的宽高进行相乘 #-----------------------------------------------------------------# box_yx = box_xy[..., ::-1] box_hw = box_wh[..., ::-1] input_shape = np.array(input_shape) image_shape = np.array(image_shape) if letterbox_image: #-----------------------------------------------------------------# # 这里求出来的offset是图像有效区域相对于图像左上角的偏移情况 # new_shape指的是宽高缩放情况 #-----------------------------------------------------------------# new_shape = np.round(image_shape * np.min(input_shape/image_shape)) offset = (input_shape - new_shape)/2./input_shape scale = input_shape/new_shape box_yx = (box_yx - offset) * scale box_hw *= scale box_mins = box_yx - (box_hw / 2.) box_maxes = box_yx + (box_hw / 2.) boxes = np.concatenate([box_mins[..., 0:1], box_mins[..., 1:2], box_maxes[..., 0:1], box_maxes[..., 1:2]], axis=-1) boxes *= np.concatenate([image_shape, image_shape], axis=-1) return boxes def non_max_suppression(self, prediction, num_classes, input_shape, image_shape, letterbox_image, conf_thres=0.5, nms_thres=0.4): #----------------------------------------------------------# # 将预测结果的格式转换成左上角右下角的格式。 # prediction [batch_size, num_anchors, 85] #----------------------------------------------------------# box_corner = prediction.new(prediction.shape) box_corner[:, :, 0] = prediction[:, :, 0] - prediction[:, :, 2] / 2 box_corner[:, :, 1] = prediction[:, :, 1] - prediction[:, :, 3] / 2 box_corner[:, :, 2] = prediction[:, :, 0] + prediction[:, :, 2] / 2 box_corner[:, :, 3] = prediction[:, :, 1] + prediction[:, :, 3] / 2 prediction[:, :, :4] = box_corner[:, :, :4] output = [None for _ in range(len(prediction))] for i, image_pred in enumerate(prediction): #----------------------------------------------------------# # 对种类预测部分取max。 # class_conf [num_anchors, 1] 种类置信度 # class_pred [num_anchors, 1] 种类 #----------------------------------------------------------# class_conf, class_pred = torch.max(image_pred[:, 5:5 + num_classes], 1, keepdim=True) #----------------------------------------------------------# # 利用置信度进行第一轮筛选 #----------------------------------------------------------# conf_mask = (image_pred[:, 4] * class_conf[:, 0] >= conf_thres).squeeze() #----------------------------------------------------------# # 根据置信度进行预测结果的筛选 #----------------------------------------------------------# image_pred = image_pred[conf_mask] class_conf = class_conf[conf_mask] class_pred = class_pred[conf_mask] if not image_pred.size(0): continue #-------------------------------------------------------------------------# # detections [num_anchors, 7] # 7的内容为:x1, y1, x2, y2, obj_conf, class_conf, class_pred #-------------------------------------------------------------------------# detections = torch.cat((image_pred[:, :5], class_conf.float(), class_pred.float()), 1) #------------------------------------------# # 获得预测结果中包含的所有种类 #------------------------------------------# unique_labels = detections[:, -1].cpu().unique() if prediction.is_cuda: unique_labels = unique_labels.cuda() detections = detections.cuda() for c in unique_labels: #------------------------------------------# # 获得某一类得分筛选后全部的预测结果 #------------------------------------------# detections_class = detections[detections[:, -1] == c] #------------------------------------------# # 使用官方自带的非极大抑制会速度更快一些! #------------------------------------------# keep = nms( detections_class[:, :4], detections_class[:, 4] * detections_class[:, 5], nms_thres ) max_detections = detections_class[keep] # Add max detections to outputs output[i] = max_detections if output[i] is None else torch.cat((output[i], max_detections)) if output[i] is not None: output[i] = output[i].cpu().numpy() box_xy, box_wh = (output[i][:, 0:2] + output[i][:, 2:4])/2, output[i][:, 2:4] - output[i][:, 0:2] output[i][:, :4] = self.yolo_correct_boxes(box_xy, box_wh, input_shape, image_shape, letterbox_image) return output 模型训练的lossYOLO模型的损失函数包含以下3部分损失: 1、坐标损失loss_loc用于回归预测框和真实框之间的距离,包含框中心坐标、宽高等的损失。可以使用GIoU损失或者传统的L1、L2损失。 2、置信度损失loss_conf用于判断预测框是否包含对象,预测框是否应该被禁用的二分类损失,使用BCELoss计算。 3、类别损失loss_cls用于预测框包含的物体类别分类损失,也使用BCELoss计算。 最后将三部分损失进行求和,构成最终的YOLO模型损失函数loss。 坐标损失和置信度损失关注预测框的定位精度,类别损失关注特征提取和分类的效果。三者组合可以联合优化检测模型的不同能力。 import math from functools import partial import numpy as np import torch import torch.nn as nn class YOLOLoss(nn.Module): def __init__(self, anchors, num_classes, input_shape, cuda, anchors_mask = [[6,7,8], [3,4,5], [0,1,2]]): super(YOLOLoss, self).__init__() #-----------------------------------------------------------# # 13x13的特征层对应的anchor是[116,90],[156,198],[373,326] # 26x26的特征层对应的anchor是[30,61],[62,45],[59,119] # 52x52的特征层对应的anchor是[10,13],[16,30],[33,23] #-----------------------------------------------------------# self.anchors = anchors self.num_classes = num_classes self.bbox_attrs = 5 + num_classes self.input_shape = input_shape self.anchors_mask = anchors_mask self.giou = True self.balance = [0.4, 1.0, 4] self.box_ratio = 0.05 self.obj_ratio = 5 * (input_shape[0] * input_shape[1]) / (416 ** 2) self.cls_ratio = 1 * (num_classes / 80) self.ignore_threshold = 0.5 self.cuda = cuda def clip_by_tensor(self, t, t_min, t_max): t = t.float() result = (t >= t_min).float() * t + (t < t_min).float() * t_min result = (result t_max).float() * t_max return result def MSELoss(self, pred, target): return torch.pow(pred - target, 2) def BCELoss(self, pred, target): epsilon = 1e-7 pred = self.clip_by_tensor(pred, epsilon, 1.0 - epsilon) output = - target * torch.log(pred) - (1.0 - target) * torch.log(1.0 - pred) return output def box_giou(self, b1, b2): """ 输入为: ---------- b1: tensor, shape=(batch, feat_w, feat_h, anchor_num, 4), xywh b2: tensor, shape=(batch, feat_w, feat_h, anchor_num, 4), xywh 返回为: ------- giou: tensor, shape=(batch, feat_w, feat_h, anchor_num, 1) """ #----------------------------------------------------# # 求出预测框左上角右下角 #----------------------------------------------------# b1_xy = b1[..., :2] b1_wh = b1[..., 2:4] b1_wh_half = b1_wh/2. b1_mins = b1_xy - b1_wh_half b1_maxes = b1_xy + b1_wh_half #----------------------------------------------------# # 求出真实框左上角右下角 #----------------------------------------------------# b2_xy = b2[..., :2] b2_wh = b2[..., 2:4] b2_wh_half = b2_wh/2. b2_mins = b2_xy - b2_wh_half b2_maxes = b2_xy + b2_wh_half #----------------------------------------------------# # 求真实框和预测框所有的iou #----------------------------------------------------# intersect_mins = torch.max(b1_mins, b2_mins) intersect_maxes = torch.min(b1_maxes, b2_maxes) intersect_wh = torch.max(intersect_maxes - intersect_mins, torch.zeros_like(intersect_maxes)) intersect_area = intersect_wh[..., 0] * intersect_wh[..., 1] b1_area = b1_wh[..., 0] * b1_wh[..., 1] b2_area = b2_wh[..., 0] * b2_wh[..., 1] union_area = b1_area + b2_area - intersect_area iou = intersect_area / union_area #----------------------------------------------------# # 找到包裹两个框的最小框的左上角和右下角 #----------------------------------------------------# enclose_mins = torch.min(b1_mins, b2_mins) enclose_maxes = torch.max(b1_maxes, b2_maxes) enclose_wh = torch.max(enclose_maxes - enclose_mins, torch.zeros_like(intersect_maxes)) #----------------------------------------------------# # 计算对角线距离 #----------------------------------------------------# enclose_area = enclose_wh[..., 0] * enclose_wh[..., 1] giou = iou - (enclose_area - union_area) / enclose_area return giou def forward(self, l, input, targets=None): #----------------------------------------------------# # l代表的是,当前输入进来的有效特征层,是第几个有效特征层 # input的shape为 bs, 3*(5+num_classes), 13, 13 # bs, 3*(5+num_classes), 26, 26 # bs, 3*(5+num_classes), 52, 52 # targets代表的是真实框。 #----------------------------------------------------# #--------------------------------# # 获得图片数量,特征层的高和宽 # 13和13 #--------------------------------# bs = input.size(0) in_h = input.size(2) in_w = input.size(3) #-----------------------------------------------------------------------# # 计算步长 # 每一个特征点对应原来的图片上多少个像素点 # 如果特征层为13x13的话,一个特征点就对应原来的图片上的32个像素点 # 如果特征层为26x26的话,一个特征点就对应原来的图片上的16个像素点 # 如果特征层为52x52的话,一个特征点就对应原来的图片上的8个像素点 # stride_h = stride_w = 32、16、8 # stride_h和stride_w都是32。 #-----------------------------------------------------------------------# stride_h = self.input_shape[0] / in_h stride_w = self.input_shape[1] / in_w #-------------------------------------------------# # 此时获得的scaled_anchors大小是相对于特征层的 #-------------------------------------------------# scaled_anchors = [(a_w / stride_w, a_h / stride_h) for a_w, a_h in self.anchors] #-----------------------------------------------# # 输入的input一共有三个,他们的shape分别是 # bs, 3*(5+num_classes), 13, 13 => batch_size, 3, 13, 13, 5 + num_classes # batch_size, 3, 26, 26, 5 + num_classes # batch_size, 3, 52, 52, 5 + num_classes #-----------------------------------------------# prediction = input.view(bs, len(self.anchors_mask[l]), self.bbox_attrs, in_h, in_w).permute(0, 1, 3, 4, 2).contiguous() #-----------------------------------------------# # 先验框的中心位置的调整参数 #-----------------------------------------------# x = torch.sigmoid(prediction[..., 0]) y = torch.sigmoid(prediction[..., 1]) #-----------------------------------------------# # 先验框的宽高调整参数 #-----------------------------------------------# w = prediction[..., 2] h = prediction[..., 3] #-----------------------------------------------# # 获得置信度,是否有物体 #-----------------------------------------------# conf = torch.sigmoid(prediction[..., 4]) #-----------------------------------------------# # 种类置信度 #-----------------------------------------------# pred_cls = torch.sigmoid(prediction[..., 5:]) #-----------------------------------------------# # 获得网络应该有的预测结果 #-----------------------------------------------# y_true, noobj_mask, box_loss_scale = self.get_target(l, targets, scaled_anchors, in_h, in_w) #---------------------------------------------------------------# # 将预测结果进行解码,判断预测结果和真实值的重合程度 # 如果重合程度过大则忽略,因为这些特征点属于预测比较准确的特征点 # 作为负样本不合适 #----------------------------------------------------------------# noobj_mask, pred_boxes = self.get_ignore(l, x, y, h, w, targets, scaled_anchors, in_h, in_w, noobj_mask) if self.cuda: y_true = y_true.type_as(x) noobj_mask = noobj_mask.type_as(x) box_loss_scale = box_loss_scale.type_as(x) #--------------------------------------------------------------------------# # box_loss_scale是真实框宽高的乘积,宽高均在0-1之间,因此乘积也在0-1之间。 # 2-宽高的乘积代表真实框越大,比重越小,小框的比重更大。 #--------------------------------------------------------------------------# box_loss_scale = 2 - box_loss_scale loss = 0 obj_mask = y_true[..., 4] == 1 n = torch.sum(obj_mask) if n != 0: if self.giou: #---------------------------------------------------------------# # 计算预测结果和真实结果的giou #----------------------------------------------------------------# giou = self.box_giou(pred_boxes, y_true[..., :4]).type_as(x) loss_loc = torch.mean((1 - giou)[obj_mask]) else: #-----------------------------------------------------------# # 计算中心偏移情况的loss,使用BCELoss效果好一些 #-----------------------------------------------------------# loss_x = torch.mean(self.BCELoss(x[obj_mask], y_true[..., 0][obj_mask]) * box_loss_scale[obj_mask]) loss_y = torch.mean(self.BCELoss(y[obj_mask], y_true[..., 1][obj_mask]) * box_loss_scale[obj_mask]) #-----------------------------------------------------------# # 计算宽高调整值的loss #-----------------------------------------------------------# loss_w = torch.mean(self.MSELoss(w[obj_mask], y_true[..., 2][obj_mask]) * box_loss_scale[obj_mask]) loss_h = torch.mean(self.MSELoss(h[obj_mask], y_true[..., 3][obj_mask]) * box_loss_scale[obj_mask]) loss_loc = (loss_x + loss_y + loss_h + loss_w) * 0.1 loss_cls = torch.mean(self.BCELoss(pred_cls[obj_mask], y_true[..., 5:][obj_mask])) loss += loss_loc * self.box_ratio + loss_cls * self.cls_ratio loss_conf = torch.mean(self.BCELoss(conf, obj_mask.type_as(conf))[noobj_mask.bool() | obj_mask]) loss += loss_conf * self.balance[l] * self.obj_ratio # if n != 0: # print(loss_loc * self.box_ratio, loss_cls * self.cls_ratio, loss_conf * self.balance[l] * self.obj_ratio) return loss def calculate_iou(self, _box_a, _box_b): #-----------------------------------------------------------# # 计算真实框的左上角和右下角 #-----------------------------------------------------------# b1_x1, b1_x2 = _box_a[:, 0] - _box_a[:, 2] / 2, _box_a[:, 0] + _box_a[:, 2] / 2 b1_y1, b1_y2 = _box_a[:, 1] - _box_a[:, 3] / 2, _box_a[:, 1] + _box_a[:, 3] / 2 #-----------------------------------------------------------# # 计算先验框获得的预测框的左上角和右下角 #-----------------------------------------------------------# b2_x1, b2_x2 = _box_b[:, 0] - _box_b[:, 2] / 2, _box_b[:, 0] + _box_b[:, 2] / 2 b2_y1, b2_y2 = _box_b[:, 1] - _box_b[:, 3] / 2, _box_b[:, 1] + _box_b[:, 3] / 2 #-----------------------------------------------------------# # 将真实框和预测框都转化成左上角右下角的形式 #-----------------------------------------------------------# box_a = torch.zeros_like(_box_a) box_b = torch.zeros_like(_box_b) box_a[:, 0], box_a[:, 1], box_a[:, 2], box_a[:, 3] = b1_x1, b1_y1, b1_x2, b1_y2 box_b[:, 0], box_b[:, 1], box_b[:, 2], box_b[:, 3] = b2_x1, b2_y1, b2_x2, b2_y2 #-----------------------------------------------------------# # A为真实框的数量,B为先验框的数量 #-----------------------------------------------------------# A = box_a.size(0) B = box_b.size(0) #-----------------------------------------------------------# # 计算交的面积 #-----------------------------------------------------------# max_xy = torch.min(box_a[:, 2:].unsqueeze(1).expand(A, B, 2), box_b[:, 2:].unsqueeze(0).expand(A, B, 2)) min_xy = torch.max(box_a[:, :2].unsqueeze(1).expand(A, B, 2), box_b[:, :2].unsqueeze(0).expand(A, B, 2)) inter = torch.clamp((max_xy - min_xy), min=0) inter = inter[:, :, 0] * inter[:, :, 1] #-----------------------------------------------------------# # 计算预测框和真实框各自的面积 #-----------------------------------------------------------# area_a = ((box_a[:, 2]-box_a[:, 0]) * (box_a[:, 3]-box_a[:, 1])).unsqueeze(1).expand_as(inter) # [A,B] area_b = ((box_b[:, 2]-box_b[:, 0]) * (box_b[:, 3]-box_b[:, 1])).unsqueeze(0).expand_as(inter) # [A,B] #-----------------------------------------------------------# # 求IOU #-----------------------------------------------------------# union = area_a + area_b - inter return inter / union # [A,B] def get_target(self, l, targets, anchors, in_h, in_w): #-----------------------------------------------------# # 计算一共有多少张图片 #-----------------------------------------------------# bs = len(targets) #-----------------------------------------------------# # 用于选取哪些先验框不包含物体 #-----------------------------------------------------# noobj_mask = torch.ones(bs, len(self.anchors_mask[l]), in_h, in_w, requires_grad = False) #-----------------------------------------------------# # 让网络更加去关注小目标 #-----------------------------------------------------# box_loss_scale = torch.zeros(bs, len(self.anchors_mask[l]), in_h, in_w, requires_grad = False) #-----------------------------------------------------# # batch_size, 3, 13, 13, 5 + num_classes #-----------------------------------------------------# y_true = torch.zeros(bs, len(self.anchors_mask[l]), in_h, in_w, self.bbox_attrs, requires_grad = False) for b in range(bs): if len(targets[b])==0: continue batch_target = torch.zeros_like(targets[b]) #-------------------------------------------------------# # 计算出正样本在特征层上的中心点 #-------------------------------------------------------# batch_target[:, [0,2]] = targets[b][:, [0,2]] * in_w batch_target[:, [1,3]] = targets[b][:, [1,3]] * in_h batch_target[:, 4] = targets[b][:, 4] batch_target = batch_target.cpu() #-------------------------------------------------------# # 将真实框转换一个形式 # num_true_box, 4 #-------------------------------------------------------# gt_box = torch.FloatTensor(torch.cat((torch.zeros((batch_target.size(0), 2)), batch_target[:, 2:4]), 1)) #-------------------------------------------------------# # 将先验框转换一个形式 # 9, 4 #-------------------------------------------------------# anchor_shapes = torch.FloatTensor(torch.cat((torch.zeros((len(anchors), 2)), torch.FloatTensor(anchors)), 1)) #-------------------------------------------------------# # 计算交并比 # self.calculate_iou(gt_box, anchor_shapes) = [num_true_box, 9]每一个真实框和9个先验框的重合情况 # best_ns: # [每个真实框最大的重合度max_iou, 每一个真实框最重合的先验框的序号] #-------------------------------------------------------# best_ns = torch.argmax(self.calculate_iou(gt_box, anchor_shapes), dim=-1) for t, best_n in enumerate(best_ns): if best_n not in self.anchors_mask[l]: continue #----------------------------------------# # 判断这个先验框是当前特征点的哪一个先验框 #----------------------------------------# k = self.anchors_mask[l].index(best_n) #----------------------------------------# # 获得真实框属于哪个网格点 #----------------------------------------# i = torch.floor(batch_target[t, 0]).long() j = torch.floor(batch_target[t, 1]).long() #----------------------------------------# # 取出真实框的种类 #----------------------------------------# c = batch_target[t, 4].long() #----------------------------------------# # noobj_mask代表无目标的特征点 #----------------------------------------# noobj_mask[b, k, j, i] = 0 #----------------------------------------# # tx、ty代表中心调整参数的真实值 #----------------------------------------# if not self.giou: #----------------------------------------# # tx、ty代表中心调整参数的真实值 #----------------------------------------# y_true[b, k, j, i, 0] = batch_target[t, 0] - i.float() y_true[b, k, j, i, 1] = batch_target[t, 1] - j.float() y_true[b, k, j, i, 2] = math.log(batch_target[t, 2] / anchors[best_n][0]) y_true[b, k, j, i, 3] = math.log(batch_target[t, 3] / anchors[best_n][1]) y_true[b, k, j, i, 4] = 1 y_true[b, k, j, i, c + 5] = 1 else: #----------------------------------------# # tx、ty代表中心调整参数的真实值 #----------------------------------------# y_true[b, k, j, i, 0] = batch_target[t, 0] y_true[b, k, j, i, 1] = batch_target[t, 1] y_true[b, k, j, i, 2] = batch_target[t, 2] y_true[b, k, j, i, 3] = batch_target[t, 3] y_true[b, k, j, i, 4] = 1 y_true[b, k, j, i, c + 5] = 1 #----------------------------------------# # 用于获得xywh的比例 # 大目标loss权重小,小目标loss权重大 #----------------------------------------# box_loss_scale[b, k, j, i] = batch_target[t, 2] * batch_target[t, 3] / in_w / in_h return y_true, noobj_mask, box_loss_scale def get_ignore(self, l, x, y, h, w, targets, scaled_anchors, in_h, in_w, noobj_mask): #-----------------------------------------------------# # 计算一共有多少张图片 #-----------------------------------------------------# bs = len(targets) #-----------------------------------------------------# # 生成网格,先验框中心,网格左上角 #-----------------------------------------------------# grid_x = torch.linspace(0, in_w - 1, in_w).repeat(in_h, 1).repeat( int(bs * len(self.anchors_mask[l])), 1, 1).view(x.shape).type_as(x) grid_y = torch.linspace(0, in_h - 1, in_h).repeat(in_w, 1).t().repeat( int(bs * len(self.anchors_mask[l])), 1, 1).view(y.shape).type_as(x) # 生成先验框的宽高 scaled_anchors_l = np.array(scaled_anchors)[self.anchors_mask[l]] anchor_w = torch.Tensor(scaled_anchors_l).index_select(1, torch.LongTensor([0])).type_as(x) anchor_h = torch.Tensor(scaled_anchors_l).index_select(1, torch.LongTensor([1])).type_as(x) anchor_w = anchor_w.repeat(bs, 1).repeat(1, 1, in_h * in_w).view(w.shape) anchor_h = anchor_h.repeat(bs, 1).repeat(1, 1, in_h * in_w).view(h.shape) #-------------------------------------------------------# # 计算调整后的先验框中心与宽高 #-------------------------------------------------------# pred_boxes_x = torch.unsqueeze(x + grid_x, -1) pred_boxes_y = torch.unsqueeze(y + grid_y, -1) pred_boxes_w = torch.unsqueeze(torch.exp(w) * anchor_w, -1) pred_boxes_h = torch.unsqueeze(torch.exp(h) * anchor_h, -1) pred_boxes = torch.cat([pred_boxes_x, pred_boxes_y, pred_boxes_w, pred_boxes_h], dim = -1) for b in range(bs): #-------------------------------------------------------# # 将预测结果转换一个形式 # pred_boxes_for_ignore num_anchors, 4 #-------------------------------------------------------# pred_boxes_for_ignore = pred_boxes[b].view(-1, 4) #-------------------------------------------------------# # 计算真实框,并把真实框转换成相对于特征层的大小 # gt_box num_true_box, 4 #-------------------------------------------------------# if len(targets[b]) > 0: batch_target = torch.zeros_like(targets[b]) #-------------------------------------------------------# # 计算出正样本在特征层上的中心点 #-------------------------------------------------------# batch_target[:, [0,2]] = targets[b][:, [0,2]] * in_w batch_target[:, [1,3]] = targets[b][:, [1,3]] * in_h batch_target = batch_target[:, :4].type_as(x) #-------------------------------------------------------# # 计算交并比 # anch_ious num_true_box, num_anchors #-------------------------------------------------------# anch_ious = self.calculate_iou(batch_target, pred_boxes_for_ignore) #-------------------------------------------------------# # 每个先验框对应真实框的最大重合度 # anch_ious_max num_anchors #-------------------------------------------------------# anch_ious_max, _ = torch.max(anch_ious, dim = 0) anch_ious_max = anch_ious_max.view(pred_boxes[b].size()[:3]) noobj_mask[b][anch_ious_max > self.ignore_threshold] = 0 return noobj_mask, pred_boxes def weights_init(net, init_type='normal', init_gain = 0.02): def init_func(m): classname = m.__class__.__name__ if hasattr(m, 'weight') and classname.find('Conv') != -1: if init_type == 'normal': torch.nn.init.normal_(m.weight.data, 0.0, init_gain) elif init_type == 'xavier': torch.nn.init.xavier_normal_(m.weight.data, gain=init_gain) elif init_type == 'kaiming': torch.nn.init.kaiming_normal_(m.weight.data, a=0, mode='fan_in') elif init_type == 'orthogonal': torch.nn.init.orthogonal_(m.weight.data, gain=init_gain) else: raise NotImplementedError('initialization method [%s] is not implemented' % init_type) elif classname.find('BatchNorm2d') != -1: torch.nn.init.normal_(m.weight.data, 1.0, 0.02) torch.nn.init.constant_(m.bias.data, 0.0) print('initialize network with %s type' % init_type) net.apply(init_func) def get_lr_scheduler(lr_decay_type, lr, min_lr, total_iters, warmup_iters_ratio = 0.05, warmup_lr_ratio = 0.1, no_aug_iter_ratio = 0.05, step_num = 10): def yolox_warm_cos_lr(lr, min_lr, total_iters, warmup_total_iters, warmup_lr_start, no_aug_iter, iters): if iters = total_iters - no_aug_iter: lr = min_lr else: lr = min_lr + 0.5 * (lr - min_lr) * ( 1.0 + math.cos(math.pi* (iters - warmup_total_iters) / (total_iters - warmup_total_iters - no_aug_iter)) ) return lr def step_lr(lr, decay_rate, step_size, iters): if step_size < 1: raise ValueError("step_size must above 1.") n = iters // step_size out_lr = lr * decay_rate ** n return out_lr if lr_decay_type == "cos": warmup_total_iters = min(max(warmup_iters_ratio * total_iters, 1), 3) warmup_lr_start = max(warmup_lr_ratio * lr, 1e-6) no_aug_iter = min(max(no_aug_iter_ratio * total_iters, 1), 15) func = partial(yolox_warm_cos_lr ,lr, min_lr, total_iters, warmup_total_iters, warmup_lr_start, no_aug_iter) else: decay_rate = (min_lr / lr) ** (1 / (step_num - 1)) step_size = total_iters / step_num func = partial(step_lr, lr, decay_rate, step_size) return func def set_optimizer_lr(optimizer, lr_scheduler_func, epoch): lr = lr_scheduler_func(epoch) for param_group in optimizer.param_groups: param_group['lr'] = lr Yolov3代码的下载和使用你可以通过Auorui/Yolov3-pytorch: Yolov3 (github.com)这里下载。 环境问题可以查看Readme文件: Yolov3-pytorch/YOLOV3/README.md at main · Auorui/Yolov3-pytorch (github.com) 目录大致结构
[1] yolov3网络(DarkNet53)结构详解以及Pytorch代码实现_darknet-53 [2] 目标检测YOLO算法,先从yolov1开始_夏天是冰红茶的博客-CSDN博客 |

【本文地址】
今日新闻 |
推荐新闻 |