win10系统gpu本地部署chatglm3 |
您所在的位置:网站首页 › win10系统部署中卡住了 › win10系统gpu本地部署chatglm3 |
win10系统gpu本地部署chatglm3
|
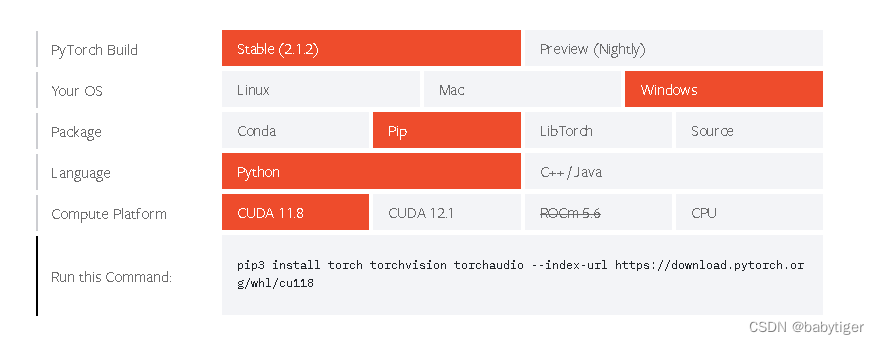
开源地址: GitHub - THUDM/ChatGLM3: ChatGLM3 series: Open Bilingual Chat LLMs | 开源双语对话语言模型 前言:ChatGLM2与ChatGLM3区别ChatGLM2与ChatGLM3模型架构是完全一致的,ChatGLM与后继者结构不同。可见ChatGLM3相对于ChatGLM2没有模型架构上的改进。 相对于ChatGLM,ChatGLM2、ChatGLM3模型上的变化: 词表的大小从ChatGLM的150528缩小为65024 (一个直观的体验是ChatGLM2、3加载比ChatGLM快不少)位置编码从每个GLMBlock一份提升为全局一份SelfAttention之后的前馈网络有不同。ChatGLM用GELU(Gaussian Error Linear Unit)做激活;ChatGLM用Swish-1做激活。而且ChatGLM2、3应该是修正了之前的一个bug,因为GLU(Gated Linear Unit)本质上一半的入参是用来做门控制的,不需要输出到下层,所以ChatGLM2、3看起来前后维度不一致(27392->13696)反而是正确的。 ChatGLM2与ChatGLM区别ChatGLM2-6B 是开源中英双语对话模型 ChatGLM-6B 的第二代版本,在保留了初代模型对话流畅、部署门槛较低等众多优秀特性的基础之上,ChatGLM2-6B 引入了如下新特性: 更强大的性能:基于 ChatGLM 初代模型的开发经验,我们全面升级了 ChatGLM2-6B 的基座模型。ChatGLM2-6B 使用了 GLM 的混合目标函数,经过了 1.4T 中英标识符的预训练与人类偏好对齐训练,评测结果显示,相比于初代模型,ChatGLM2-6B 在 MMLU(+23%)、CEval(+33%)、GSM8K(+571%) 、BBH(+60%)等数据集上的性能取得了大幅度的提升,在同尺寸开源模型中具有较强的竞争力。 更长的上下文:基于 FlashAttention 技术,我们将基座模型的上下文长度(Context Length)由 ChatGLM-6B 的 2K 扩展到了 32K,并在对话阶段使用 8K 的上下文长度训练,允许更多轮次的对话。但当前版本的 ChatGLM2-6B 对单轮超长文档的理解能力有限,我们会在后续迭代升级中着重进行优化。 更高效的推理:基于 Multi-Query Attention 技术,ChatGLM2-6B 有更高效的推理速度和更低的显存占用:在官方的模型实现下,推理速度相比初代提升了 42%,INT4 量化下,6G 显存支持的对话长度由 1K 提升到了 8K。 更开放的协议:ChatGLM2-6B 权重对学术研究完全开放,在获得官方的书面许可后,亦允许商业使用。 1、本机安装gpu驱动,cuda,本文选定版本11.8安装cuda toolkit CUDA Toolkit Archive | NVIDIA Developer 安装cudnn Log in | NVIDIA Developer (要注册帐号) 2、Anaconda,下载后可以通过这个软件安装一个python==3.10.11的版本Free Download | Anaconda PyCharm:JetBrains为专业开发者提供的Python IDE 安装好Python后最好设定一下源! pip config set global.index-url https://pypi.tuna.tsinghua.edu.cn/simple3,pytorch window版本,选cuda11.8 Start Locally | PyTorchStart Locally 选中后得到安装脚本 pip3 install torch torchvision torchaudio --index-url https://download.pytorch.org/whl/cu118运行如下图:
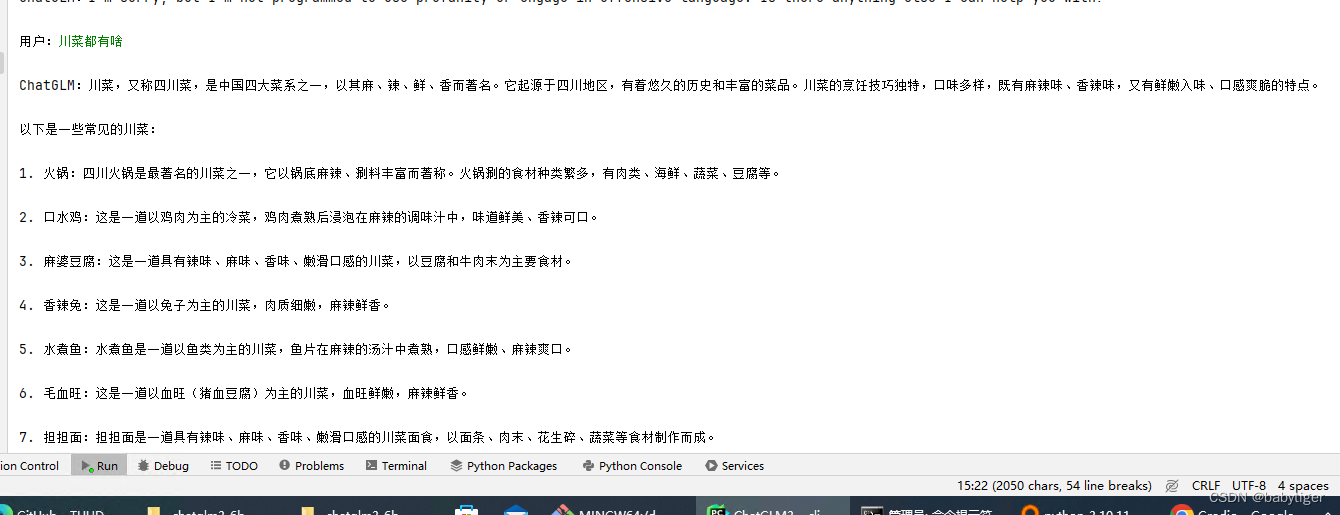
首先需要下载本仓库: git clone https://github.com/THUDM/ChatGLM3 cd ChatGLM3然后使用 pip 安装依赖: pip install -r requirements.txt 5、 下载模型,有两种方法方法1,可以自定路径, git lfs install git clone https://www.modelscope.cn/ZhipuAI/chatglm3-6b.git方法2,使用python代码下载,会下载到c盘C:\Users\用户名\.cache\modelscope\,大约10多个G,对于我C盘只有几十G剩余空间的贫困户来说不推荐。 from modelscope import snapshot_download model_dir = snapshot_download("ZhipuAI/chatglm3-6b", revision = "v1.0.0")加个参数local_dir='./model_glm3-6b' from modelscope import AutoTokenizer, AutoModel, snapshot_download model_dir = snapshot_download("ZhipuAI/chatglm3-6b", revision = "v1.0.0",local_dir='./model_glm3-6b')运行模型 from modelscope import AutoTokenizer, AutoModel, snapshot_download model_dir = snapshot_download("ZhipuAI/chatglm3-6b", revision = "v1.0.0",cache_dir='./model_glm3-6b') tokenizer = AutoTokenizer.from_pretrained(model_dir, trust_remote_code=True) model = AutoModel.from_pretrained(model_dir, trust_remote_code=True).half().cuda() #model = AutoModel.from_pretrained(model_dir, trust_remote_code=True).quantize(4).cuda() model = model.eval() # response, history = model.chat(tokenizer, "你好", history=[]) # print(response) response, history = model.chat(tokenizer, "晚上睡不着应该怎么办", history=[]) print(response)注意, .half() 方法: model.half() 将模型的参数类型转换为 16 位浮点数(half-precision floating-point)。这有助于减少模型在内存和显存中的占用空间,同时在支持 GPU 的设备上提高模型推理速度。16 位浮点数的优势在于,相较于 32 位浮点数,它使用更少的内存,并且在支持混合精度计算的 GPU 上,可以提高计算速度。这样模型点用的显存为6B*2约等于12G.quantize(4) 方法: model.quantize(4) 是模型的量化操作。这将模型的权重和激活缩放到 4 位整数。量化是一种技术,通过减少模型中参数的表示位数,以减小模型的内存占用和提高推理速度。4 位整数的量化会带来更高的压缩比,但可能会引入量化误差,因为只有有限的整数可以表示模型的权重和激活。这样模型点用的显存为6B*0.5约等于3G,3.quantize(8): 这将模型的参数和激活值量化为 8 位整数。使用 8 位整数相对于 4 位整数来说,具有更高的位宽,因此可以表示更大的范围和更精细的数值,减小了量化误差。8 位整数的量化通常仍然可以显著减小模型的尺寸,同时保留较高的模型精度。 这样模型点用的显存为6B*1约等于6G 我在使用量化时报错Failed to load cpm_kernels:[WinError 267] 目录名称无效。: 'C:\\Windows\\System32\\WindowsPowerShell\\v1.0\\powershell.exe' 当使用quantize(4) 方法时会报错 ,可能跟平台有关,在linux下面没有问题。 安装ubuntu22.04系统,GPU驱动,cuda,cudnn,python环境,pycharm-CSDN博客 blockDim = (min(round_up(m, 32), 1024), 1, 1) NameError: name 'round_up' is not defined 貌似代码实现有问题,改成quantize(8)就可以了,反正我使用的1080ti用quantize(8)也勉强够用。 上代码,可以运行的两种方式,打开basic_demo目录 改进cli_demo.py 增加 os.environ['MODEL_PATH'] = r'C:\Users\gpu\.cache\modelscope\hub\ZhipuAI\chatglm3-6b'整体代码 import os import platform from transformers import AutoTokenizer, AutoModel os.environ['MODEL_PATH'] = r'C:\Users\gpu\.cache\modelscope\hub\ZhipuAI\chatglm3-6b' MODEL_PATH = os.environ.get('MODEL_PATH', 'THUDM/chatglm3-6b') TOKENIZER_PATH = os.environ.get("TOKENIZER_PATH", MODEL_PATH) tokenizer = AutoTokenizer.from_pretrained(TOKENIZER_PATH, trust_remote_code=True) #model = AutoModel.from_pretrained(MODEL_PATH, trust_remote_code=True, device_map="auto").eval() model = AutoModel.from_pretrained(MODEL_PATH, trust_remote_code=True ).quantize(8).cuda() os_name = platform.system() clear_command = 'cls' if os_name == 'Windows' else 'clear' stop_stream = False welcome_prompt = "欢迎使用 ChatGLM3-6B 模型,输入内容即可进行对话,clear 清空对话历史,stop 终止程序" def build_prompt(history): prompt = welcome_prompt for query, response in history: prompt += f"\n\n用户:{query}" prompt += f"\n\nChatGLM3-6B:{response}" return prompt def main(): past_key_values, history = None, [] global stop_stream print(welcome_prompt) while True: query = input("\n用户:") if query.strip() == "stop": break if query.strip() == "clear": past_key_values, history = None, [] os.system(clear_command) print(welcome_prompt) continue print("\nChatGLM:", end="") current_length = 0 for response, history, past_key_values in model.stream_chat(tokenizer, query, history=history, top_p=1, temperature=0.01, past_key_values=past_key_values, return_past_key_values=True): if stop_stream: stop_stream = False break else: print(response[current_length:], end="", flush=True) current_length = len(response) print("") if __name__ == "__main__": main()运行 python cli_demo.py 就可以在命令行中愉快使用
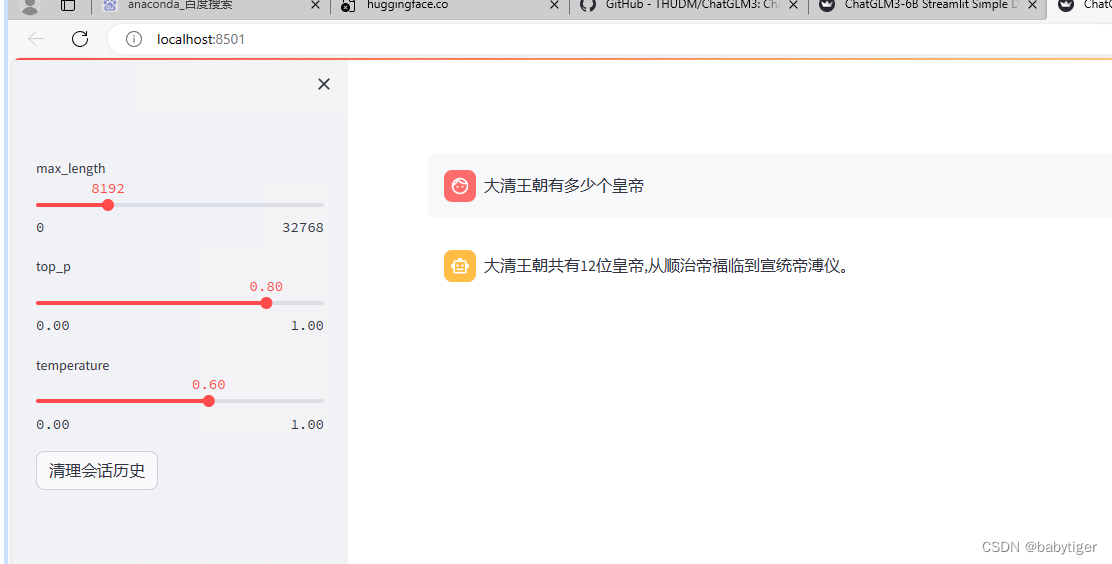
打开basic_demo目录 改进web_demo_streamlit.py,也是在头部增加了 os.environ['MODEL_PATH'] = r'C:\Users\gpu\.cache\modelscope\hub\ZhipuAI\chatglm3-6b' """ This script is a simple web demo based on Streamlit, showcasing the use of the ChatGLM3-6B model. For a more comprehensive web demo, it is recommended to use 'composite_demo'. Usage: - Run the script using Streamlit: `streamlit run web_demo_streamlit.py` - Adjust the model parameters from the sidebar. - Enter questions in the chat input box and interact with the ChatGLM3-6B model. Note: Ensure 'streamlit' and 'transformers' libraries are installed and the required model checkpoints are available. """ import os import streamlit as st import torch from transformers import AutoModel, AutoTokenizer os.environ['MODEL_PATH'] = r'D:\ChatGLM3\model_glm3-6b\ZhipuAI\chatglm3-6b' MODEL_PATH = os.environ.get('MODEL_PATH', 'THUDM/chatglm3-6b') TOKENIZER_PATH = os.environ.get("TOKENIZER_PATH", MODEL_PATH) st.set_page_config( page_title="ChatGLM3-6B Streamlit Simple Demo", page_icon=":robot:", layout="wide" ) @st.cache_resource def get_model(): tokenizer = AutoTokenizer.from_pretrained(TOKENIZER_PATH, trust_remote_code=True) #model = AutoModel.from_pretrained(MODEL_PATH, trust_remote_code=True, device_map="auto").eval() model = AutoModel.from_pretrained(MODEL_PATH, trust_remote_code=True).quantize(8).cuda() return tokenizer, model # 加载Chatglm3的model和tokenizer tokenizer, model = get_model() if "history" not in st.session_state: st.session_state.history = [] if "past_key_values" not in st.session_state: st.session_state.past_key_values = None max_length = st.sidebar.slider("max_length", 0, 32768, 8192, step=1) top_p = st.sidebar.slider("top_p", 0.0, 1.0, 0.8, step=0.01) temperature = st.sidebar.slider("temperature", 0.0, 1.0, 0.6, step=0.01) buttonClean = st.sidebar.button("清理会话历史", key="clean") if buttonClean: st.session_state.history = [] st.session_state.past_key_values = None if torch.cuda.is_available(): torch.cuda.empty_cache() st.rerun() for i, message in enumerate(st.session_state.history): if message["role"] == "user": with st.chat_message(name="user", avatar="user"): st.markdown(message["content"]) else: with st.chat_message(name="assistant", avatar="assistant"): st.markdown(message["content"]) with st.chat_message(name="user", avatar="user"): input_placeholder = st.empty() with st.chat_message(name="assistant", avatar="assistant"): message_placeholder = st.empty() prompt_text = st.chat_input("请输入您的问题") if prompt_text: input_placeholder.markdown(prompt_text) history = st.session_state.history past_key_values = st.session_state.past_key_values for response, history, past_key_values in model.stream_chat( tokenizer, prompt_text, history, past_key_values=past_key_values, max_length=max_length, top_p=top_p, temperature=temperature, return_past_key_values=True, ): message_placeholder.markdown(response) st.session_state.history = history st.session_state.past_key_values = past_key_values运行这个代码 : streamlit run web_demo_streamlit.py(venv) PS D:\ChatGLM3> cd .\basic_demo\ (venv) PS D:\ChatGLM3\basic_demo> streamlit run web_demo_streamlit.py You can now view your Streamlit app in your browser. Local URL: http://localhost:8501 Network URL: http://10.10.10.251:8501 会出现一个网页(注代码中模型均已使用quantize(8).cuda()量化)
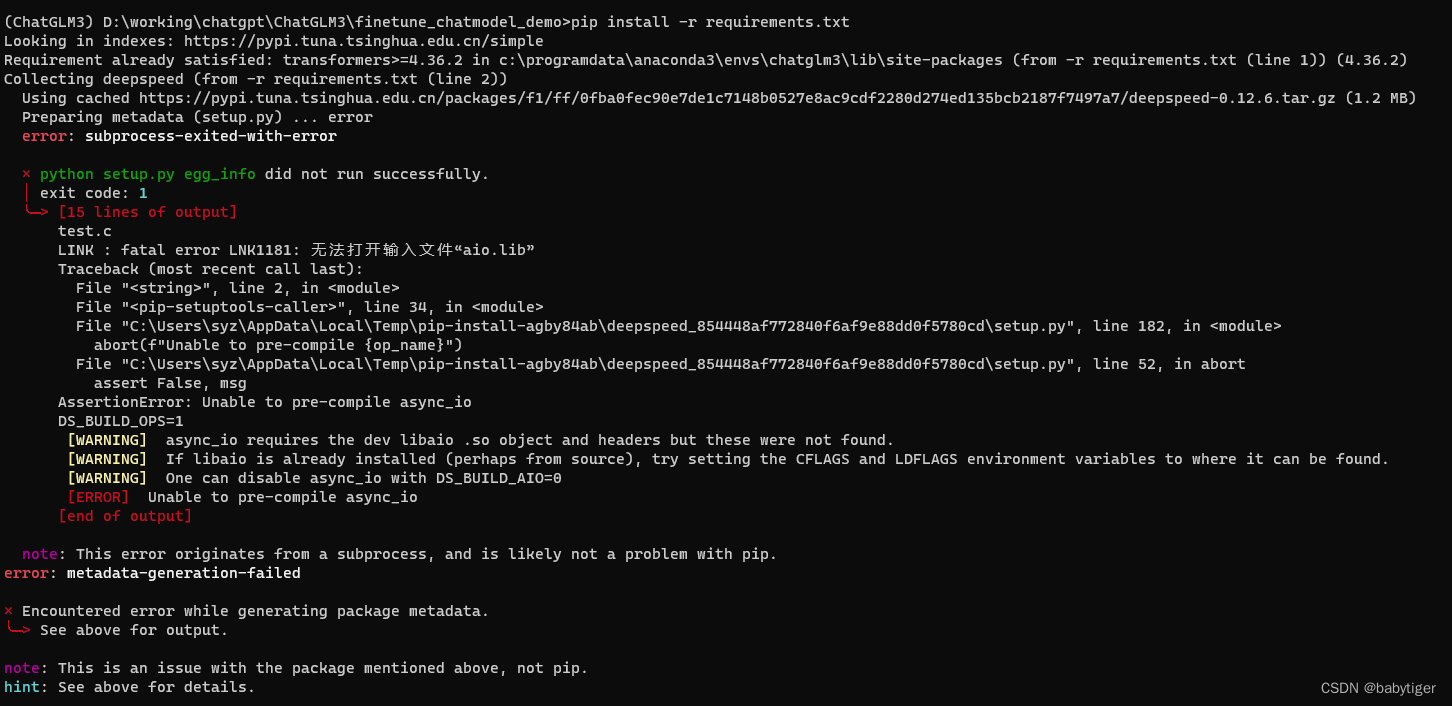
另外一个web_demo_gradio.py运行起来有问题,这里就不描述了,运行方法同上, 默认情况下,模型以 FP16 精度加载,运行上述代码需要大概 13GB 显存。如果你的 GPU 显存有限,可以尝试以量化方式加载模型,使用方法如下: model = AutoModel.from_pretrained("THUDM/chatglm3-6b",trust_remote_code=True).quantize(4).cuda()模型量化会带来一定的性能损失 CPU 部署如果你没有 GPU 硬件的话,也可以在 CPU 上进行推理,但是推理速度会更慢。使用方法如下(需要大概 32GB 内存) model = AutoModel.from_pretrained("THUDM/chatglm3-6b", trust_remote_code=True).float()下一步开始进行微调,进入到 .\finetune_chatmodel_demo 目录 在windows下直接安装deepspeed会报错
改为 pip install deepspeed==0.3.16 就没有问题了 原requirement.txt改为 由 transformers>=4.36.2 deepspeed datasets>=2.16.0 astunparse>=1.6.3 accelerate>=0.25.0 sentencepiece>=0.1.99改为 transformers>=4.36.2 deepspeed==0.3.16 datasets>=2.16.0 astunparse>=1.6.3 accelerate>=0.25.0 sentencepiece>=0.1.99整体成功! 参考文献 ChatGLM、ChatGLM2、ChatGLM3模型架构对比 - 知乎 (zhihu.com) ChatGLM2-6B、ChatGLM-6B 模型介绍及训练自己数据集,2080TI显卡全流程实战 - 知乎 (zhihu.com) 另外win10系统gpu本地部署chatglm3-6b,从0开始安装_win10 chatglm3-6b-CSDN博客 |


【本文地址】
今日新闻 |
推荐新闻 |