Android实现BMP和PNG转换为JPEG格式 |
您所在的位置:网站首页 › webp转换jpg工具安卓 › Android实现BMP和PNG转换为JPEG格式 |
Android实现BMP和PNG转换为JPEG格式
|
项目需求,需要把BMP24位的图片转换成jpeg的格式,在网上查询了一些不同格式图片的基本知识,加以总结,实现了一个简单的Demo程序,先贴代码,然后再进行理解 picSwitcher.java文件: package com.example.bmptojpeg; import java.io.DataInputStream; import java.io.FileInputStream; import java.io.FileOutputStream; import java.io.File; import android.graphics.Bitmap; import android.graphics.BitmapFactory; import android.graphics.ImageFormat; import android.graphics.Rect; import android.graphics.YuvImage; import android.util.Log; public class picSwitcher { //picture type public static int BMP_TYPE = 100; public static int JPEG_TYPE = 101; public static int PNG_TYPE = 102; public static int UNKNOW = 104; //BMP type public static int BMP_DEEP_1 = 200; public static int BMP_DEEP_4 = 201; public static int BMP_DEEP_8 = 202; public static int BMP_DEEP_16 = 203; public static int BMP_DEEP_24 = 204; public static int BMP_DEEP_32 = 205; public static String TAG = "picSwitcher"; private int[] picInfo; public static int mFileType; private String mPath; public picSwitcher(String path){ mPath = path; } public void init(){ if(isBmpFile(mPath)){ mFileType = BMP_TYPE; picInfo = getBmpInfo(mPath); Log.i(TAG, "width = " + picInfo[0] + " height = " + picInfo[1]); }else if(isJpegFile(mPath)){ mFileType = JPEG_TYPE; }else if(isPngFile(mPath)){ picInfo = getPngInfo(mPath); Log.i(TAG, "width = " + picInfo[0] + " height = " + picInfo[1]); mFileType = PNG_TYPE; }else{ mFileType = UNKNOW; } Log.i(TAG, "type = " + mFileType); } public int getBmpType(String path){ int type = UNKNOW; try { FileInputStream fis = new FileInputStream(path); DataInputStream dis = new DataInputStream(fis); int bflen = 2; byte bf[] = new byte[bflen]; dis.skipBytes(28); dis.read(bf, 0, bflen); dis.close(); fis.close(); int deepFlag = byteToInt(bf); switch (deepFlag) { case 1: type = BMP_DEEP_1; break; case 4: type = BMP_DEEP_4; break; case 8: type = BMP_DEEP_8; break; case 16: type = BMP_DEEP_16; break; case 24: type = BMP_DEEP_24; break; case 32: type = BMP_DEEP_32; break; default: type = UNKNOW; break; } } catch (Exception e) { } return type; } public boolean isPngFile(String path){ boolean reasult = true; try { FileInputStream fis = new FileInputStream(path); DataInputStream dis = new DataInputStream(fis); int flag = dis.readInt(); dis.close(); fis.close(); Log.i(TAG, "flag = " + flag); if(flag != 0x89504E47){ reasult = false; } } catch (Exception e) { reasult = false; } return reasult; } //根据前两个字节来判断‘FFD8’ public boolean isJpegFile(String path){ boolean reasult = true; try { FileInputStream fis = new FileInputStream(path); DataInputStream dis = new DataInputStream(fis); int bflen = 2; byte bf[] = new byte[bflen]; dis.read(bf, 0, bflen); dis.close(); fis.close(); if(byteToInt(bf) != 0xD8FF){ reasult = false; } } catch (Exception e) { reasult = false; Log.i(TAG, "Exception: " + e); } return reasult; } //根据前两个字节来判断 BMP为‘BM’ private boolean isBmpFile(String path){ boolean reasult = true; try { FileInputStream fis = new FileInputStream(path); DataInputStream dis = new DataInputStream(fis); int bflen = 2; byte bf[] = new byte[bflen]; dis.read(bf, 0, bflen); dis.close(); fis.close(); if(byteToInt(bf) != 0x4D42){ reasult = false; } dis.close(); fis.close(); } catch (Exception e) { reasult = false; Log.i(TAG, "Exception: " + e); } return reasult; } //18-21位表示width,22-25位表示height private int[] getBmpInfo(String path){ try { FileInputStream fis = new FileInputStream(path); DataInputStream dis = new DataInputStream(fis); int bflen = 8; dis.skipBytes(18); byte bf[] = new byte[bflen]; dis.read(bf, 0, bflen); dis.close(); fis.close(); return byteToInt2(bf); }catch (Exception e) {} return null; } //16-19位表示width,20-23位表示height private int[] getPngInfo(String path){ try { int []info = new int[2]; FileInputStream fis = new FileInputStream(path); DataInputStream dis = new DataInputStream(fis); dis.skipBytes(16); info[0] = dis.readInt(); info[1] = dis.readInt(); dis.close(); fis.close(); return info; }catch (Exception e) {} return null; } //bmp 小端序转换成int类型 private int byteToInt(byte [] bt){ int t; t = bt[0] & 0xFF; t |= (((int) bt[1] > 0; // RGB转换成YUV的公式 Y = ((66 * R + 129 * G + 25 * B + 128) >> 8) + 16; U = ((-38 * R - 74 * G + 112 * B + 128) >> 8) + 128; V = ((112 * R - 94 * G - 18 * B + 128) >> 8) + 128; //写数据,每个像素YYYYUV yuv420sp[yIndex++] = (byte) ((Y < 0) ? 0 : ((Y > 255) ? 255 : Y)); if (j % 2 == 0 && index % 2 == 0) { yuv420sp[uvIndex++] = (byte) ((V < 0) ? 0 : ((V > 255) ? 255 : V)); yuv420sp[uvIndex++] = (byte) ((U < 0) ? 0 : ((U > 255) ? 255 : U)); } index++; } } } //将YUV转换成jpeg格式 private boolean yuvToJpeg(byte [] yuv, String dst){ boolean reasult = true; try{ File jpegFile = new File(dst); if(jpegFile.exists()){ jpegFile.delete(); }else{ jpegFile.createNewFile(); } FileOutputStream fos = new FileOutputStream(jpegFile); Rect rect = new Rect(0, 0, picInfo[0], picInfo[1]); YuvImage image = new YuvImage(yuv, ImageFormat.NV21, picInfo[0], picInfo[1], null); image.compressToJpeg(rect, 100, fos); fos.close(); }catch(Exception e){ reasult = false; Log.i(TAG, "Exception: " + e); } return reasult; } //其他格式转换成jpeg public boolean toJpeg( String dst){ byte[] yuv = bmpToYuv(mPath); return yuvToJpeg(yuv, dst); } }
测试部分,比较简单 MainActivity.java文件: package com.example.bmptojpeg; import android.app.Activity; import android.os.Bundle; import android.util.Log; public class MainActivity extends Activity { private picSwitcher bs; private String src = "/data/local/logo.bmp"; private String dst = "/data/local/boot0.jpg"; @Override protected void onCreate(Bundle savedInstanceState) { super.onCreate(savedInstanceState); setContentView(R.layout.activity_main); bs = new picSwitcher(src); bs.init(); if(bs.mFileType == bs.BMP_TYPE){ bs.toJpeg(dst); }else if(bs.mFileType == bs.PNG_TYPE){ bs.toJpeg(dst); }else if(bs.mFileType == bs.JPEG_TYPE){ Log.i("picSwitcher", "type is jpeg, doNothing"); } } }代码的大概流程如下图,不过只做了从BMP转换到JPEG格式的部分(红色部分) 要理解这部分的流程,必须要知道bmp的文件格式:
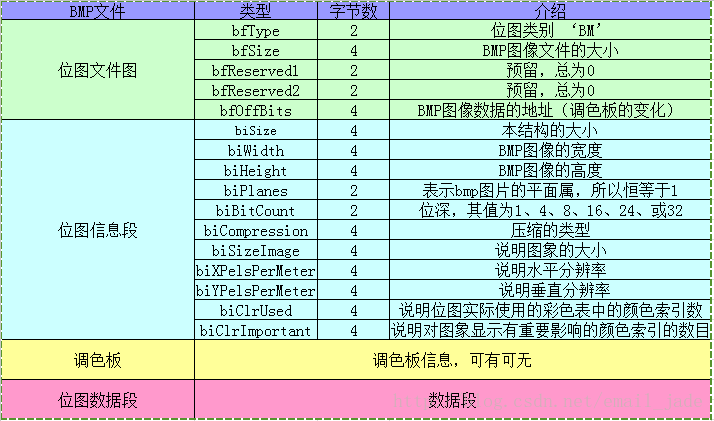
重要说一下代码里面用到的部分: 0-1位:bmp格式的图片为‘BM’,可作为改格式的判断根据 18-21位表示图片的宽width 22-25位表示图片的高height 代码里还涉及到png转jpeg的部分,做简单介绍,720P(1920*1080)png的文件打开后如下 将PNG和BMP的图片宽高数据比较会发现,数据存储的模式不一样,BMP为小端模式存储,而PNG为大端模式存储,所以在读取宽高数据的时候要做相应的转换 剩余知识可以根据代码来理解,参考雷神博客基础篇 http://blog.csdn.net/leixiaohua1020/article/details/50534150 下面简单写下其他格式转换成BMP的思路: //通过BitmapFactory.decodeFile(path)得到Bitmap数据 Bitmap bitmap=BitmapFactory.decodeFile(path); //然后根据以上的BMP头消息来填充 public void saveBmp(Bitmap bitmap ,String filename) { if (bitmap == null) return; // 位图大小 int nBmpWidth = bitmap.getWidth(); int nBmpHeight = bitmap.getHeight(); // 图像数据大小 int bufferSize = nBmpHeight * (nBmpWidth * 3 + nBmpWidth % 4); try { File file = new File(filename); Log.w(TAG,"------File : " +filename ); if (!file.exists()) { Log.w(TAG,"- not exist-----File : " +filename ); file.createNewFile(); } else{ file.delete(); } FileOutputStream fileos = new FileOutputStream(filename); // bmp文件头 int bfType = 0x4d42; long bfSize = 14 + 40 + bufferSize; int bfReserved1 = 0; int bfReserved2 = 0; long bfOffBits = 14 + 40; // 保存bmp文件头 writeWord(fileos, bfType); writeDword(fileos, bfSize); writeWord(fileos, bfReserved1); writeWord(fileos, bfReserved2); writeDword(fileos, bfOffBits); // bmp信息头 long biSize = 40L; long biWidth = nBmpWidth; long biHeight = nBmpHeight; int biPlanes = 1; int biBitCount = 24; long biCompression = 0L; long biSizeImage = 0L; long biXpelsPerMeter = 0L; long biYPelsPerMeter = 0L; long biClrUsed = 0L; long biClrImportant = 0L; // 保存bmp信息头 writeDword(fileos, biSize); writeLong(fileos, biWidth); writeLong(fileos, biHeight); writeWord(fileos, biPlanes); writeWord(fileos, biBitCount); writeDword(fileos, biCompression); writeDword(fileos, biSizeImage); writeLong(fileos, biXpelsPerMeter); writeLong(fileos, biYPelsPerMeter); writeDword(fileos, biClrUsed); writeDword(fileos, biClrImportant); // 像素扫描 byte bmpData[] = new byte[bufferSize]; int wWidth = (nBmpWidth * 3 + nBmpWidth % 4); for (int nCol = 0, nRealCol = nBmpHeight - 1; nCol < nBmpHeight; ++nCol, --nRealCol) for (int wRow = 0, wByteIdex = 0; wRow < nBmpWidth; wRow++, wByteIdex += 3) { int clr = bitmap.getPixel(wRow, nCol); bmpData[nRealCol * wWidth + wByteIdex] = (byte) Color.blue(clr); bmpData[nRealCol * wWidth + wByteIdex + 1] = (byte) Color.green(clr); bmpData[nRealCol * wWidth + wByteIdex + 2] = (byte) Color.red(clr); } fileos.write(bmpData); fileos.flush(); fileos.close(); } catch (FileNotFoundException e) { e.printStackTrace(); } catch (IOException e) { e.printStackTrace(); } } //其中writeDword等代表按小端序的模式写入对应的数据字节数,给一个简单的例子 public static void writeLong(FileOutputStream stream, long value) throws IOException { byte[] b = new byte[4]; b[0] = (byte) (value & 0xff); b[1] = (byte) (value >> 8 & 0xff); b[2] = (byte) (value >> 16 & 0xff); b[3] = (byte) (value >> 24 & 0xff); stream.write(b); }以后有空再继续研究,完善! |
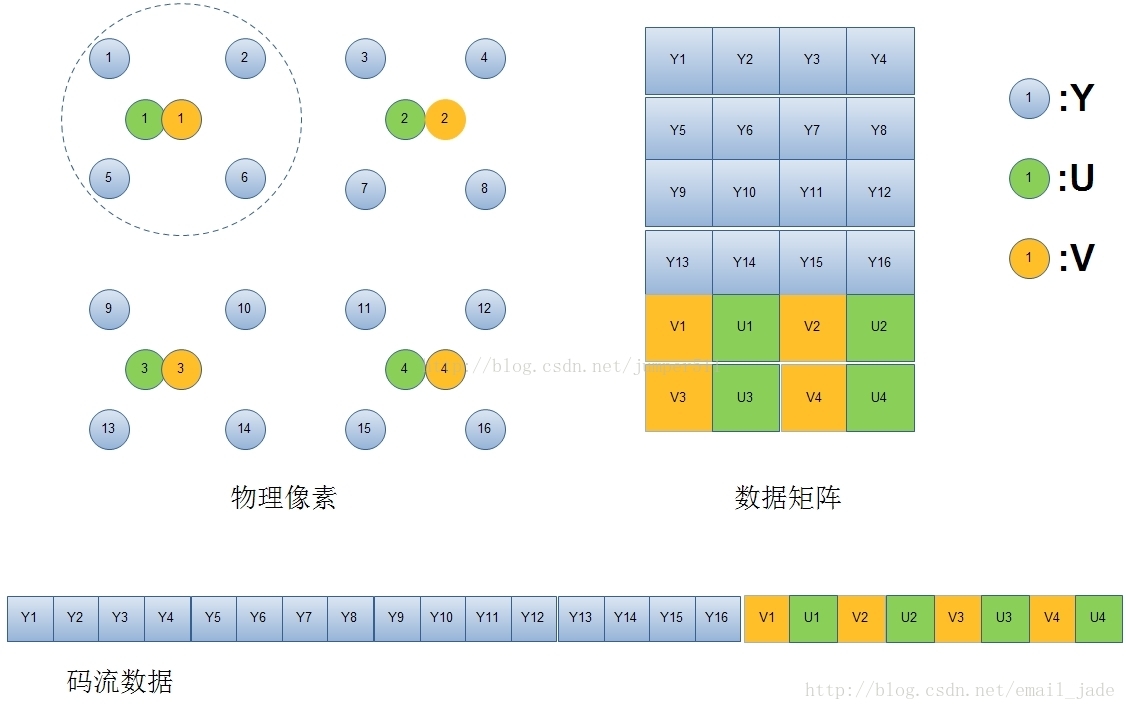 ImageFormat.NV21的YUV分量存储格式如上图,对应encodeYUV420SP的算法
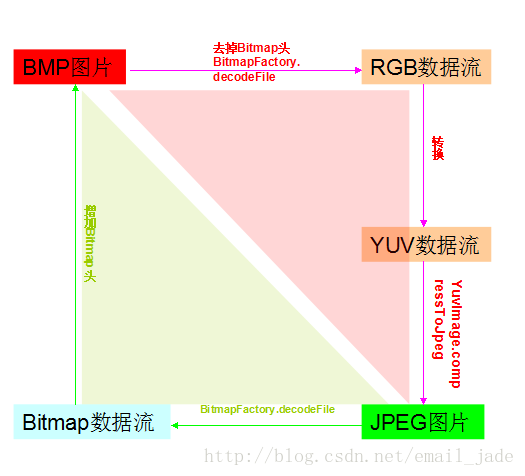
 随意找了一个720P(1920*1080)bmp的文件打开后如下
  红色部分代表的是图片的宽和高
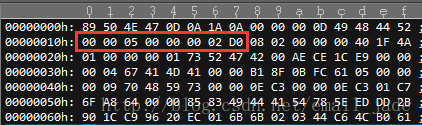 红色部分代表的是图片的宽和高
【本文地址】
今日新闻 |
推荐新闻 |