(源码篇02)webpack5中的事件调度系统和NormalModuleFactary核心逻辑 |
您所在的位置:网站首页 › webpack5和webpack4 › (源码篇02)webpack5中的事件调度系统和NormalModuleFactary核心逻辑 |
(源码篇02)webpack5中的事件调度系统和NormalModuleFactary核心逻辑
|
1. 书接上回,从 this.factorizeQueue.add(options, callback); 开始
不是很清楚上下文的兄弟,可以去看下我之前写的 (源码篇01)浅析webpack5中Compiler中重要的hook调用过程。 此文比较干,各位读者开始阅读前,请准备好 瓜子,可乐,矿泉水,好好享受阅读源码的乐趣。  1.1 通过 factorizeQueue 了解 AsyncQueue
那么 这个 this.factorizeQueue 指的是什么呢?谁来创建的呢?首先此处的this 指的是 Compilation 的 实例对象,那就去 Compilation 查找,全局搜索一下 Compilation.js 文件,找到了,代码如下(中文注释是我加的): /** @type {AsyncQueue} 进程依赖项队列 */ this.processDependenciesQueue = new AsyncQueue({ name: "processDependencies", parallelism: options.parallelism || 100, processor: this._processModuleDependencies.bind(this) }); /** @type {AsyncQueue} 添加模块队列 */ this.addModuleQueue = new AsyncQueue({ name: "addModule", parent: this.processDependenciesQueue, getKey: module => module.identifier(), processor: this._addModule.bind(this) }); /** @type {AsyncQueue} 分解队列 */ this.factorizeQueue = new AsyncQueue({ name: "factorize", parent: this.addModuleQueue, processor: this._factorizeModule.bind(this) }); /** @type {AsyncQueue} 构建队列 */ this.buildQueue = new AsyncQueue({ name: "build", parent: this.factorizeQueue, processor: this._buildModule.bind(this) }); /** @type {AsyncQueue} 重新构建的队列 */ this.rebuildQueue = new AsyncQueue({ name: "rebuild", parallelism: options.parallelism || 100, processor: this._rebuildModule.bind(this) });你会发现好家伙,这不仅仅只有一个队列呀,这里是有一堆的队列。但是都是 AsyncQueue 创建的不同名称的实例。 那根据 this.factorizeQueue.add(options, callback); 我们下一步就是去看 AsyncQueue 中的 add 方法了。 1.2 深入 AsyncQueue 中的 add 方法在深入了解add 之前,我们先要了解 它的 构造函数都需要哪些参数,以便我们更好的理解其内部的工作原理。 constructor({ name, parallelism, parent, processor, getKey }) { this._name = name; this._parallelism = parallelism || 1; this._processor = processor; this._getKey = getKey || /** @type {(T) => K} */ (item => /** @type {any} */ (item)); /** @type {Map} */ this._entries = new Map(); /** @type {ArrayQueue} */ this._queued = new ArrayQueue(); /** @type {AsyncQueue[]} */ this._children = undefined; this._activeTasks = 0; this._willEnsureProcessing = false; this._needProcessing = false; this._stopped = false; this._root = parent ? parent._root : this; if (parent) { if (this._root._children === undefined) { this._root._children = [this]; } else { this._root._children.push(this); } }this.hooks = { /** @type {AsyncSeriesHook} */ beforeAdd: new AsyncSeriesHook(["item"]), /** @type {SyncHook} */ added: new SyncHook(["item"]), /** @type {AsyncSeriesHook} */ beforeStart: new AsyncSeriesHook(["item"]), /** @type {SyncHook} */ started: new SyncHook(["item"]), /** @type {SyncHook} */ result: new SyncHook(["item", "error", "result"]) }; this._ensureProcessing = this._ensureProcessing.bind(this); } 入参如下:name, parallelism, parent, processor, getKey。name 字段是绑在实例身上的 _name,_parallelism 先忽略,parent 属性是比较重要的, 有 parent属性的情况下,实例的 this._root 指向的是 父级的 parent._root,否则指向的就是实例本身。并且会把自身丢进 父级的 this._root._children 里。 (另外在此构造函数里的 hooks就是给当前实例绑定一些执行周期的钩子,比较容易扩展,都是老 webpack玩家了,这里就不过多的介绍了。这里要注意 新建实例的 _willEnsureProcessing,_needProcessing和 _stopped 默认值都是 false 状态。) 分析一下 1.1 中的代码: this.addModuleQueue = new AsyncQueue({ name: "addModule", parent: this.processDependenciesQueue, getKey: module => module.identifier(), processor: this._addModule.bind(this)});this.factorizeQueue = new AsyncQueue({ name: "factorize", parent: this.addModuleQueue, processor: this._factorizeModule.bind(this)});this.buildQueue = new AsyncQueue({ name: "build", parent: this.factorizeQueue, processor: this._buildModule.bind(this)}); this.addModuleQueue 中的 _root 指向的是 this.processDependenciesQueue._root,也就是 processDependenciesQueue自身, this.factorizeQueue 中的 _root 指向的是 this.addModuleQueue._root,而 this.addModuleQueue._root 指向的是 processDependenciesQueue this.buildQueue 中的 _root 指向的是 this.factorizeQueue._root,而 this.factorizeQueue._root 指向的是 processDependenciesQueue这意味着上面创建的队列中的 父子关系是如下图的: 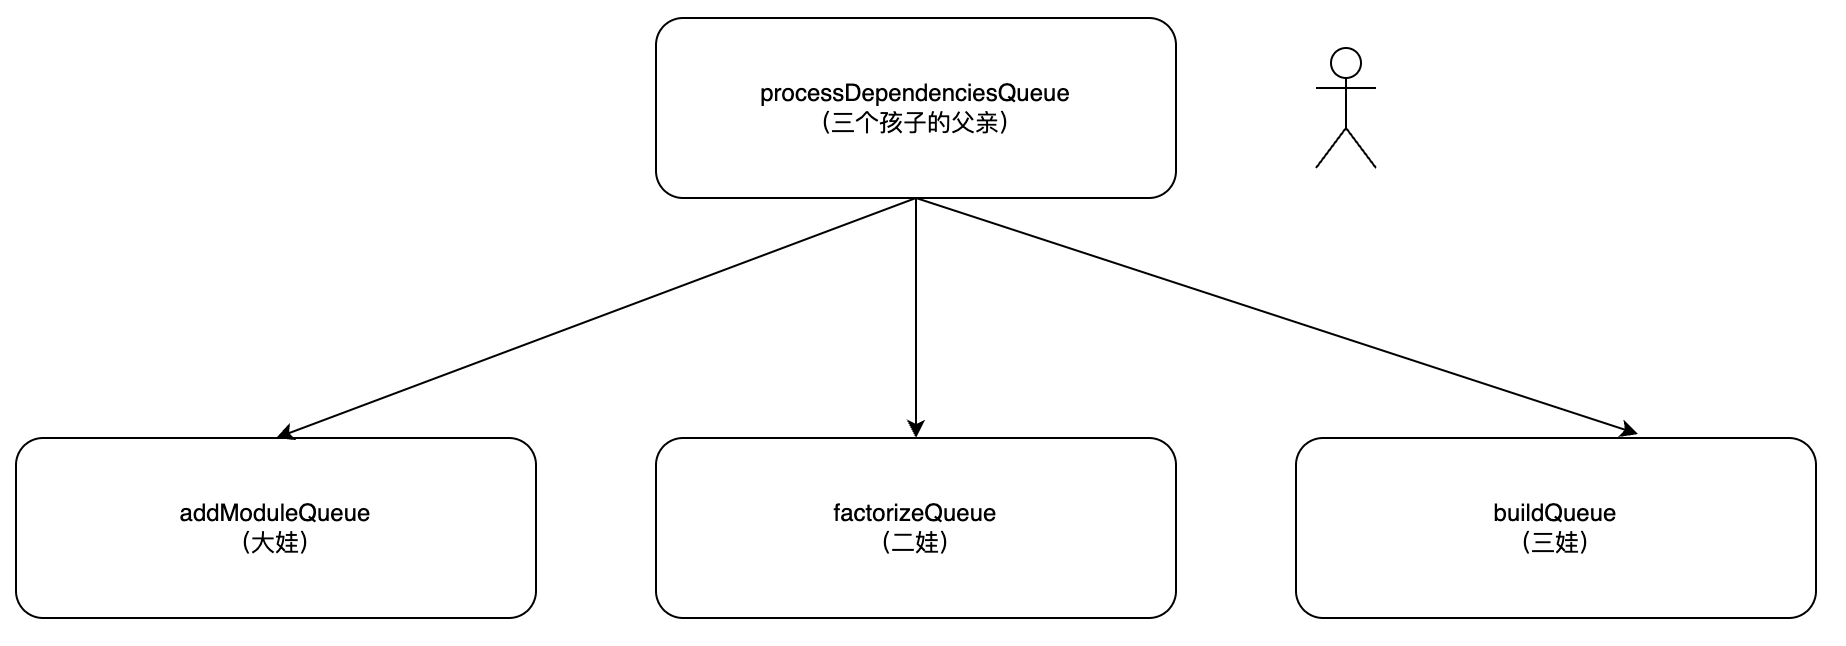
知道了父子关系以后,就开始看 add 函数具体执行了什么操作,直接断点到这里,看下入参都是什么?(记不着的兄弟去看我前一篇文章。) 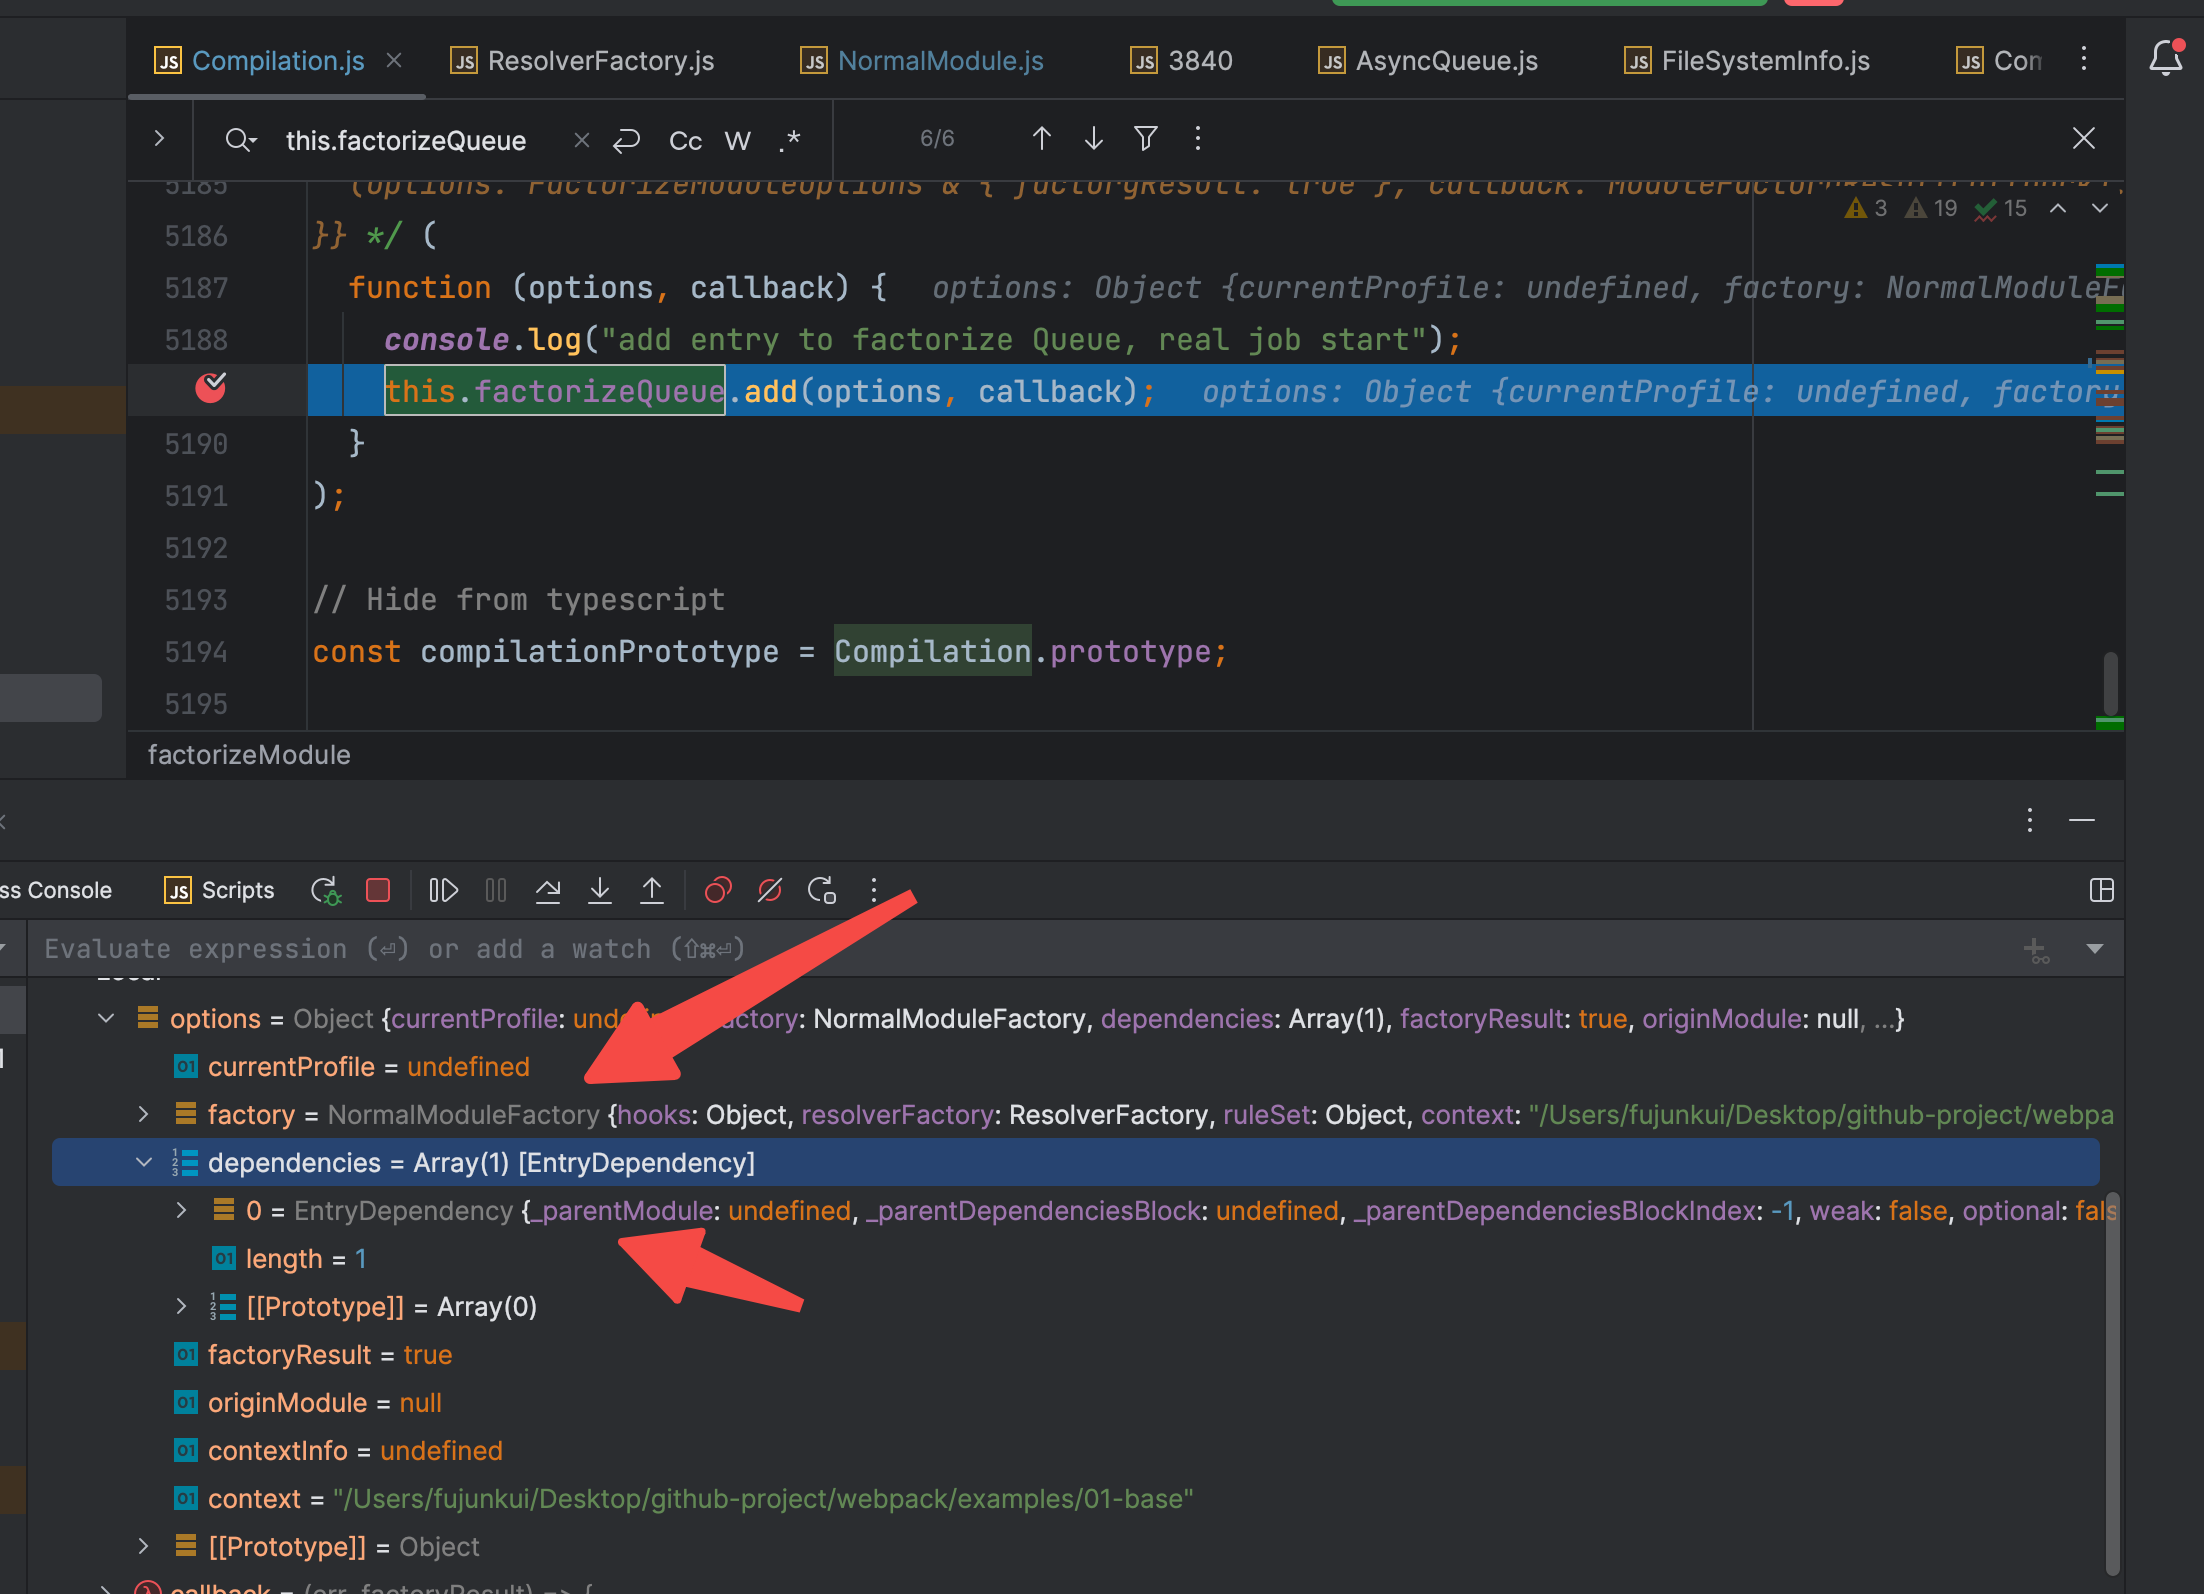
进入 add 函数内部。 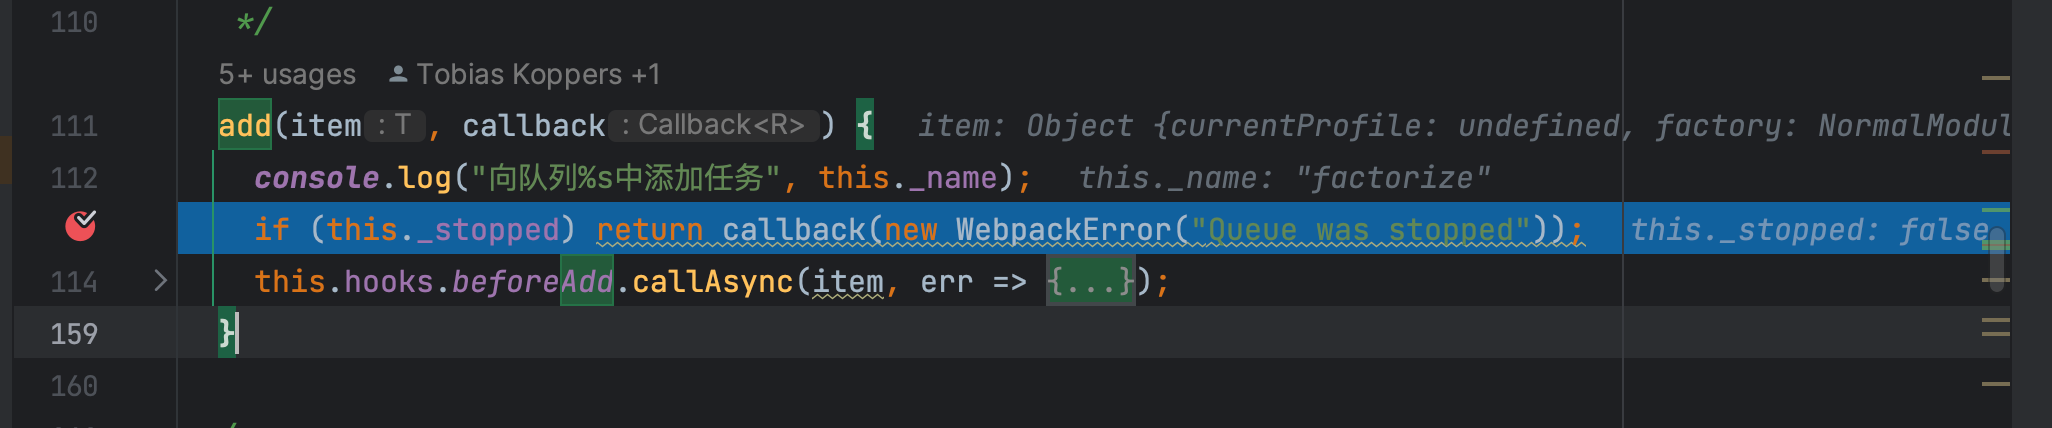
大致的逻辑就是 判断一下 this._stopped 当前的实例队列是不是暂停的状态,是暂停的状态就 直接 callback 抛出错误。 那核心的步骤就在 this.hooks.beforeAdd.callAsync这个hook了,老规矩,debug 这个 hook 看一下有哪些 监听者。 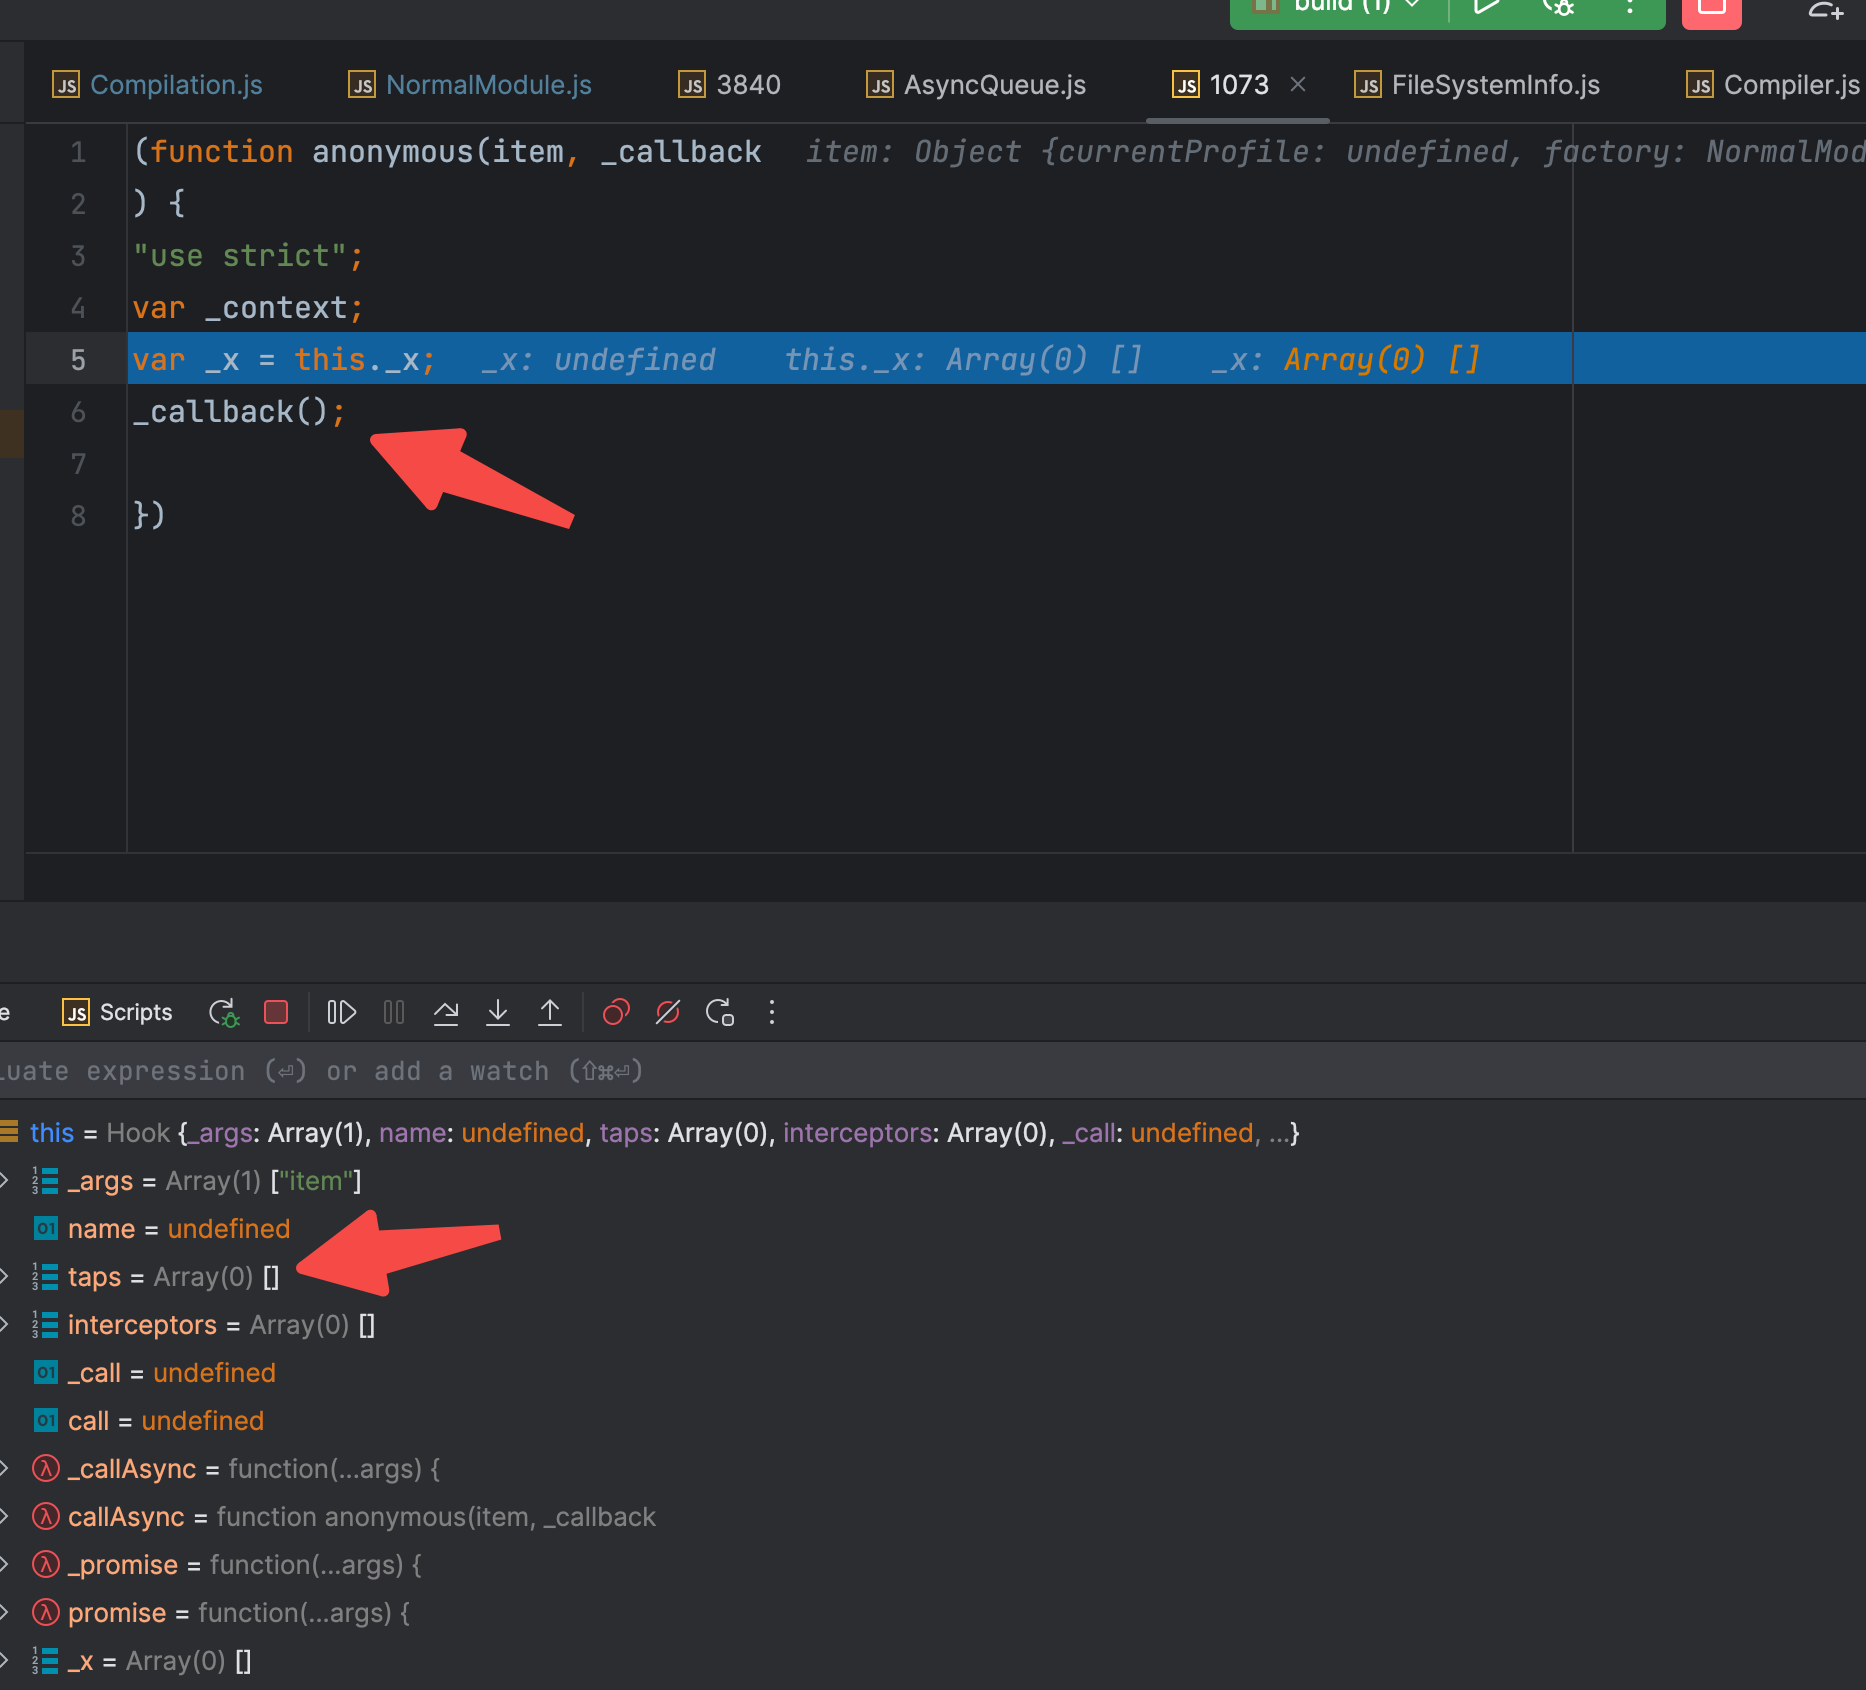
发现这个hook 没有一个监听者,直接执行了本身的callback 函数,继续 debug 下去。进入hook的内部, 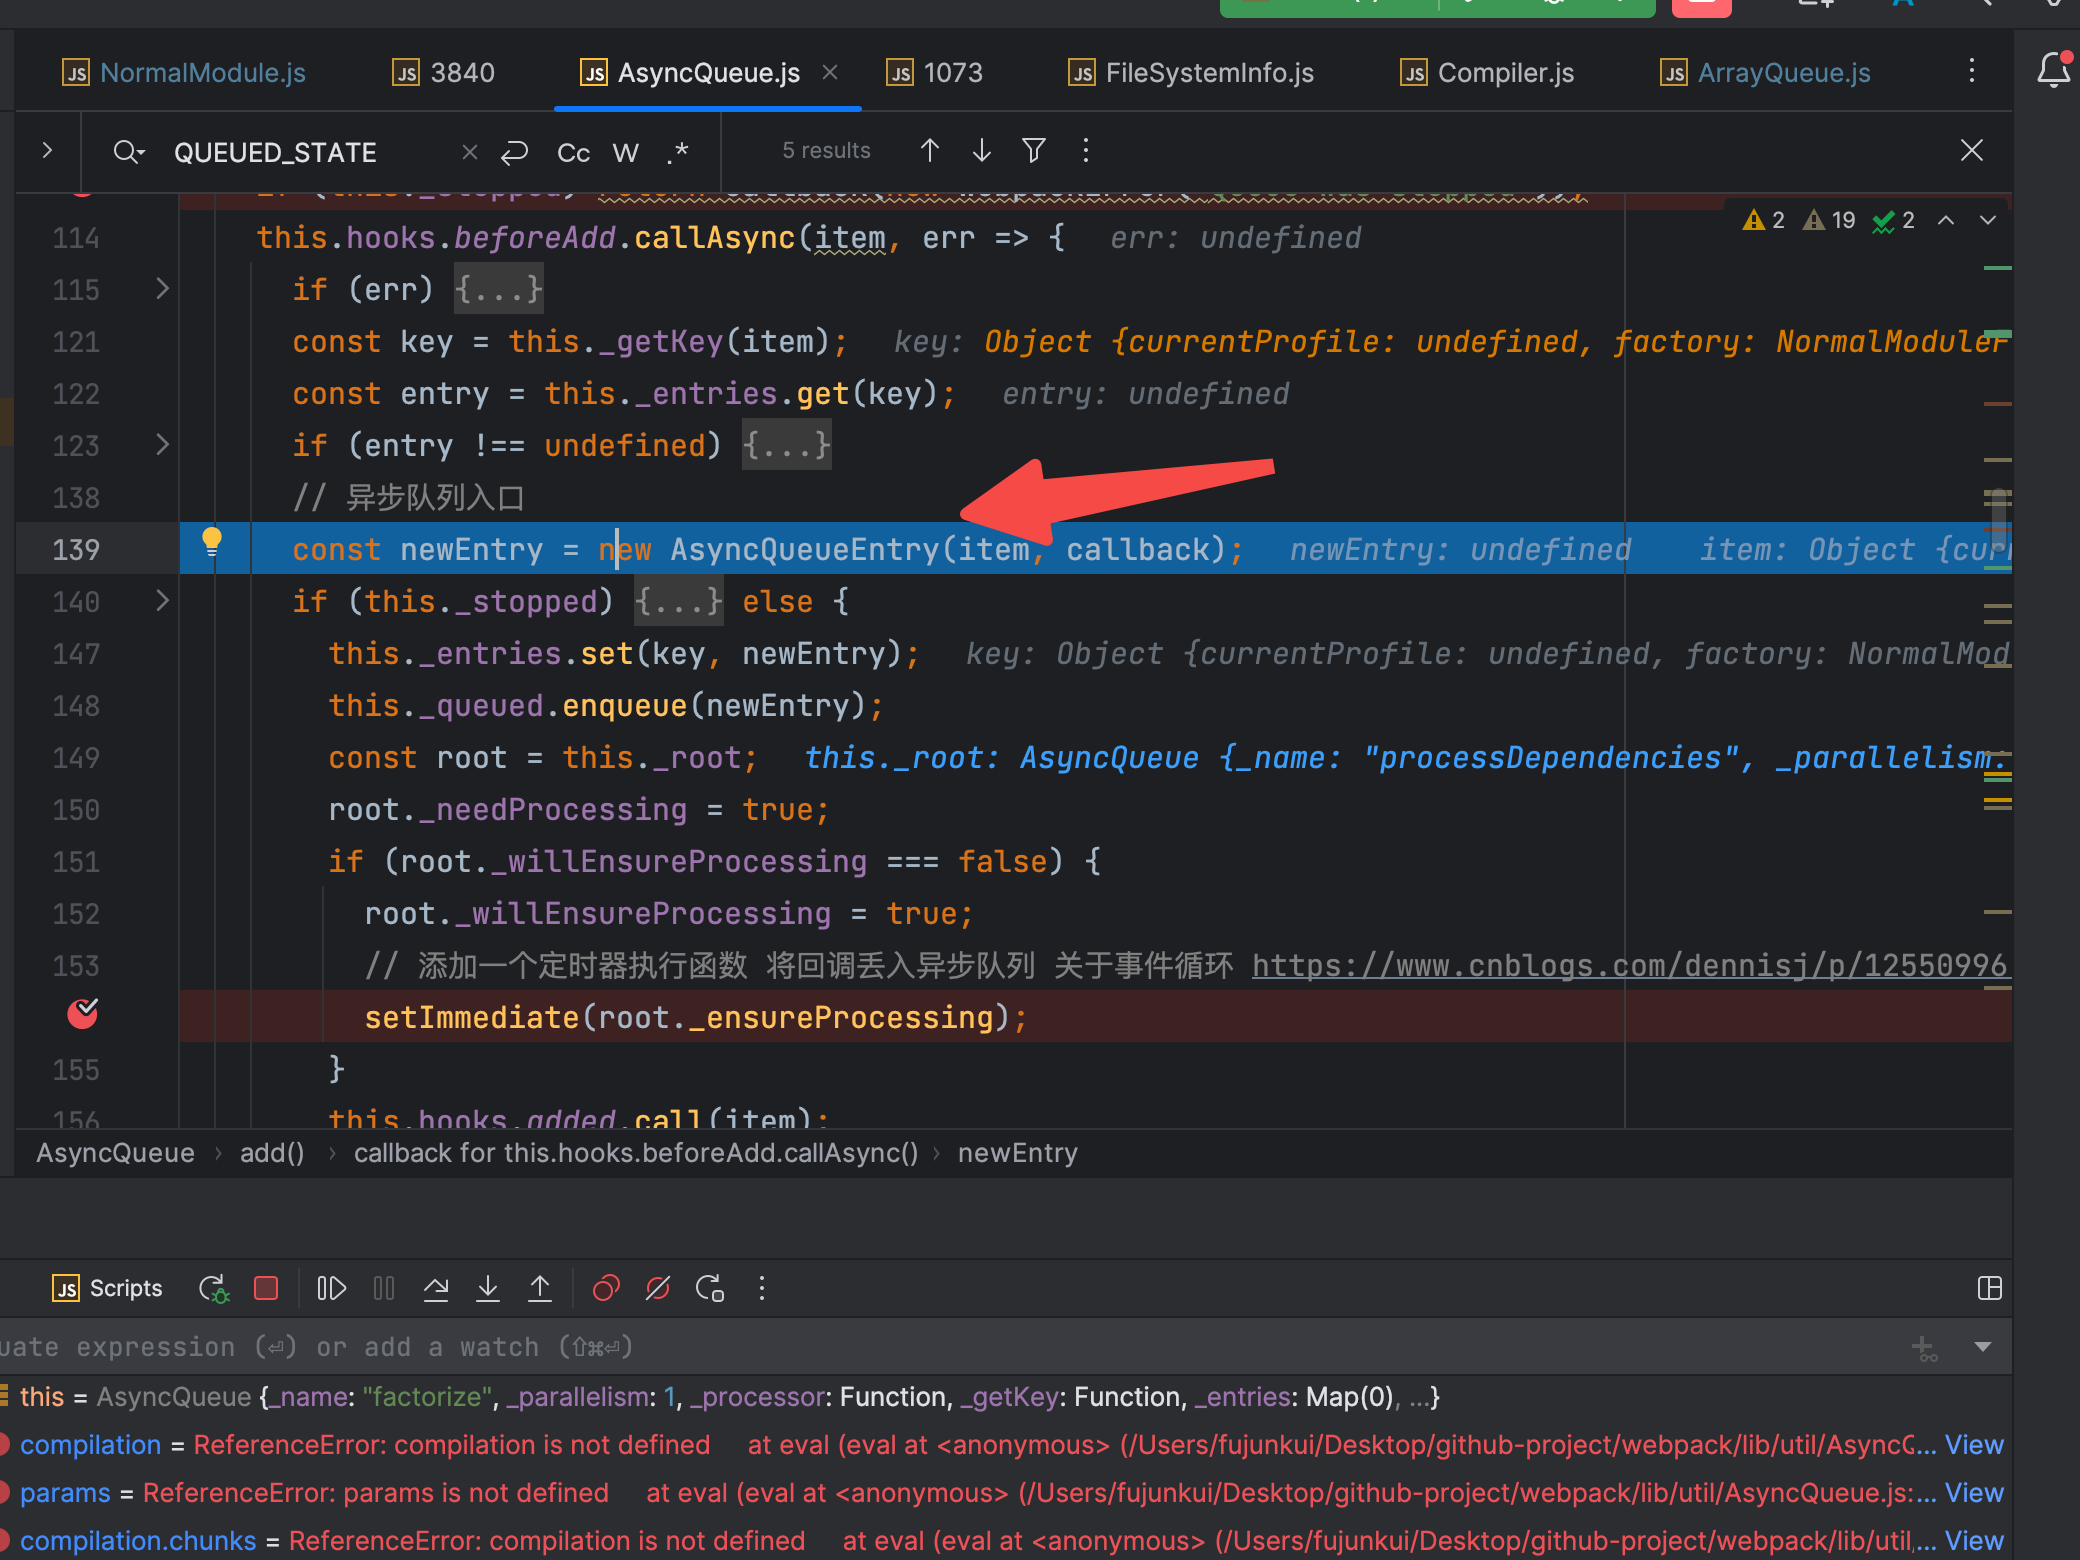
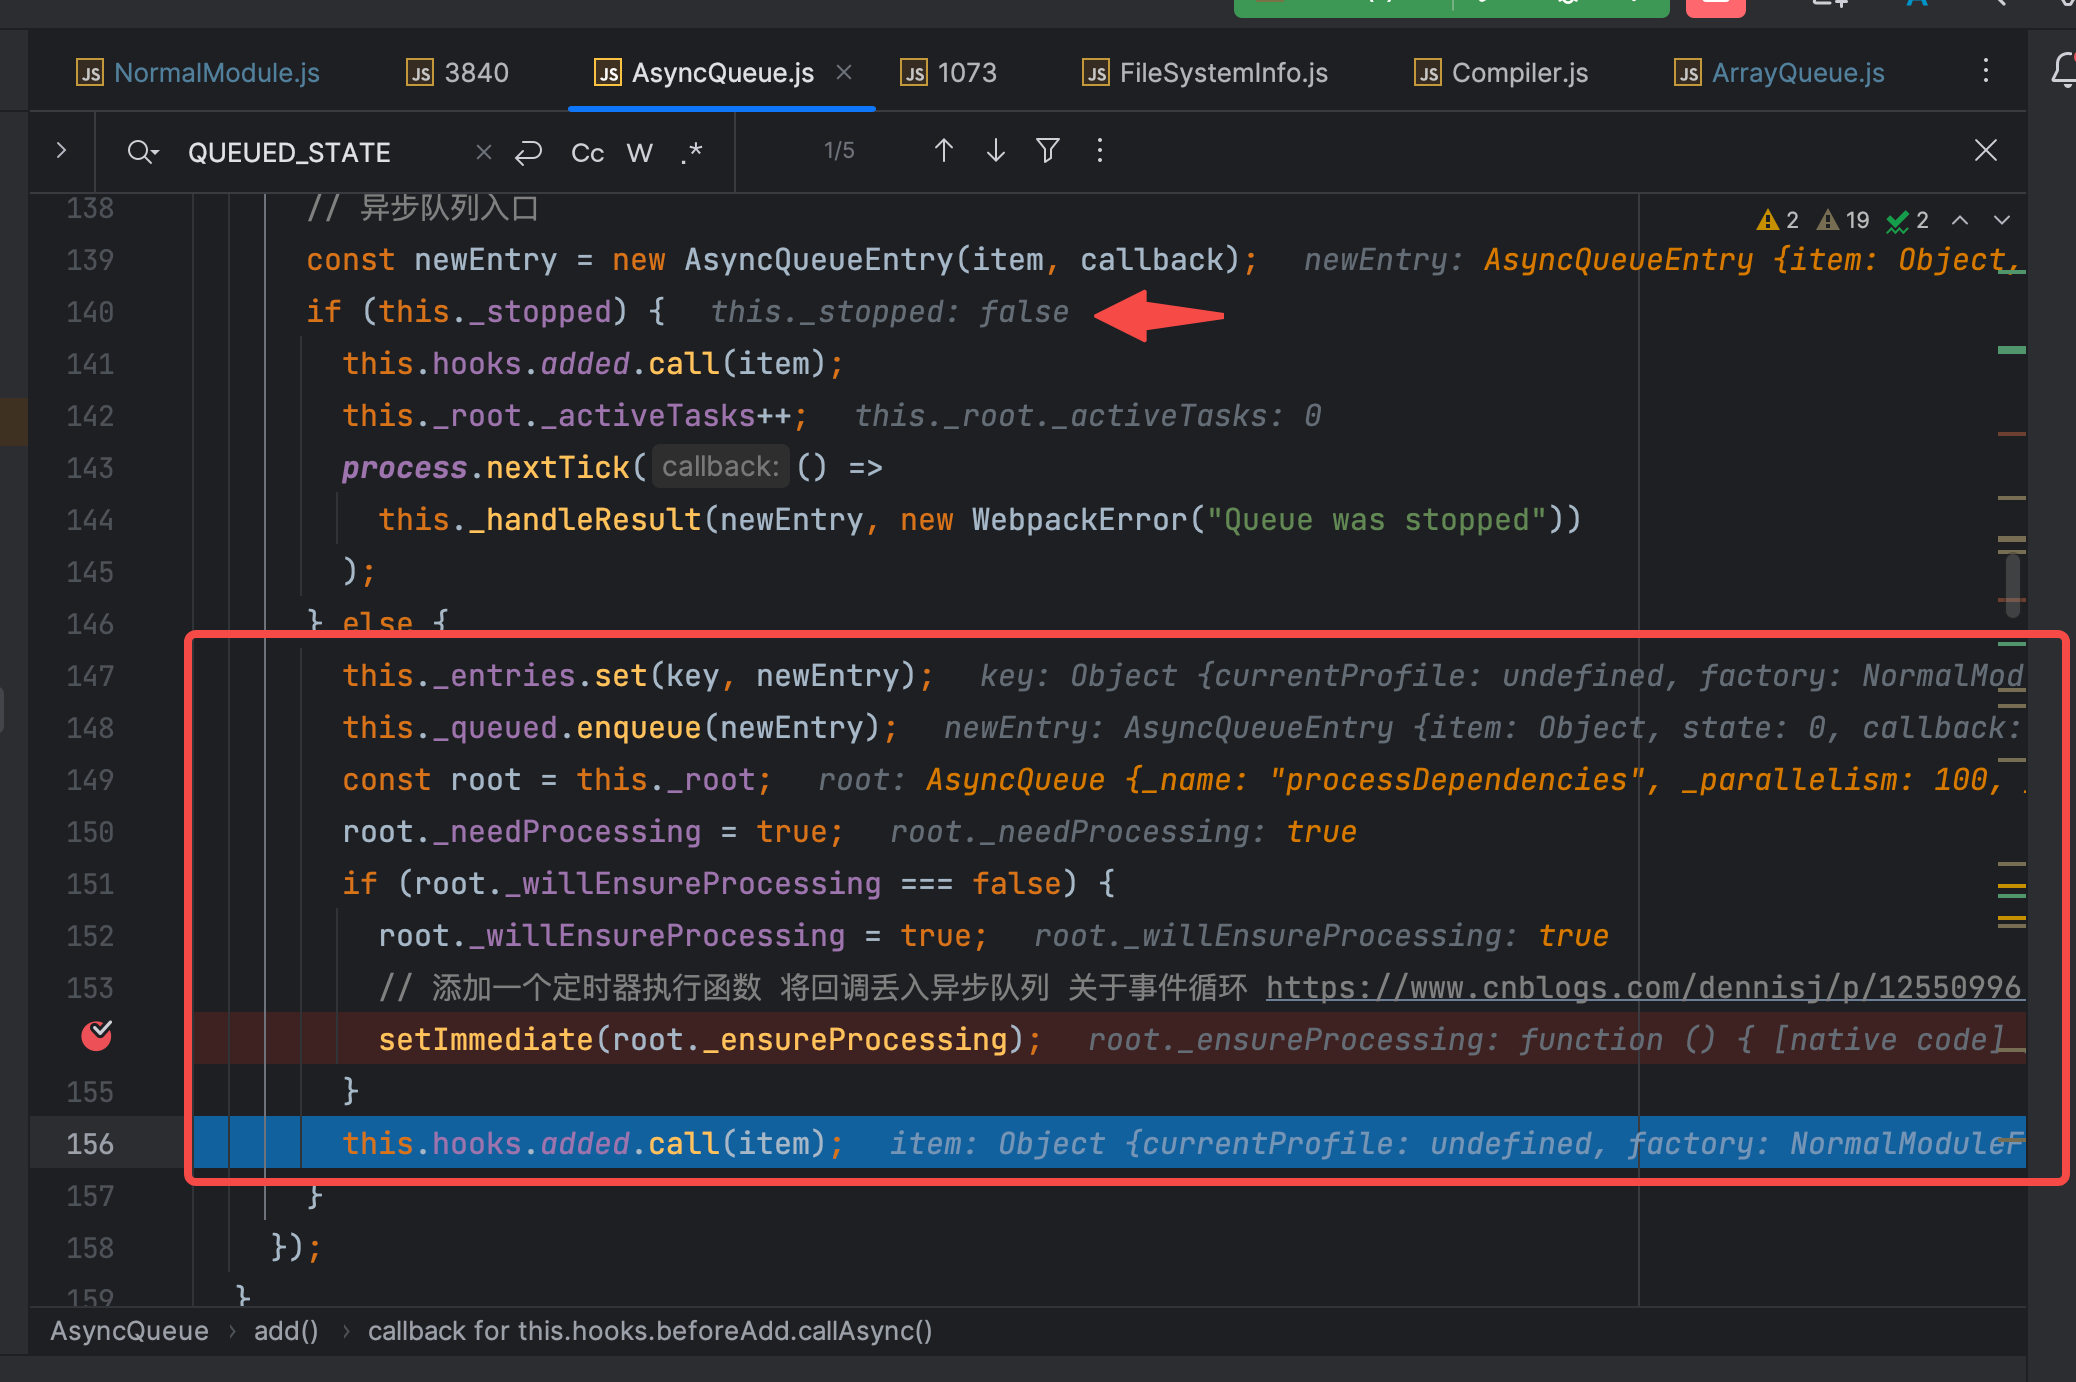
部分没有走到的逻辑 直接跳过,根据 item 和 callback 实例化AsyncQueueEntry 对象,并赋值给 newEntry变量。 稍微看下 AsyncQueueEntry 类。 const QUEUED_STATE = 0;const PROCESSING_STATE = 1;const DONE_STATE = 2;class AsyncQueueEntry { /** * @param {T} item the item * @param {Callback} callback the callback */ constructor(item, callback) { this.item = item; /** @type {typeof QUEUED_STATE | typeof PROCESSING_STATE | typeof DONE_STATE} */ this.state = QUEUED_STATE; this.callback = callback; /** @type {Callback[] | undefined} */ this.callbacks = undefined; this.result = undefined; /** @type {WebpackError | undefined} */ this.error = undefined; }} 可以看到对于 AsyncQueueEntry 的this.state字段有 3 个状态可选(看 jsDoc 部分,也就是 this.state 的上一行),初始创建的 实例是 QUEUED_STATE 状态,也就是排队状态。 
大致知道了 newEntry 变量承载了什么东西,继续debug下一步。 没有进入 if 语句的 成功分支,走了 else 部分(也就是红色圈中部分)。此处的代码量比较少,但是比较核心。 首先看 148 行 this._queued.enqueue(newEntry); 就是把当前的 newEntry 实例 丢入到 自身的 队列里。 接下来 149 行,找到该实例的父级 也就是 _name 为 processDependencies 的实例。在 150 行 将其父级的 _needProcessing 变更为 true, 因为默认创建的实例的 _willEnsureProcessing 的状态为 false,所以此处会走进 151 行的判断逻辑,去执行 152-154 行的代码,将父级(processDependencies)的 _ensureProcessing 丢进定时器里(注意是父级的,异步函数会在同步函数执行完毕以后调用,另外异步函数也是有优先级之分的哈,不一定是最先丢进去的,最先执行)。 继续debug, 触发 156 的 hook 钩子。 至此同步的函数执行完毕了,别忘了之前还向定时器里丢了一个异步的 父级(processDependencies)的 _ensureProcessing 方法,下一步直接断点蹲在 _ensureProcessing处。 1.3 浅浅的总结一下~ webpack 中的 Compilation 实例,创建了 4 个有父子关系的异步队列 最先开始 工作的是 factorizeQueue 队列,执行了 factorizeQueue 队列的 add 方法。 在 add 方法中,将 factorizeQueue队列的父级(processDependencies)队列的_ensureProcessing 方法放入了定时器中。 至此,同步函数执行完毕,开始执行 父级(processDependencies)的 _ensureProcessing 的方法。 2. 异步队列要开始了 2.1 执行 processDependencies 队列的 _ensureProcessing 方法直接断点到 _ensureProcessing 方法,验证一下猜想。 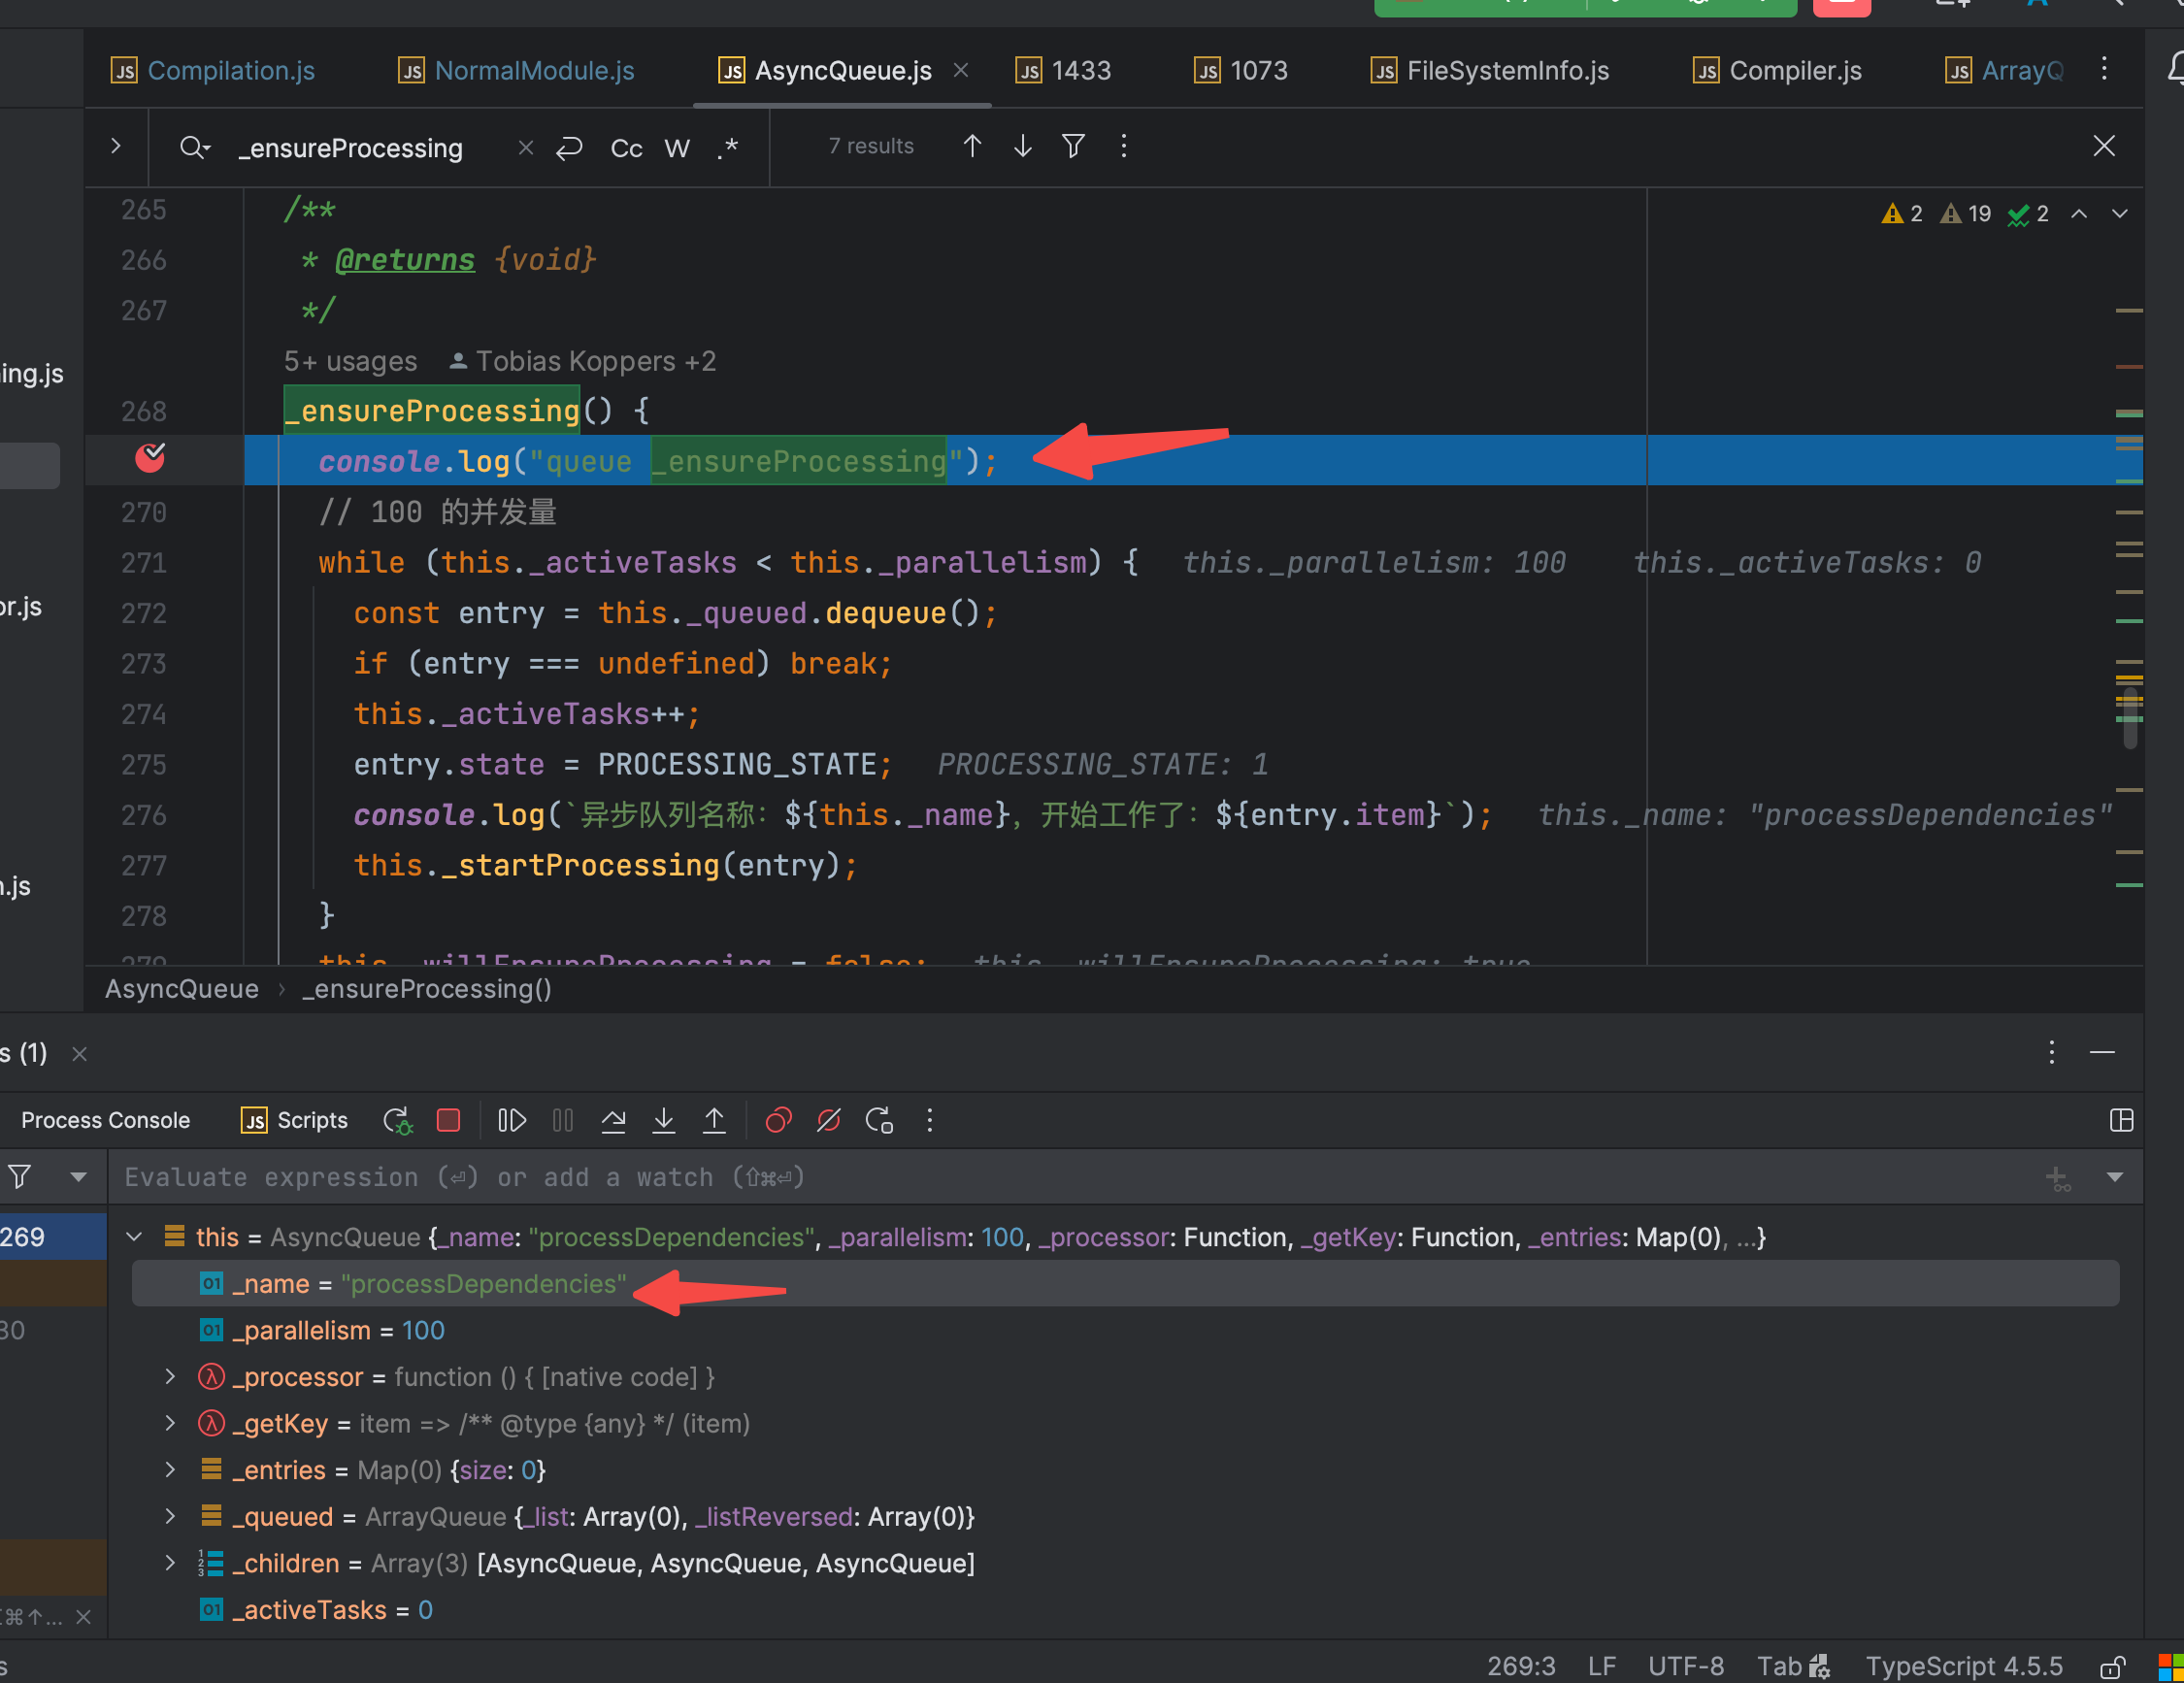
相关代码贴出来 _ensureProcessing() { console.log("queue _ensureProcessing"); // 100 的并发量 while (this._activeTasks 0) return; if (this._children !== undefined) { // this._children 是之前创建的 addModule factorize 和 build的 AsyncQueue // lib/Compilation.js 的 944 行 for (const child of this._children) { while (this._activeTasks 0) return; } } if (!this._willEnsureProcessing) this._needProcessing = false; }开始分析流程,this 指向的是 processDependencies 的实例队列,而在上一步是给它的子队列factorizeQueue里放入了东西newEntry。 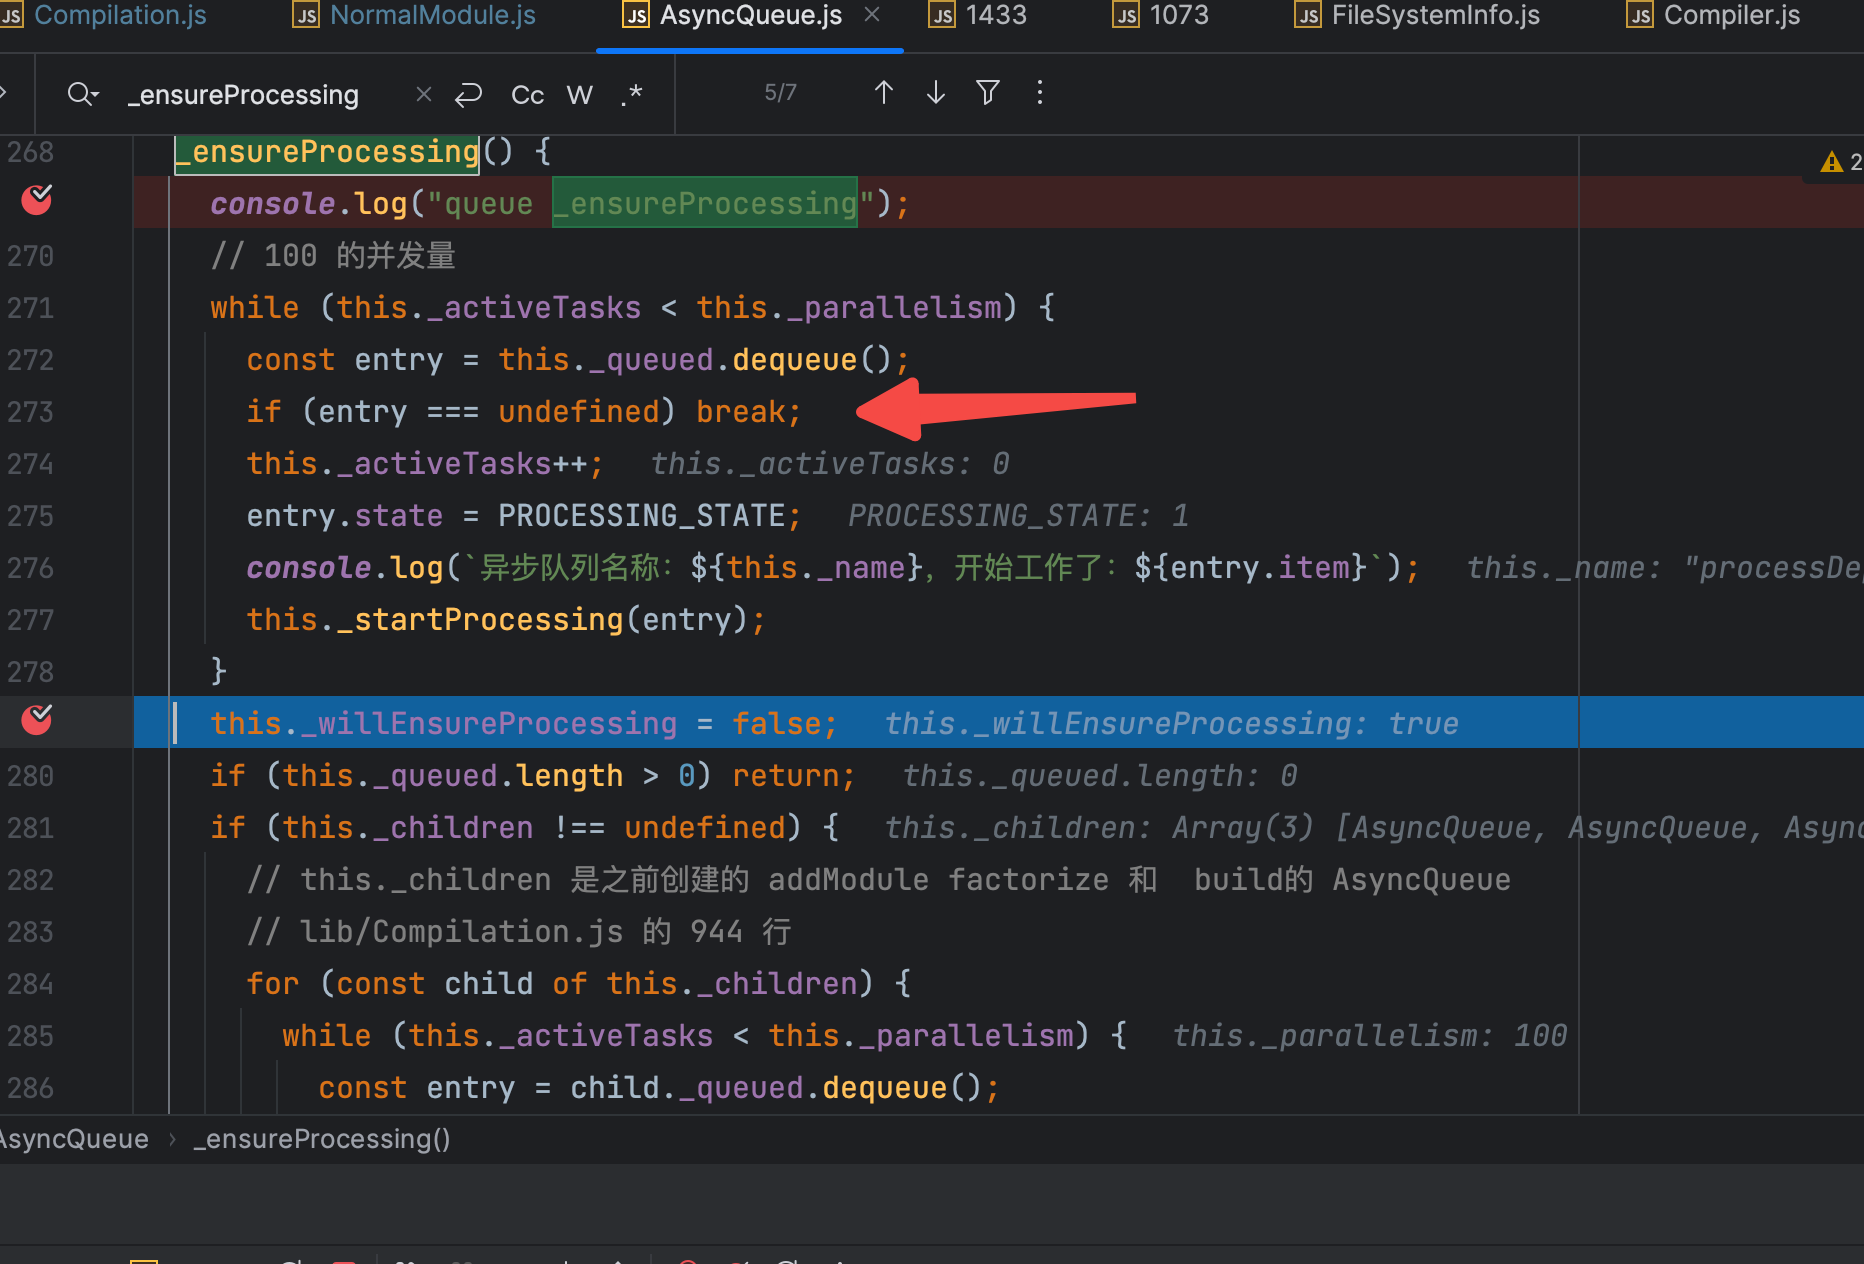
所以会直接从 273 行,break 出来,开始执行 289行,将自己的 _willEnsureProcessing 状态改为了 false。 通过之前提到的父子关系(老父亲带着3个儿子),我们继续看 281 行的代码。很显然是可以走进这个条件判断的,继续debug。 for (const child of this._children) { while (this._activeTasks 0) return; }这块代码的主要含义还是,遍历子队列,并取出相关的任务 赋值给 entry变量,如果entry 不存在,说明子队列为空,直接 break,开始遍历下一个子队列。如果子队列有数据,对父级当前进行的任务数量加一(this._activeTasks++;),然后把相关任务的状态改为 PROCESSING_STATE,也就是任务进行中,调用子队列的 _startProcessing 把任务传入。 毫无疑问的是,我们的 factorizeQueue 子队列中存在任务newEntry,继续debug 验证猜想。 下一步应该是进入factorize 队列的_startProcessing 方法了(注意队列已经切换了)。继续 debug, 
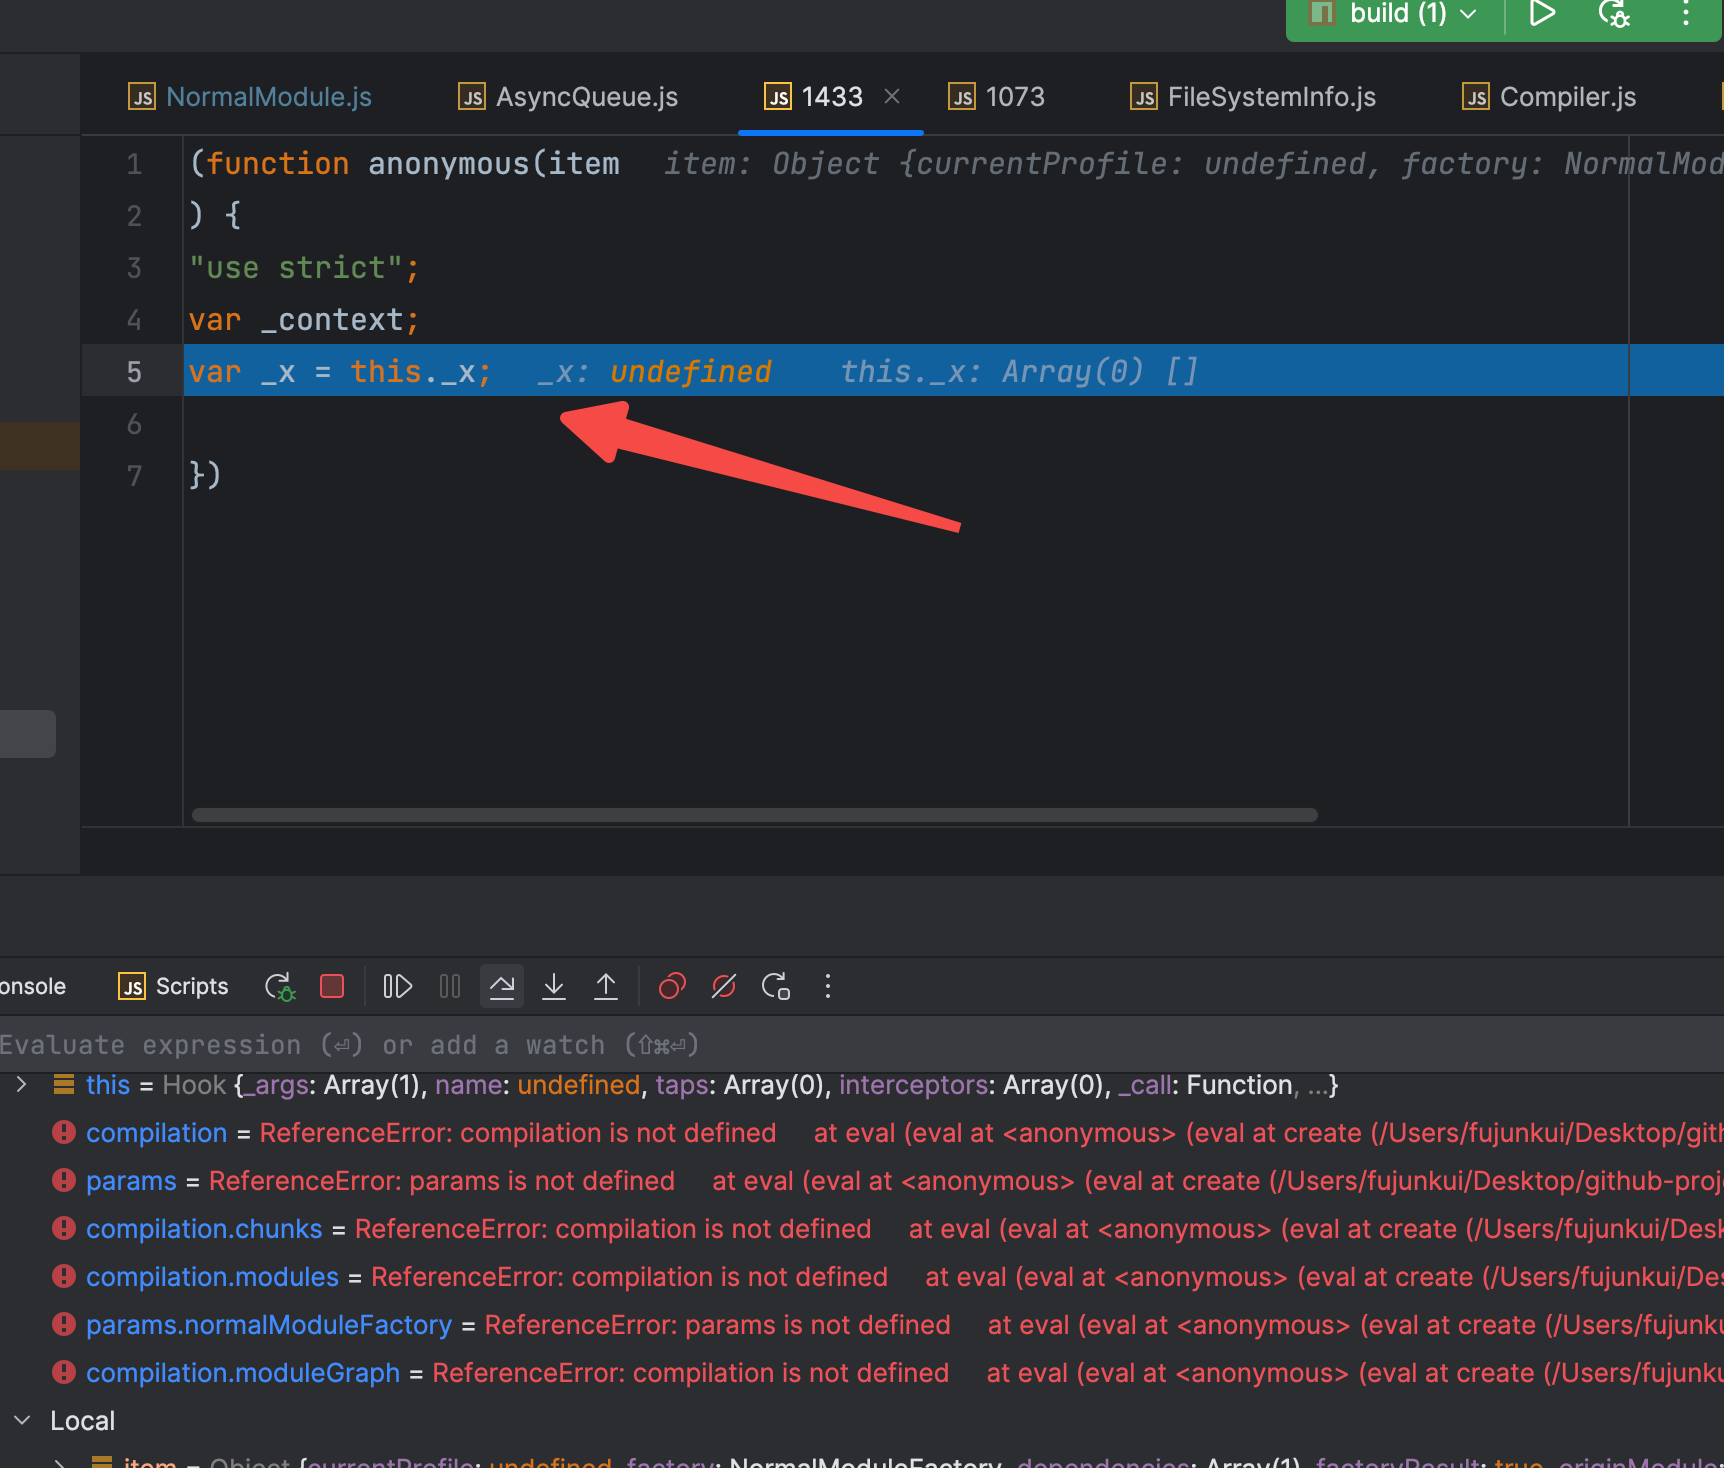
注意看,此时的 this 指向 是 factorize 队列。那就继续调试 _startProcessing 方法。 调试 this.hooks.beforeStart hook,结果如下: 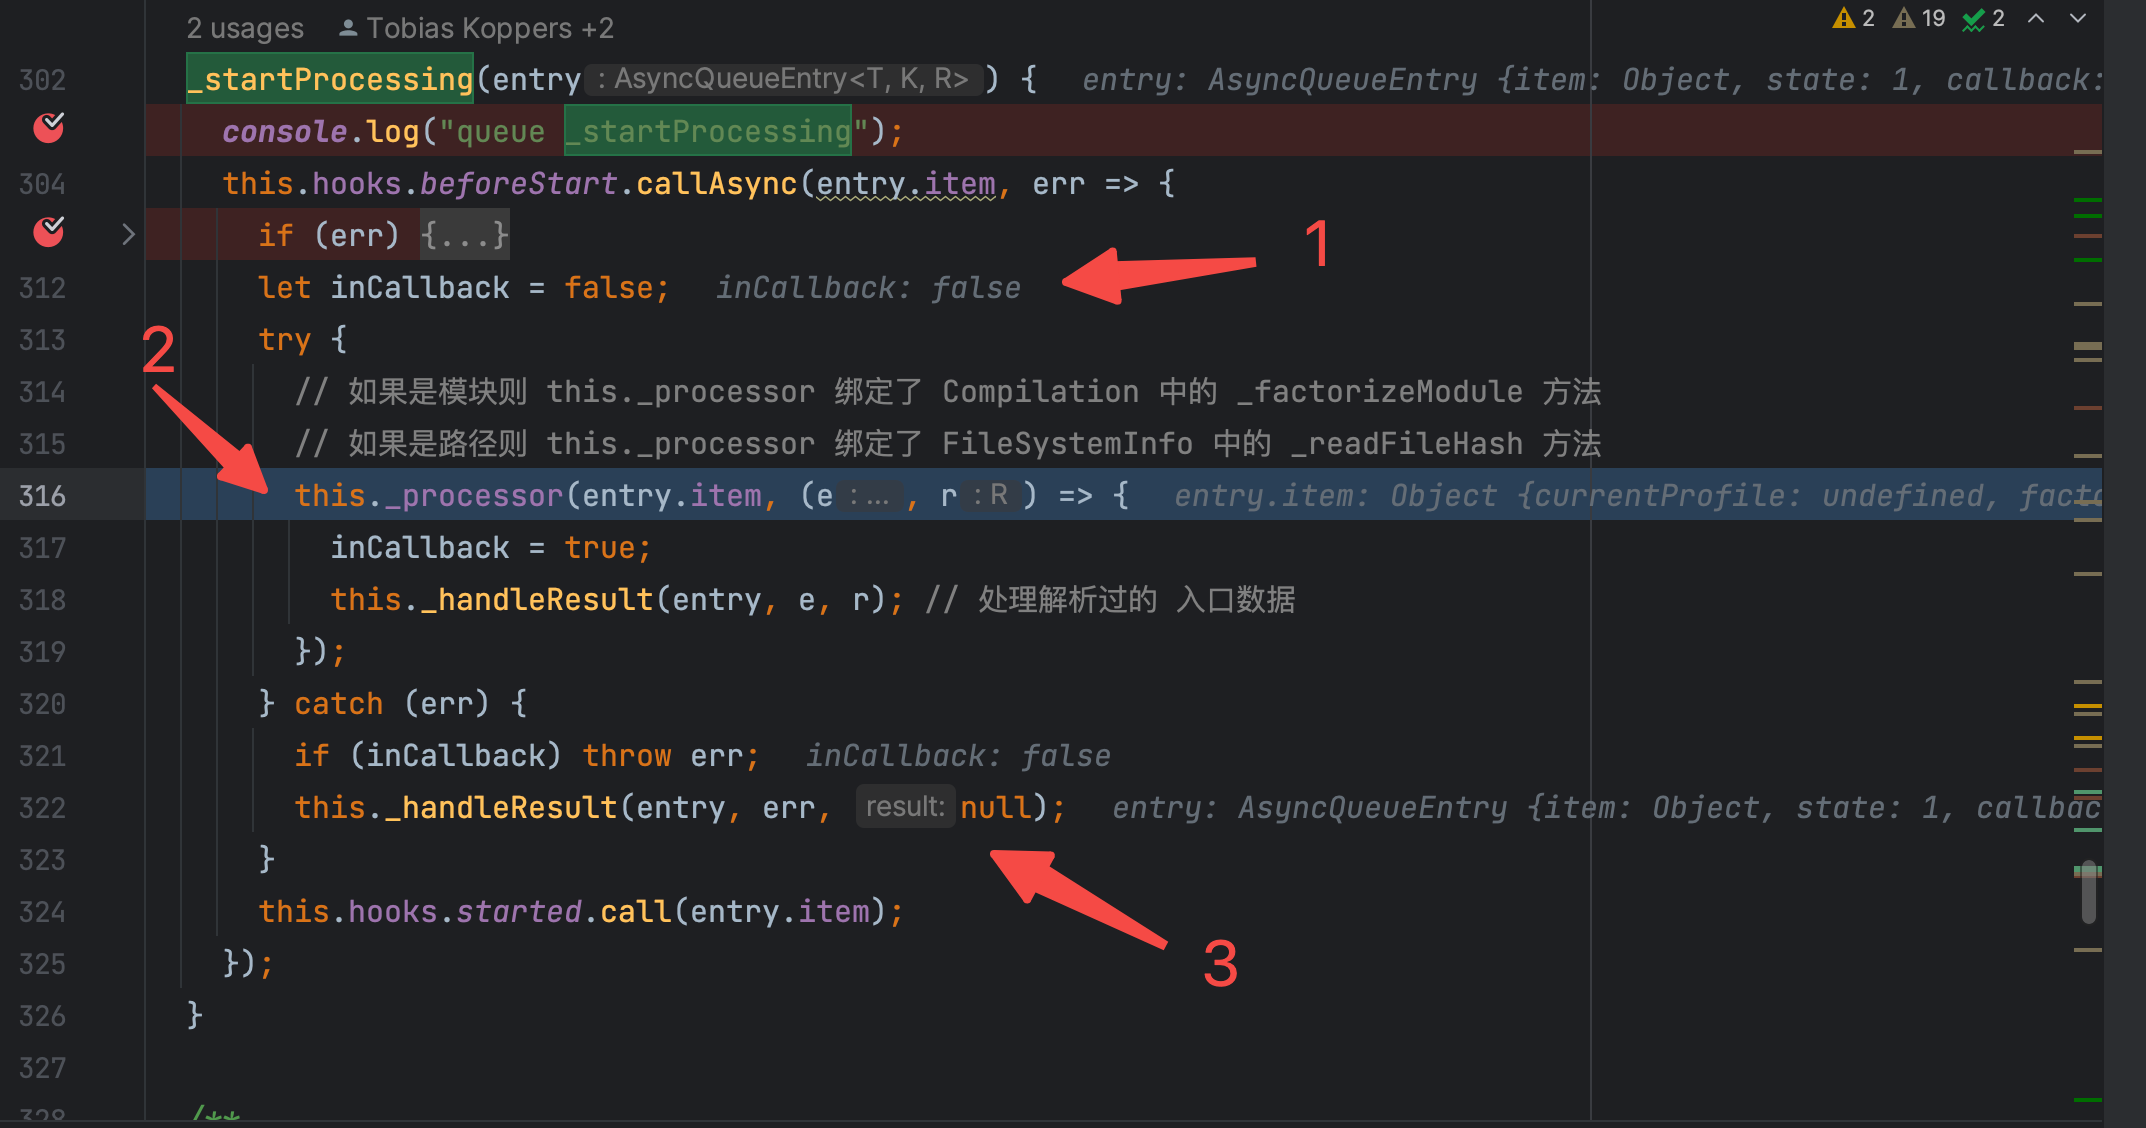
没有出现 err,直接忽略,开始看 316 行,此处的执行的 this._processor,让我们回顾一下 1.2章节 中的关于 constructor 的部分,核心代码如下图: 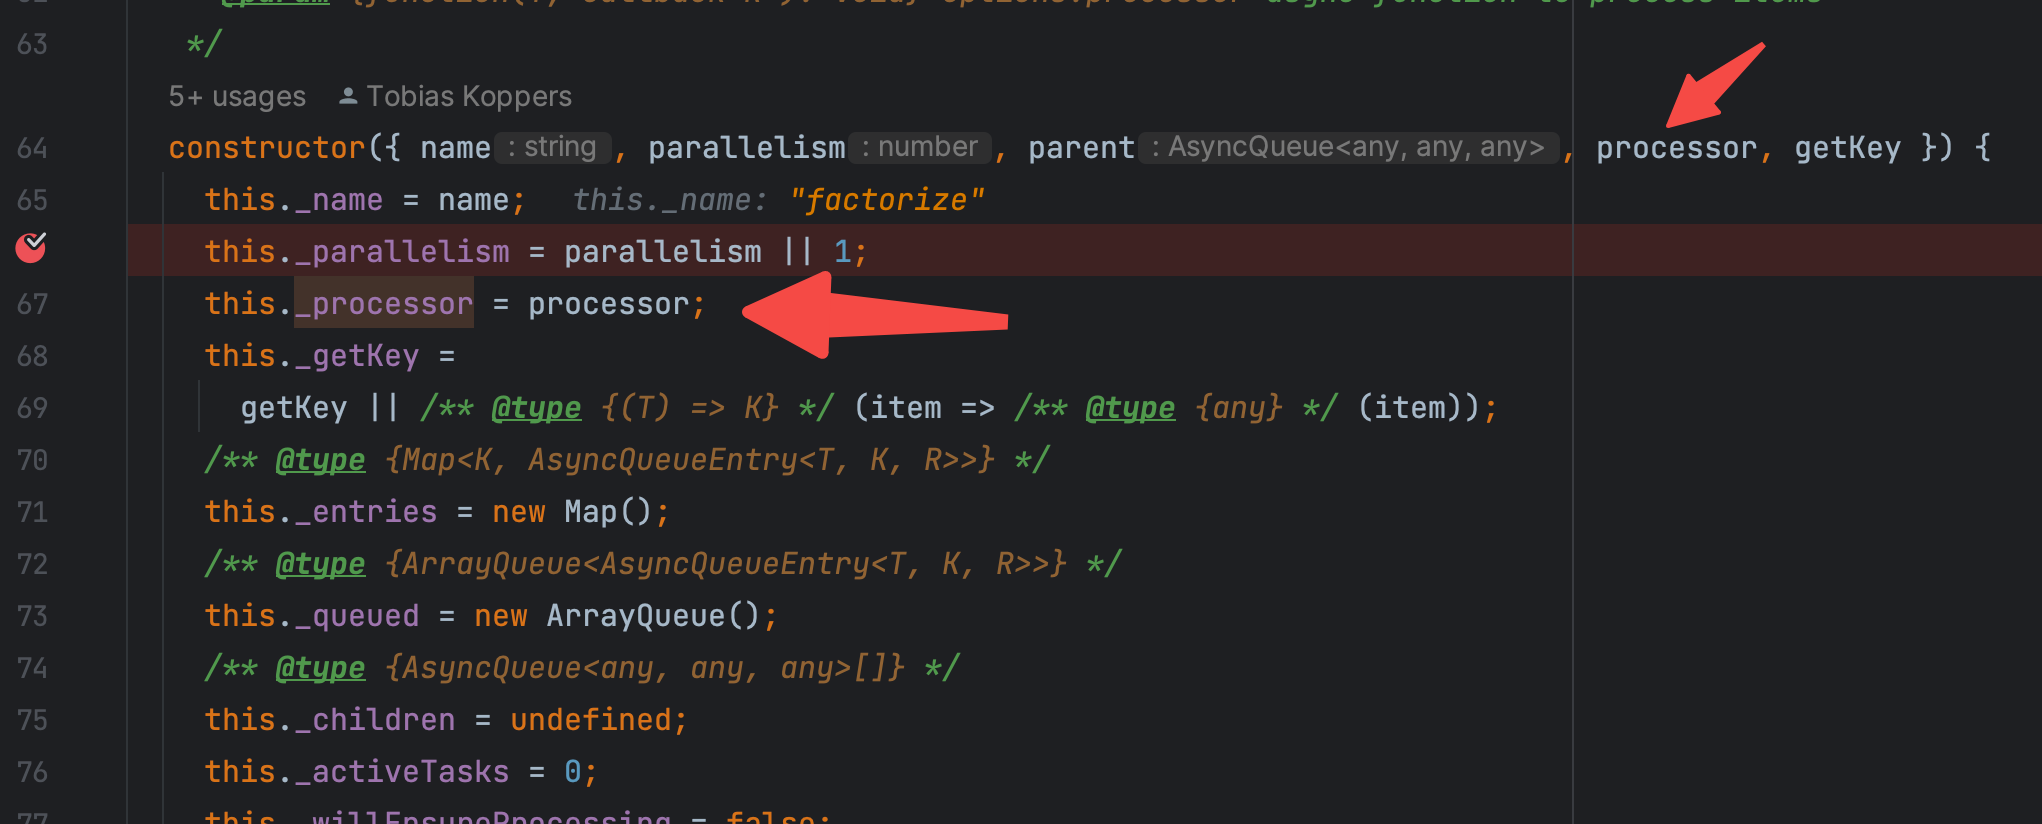
这意味着 我们要去看 实例化 factorize 时候传入的 processor 方法是什么?然后去执行它。 回顾 1.2章节 的代码 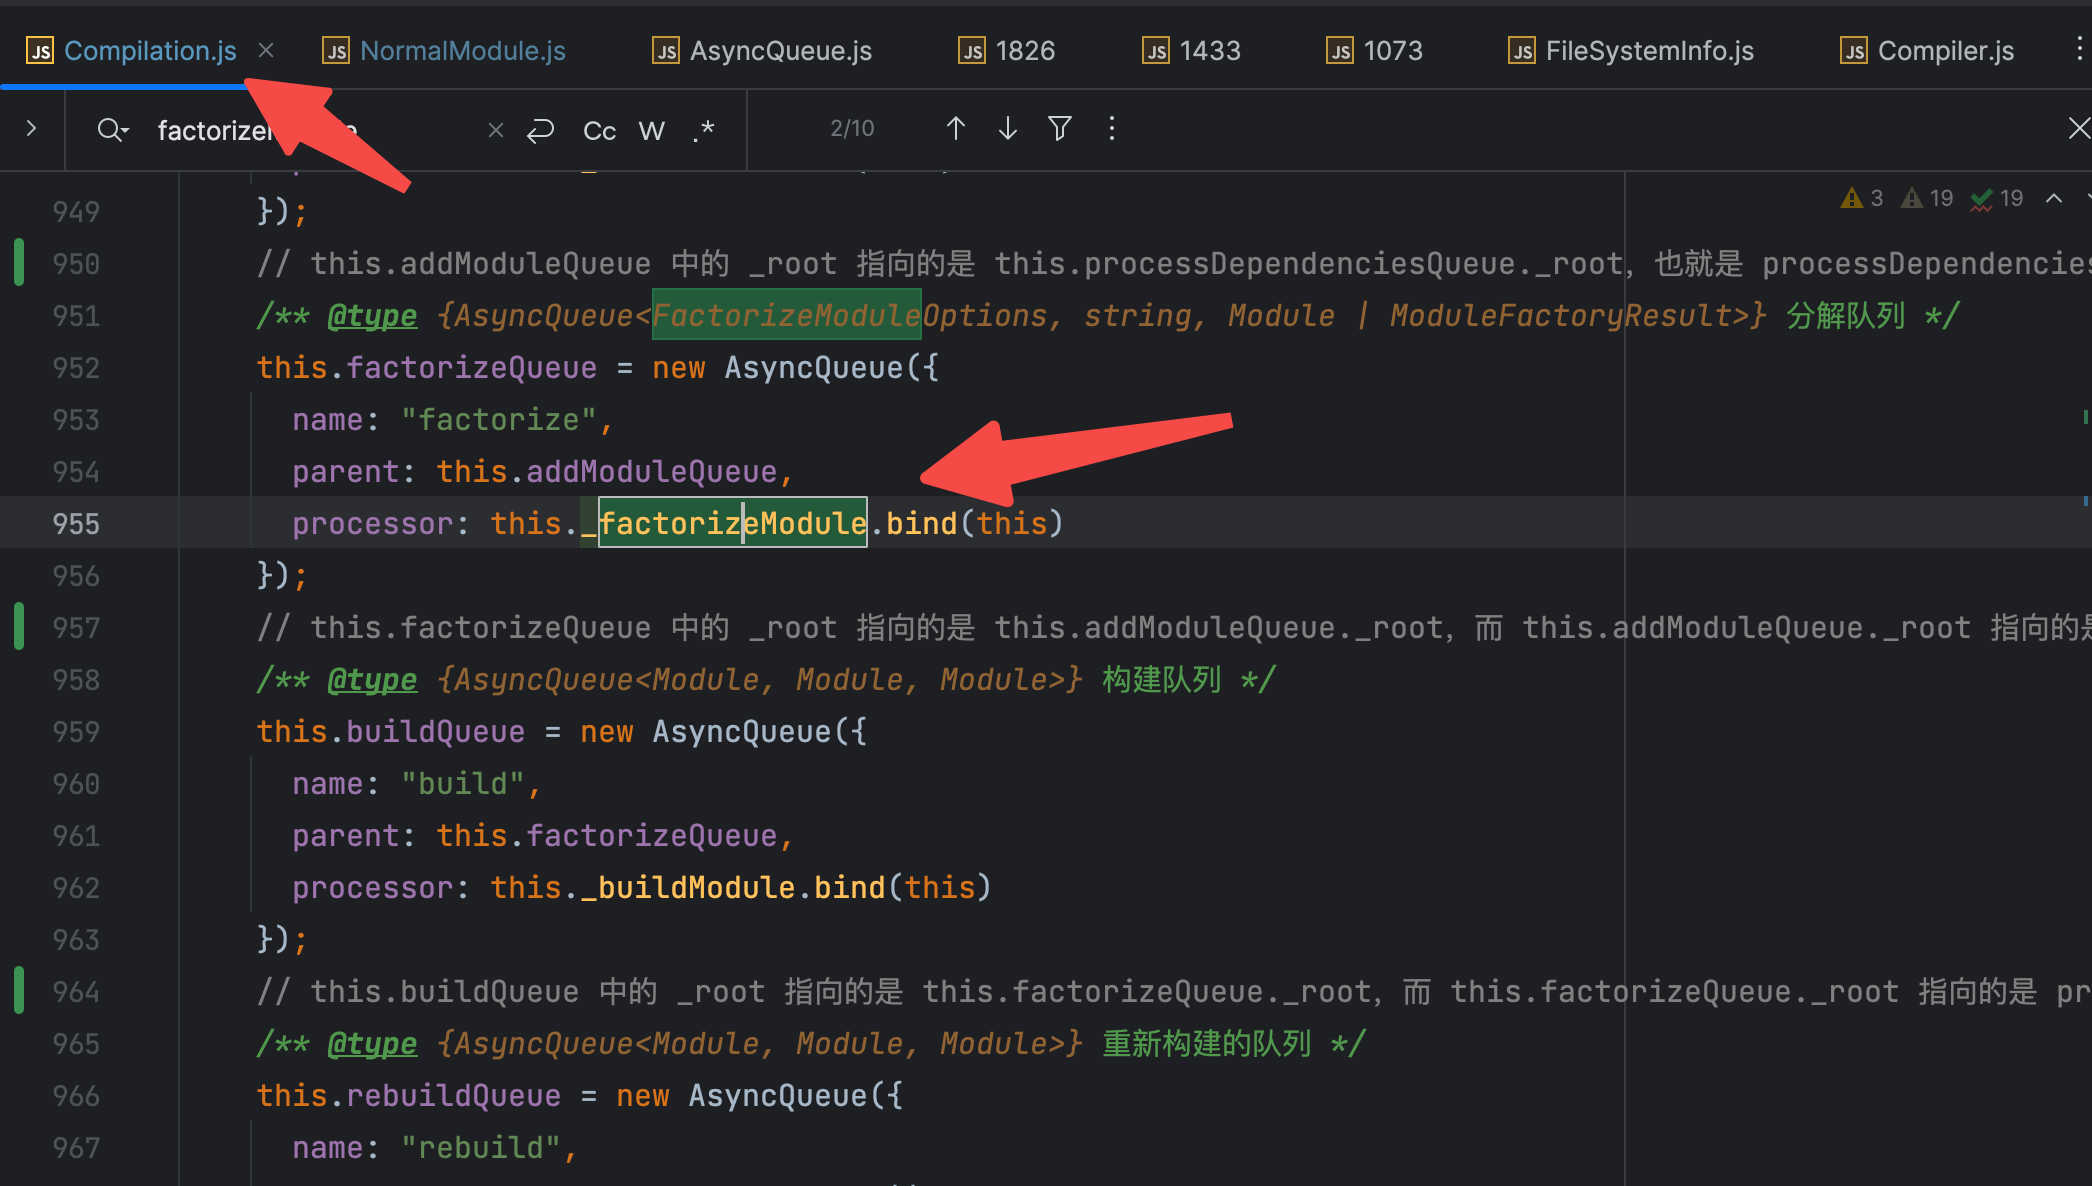
processor 指的是 compilation 中的 _factorizeModule 方法 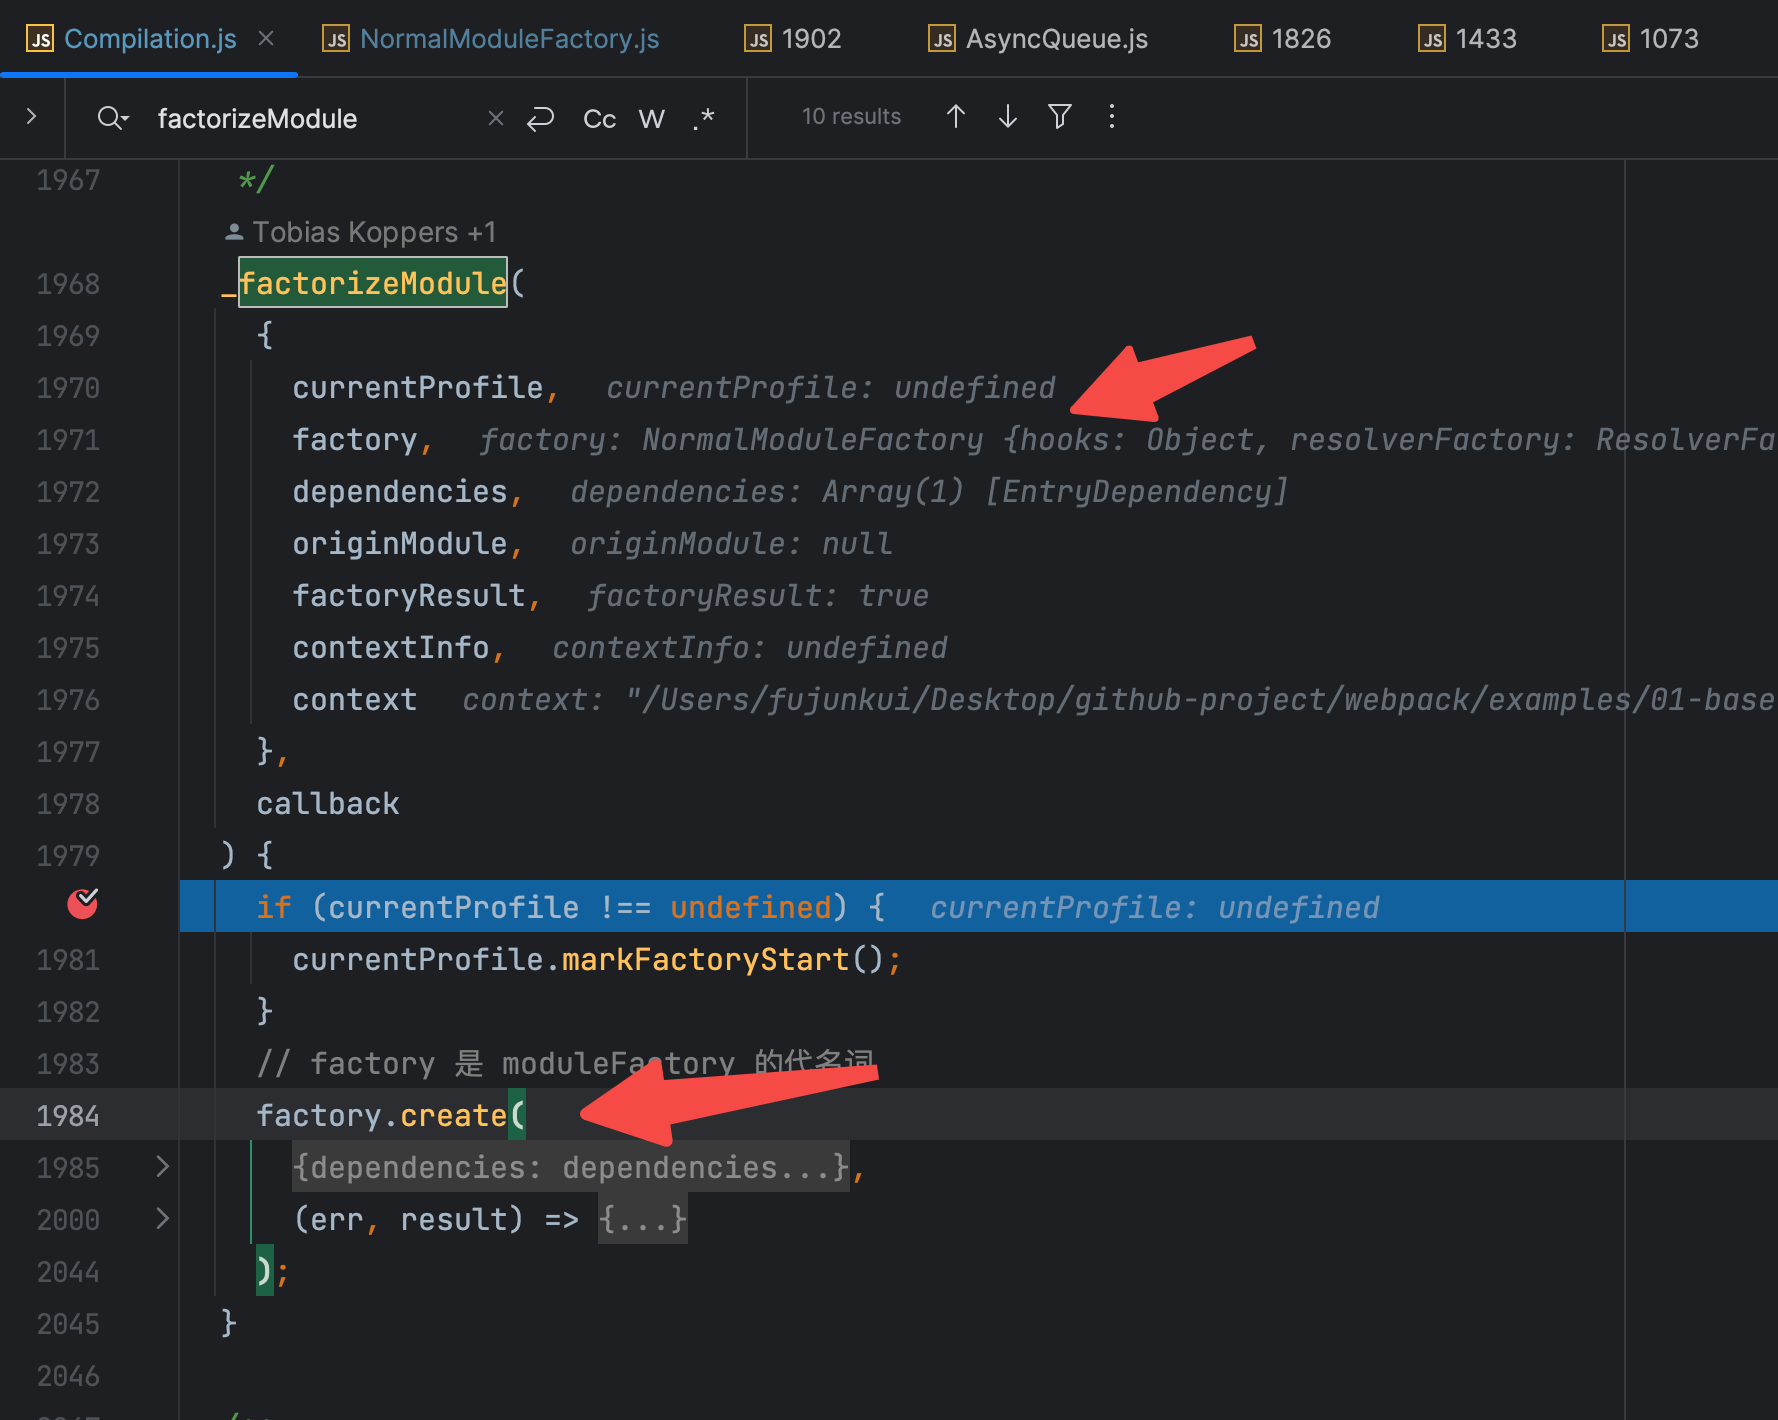
断点到 _factorizeModule 上,你会发现其主要执行的是 factory.create 方法,而此时的 factory 是 NormalModuleFactary 的实例,这里本质上也就是去 执行 NormalModuleFactary 类的 create 方法。 2.2 执行 NormalModuleFactary 类的 create 方法断点进入该 create 函数,核心代码逻辑如下: 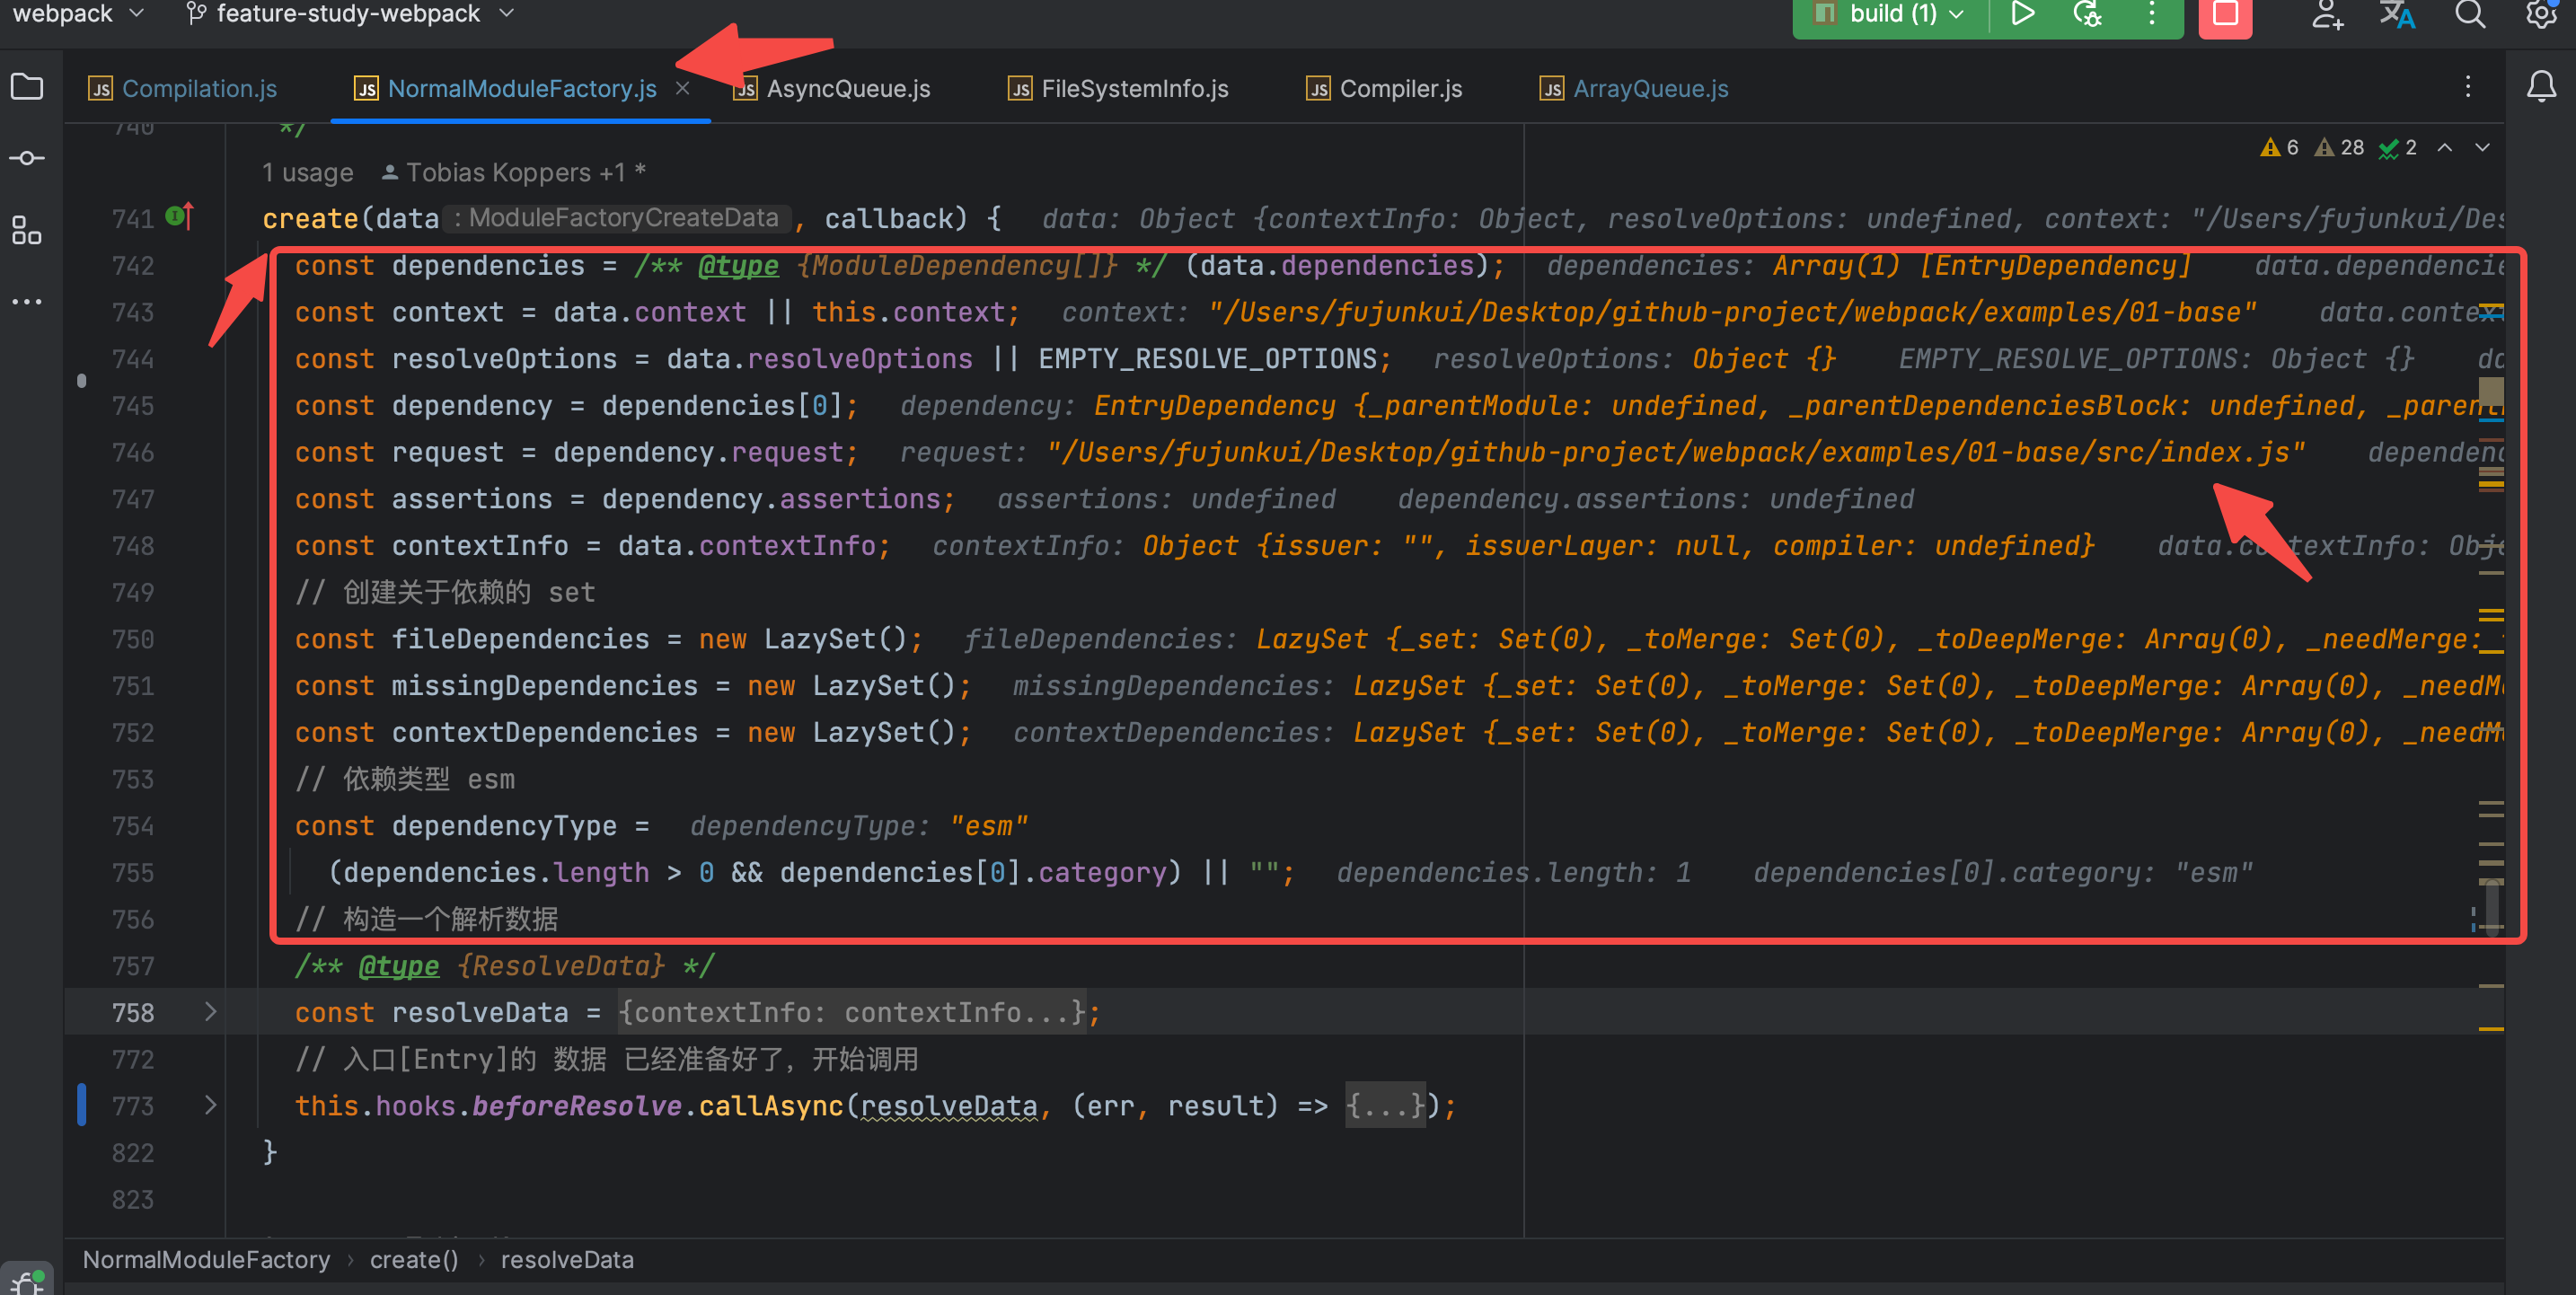
从742 到 755 行,很明显的都可以看出仅仅是变量的赋值和变量的初始化,而所有的变量都是存在了resolveData 对象里。走一下断点,看一下里面都是什么数据。 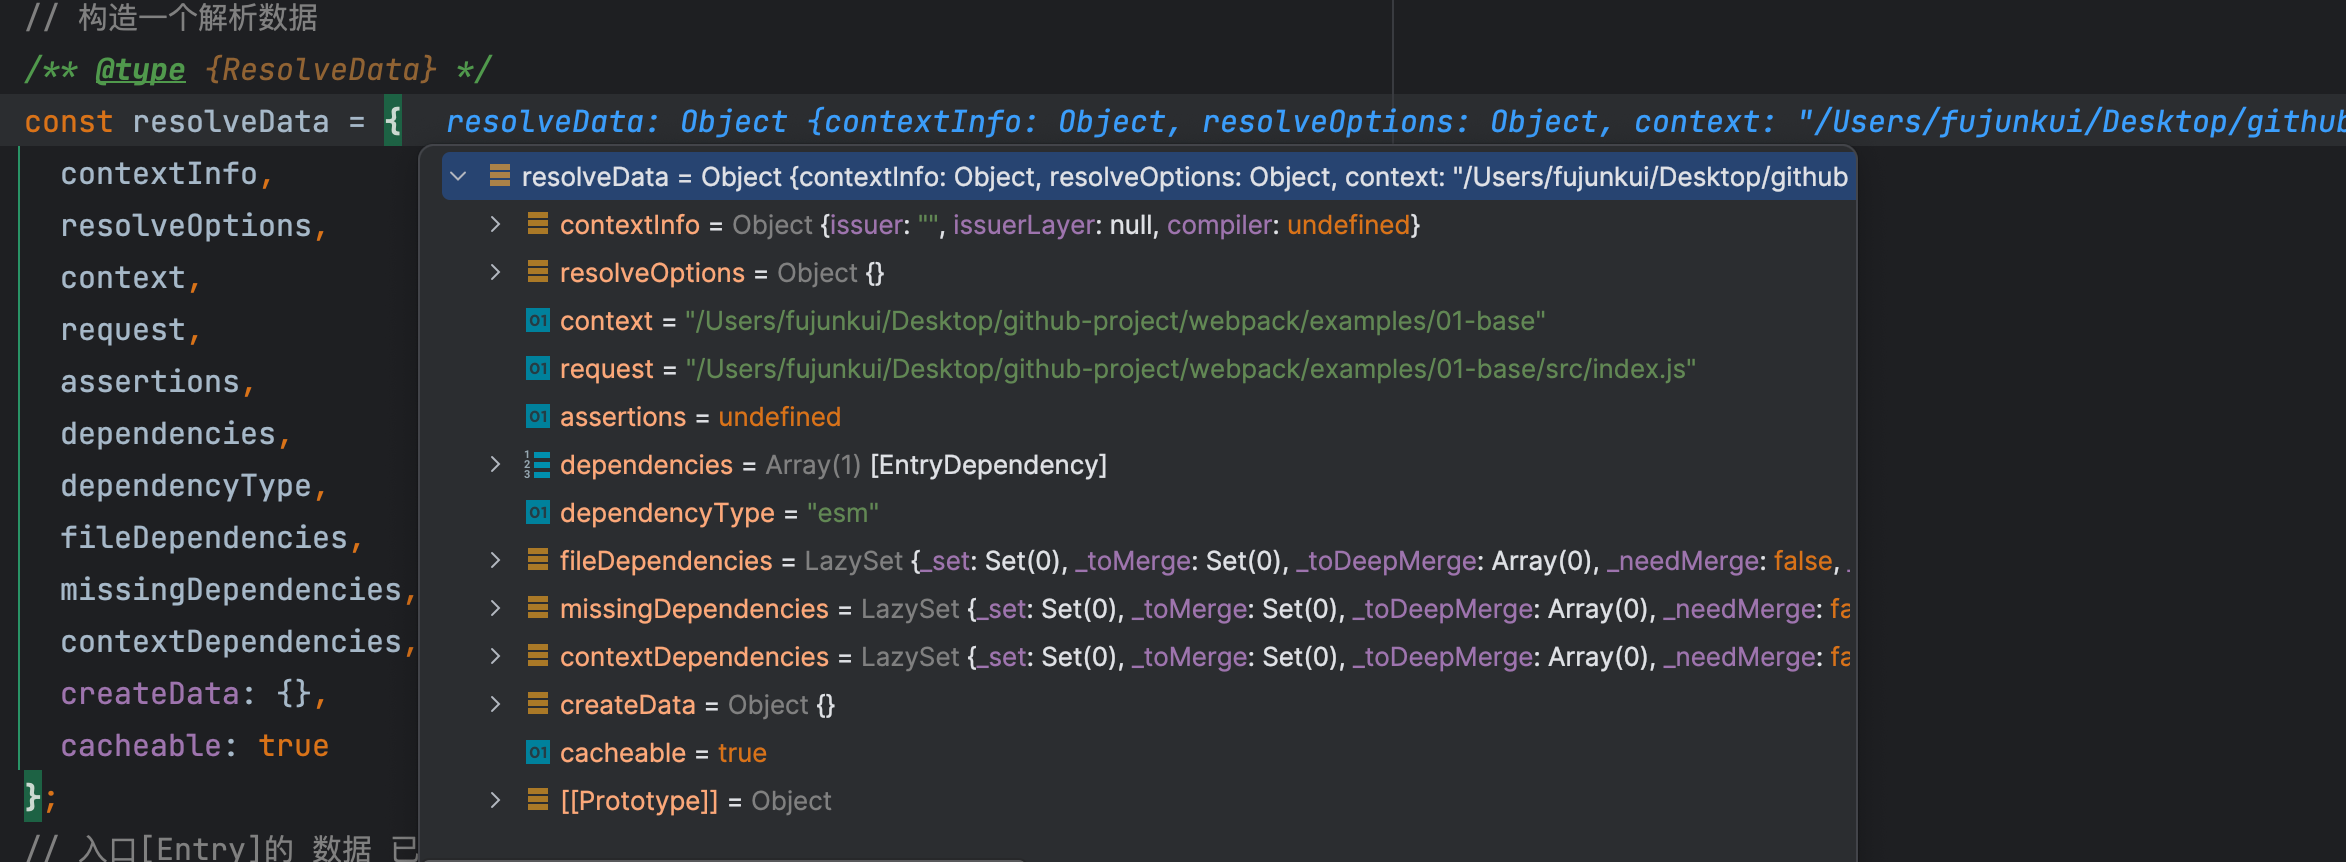
此处没啥难点,继续向下走,要进入beforeResolve的hook里了,直接断点进入,
老规矩,首先查看监听此 hook 的插件有哪些,见下图 
终于有插件进行监听了(注意此处NormalModuleFactory插件的stage属性),说明这个 hook 还是蛮重要的。继续断点,进入ExternalModuleFactoryPlugin的内部。 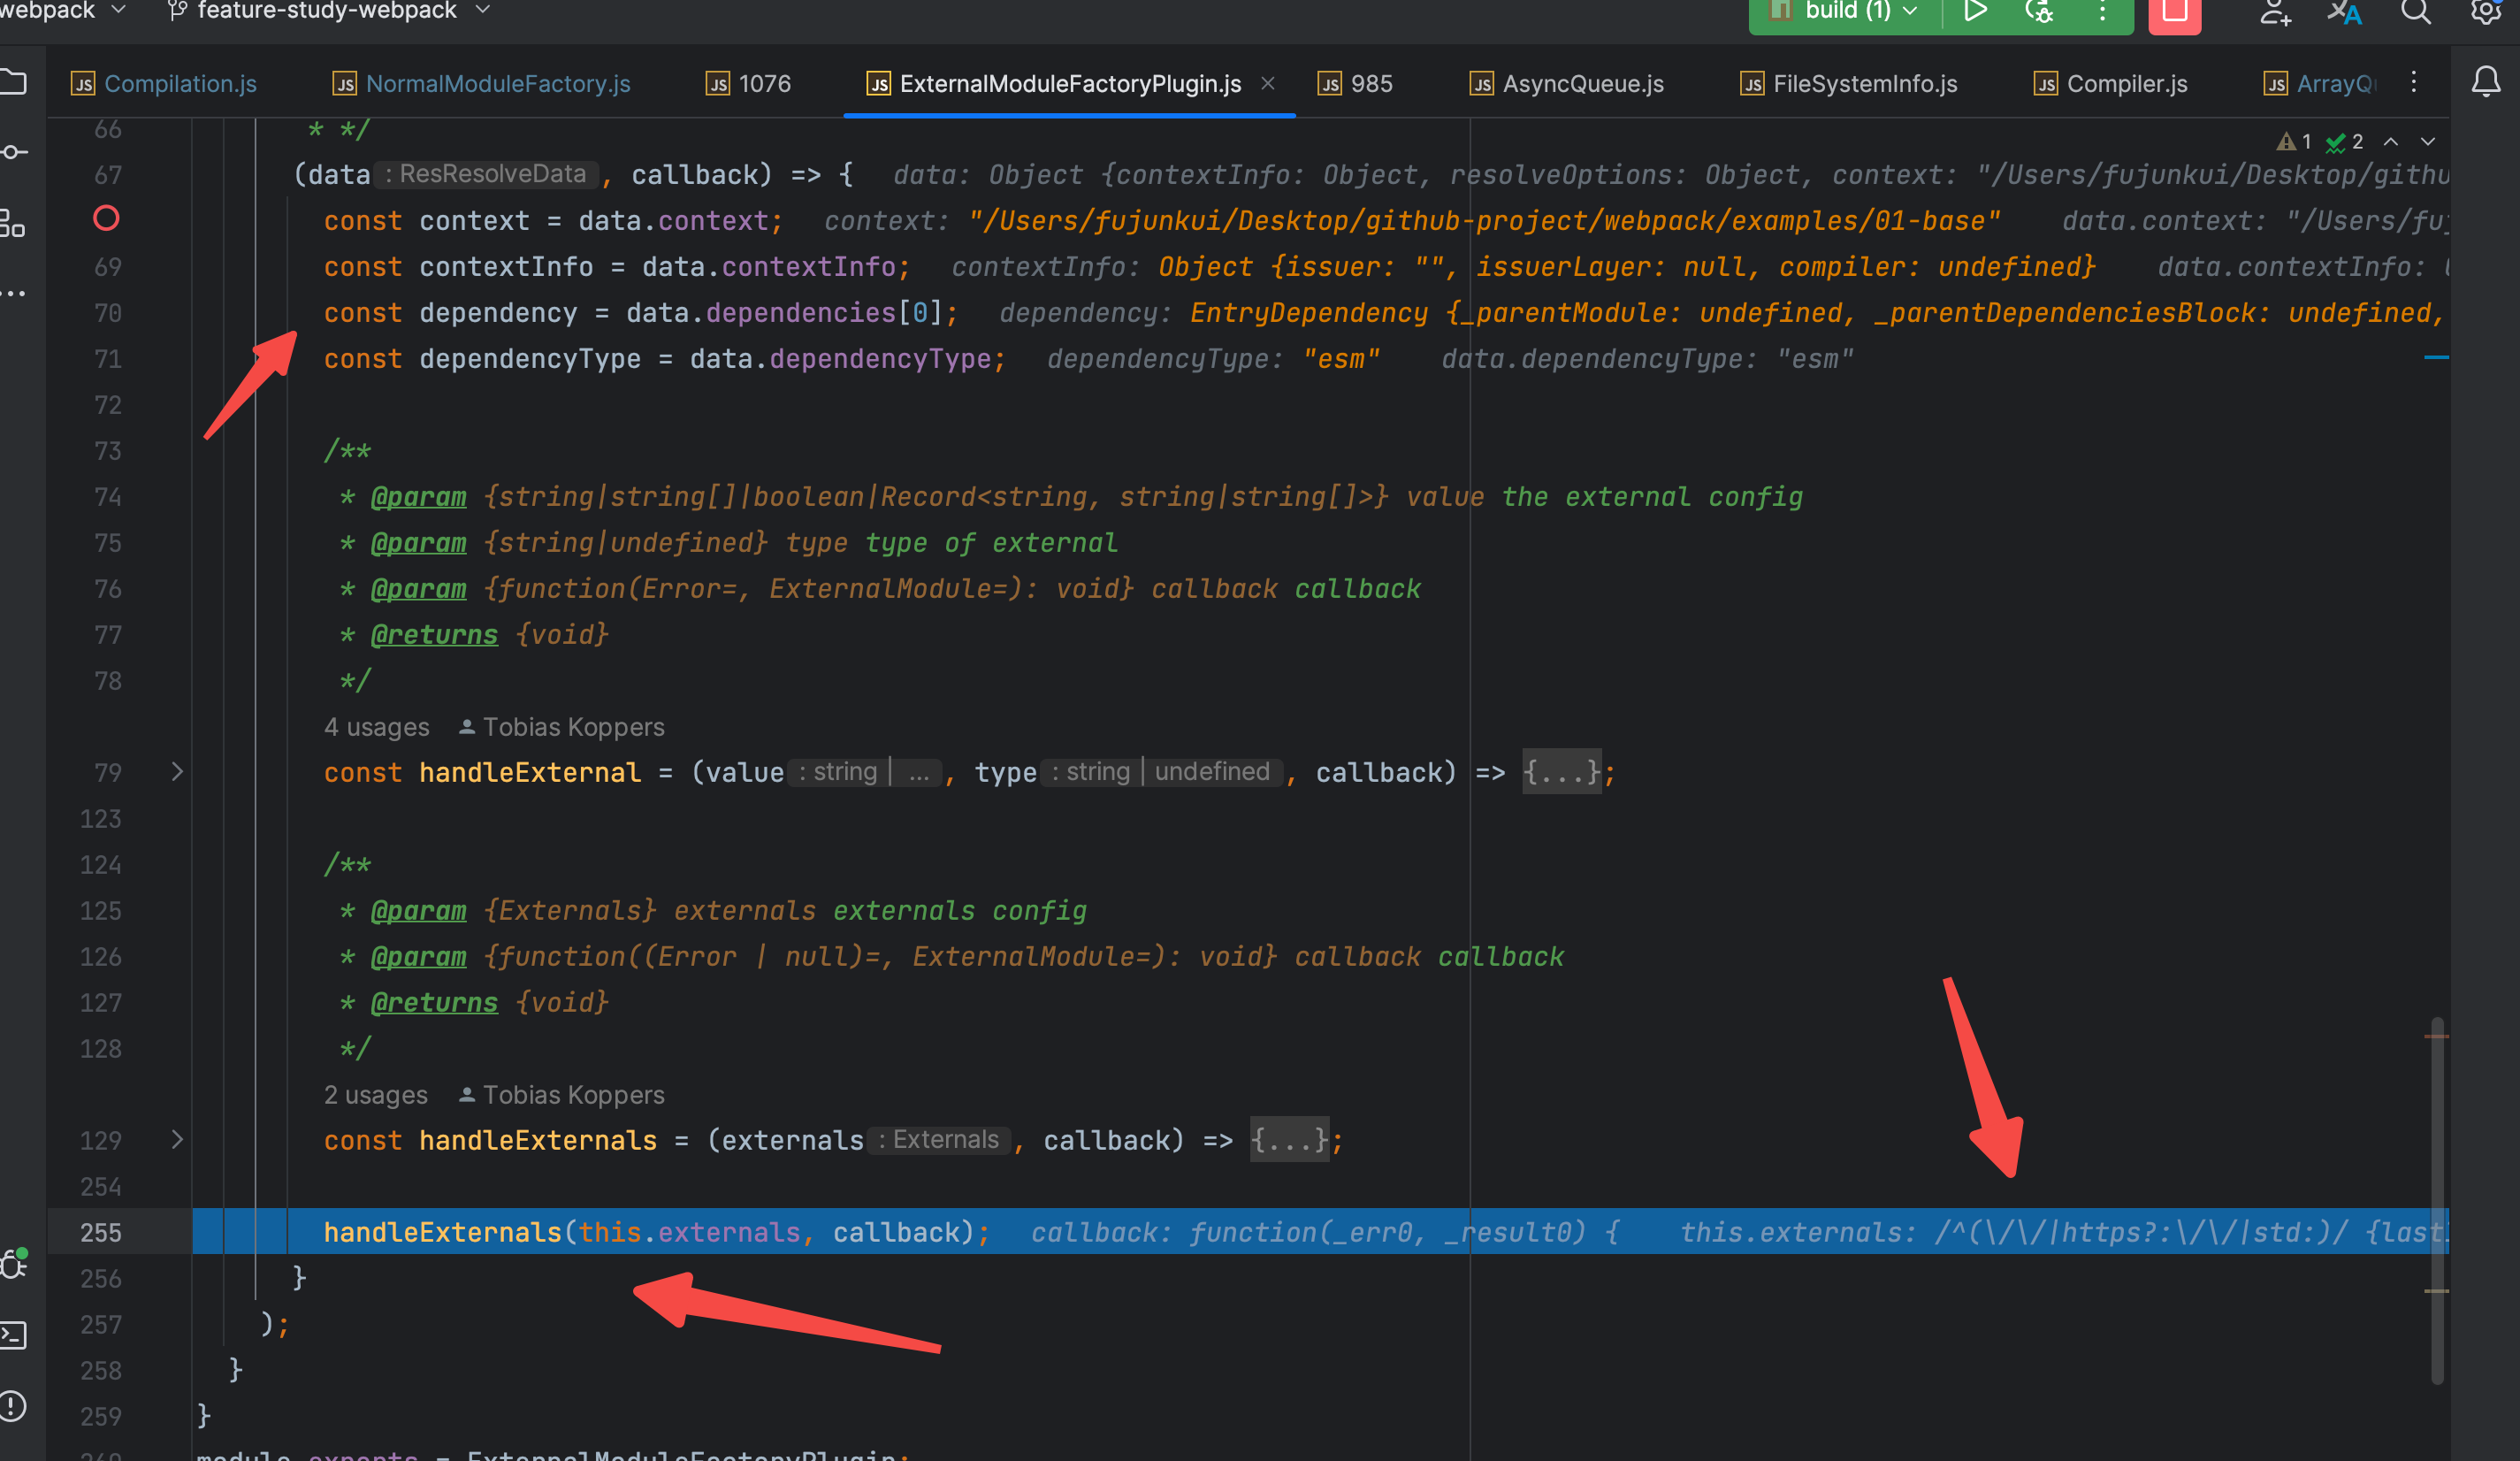
发现此插件的逻辑分为两部分,第一部队是去一步一步解构赋值传入的 resolveData 的数据。(不明白此处作者为啥不使用 es6 的对象解构语法去处理。。。。),然后生命两个函数,最后调用handleExternals 函数,传入 ExternalModuleFactoryPlugin插件 实例的 externals 属性,注意看此处的 externals 属性是 /^(\/\/|https?:\/\/|std:)/ (这个正则表达式用于匹配字符串的开头是否以”//“或”http://“或”https://“或”std:“)。 ExternalModuleFactoryPlugin 是 Webpack 的内置插件之一,它的作用是帮助 Webpack 处理外部的模块引入。在使用 Webpack 打包时,如果一个模块需要从外部引入,可以通过设置 externals 属性实现。ExternalModuleFactoryPlugin 插件会通过检查这些外部模块的配置,生成对应的 ExternalModule 对象,在 Webpack 运行过程中当这些模块被请求时,ExternalModuleFactoryPlugin 会负责处理这个请求。 进入handleExternals 函数里,结果如下图:
断点进入:
如果是你,易读和强大的能力你会选择哪个呢? 继续断点下去。
部分核心代码的运行时的参数截图如下: 
resolveRequestArray是必须要执行的,此处附上相关的运行结果 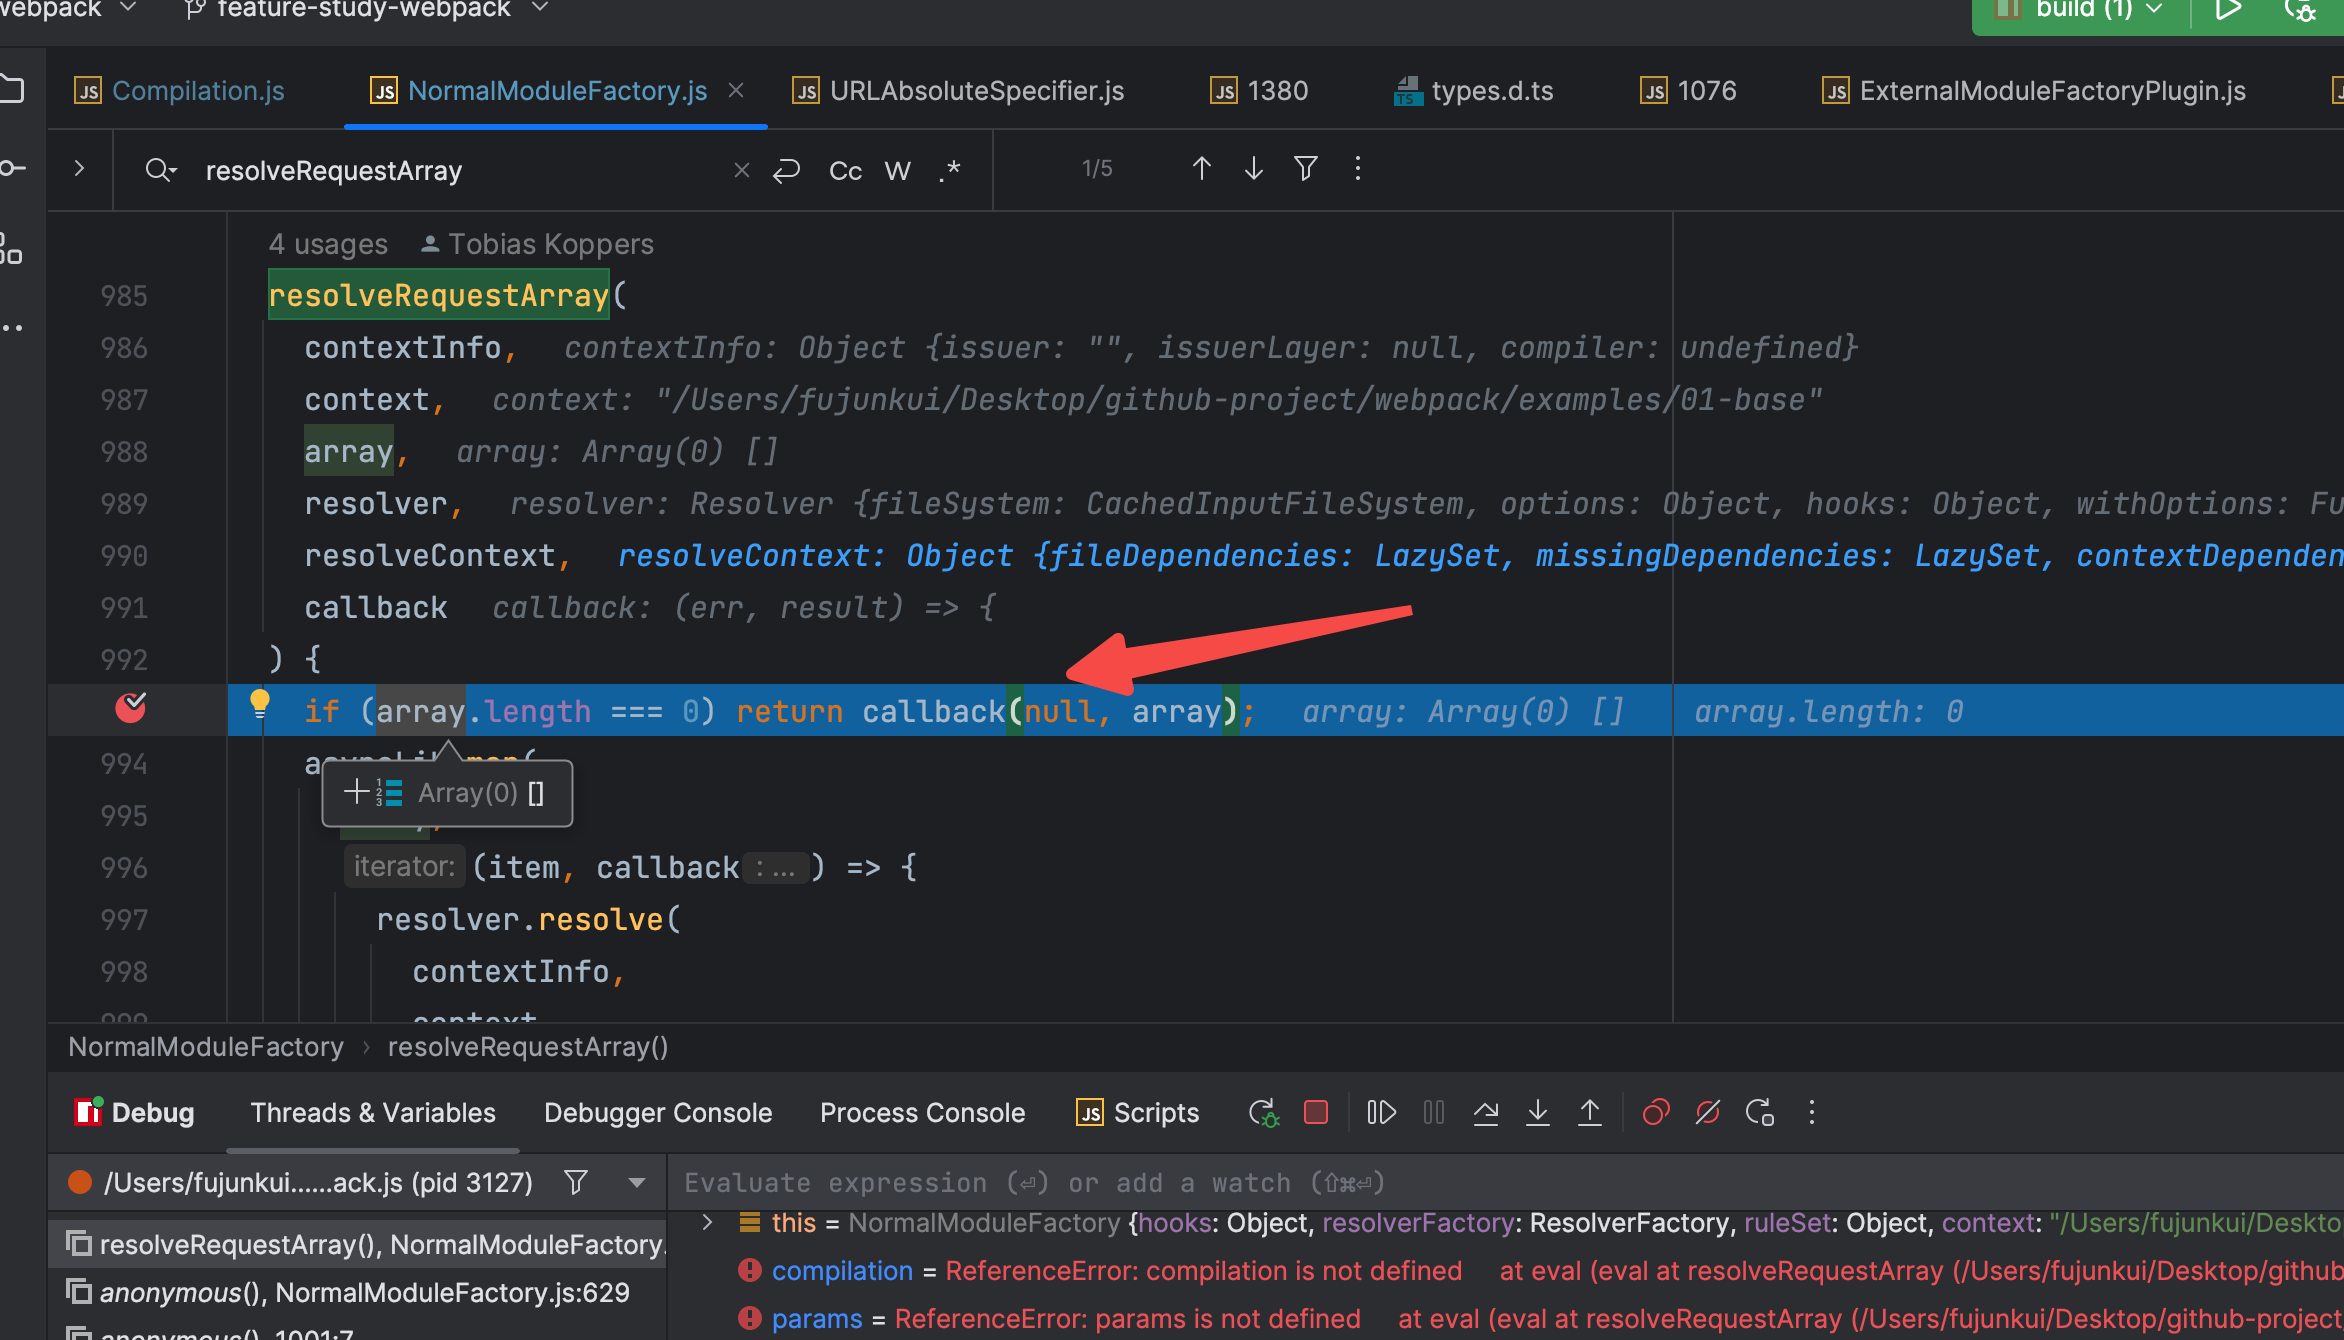
最后走进了 defaultResolve(context) 里。进入 此函数看执行过程。 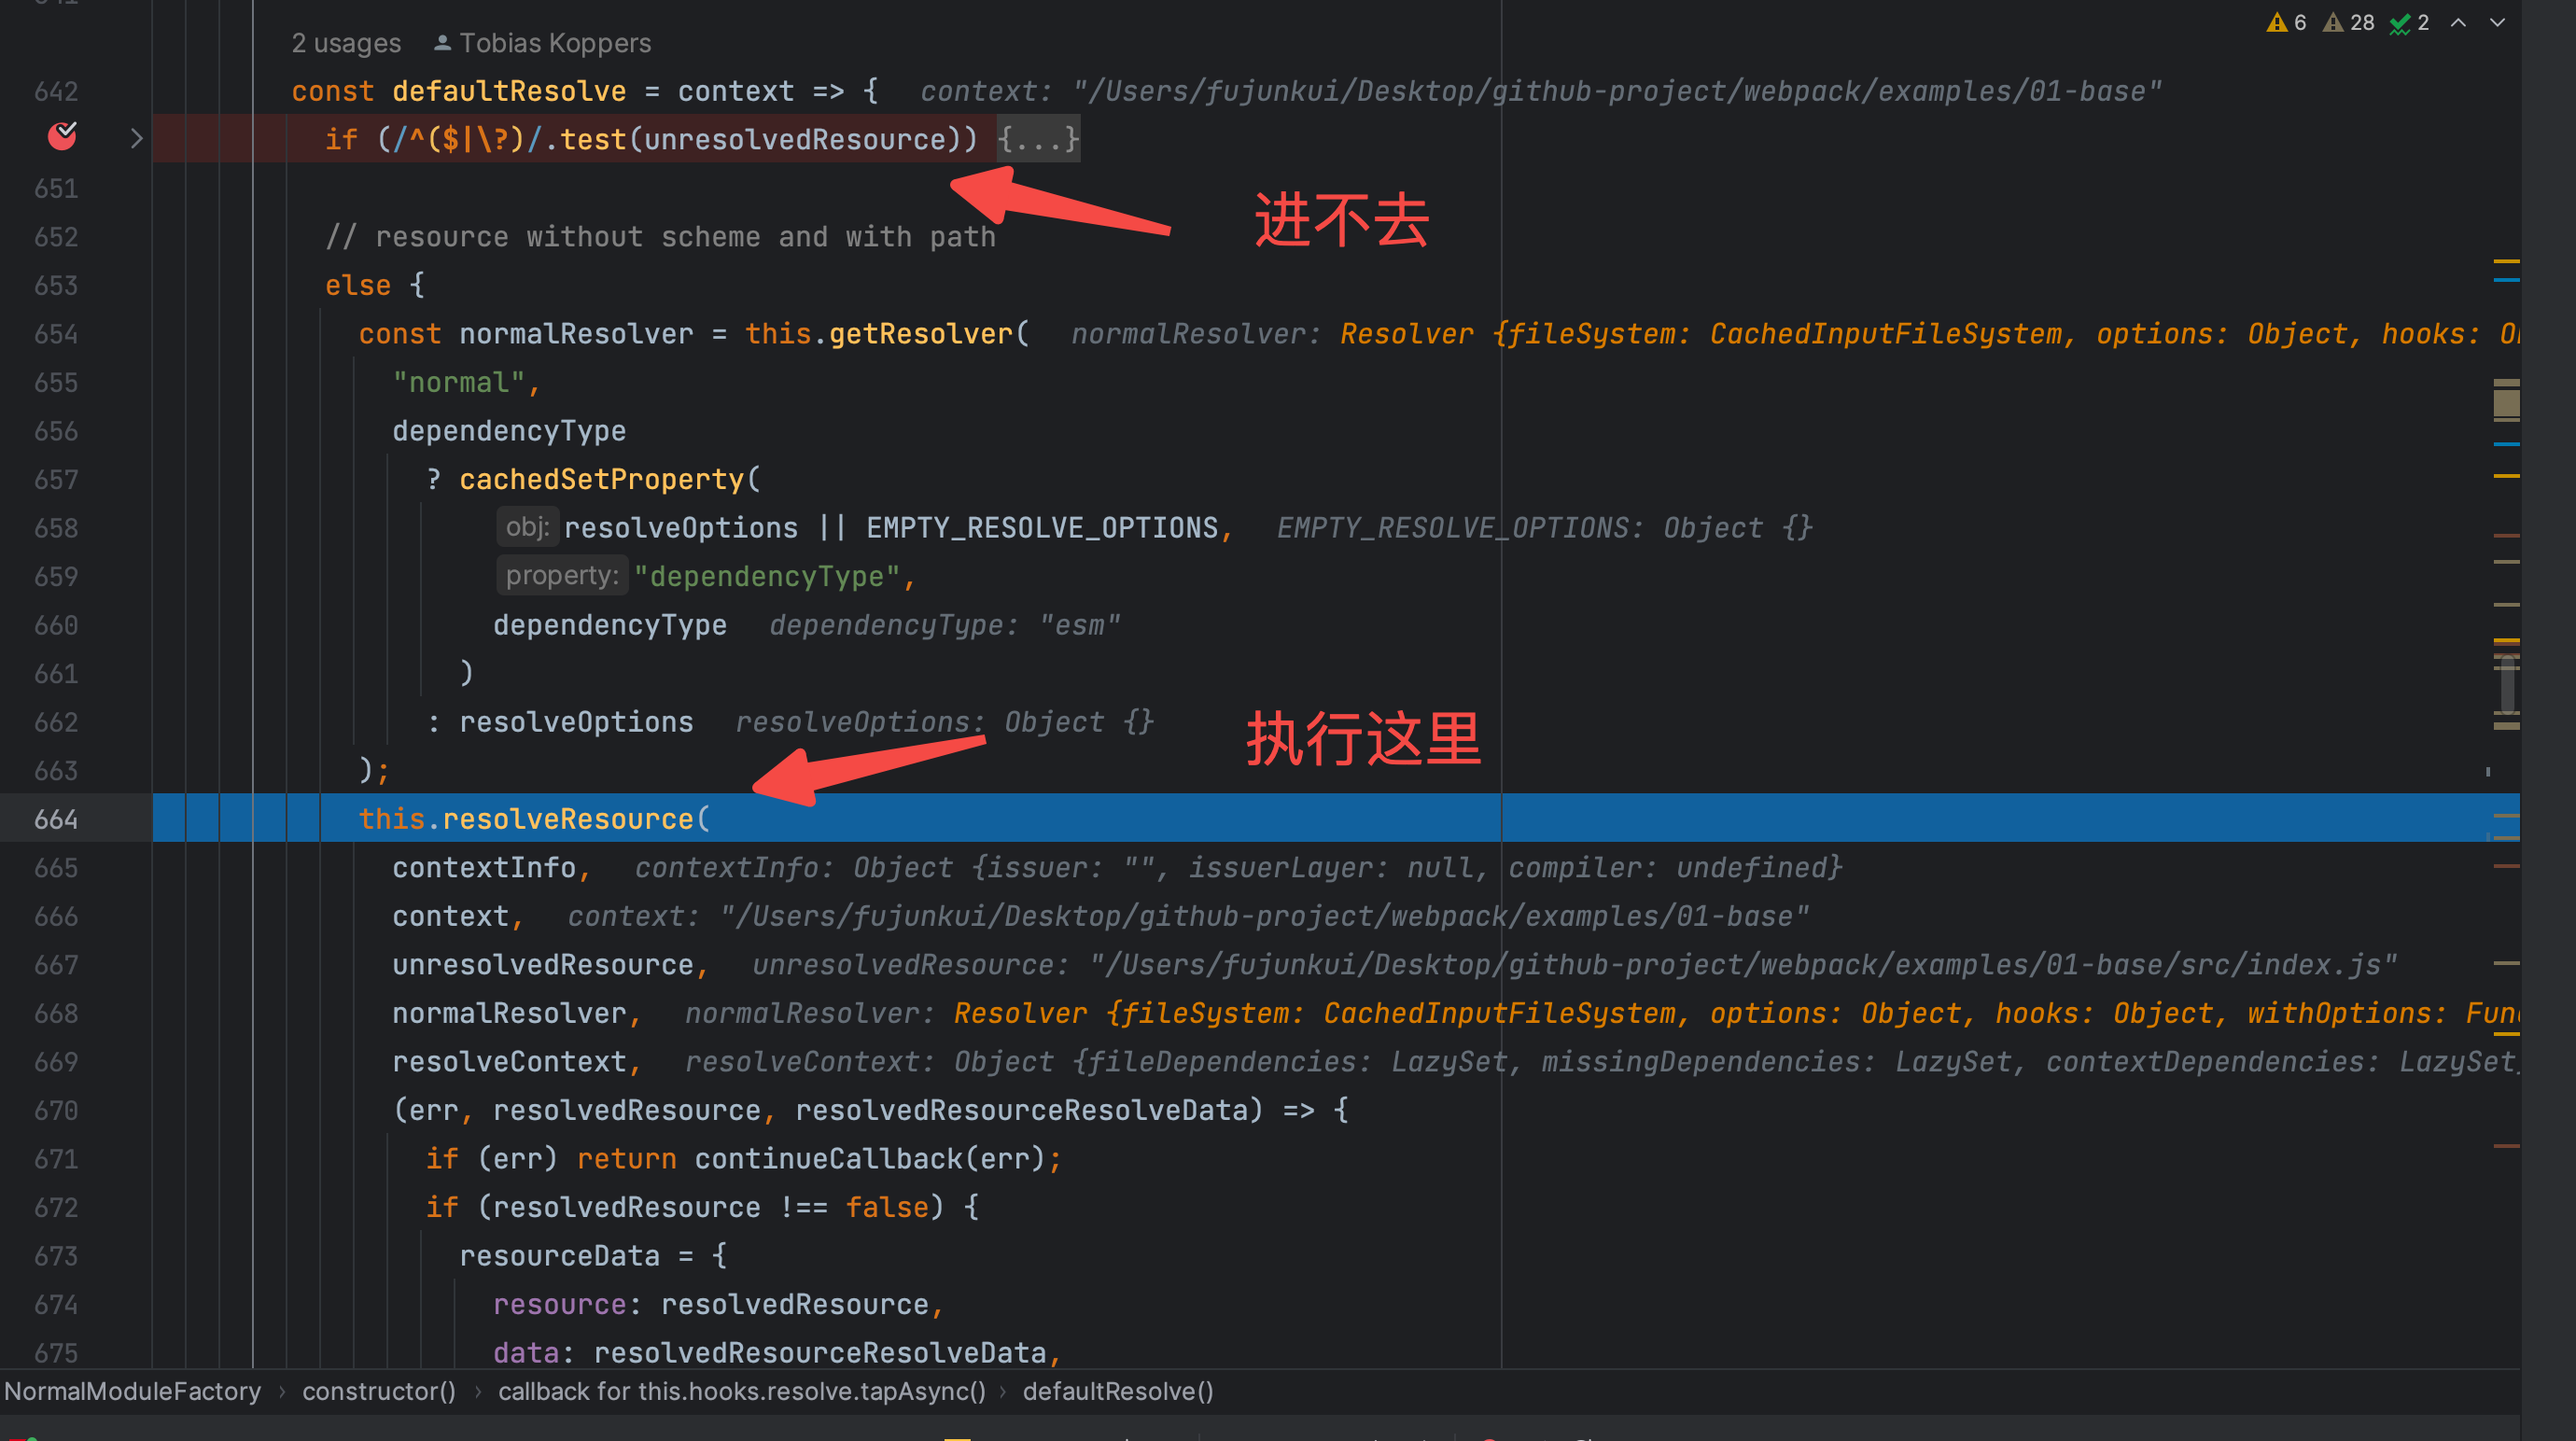
最后进入resolveResource函数里,断点进入。 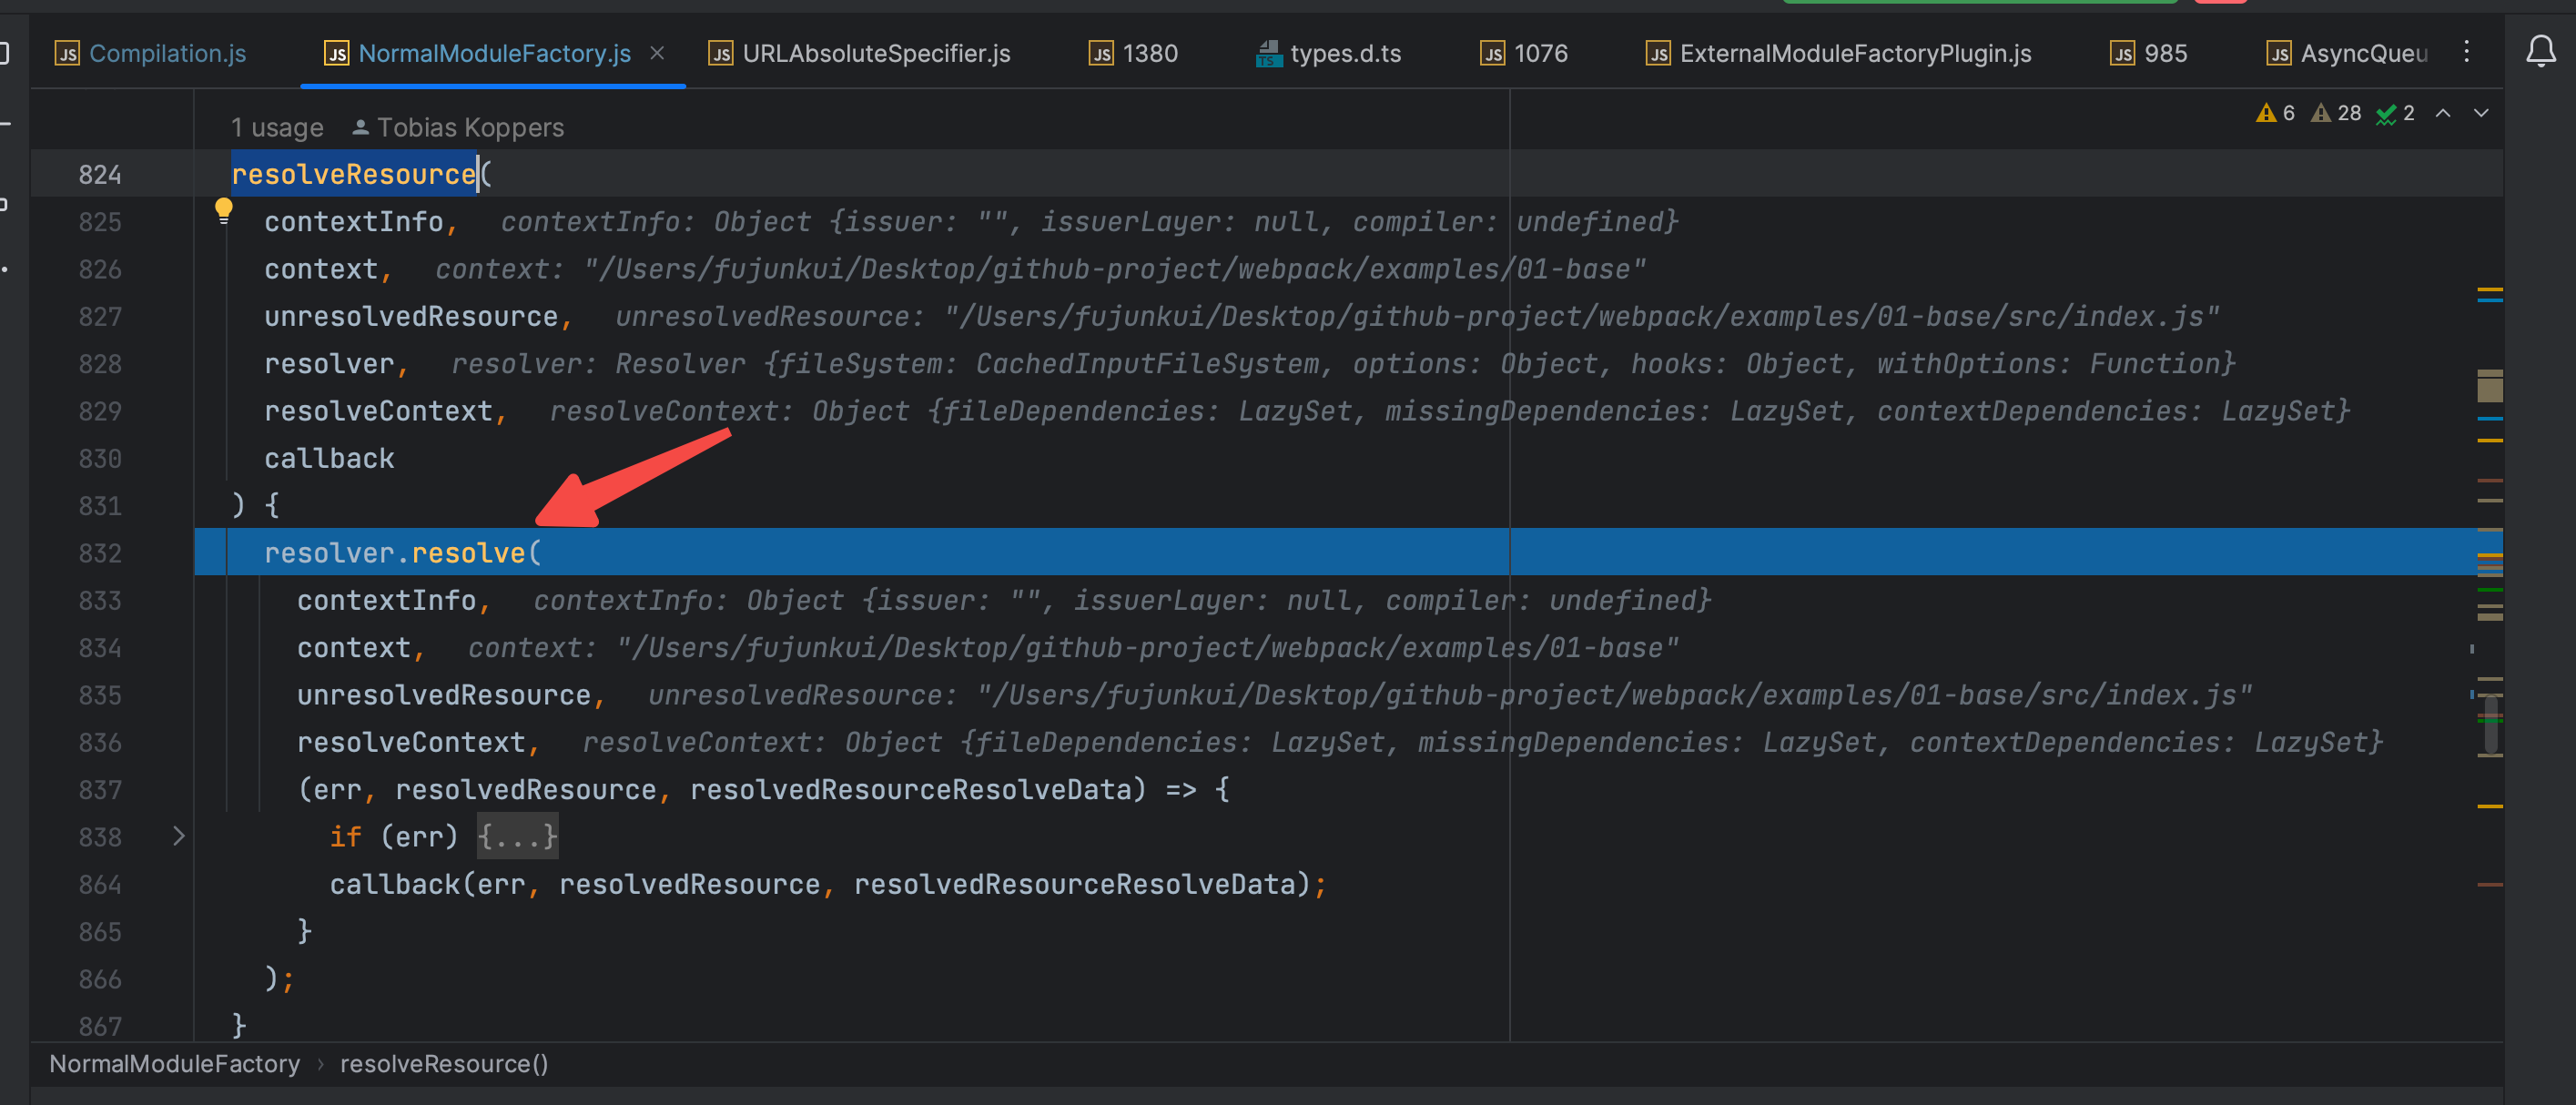
调用resolver.resolve的方法,获取到 unresolvedResource 的真实路径。 关于此处,如果你不了解 resolver.resolve的方法的原理,可以去看我前面的文章,【webpack核心库】耗时7个小时,用近50张图来学习enhance-resolve中的数据流动和插件调度机制,可以搜索一下上面的标题,也是干货满满。 继续断点,走到callback 接受 resolve 处理以后的结果如下图。 进入callback 里。 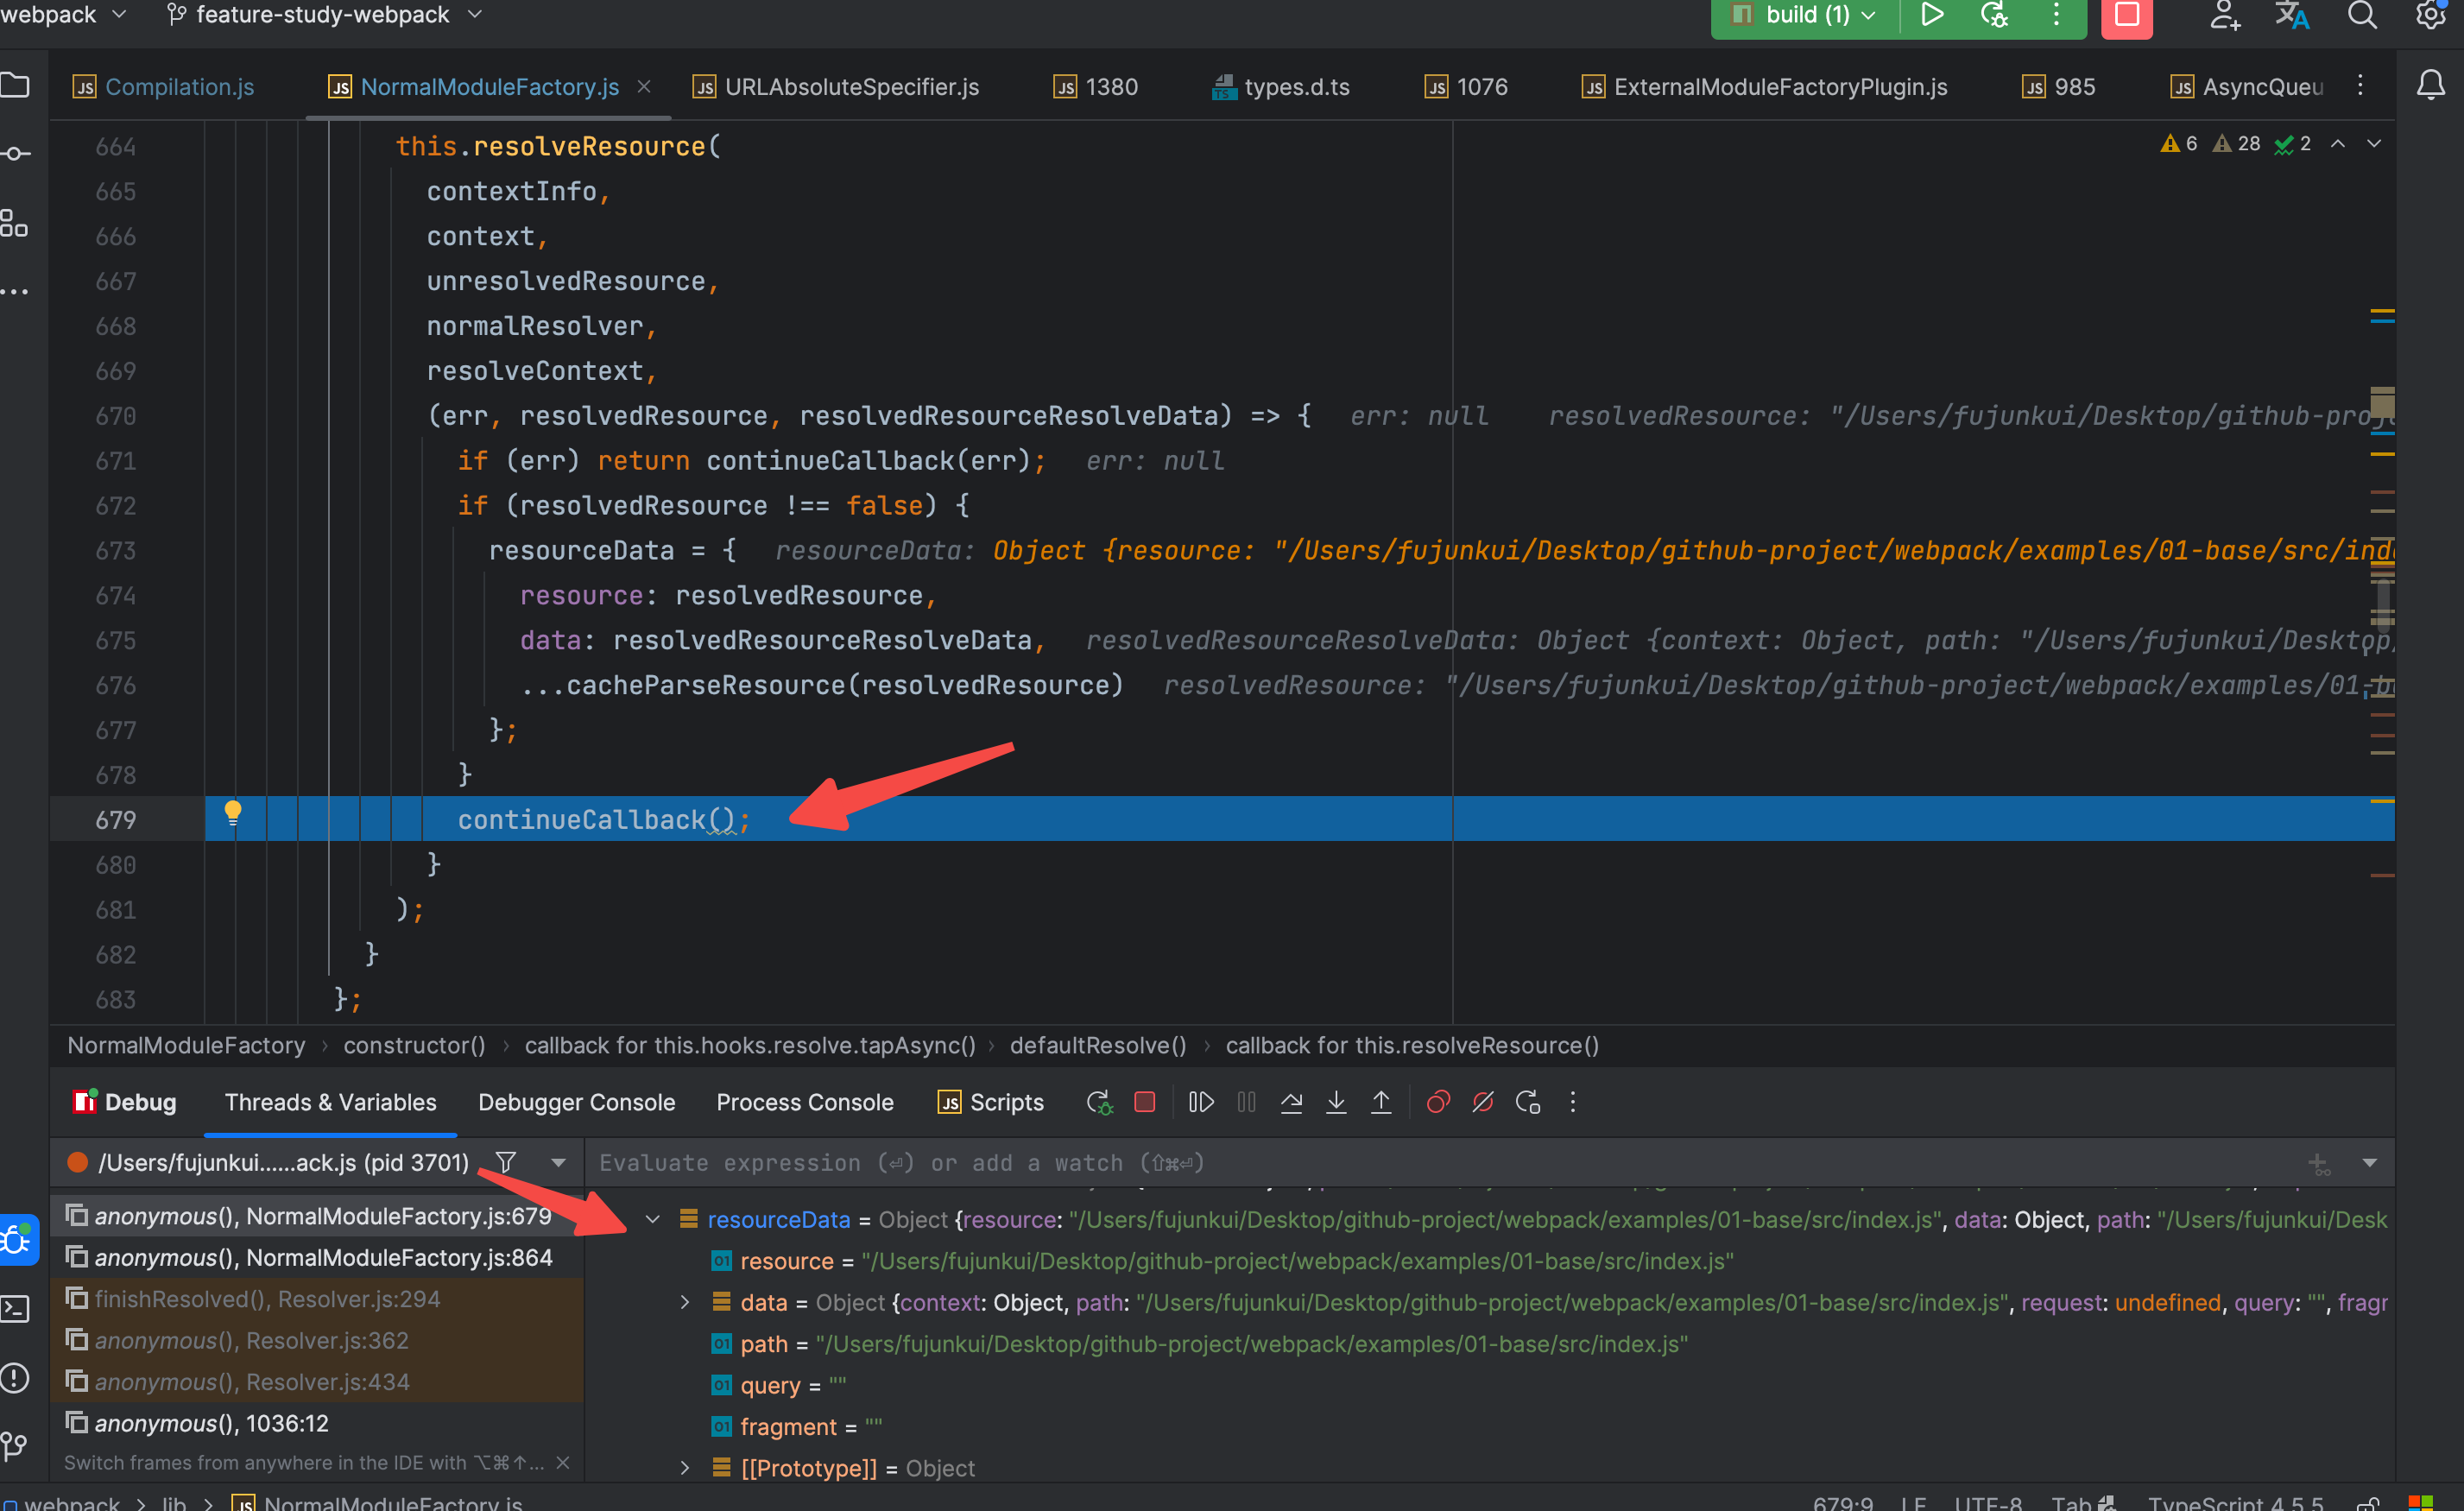
发现最后走到了 continueCallback 函数里。 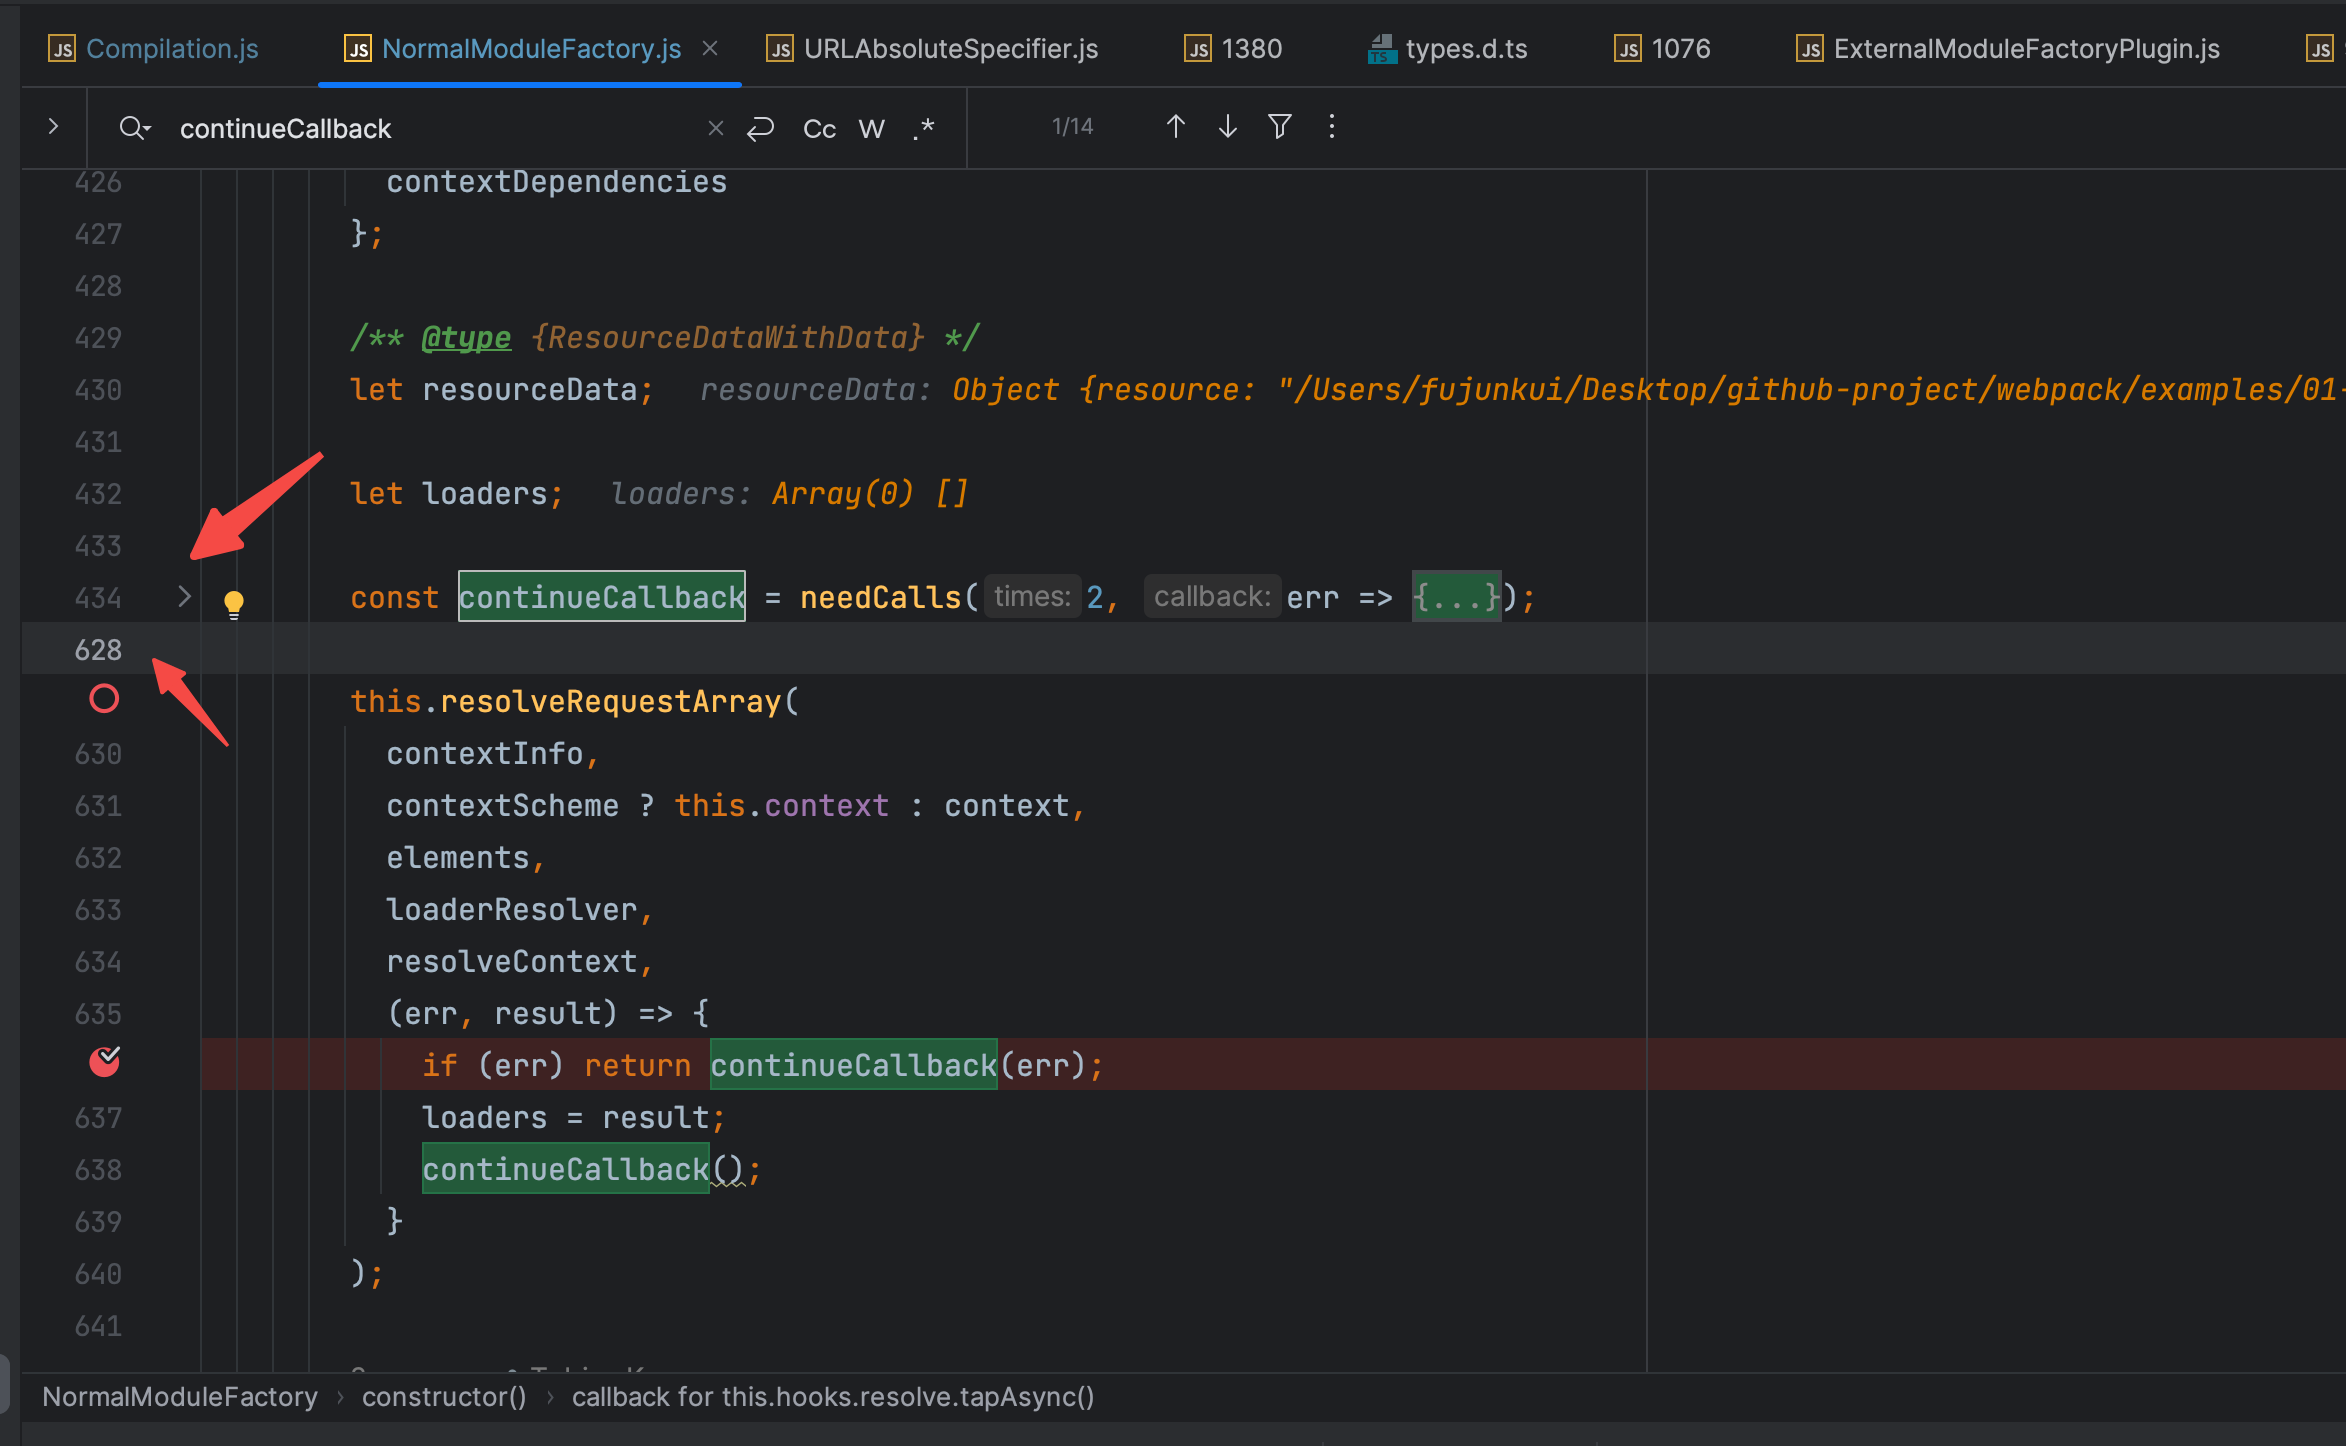
关于此函数,内容有些多,此处就不做进行解析了。直接断点回到刚刚的 this.hooks.resolve.callAsync的部分。在其 callback 内部打上断点。
继续断点 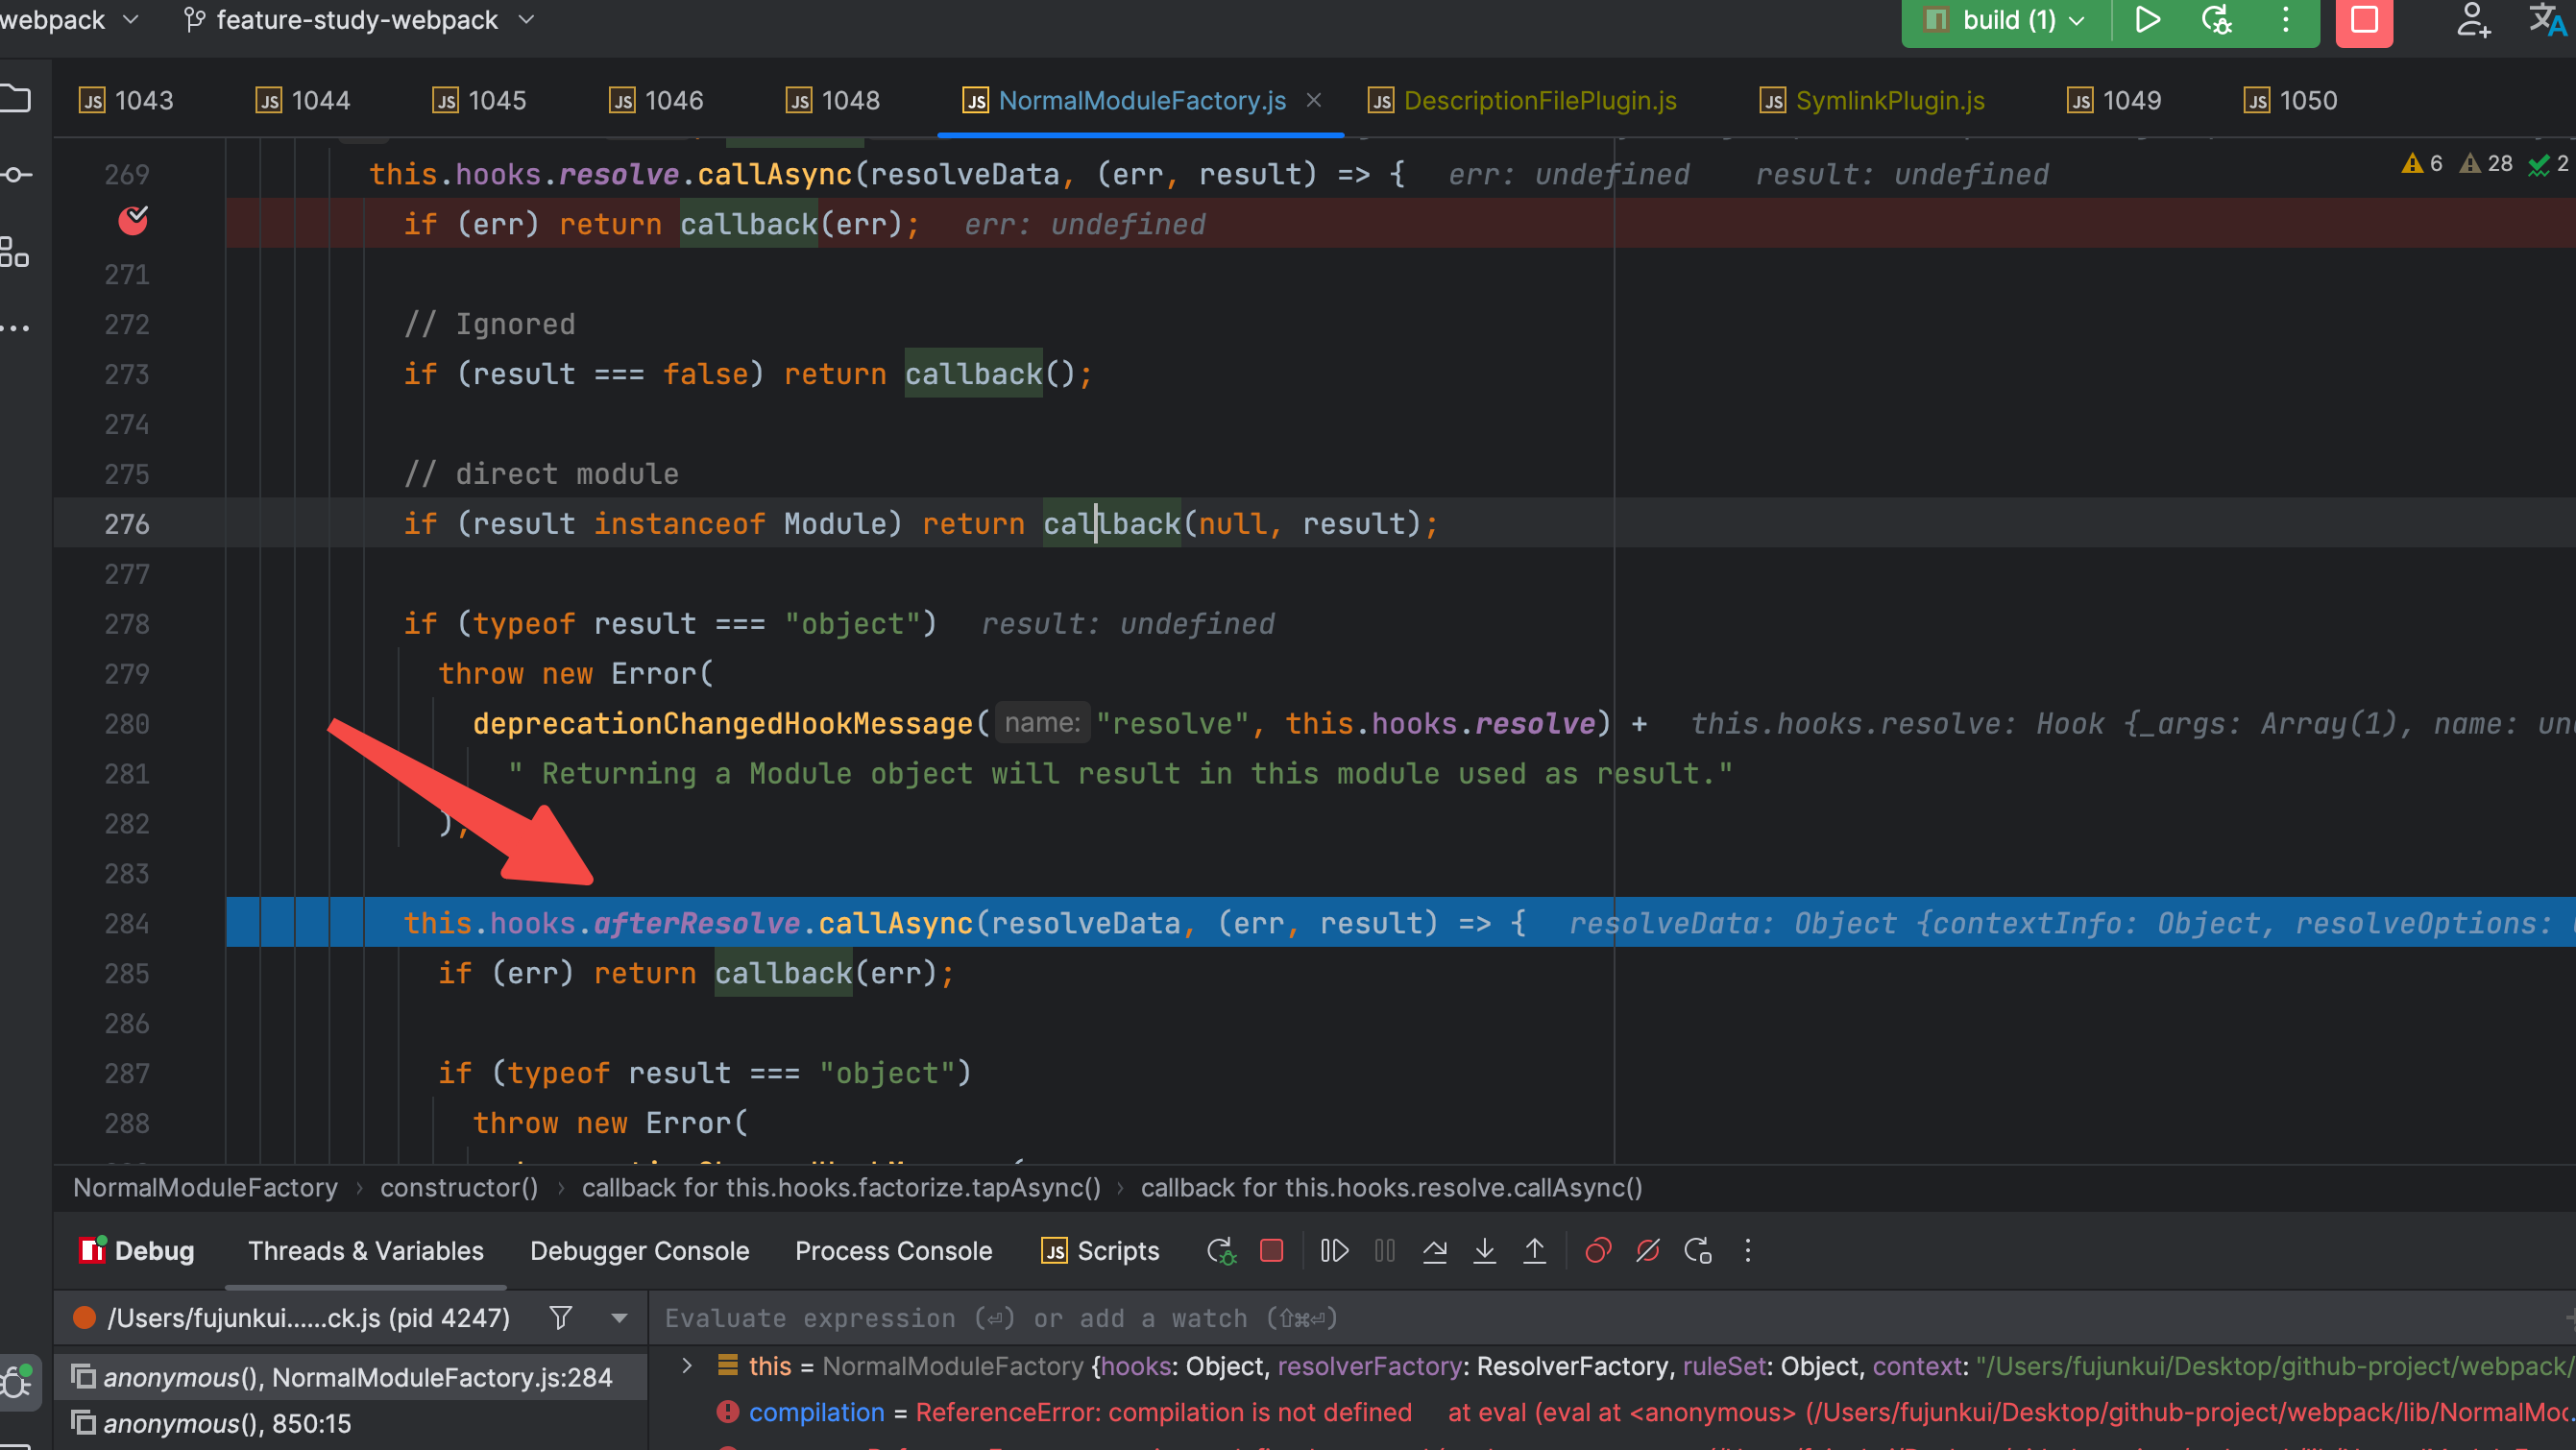
因为 err 和 result都为空,最后走到了afterResolve的hook里。 大家都应该会调试了,直接说结果了,没有插件去监听afterResolve的hook,所以直接进其内部了。 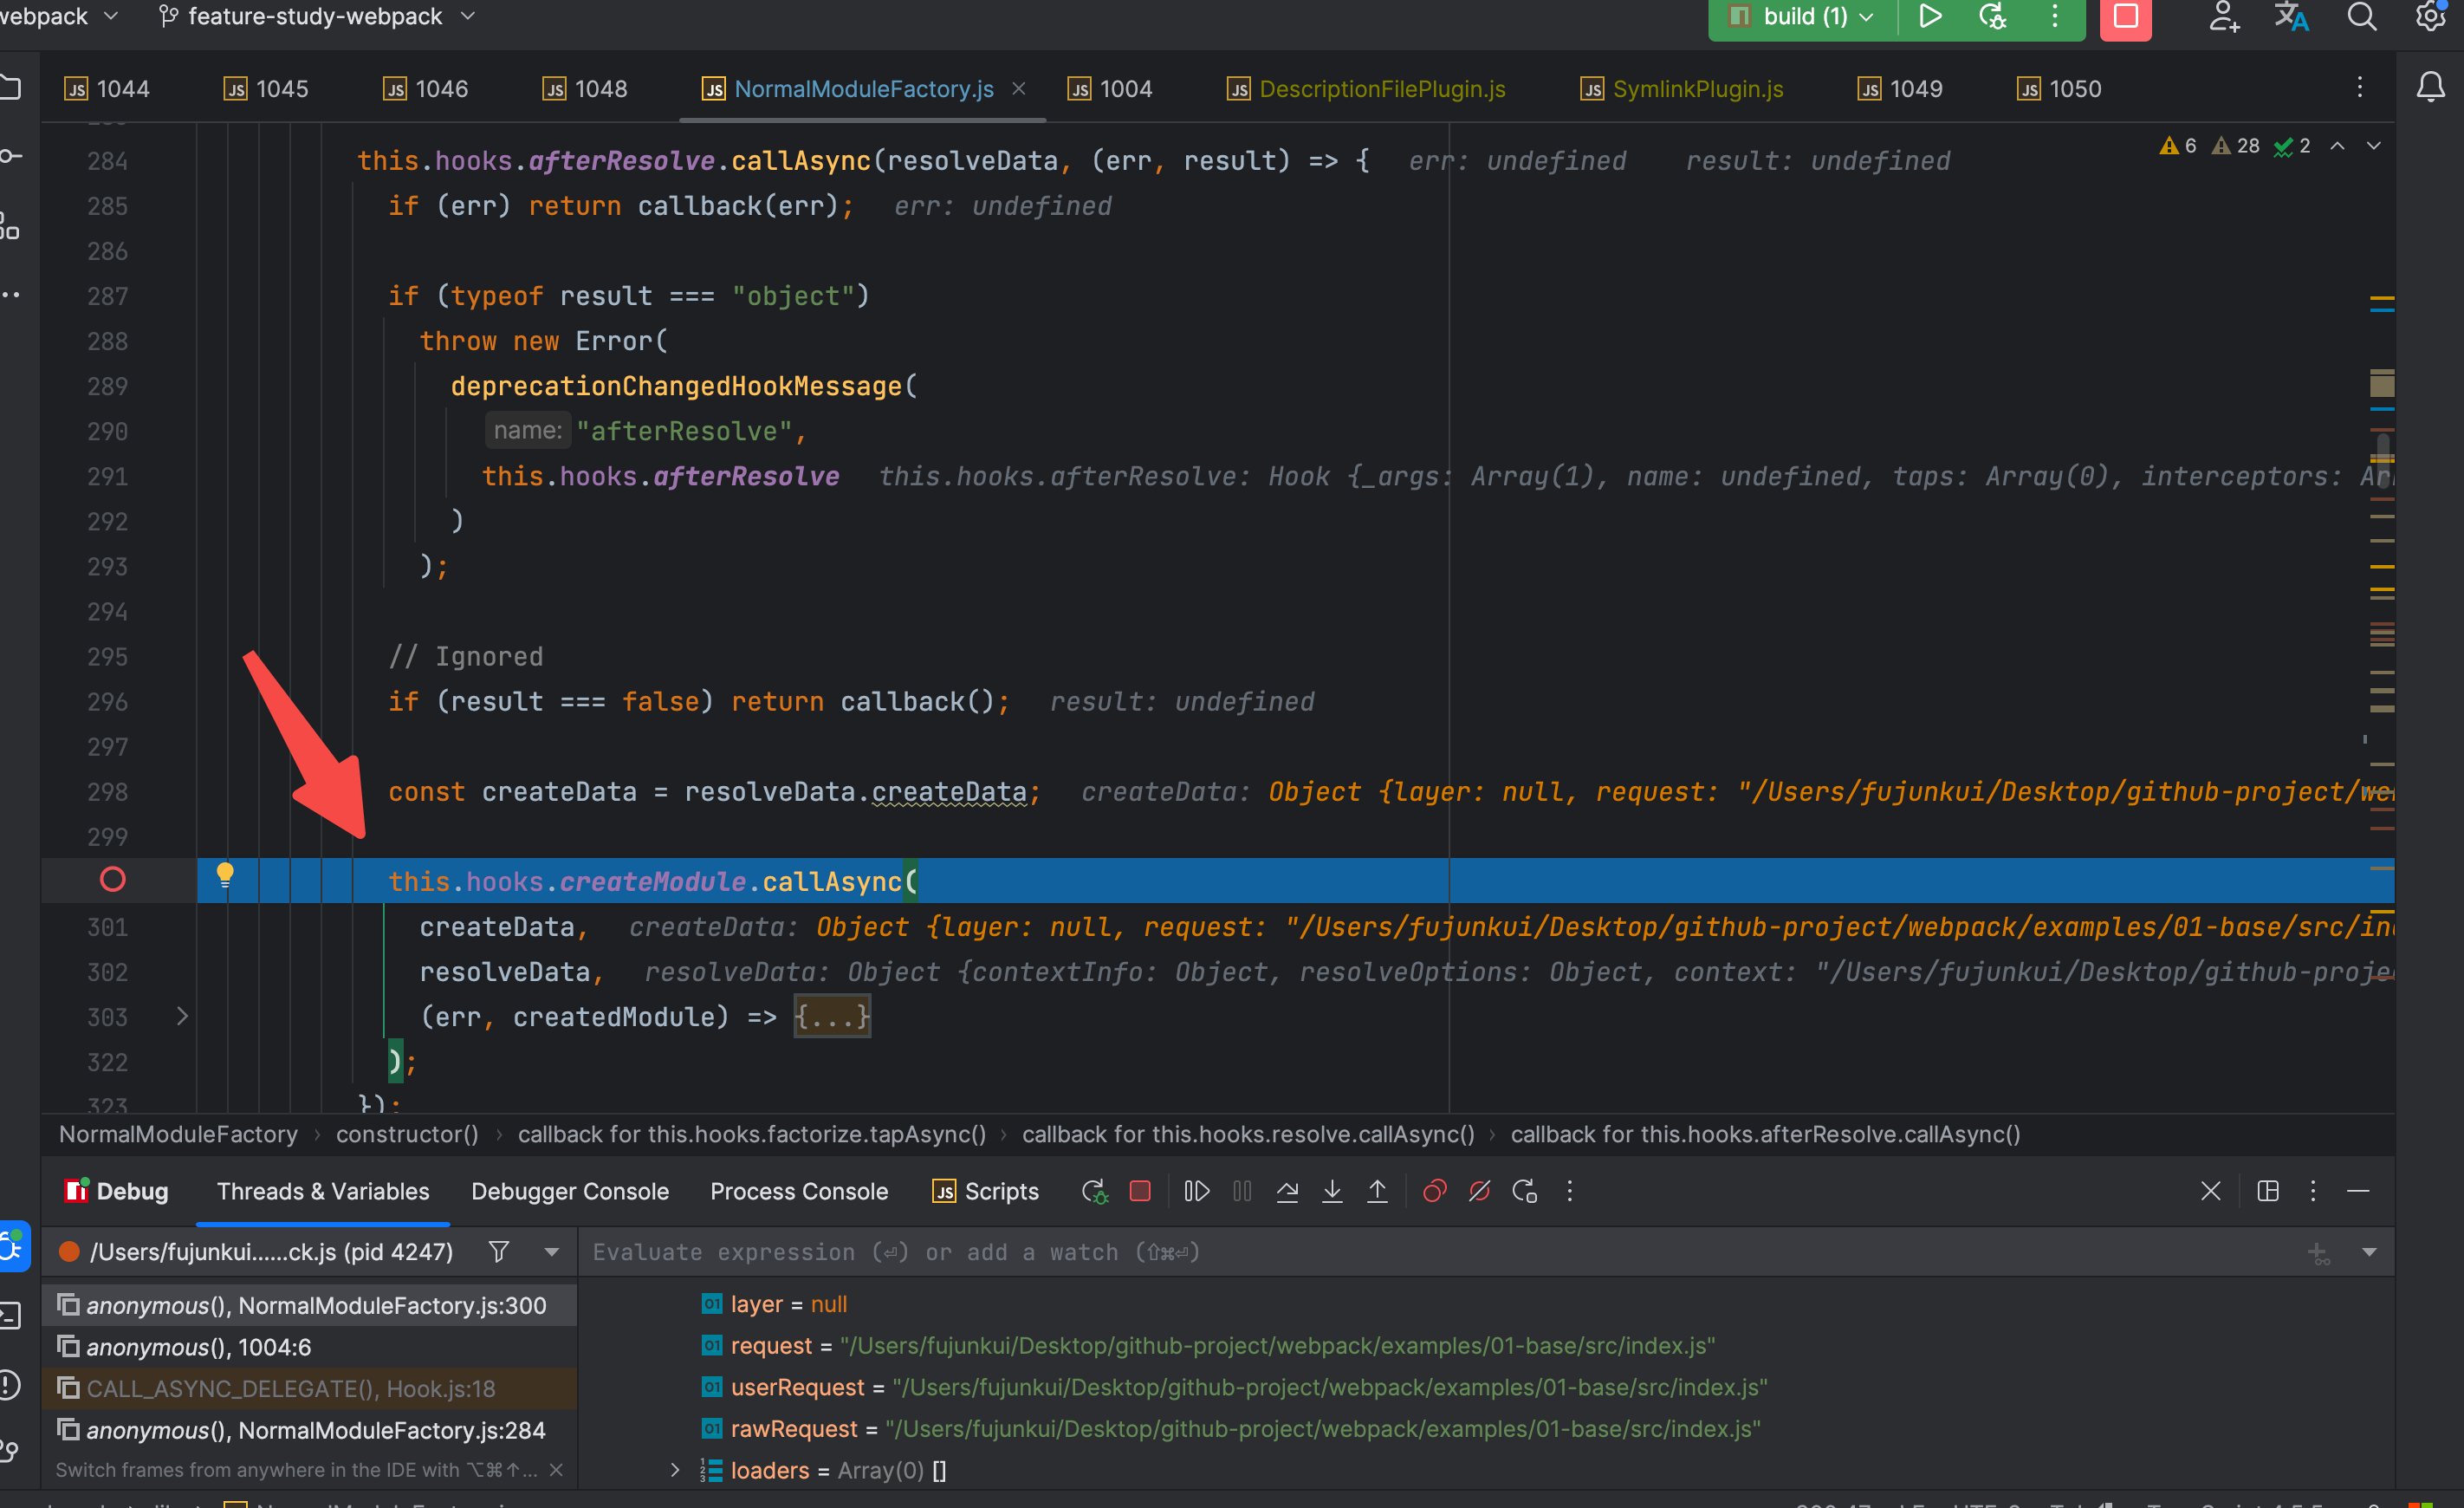
进入此hook内部以后,又是一堆的错误判断,最后走进了 createModule 的 hook。 2.6 进入 createModule 的 hook 【将路径等信息变为Module】此hook还是无插件监听,直接上图看其callback做了啥: 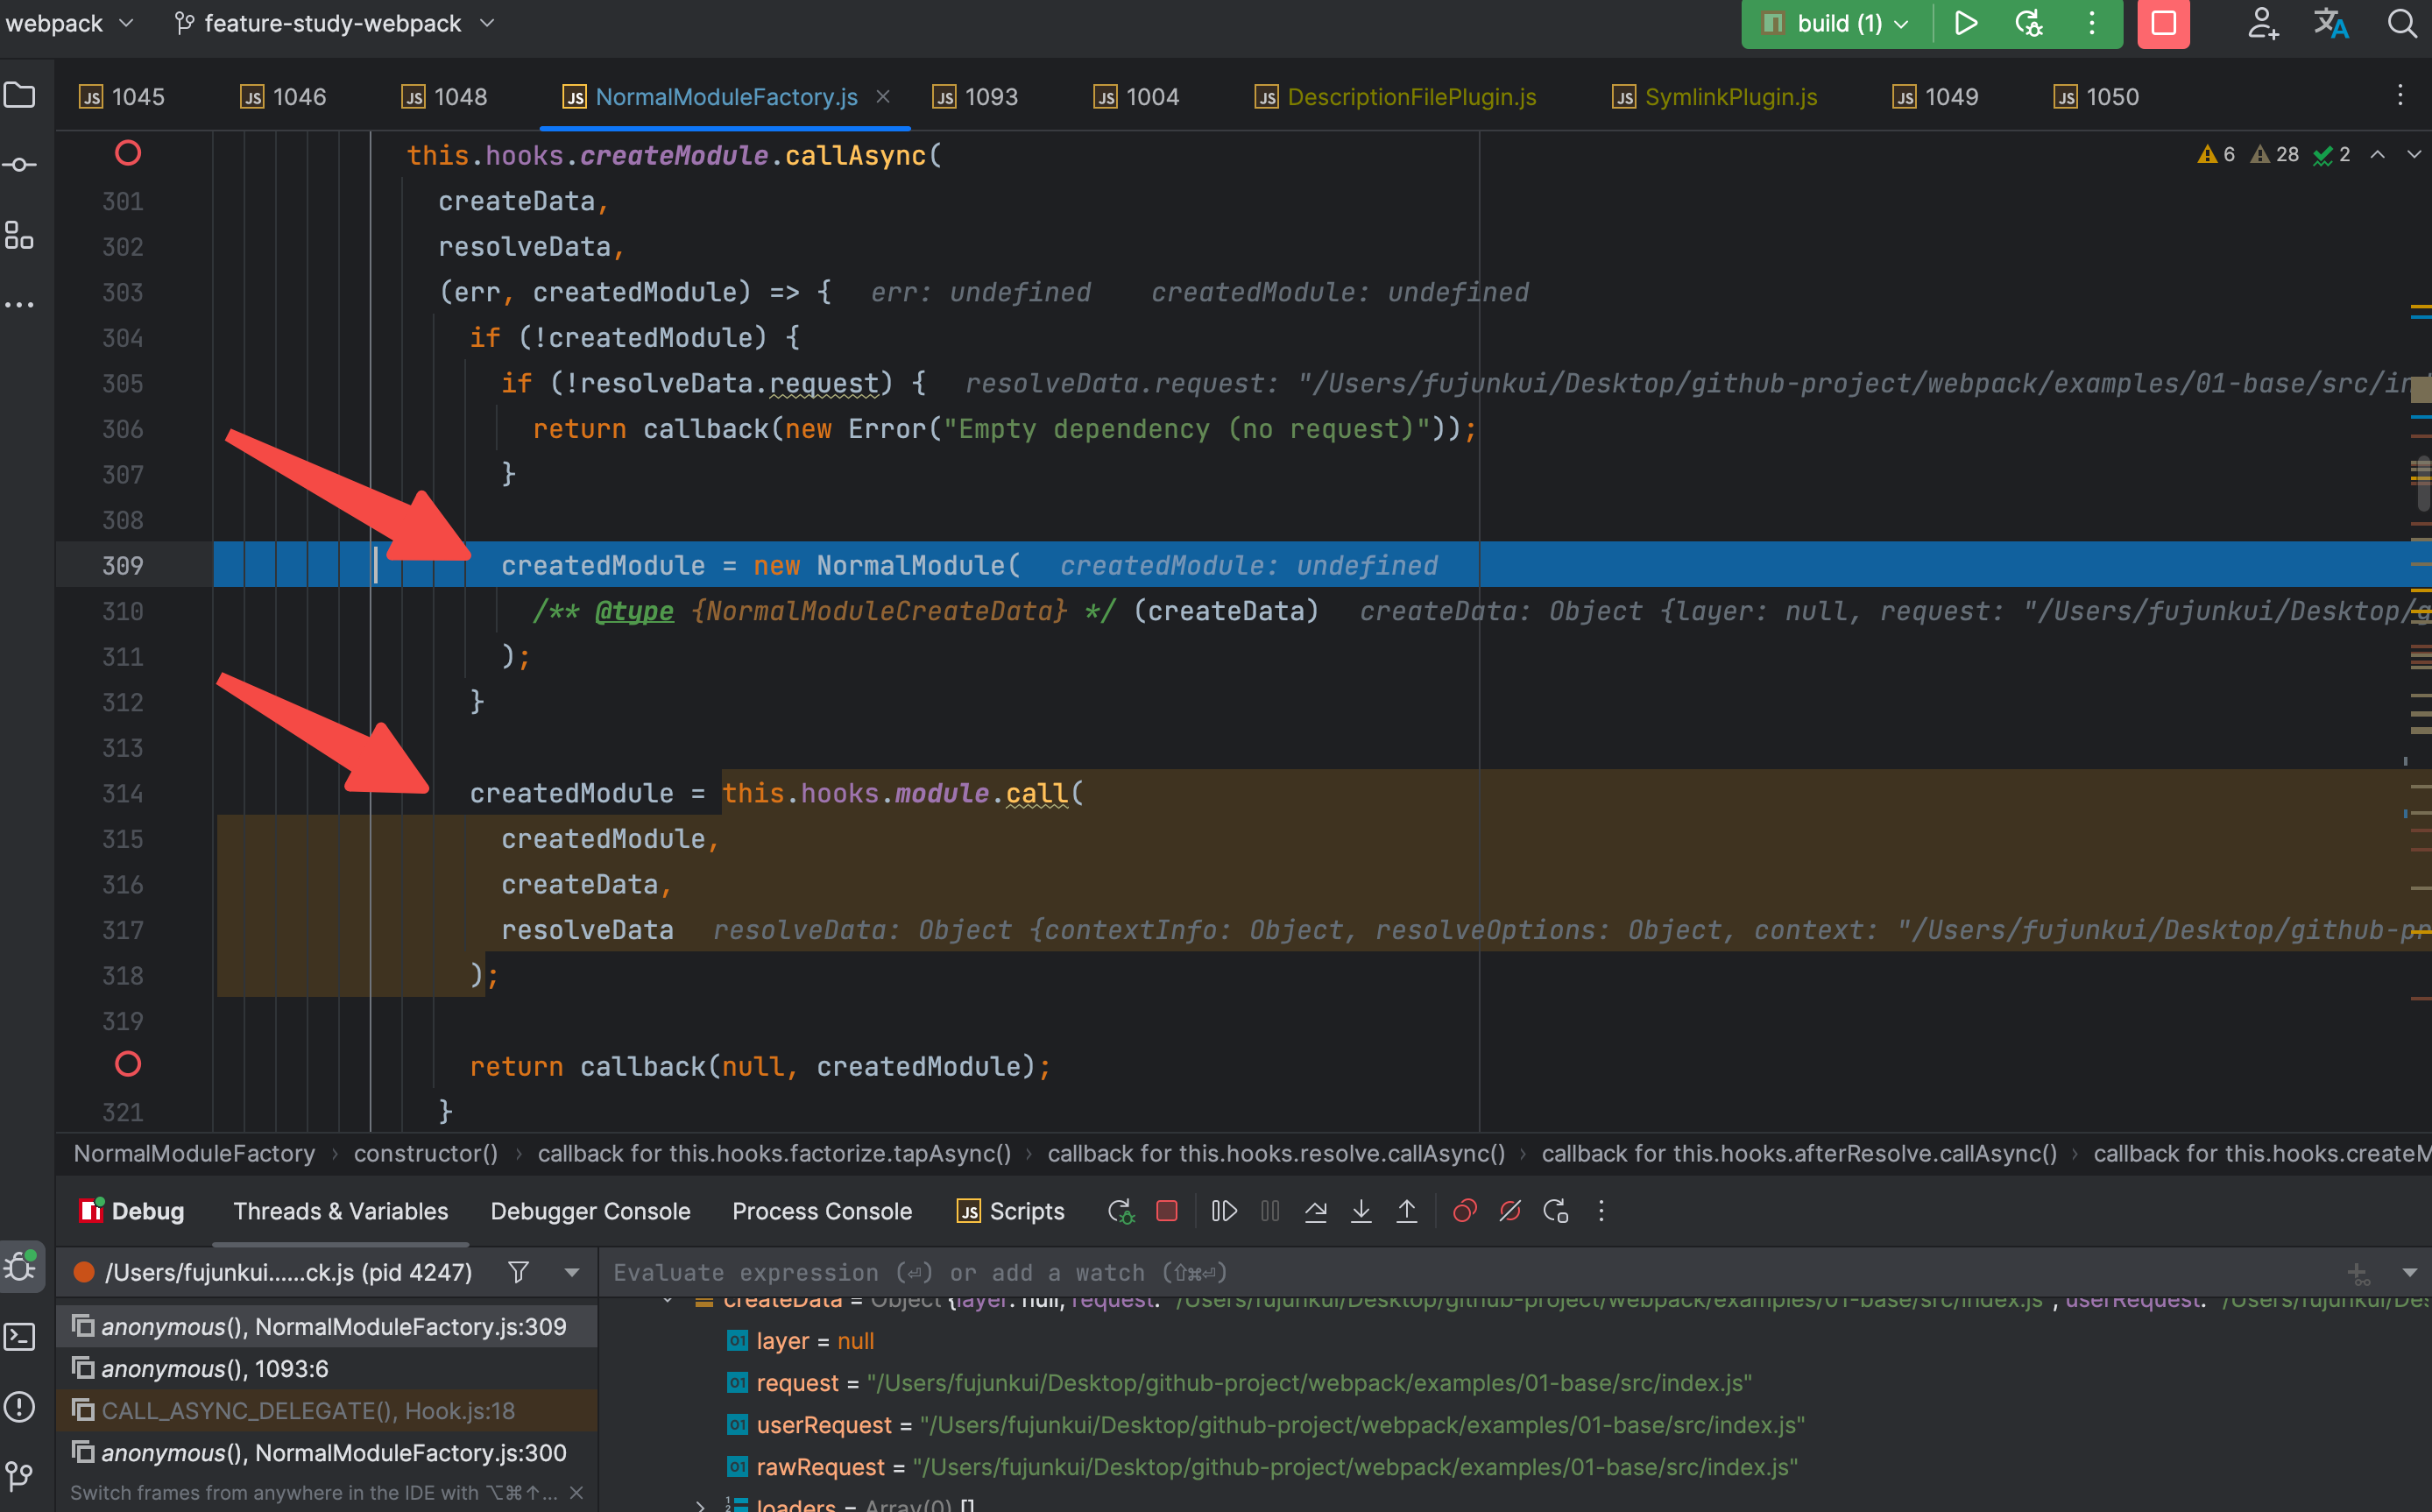
此处对整体的webpack来说是比较核心的,将路径代表的文件给变成了模块化的Module对象。(读者可以好好理解其背后的含义) 至于Module 对象 不是本章的重点,这里只需要明白 路径代表的文件变为了 Module对象 即可。 然后继续向下执行,调用 module的hook。直接看注册此hook的SideEffectsFlagPlugin插件。 Webpack 5 中的 SideEffectsFlagPlugin 主要用于优化项目的构建速度和代码体积。它能够在打包时根据配置文件中的 "sideEffects" 属性,自动确定哪些模块是有副作用的(即会对全局状态产生影响),哪些模块是纯粹的(即不会对全局状态产生影响)。当一个模块被判断为无副作用时,Webpack 5 会将其标记为 "side-effect-free",这样就可以进行一系列优化操作,如 tree shaking、scope hoisting 等,以减小最终打包出来的代码体积和提高加载速度。因此,通过合理配置 "sideEffects" 属性,并使用 SideEffectsFlagPlugin 插件,可以帮助开发者更好地优化自己的 Webpack 5 项目。 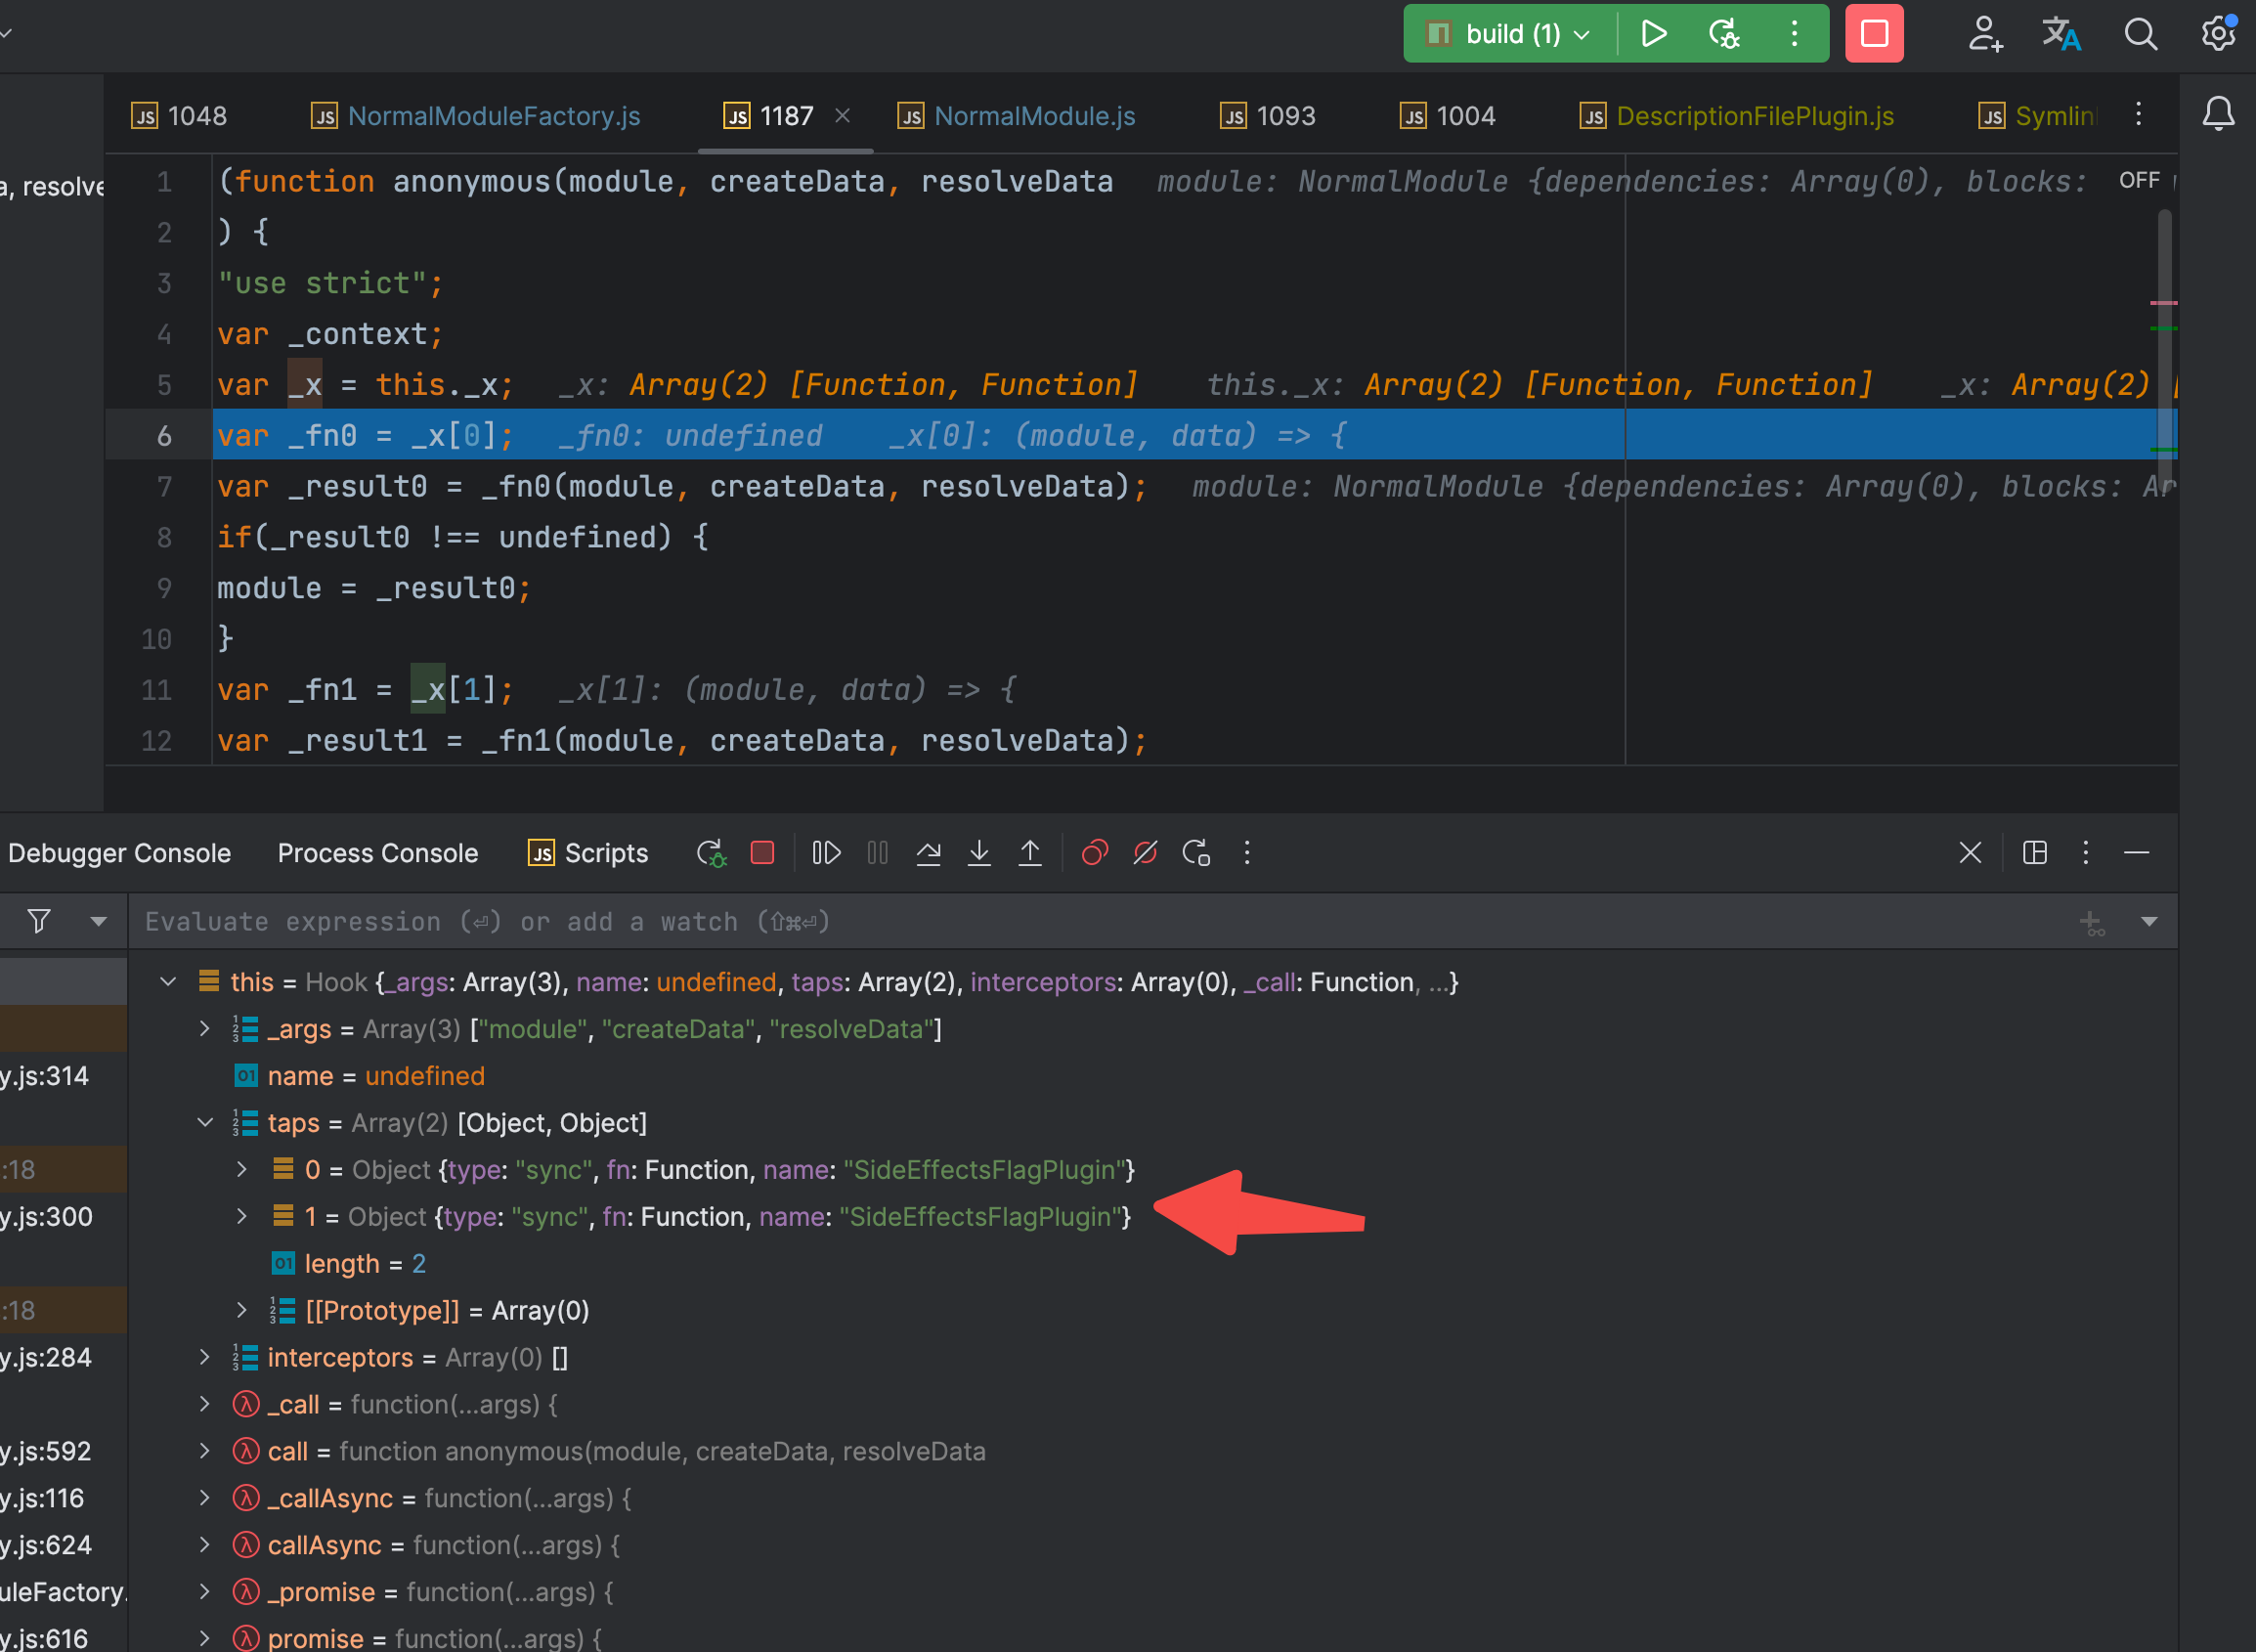
此插件里注册了两个监听函数。其执行结果如下: 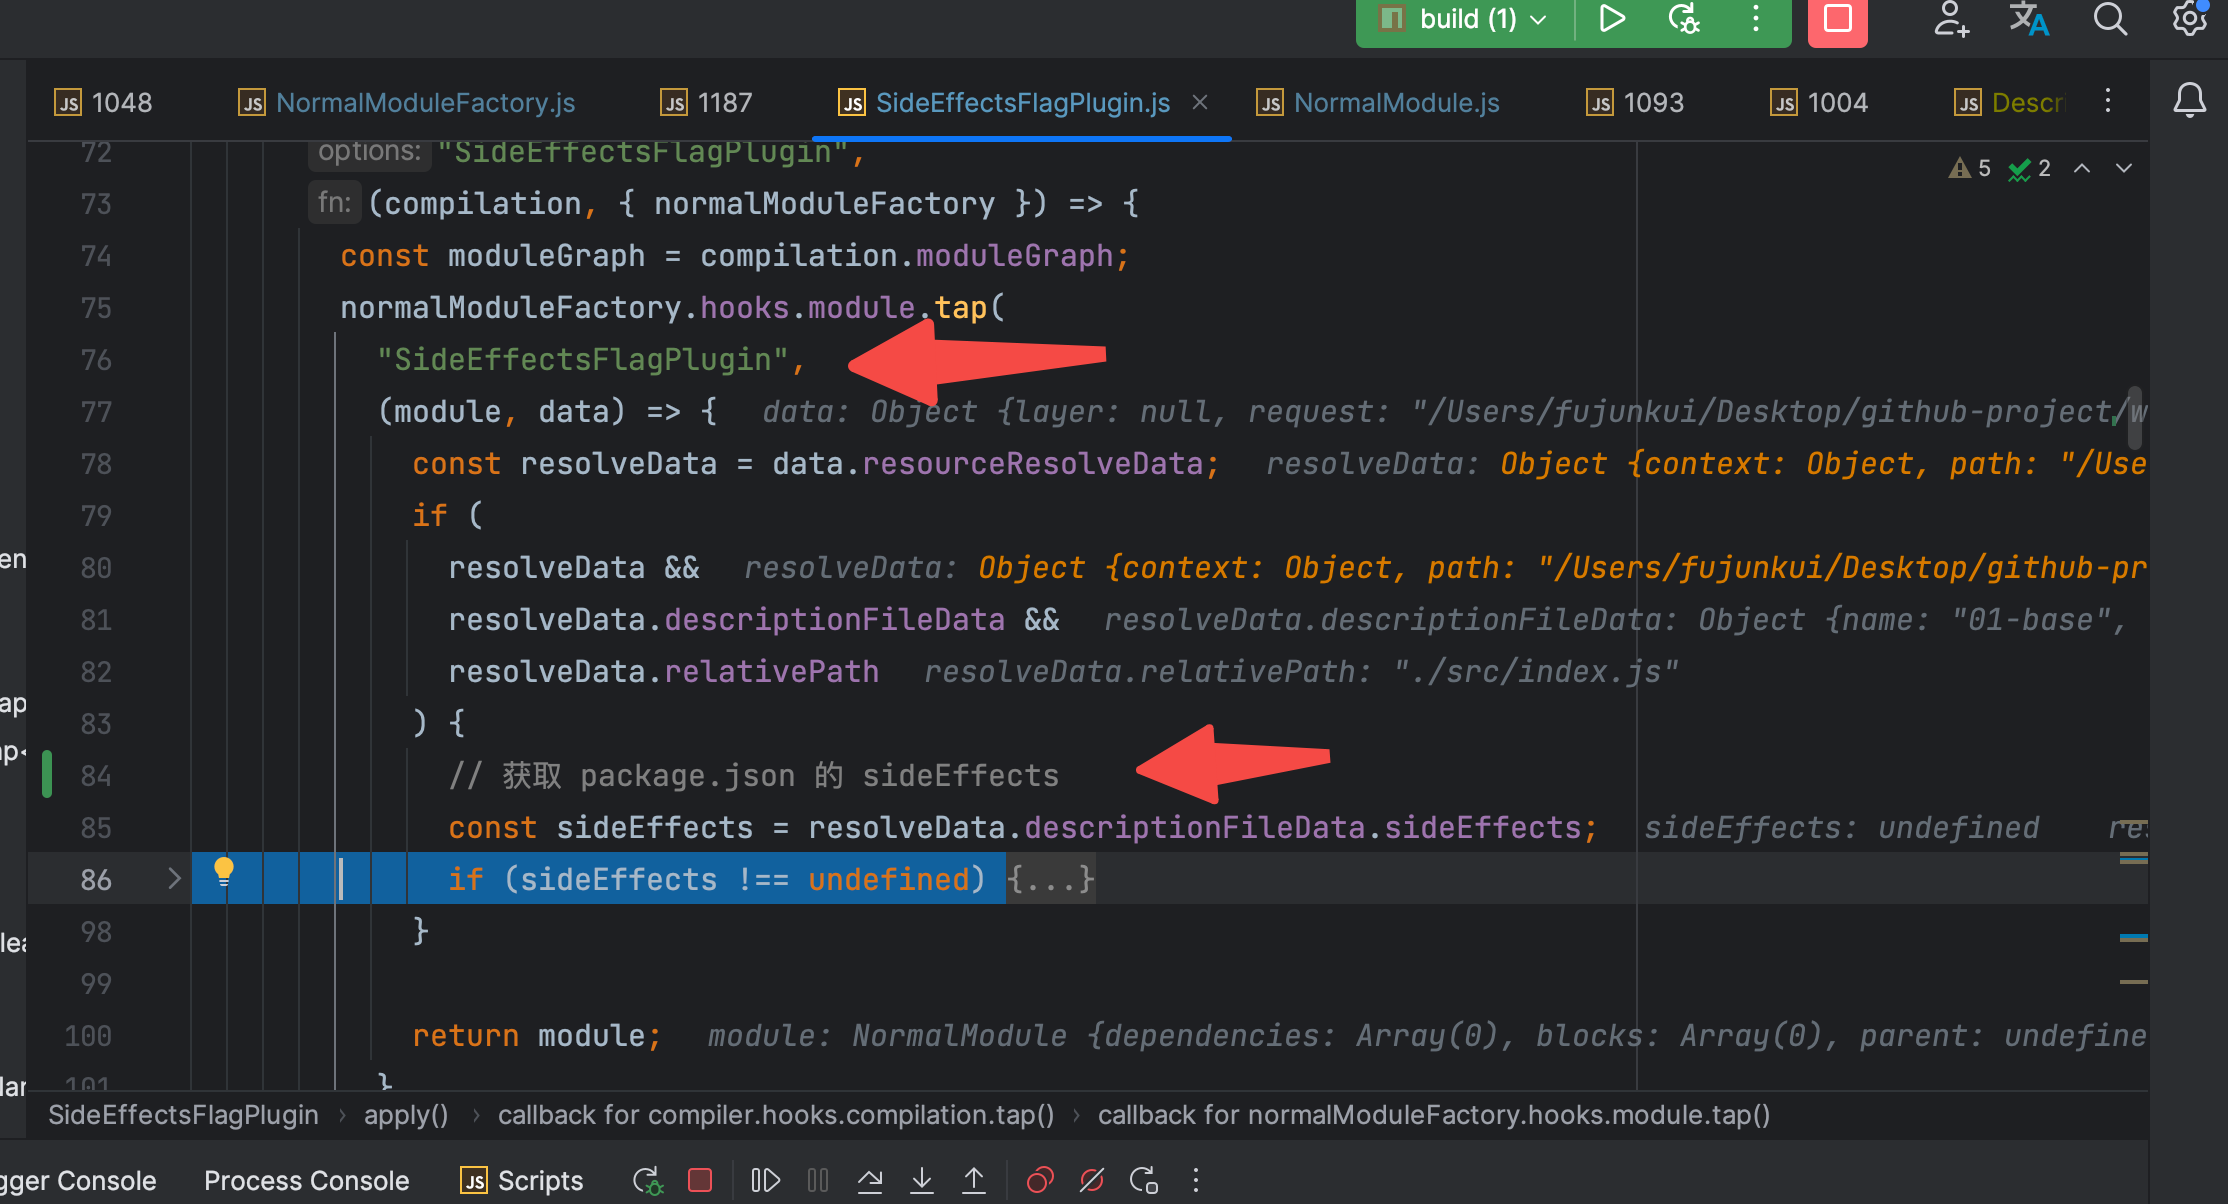
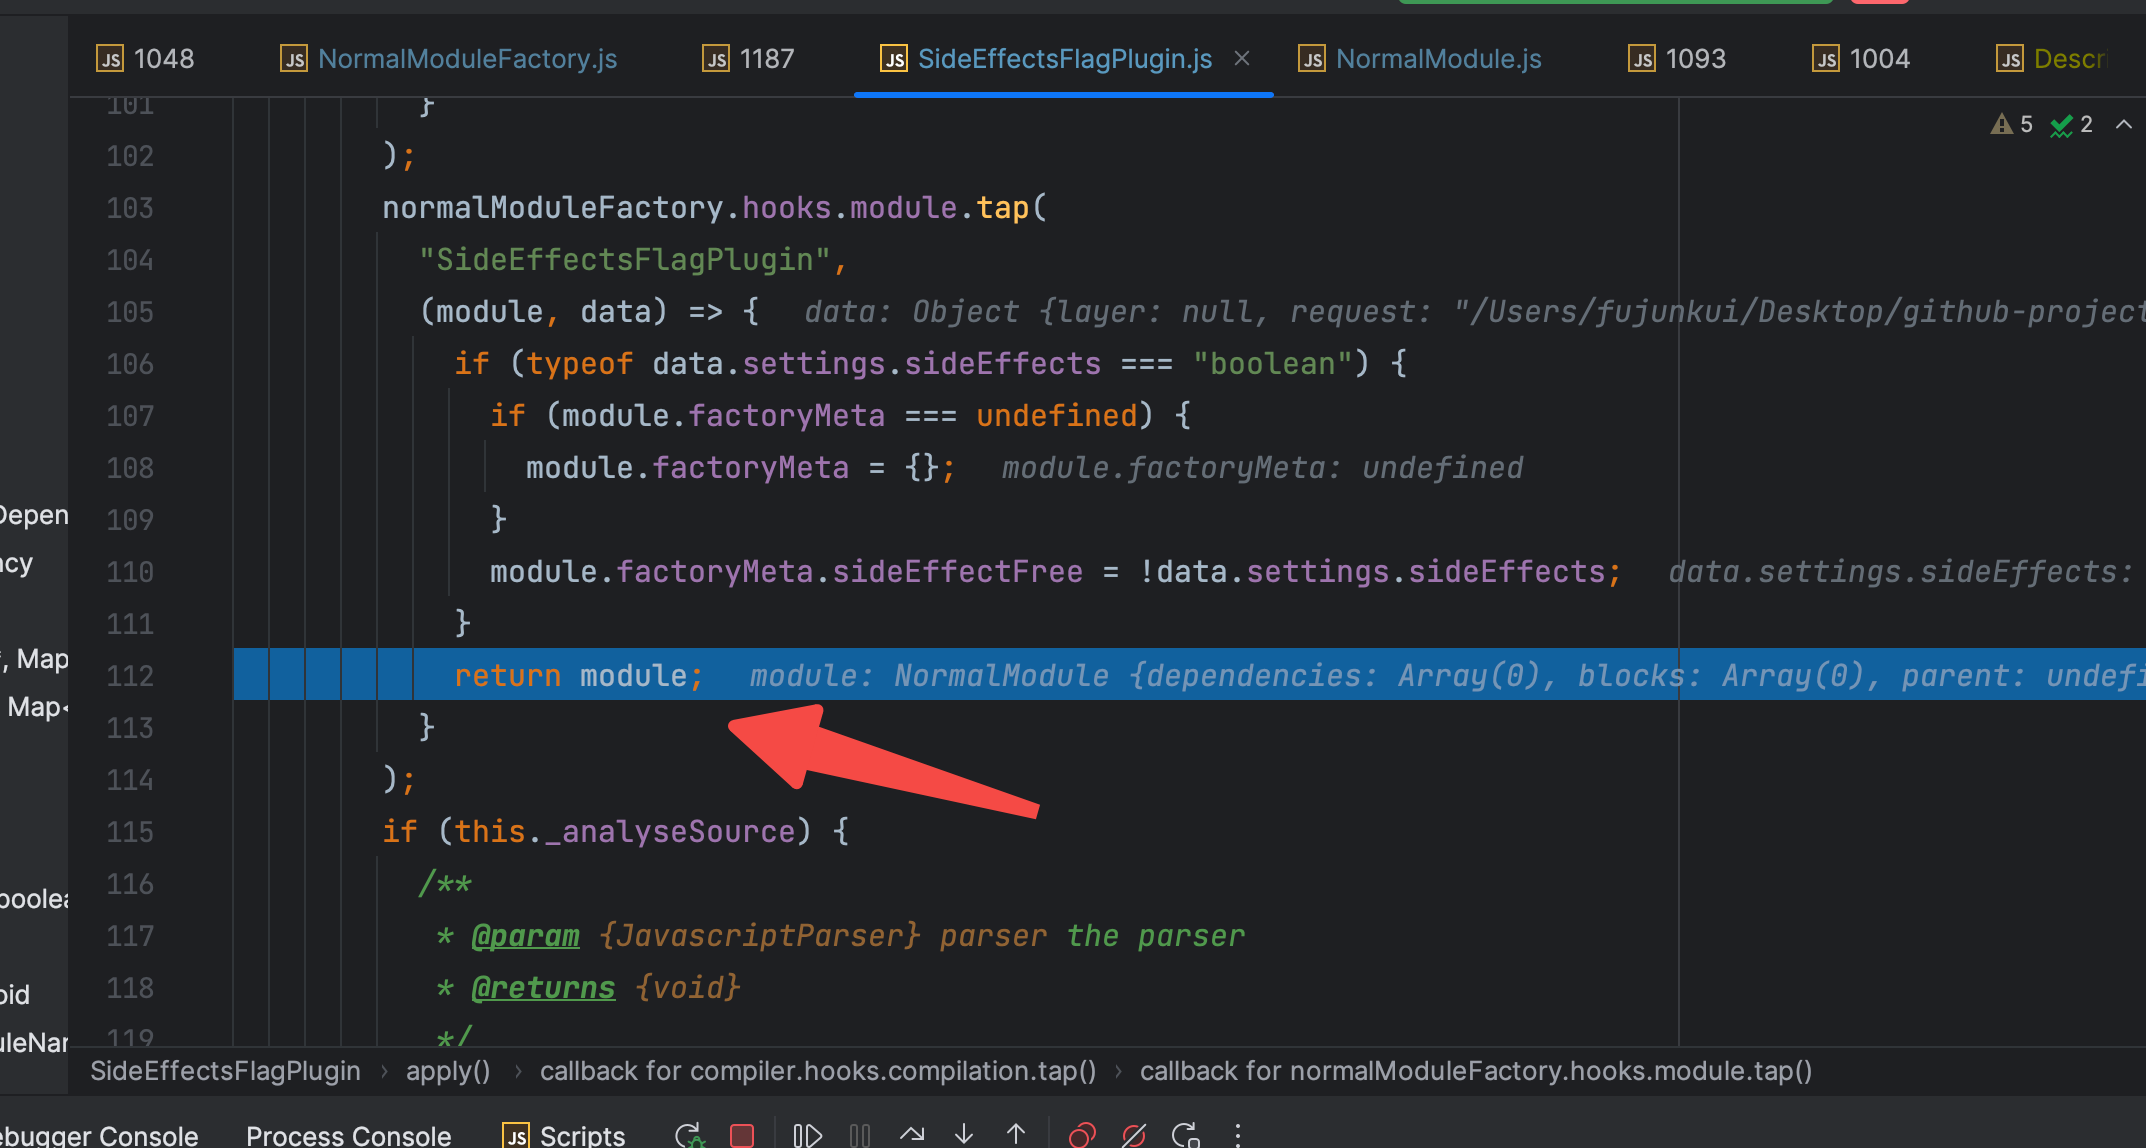
执行完毕,将根据路径创建的 module 实例通过callback传递出去。继续单步断点,看此callback 会走进哪个hook里。 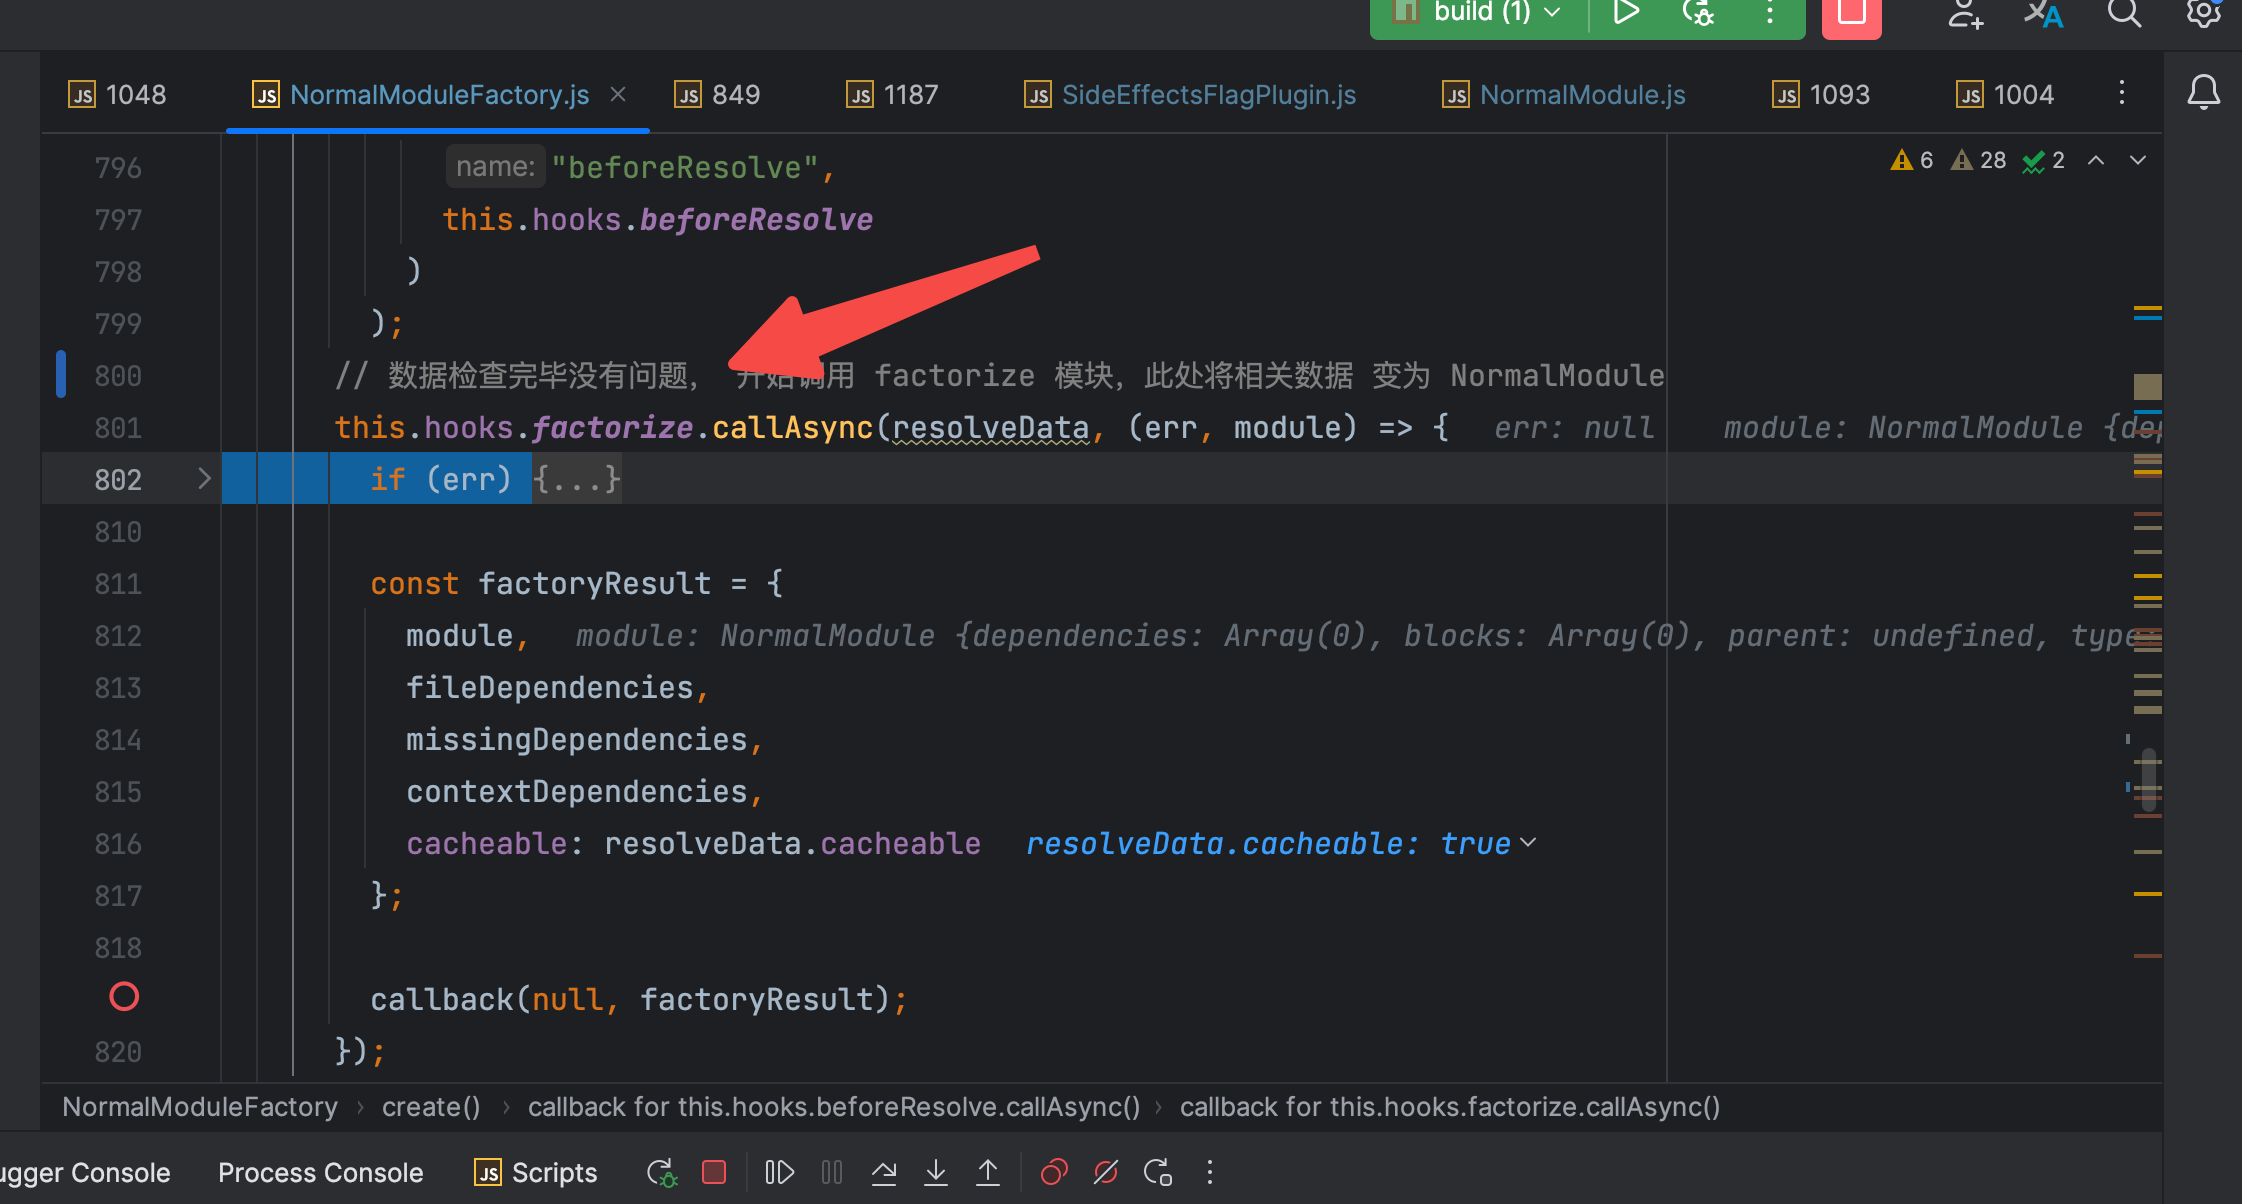
最后走进了 factorize 的 hook, 至此,实现了一个 文件变成了一个 Module的过程。继续向下执行callback,看下一步是做什么? 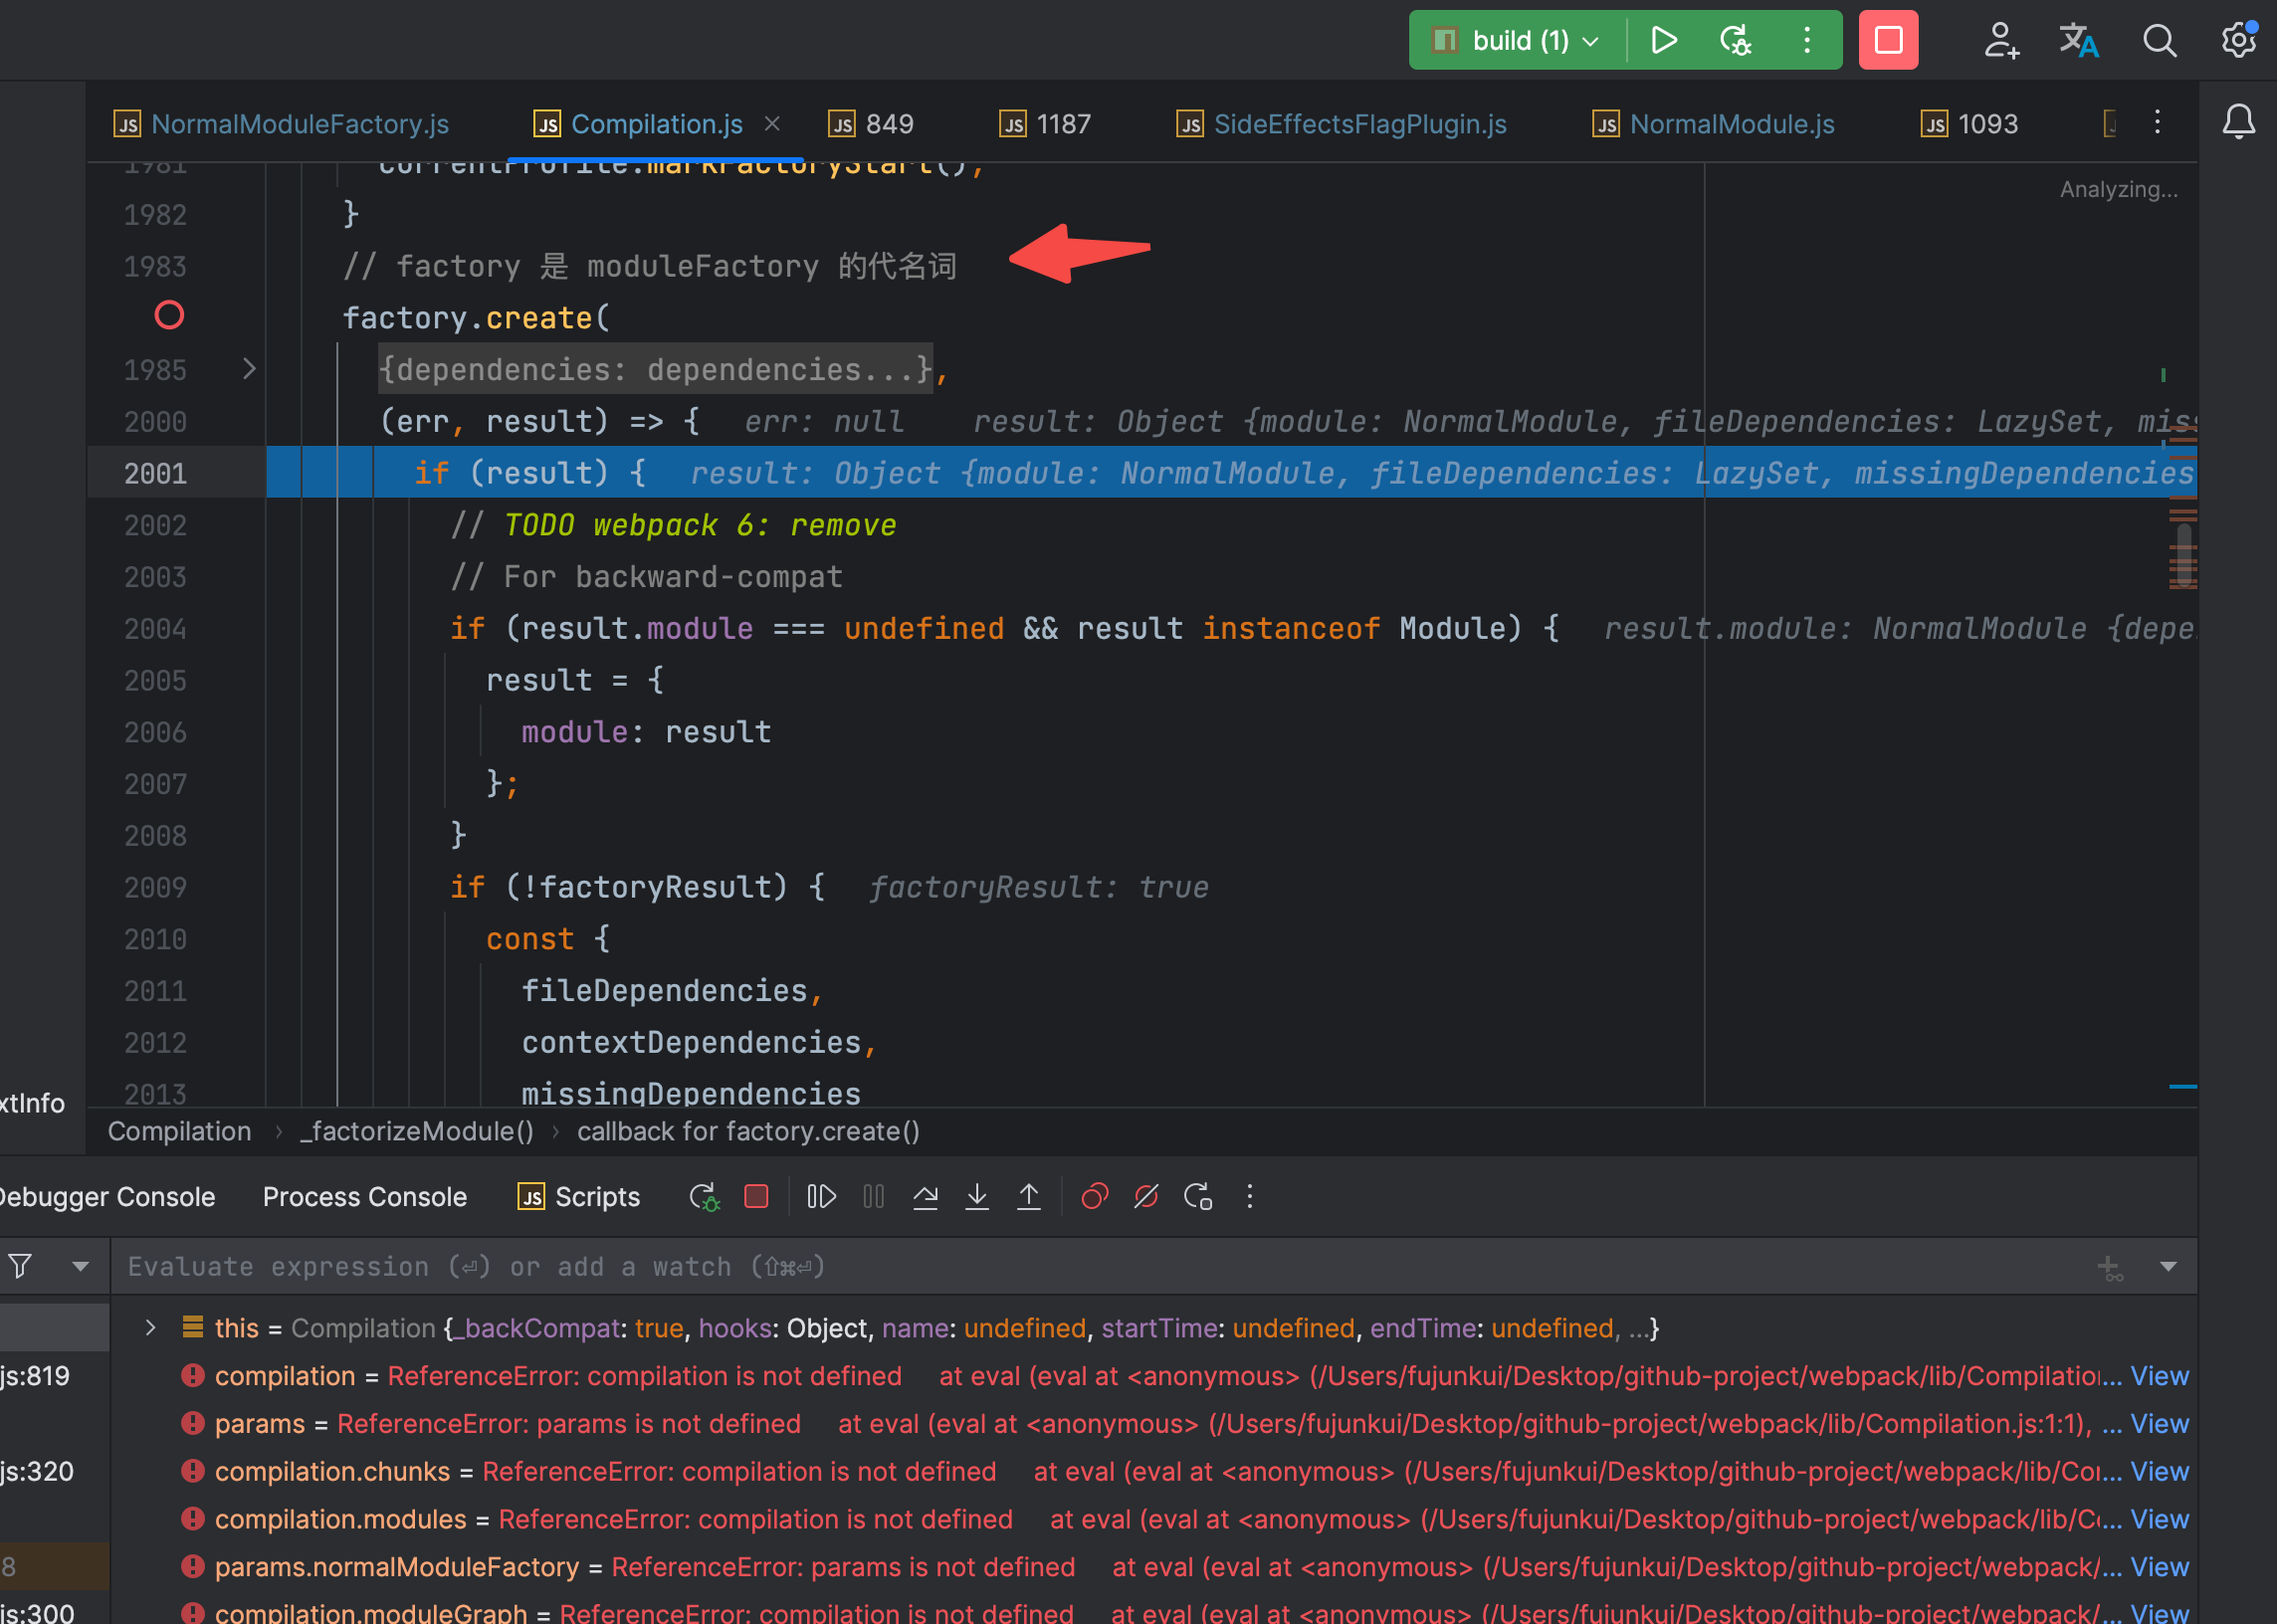
走到了 factory.create 的 callback 函数了,也就是 _factorizeModule方法。还记得这个方法是哪个队列的 processor方法吗? 贴上代码: this.factorizeQueue = new AsyncQueue({ name: "factorize", parent: this.addModuleQueue, processor: this._factorizeModule.bind(this)});让我们继续执行下去,
进入到 AsyncQueue.js文件。
上图: 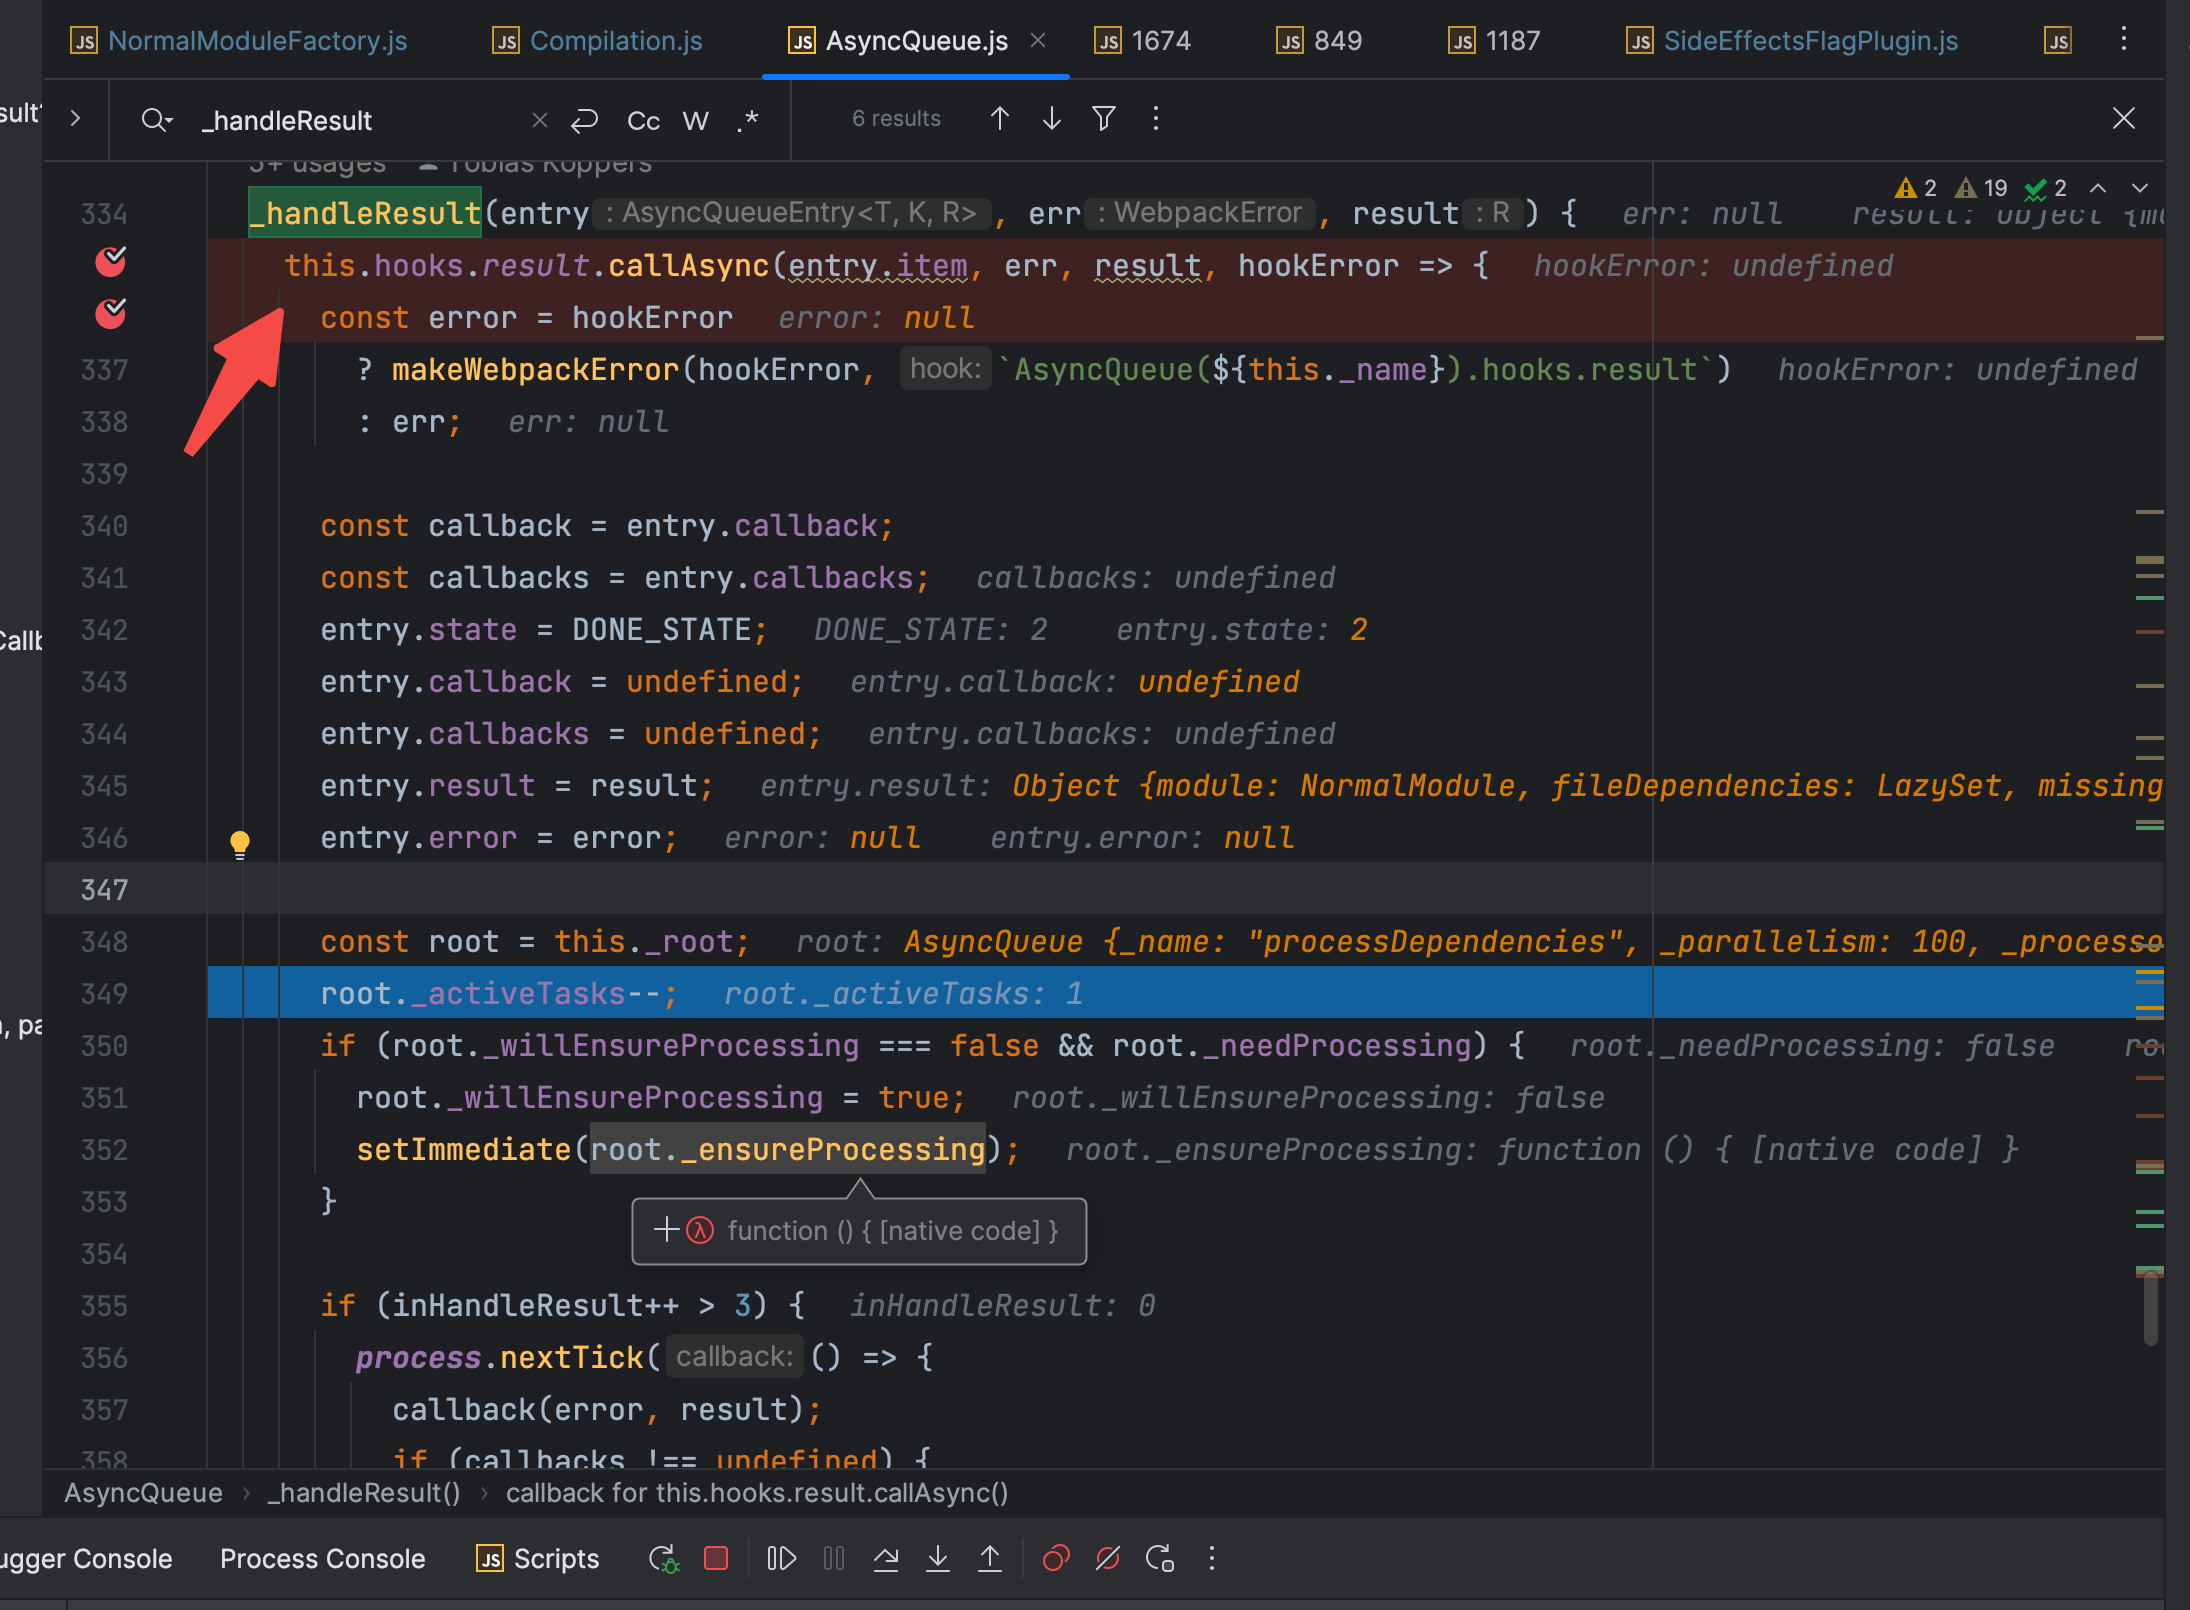
这个方法比较简单,直接调用了 result 的 hook,此hook也没有插件进行监听,直接执行自身的callback 函数,进入 此 hook的内部。 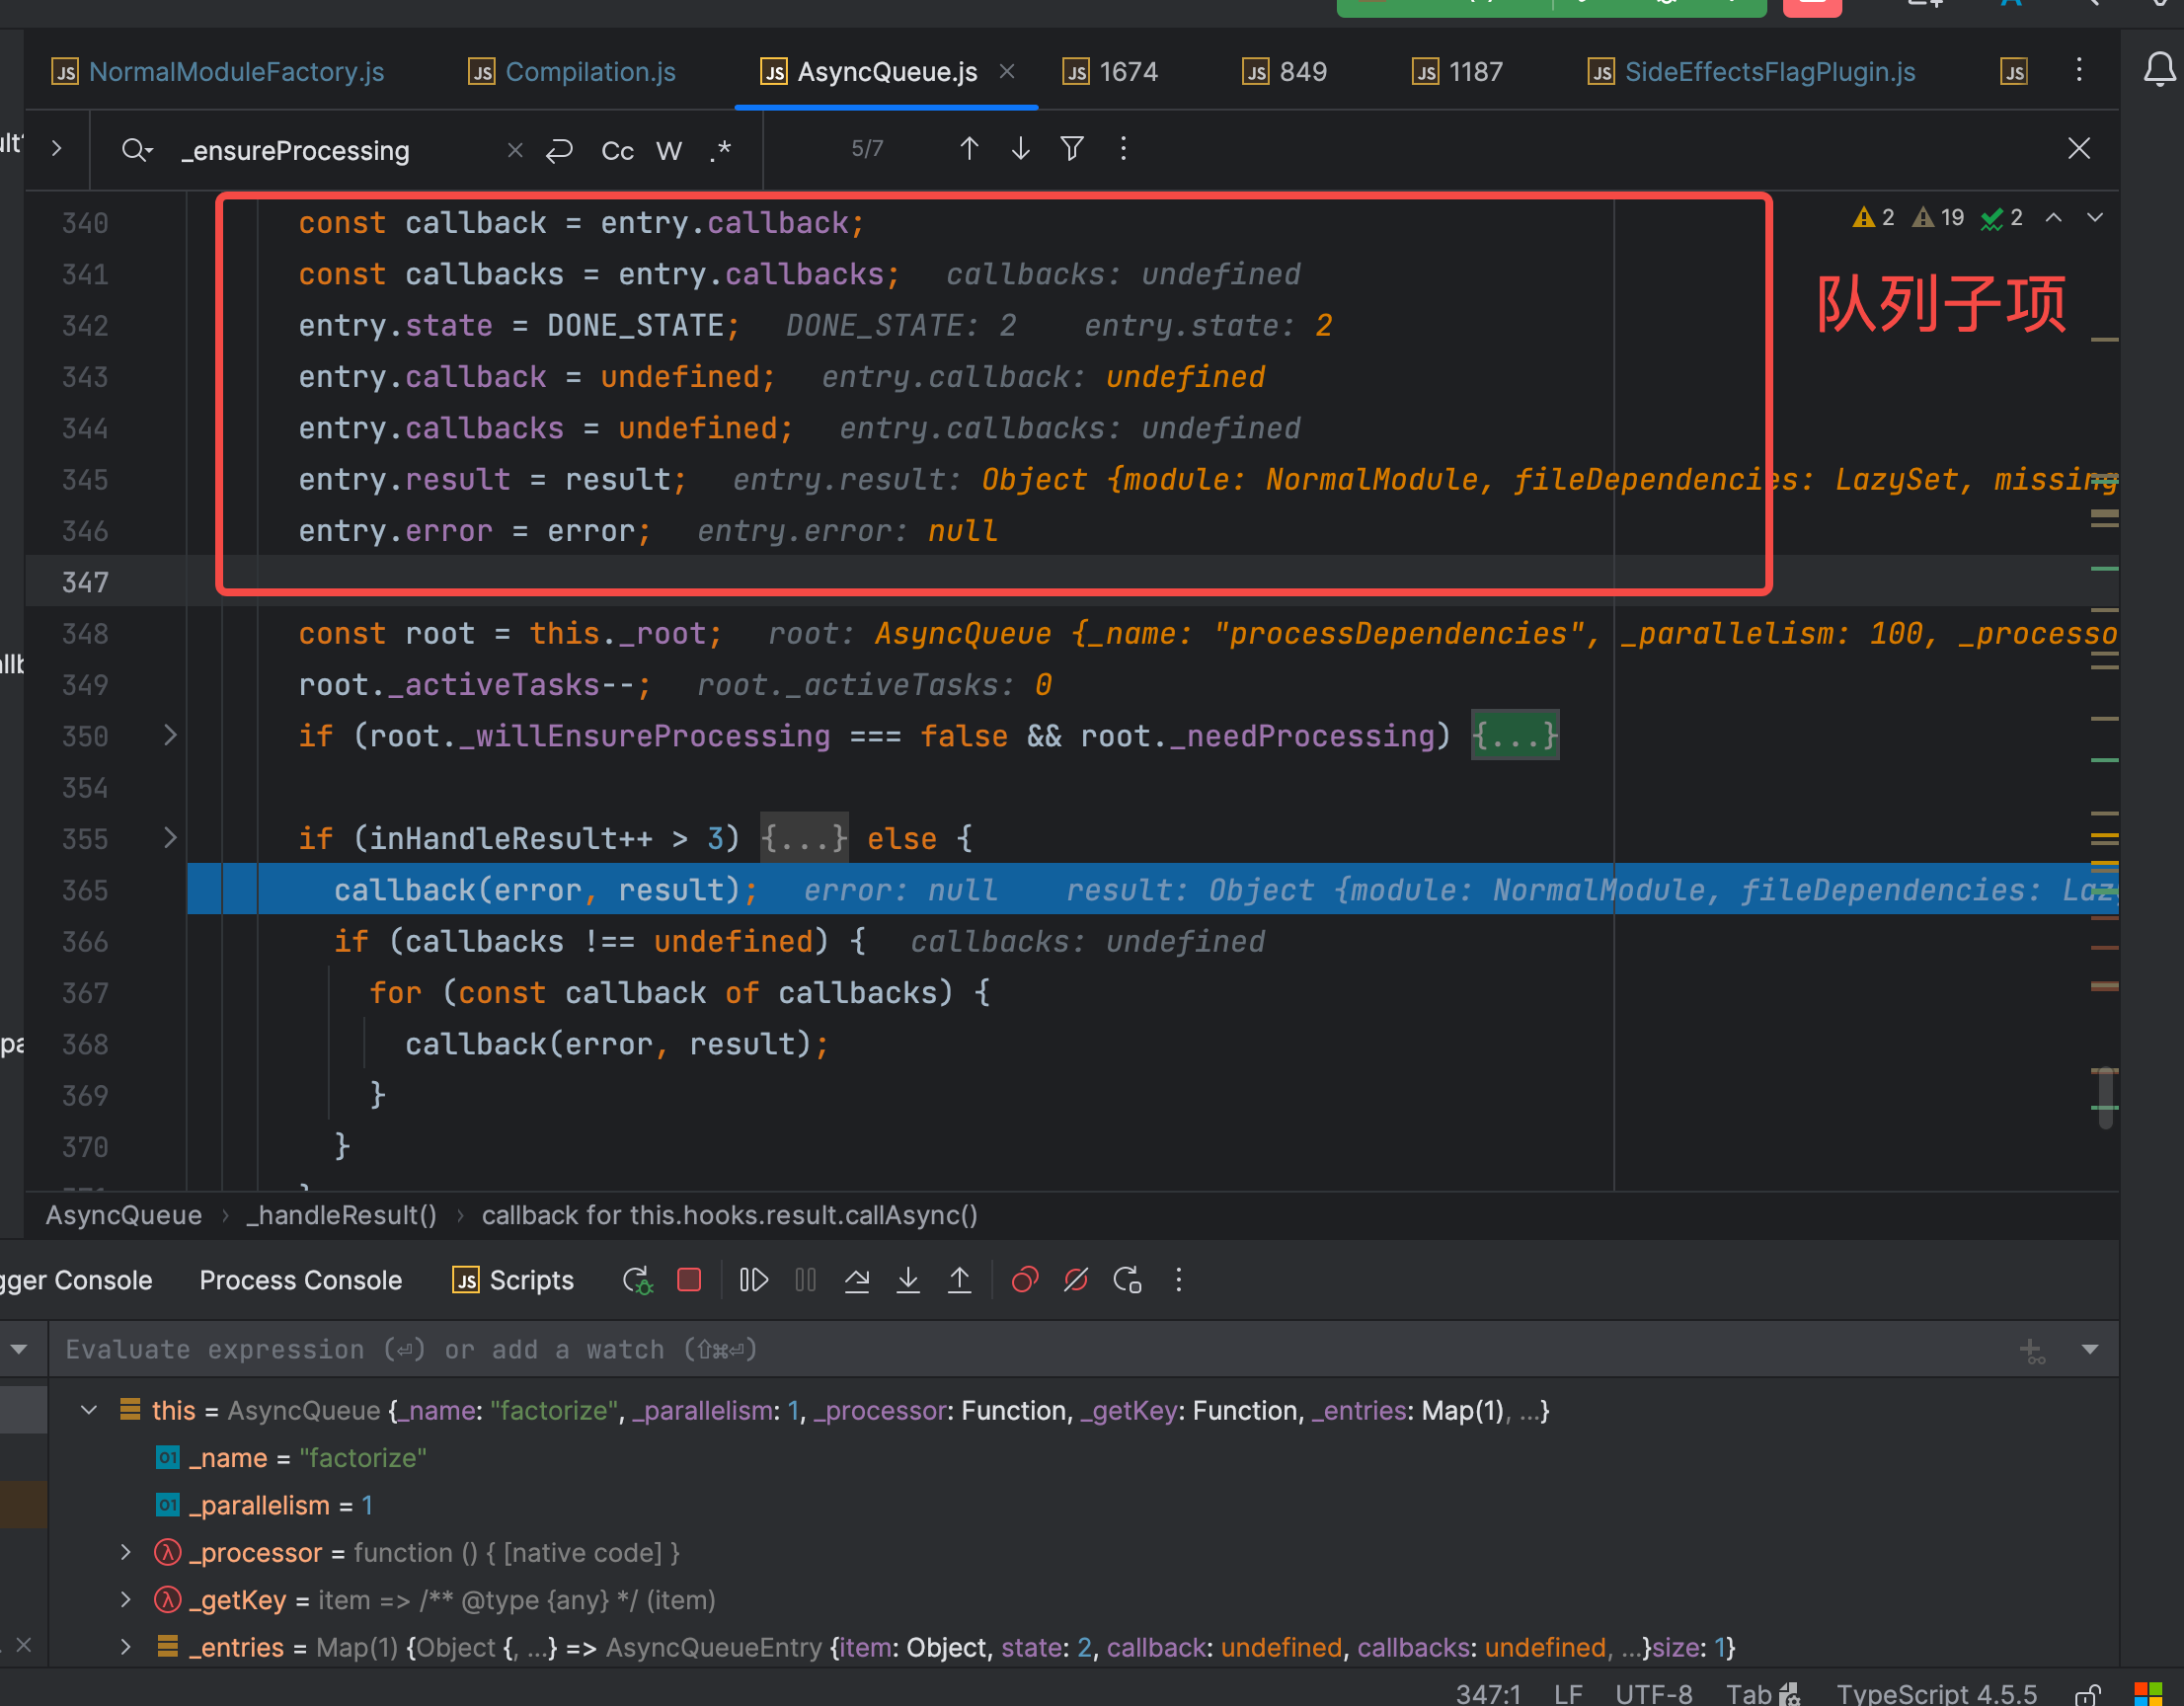
红色圈中部分,将队列子项AsyncQueueEntry的状态改为完成的状态。然后找到父级,将父级用于计数当前激活任务的值减一。 // 如果父级用有需要进行的任务并且父级需要去执行。就把相关任务添加进异步里。if (root._willEnsureProcessing === false && root._needProcessing) { root._willEnsureProcessing = true; setImmediate(root._ensureProcessing); }当前父级不需要执行什么任务,此处跳过。继续向下执行。 if (inHandleResult++ > 3) { process.nextTick(() => { callback(error, result); if (callbacks !== undefined) { for (const callback of callbacks) { callback(error, result); } } }); } else { callback(error, result); if (callbacks !== undefined) { for (const callback of callbacks) { callback(error, result); } } }此时的 inHandleResult 判断没有走进if分支,走到else分支。这里你会发现不管走进那个条件里,核心代码都是一样的,唯一的区别在于是否包裹在process.nextTick里。 继续调试下去,执行callback(error, result);,此处的 callback是从 AsyncQueueEntry身上取到的。回想一下这里的 callback的来源是哪里? 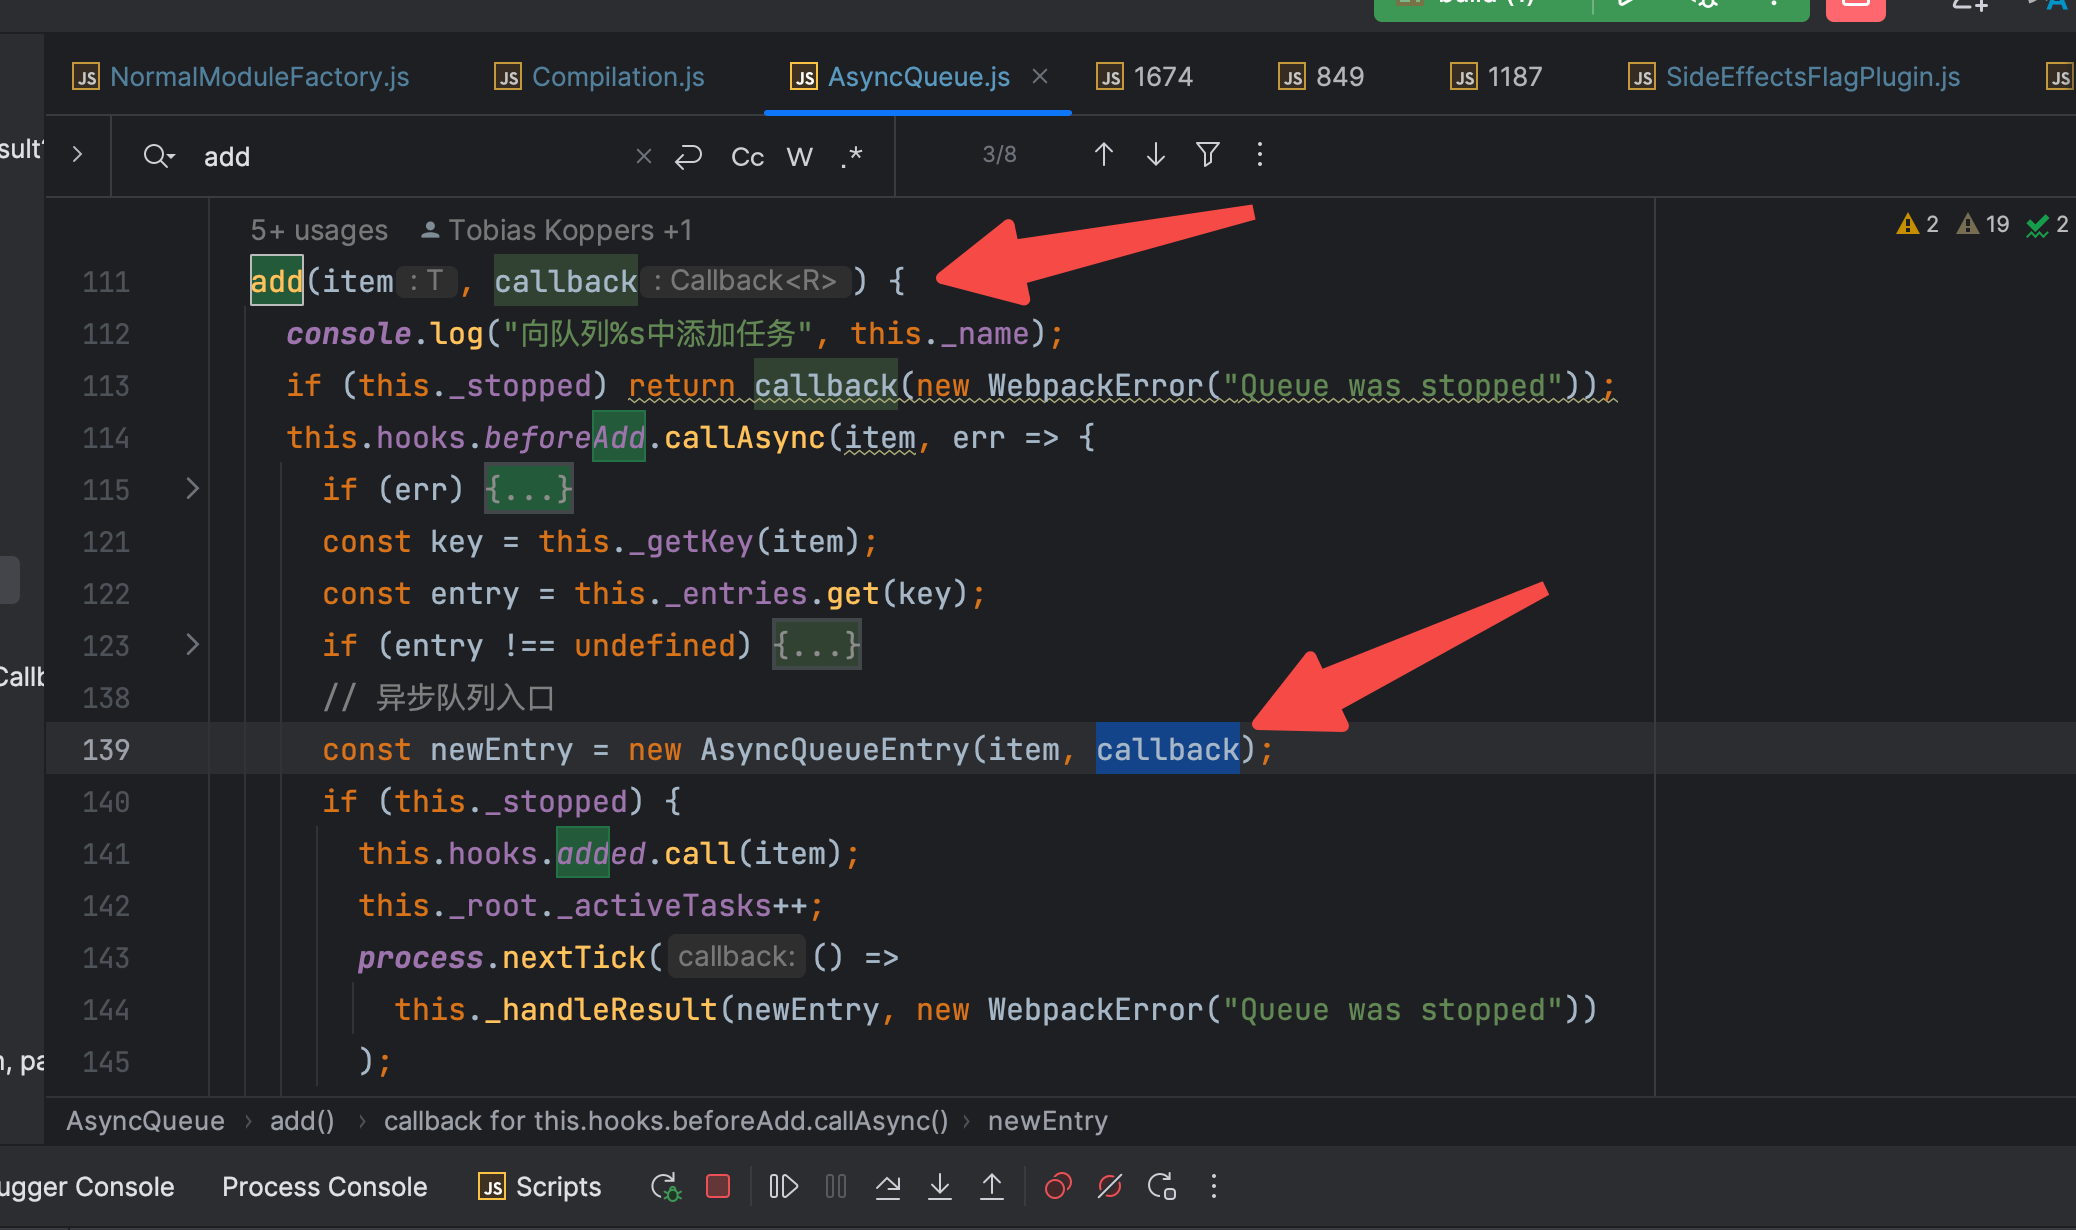
是AsyncQueue 调用add时候传入的 callback 函数。 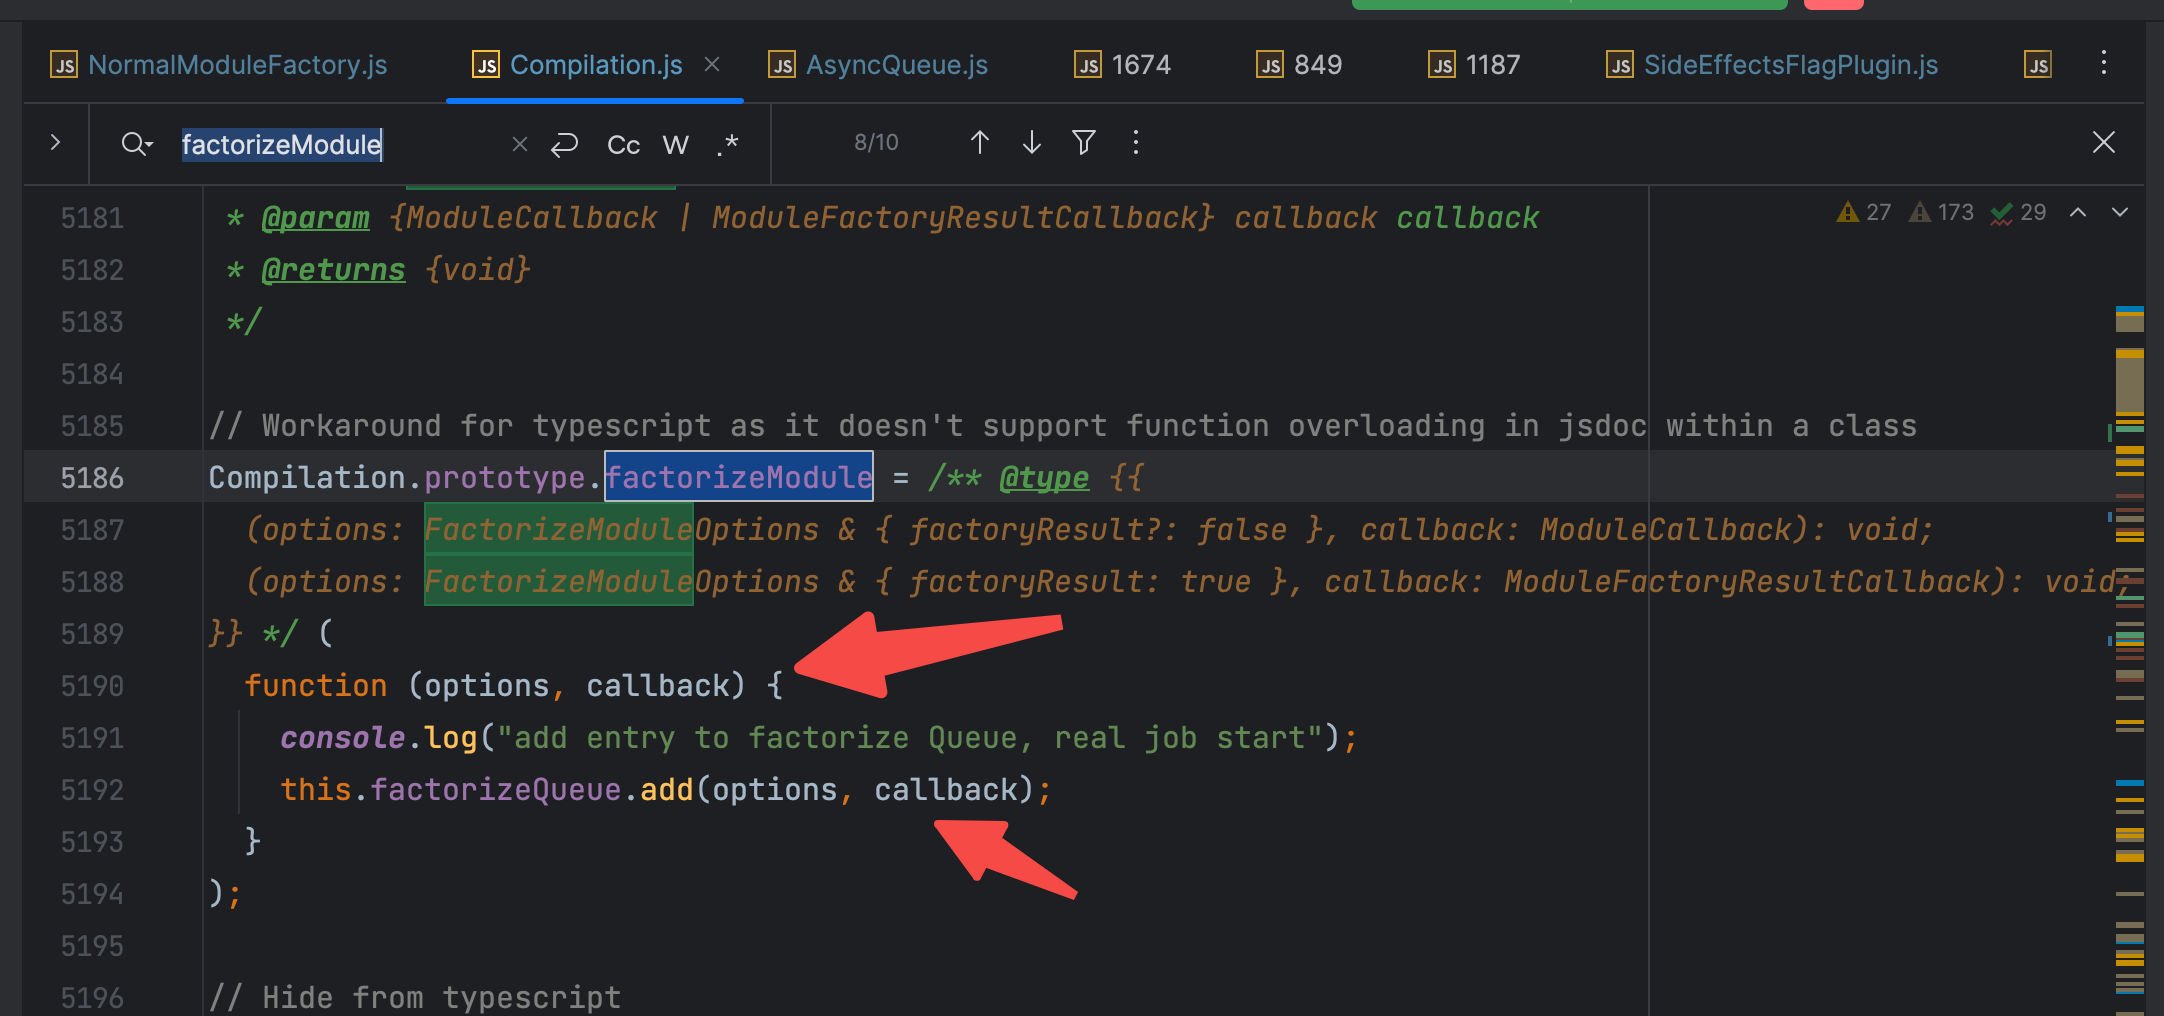
回想一下调用这个方法的位置: 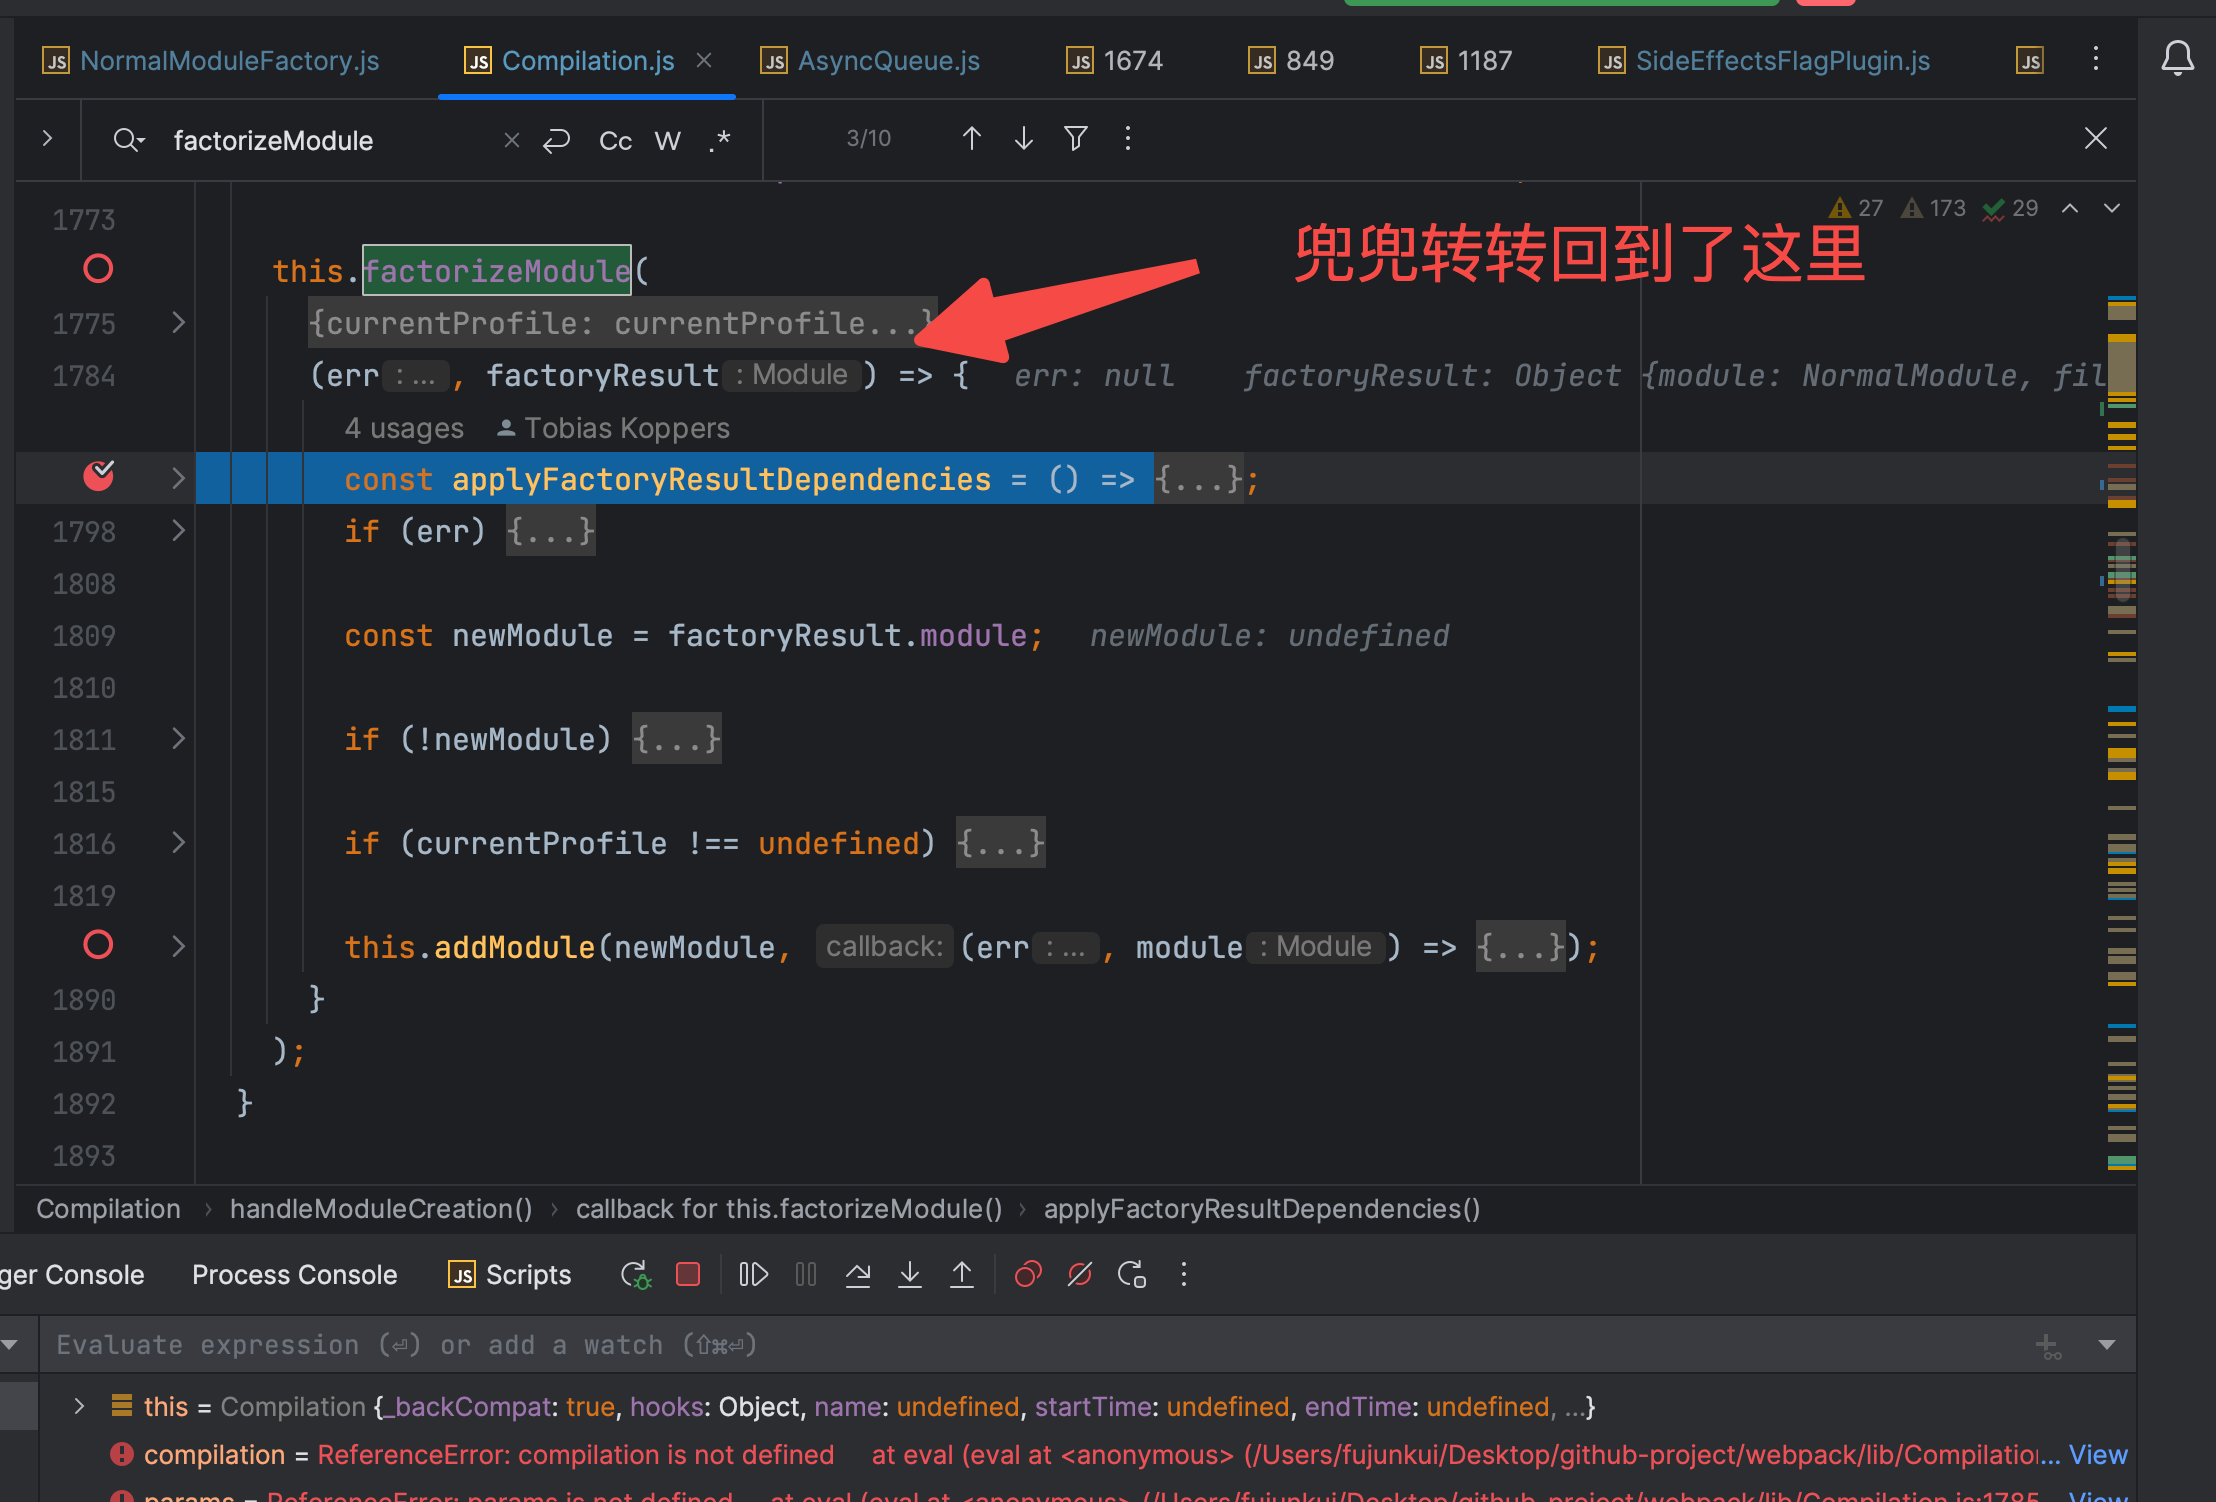
兜兜转转的,又回到了 Compilation.js 这个文件。继续调试,大概率是要进入 addModule这个方法的。 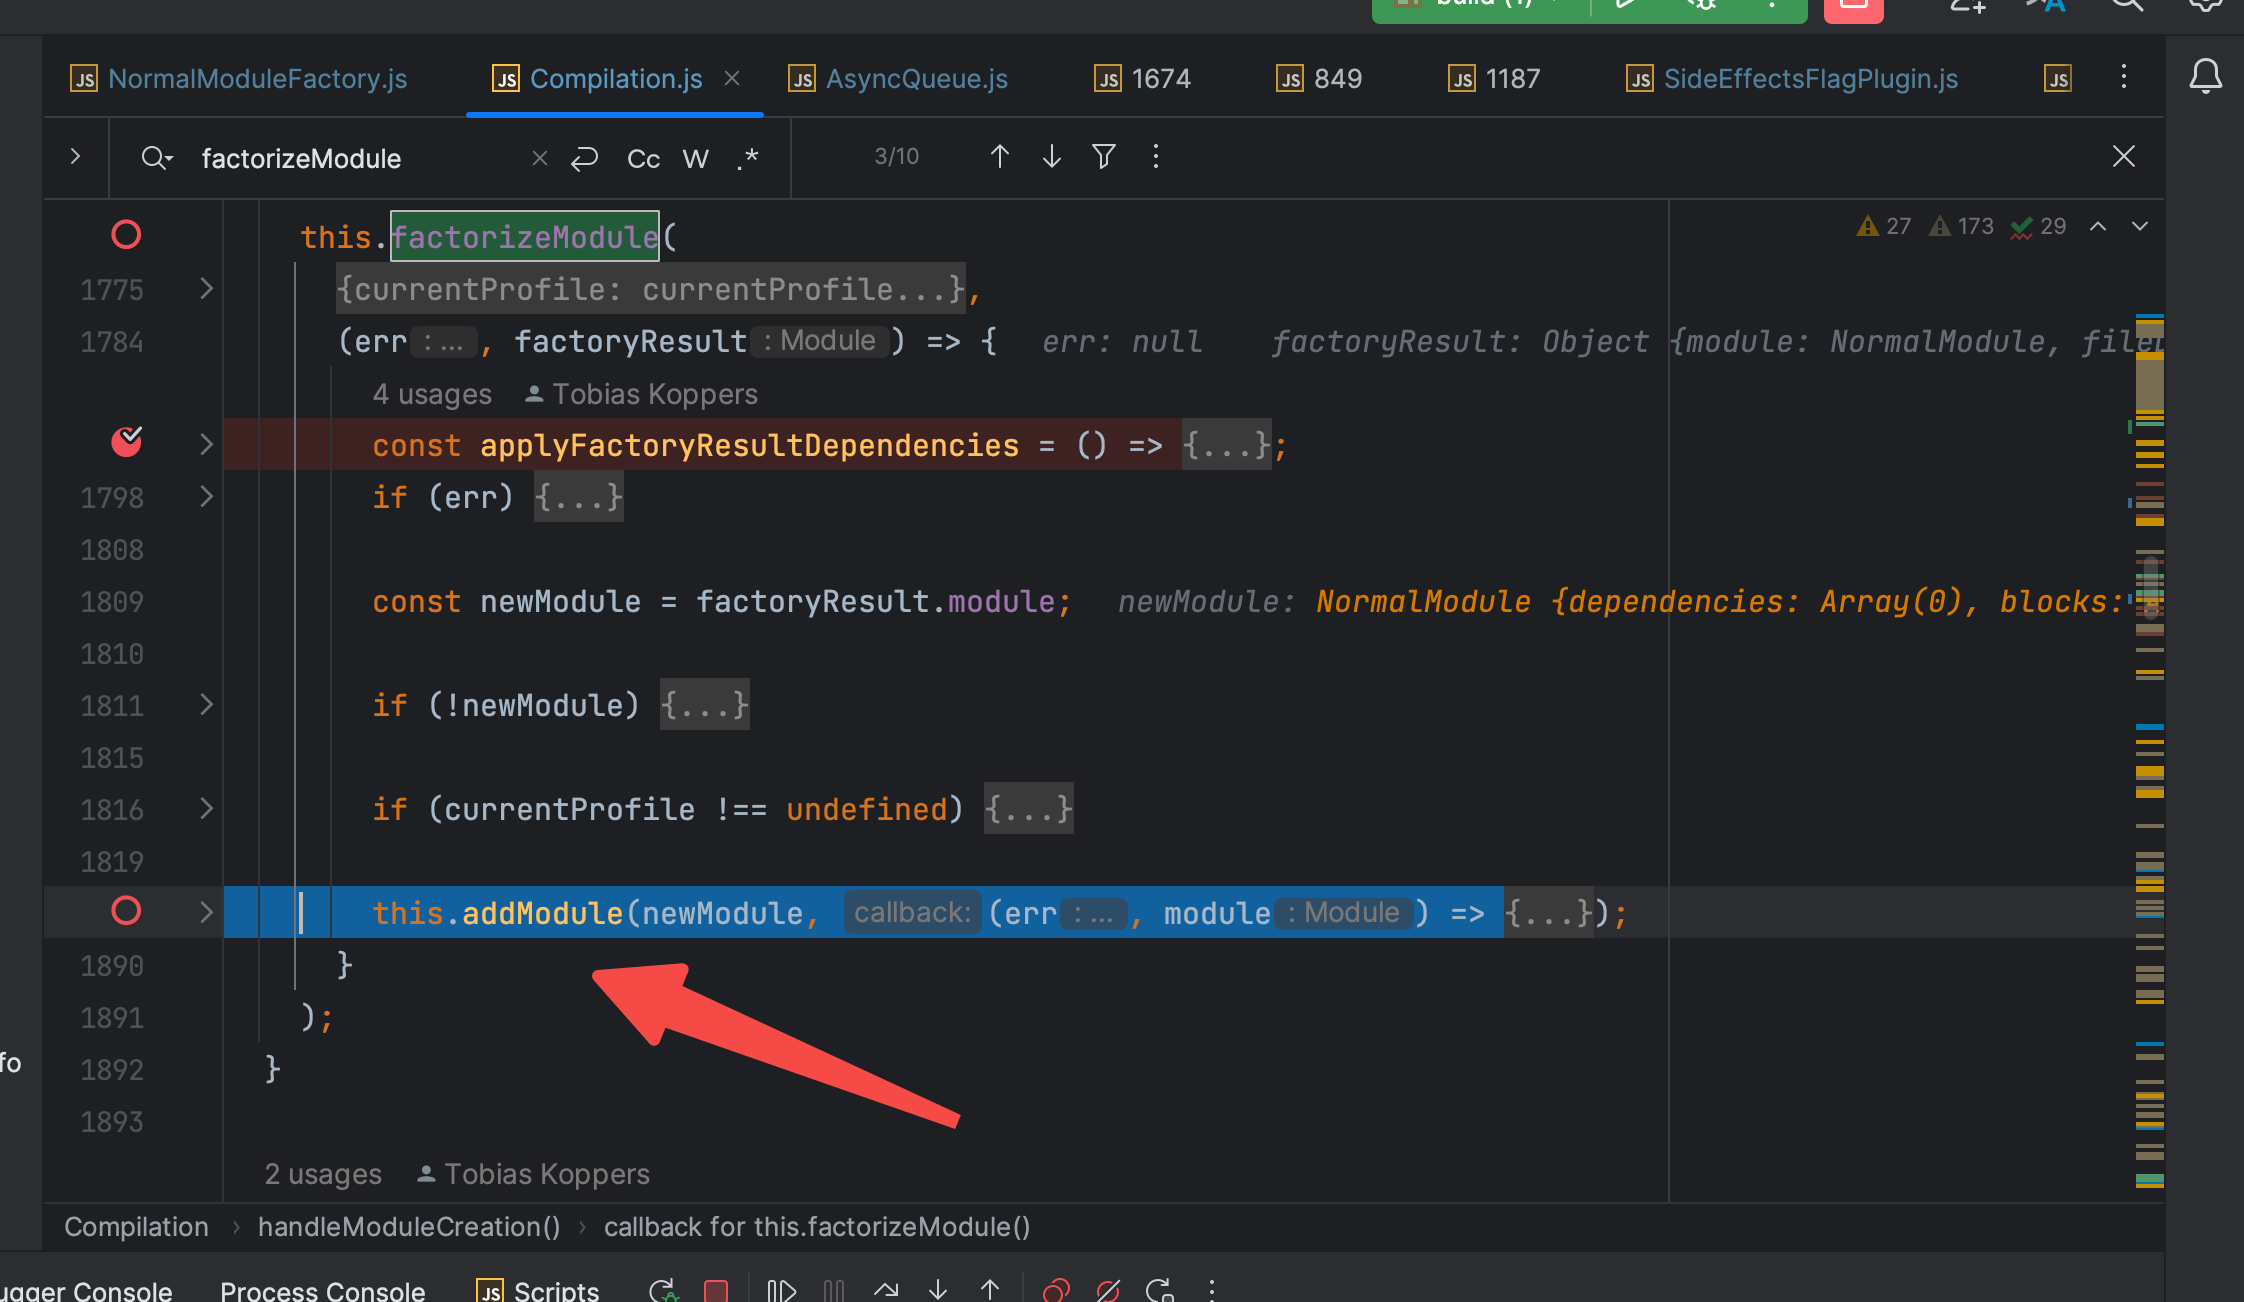 addModule(module, callback) { this.addModuleQueue.add(module, callback); }
看到这个代码,感觉是不是有些相似,又回到了本文(梦)开始的地方。 关于addModuleQueue.add后,接下来的路,各位读者,还需要我再出一篇文章去解析吗?有需要的读者,可以在评论区评论告诉我哈。毕竟每个 AsyncQueue 里的具体执行内容不一样。 
|
 这个钩子真可怜,没有人注册监听事件。(就不放s图了,上次放的s图导致违规了)。
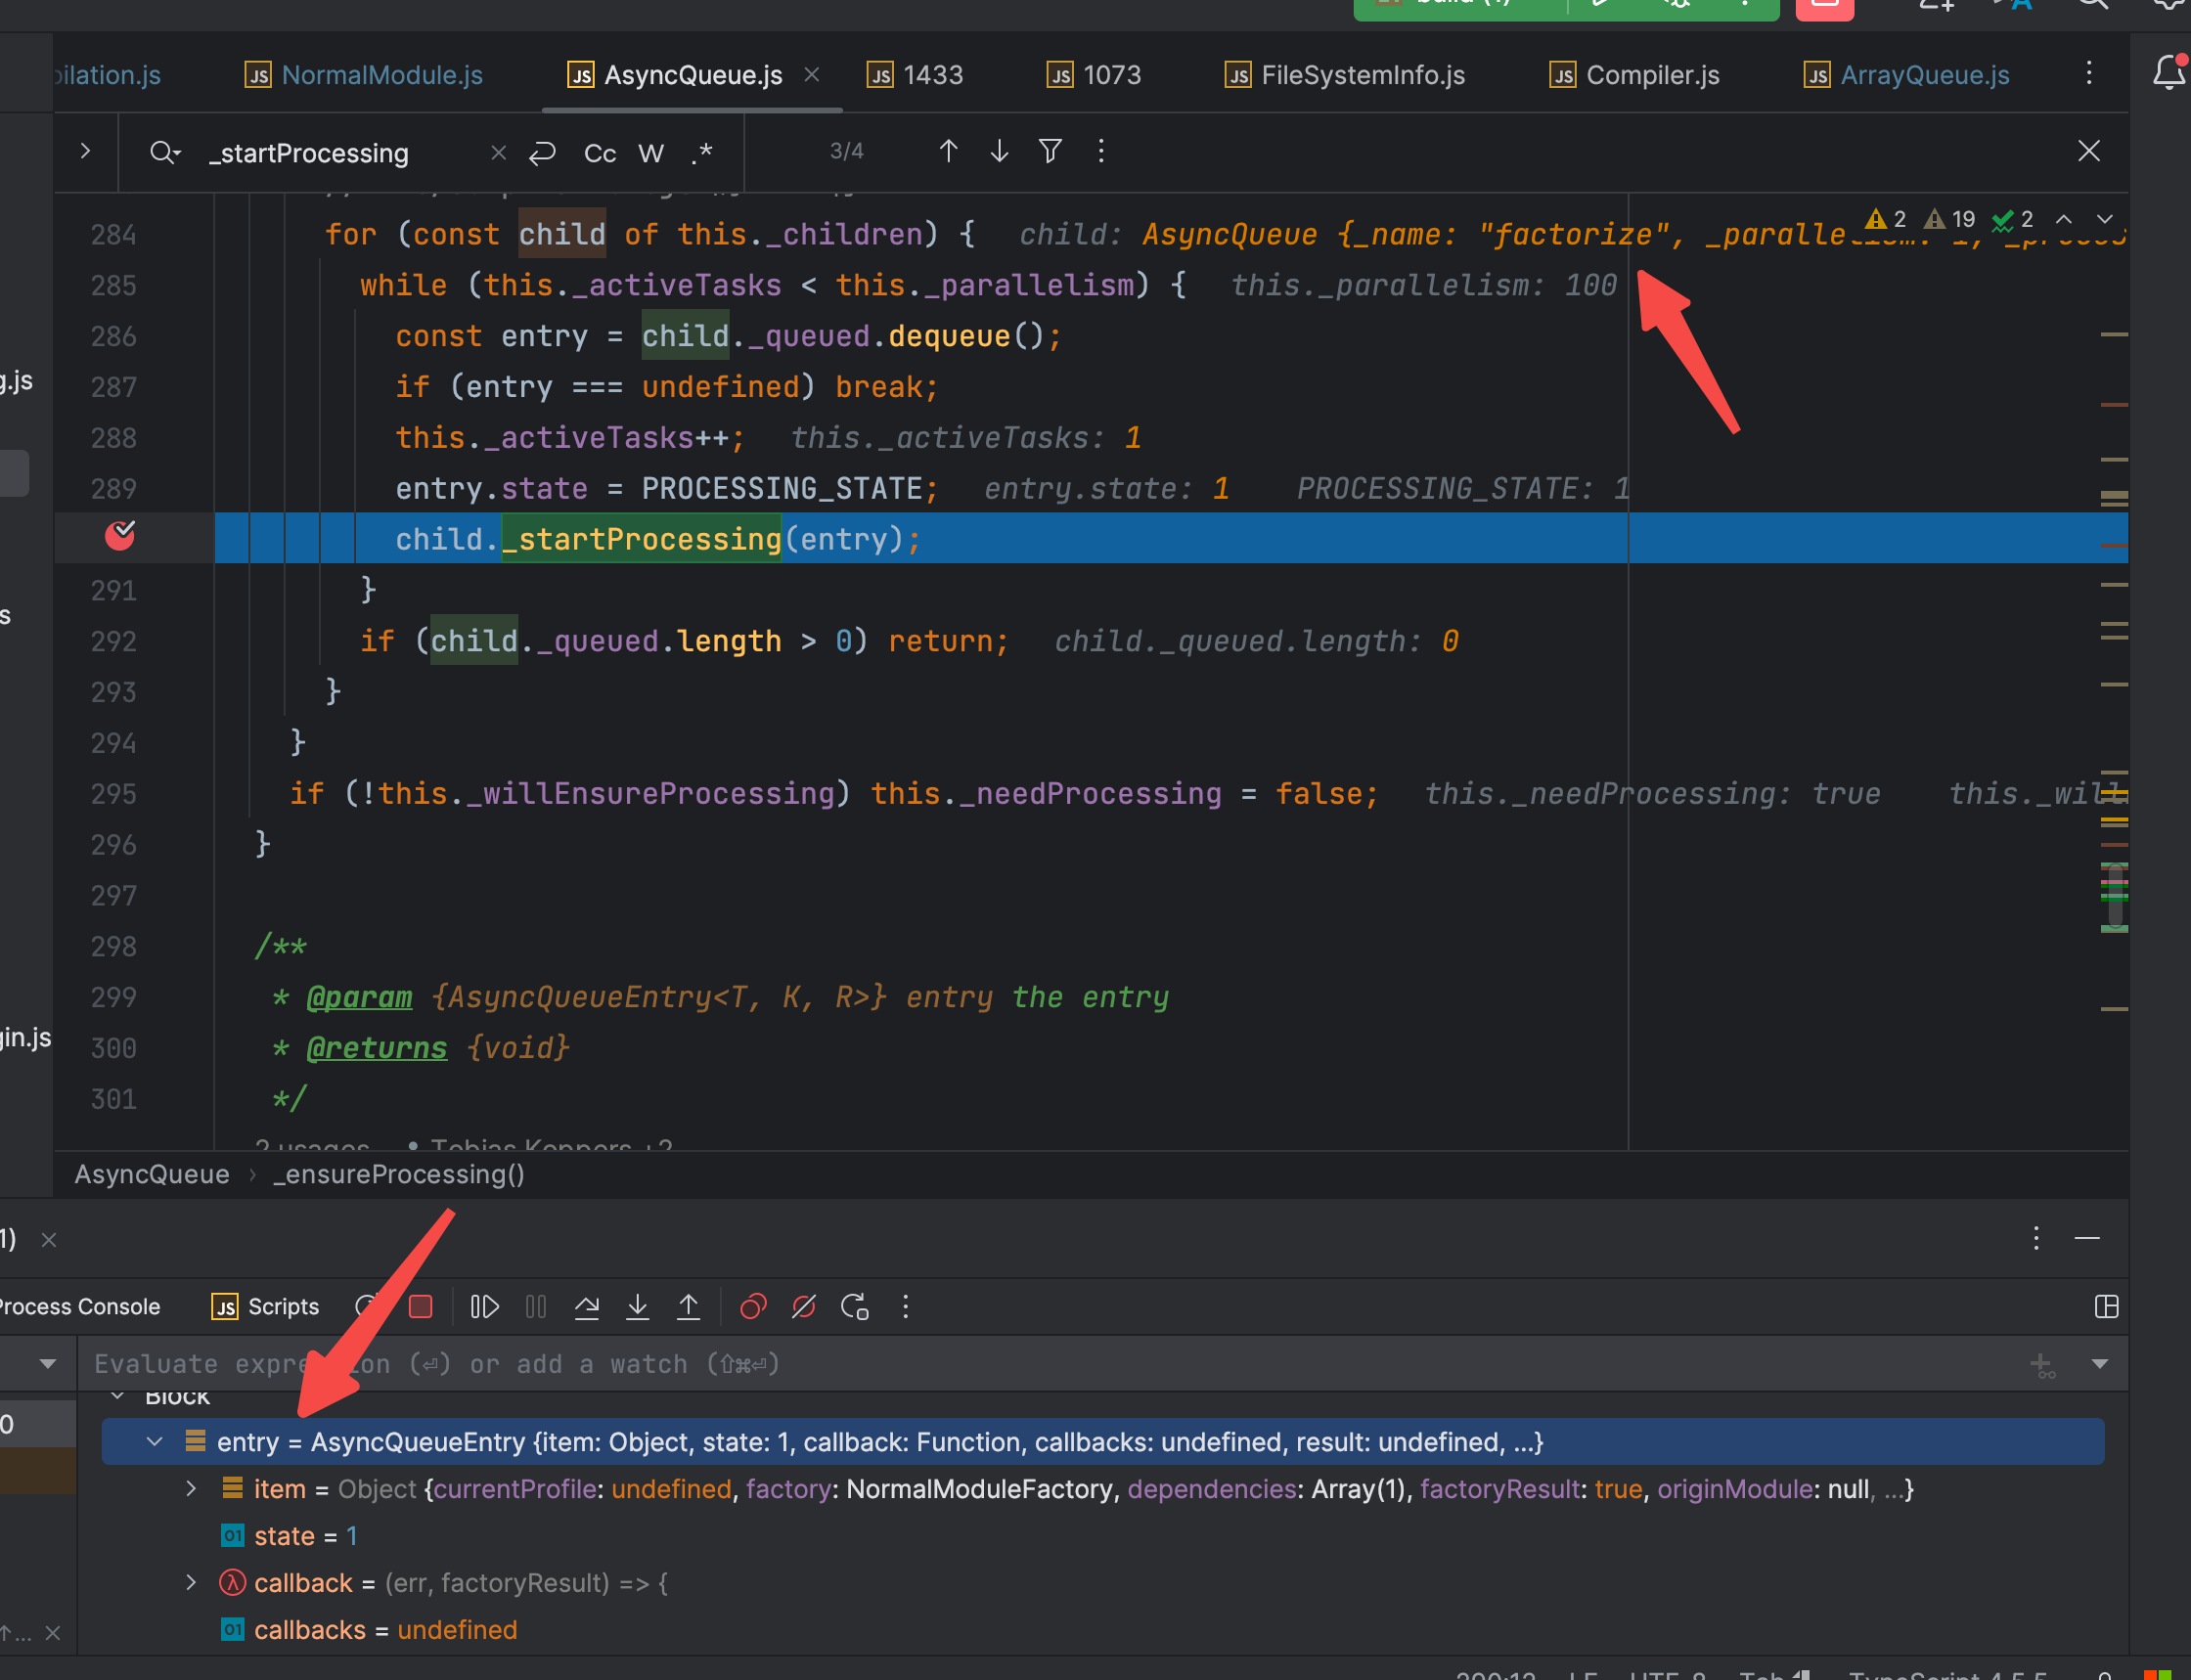
 还是未绑定任何的插件,继续执行下去。
 发现此hook也没有被任何插件所监听,那就直接进入此hook的callback里。
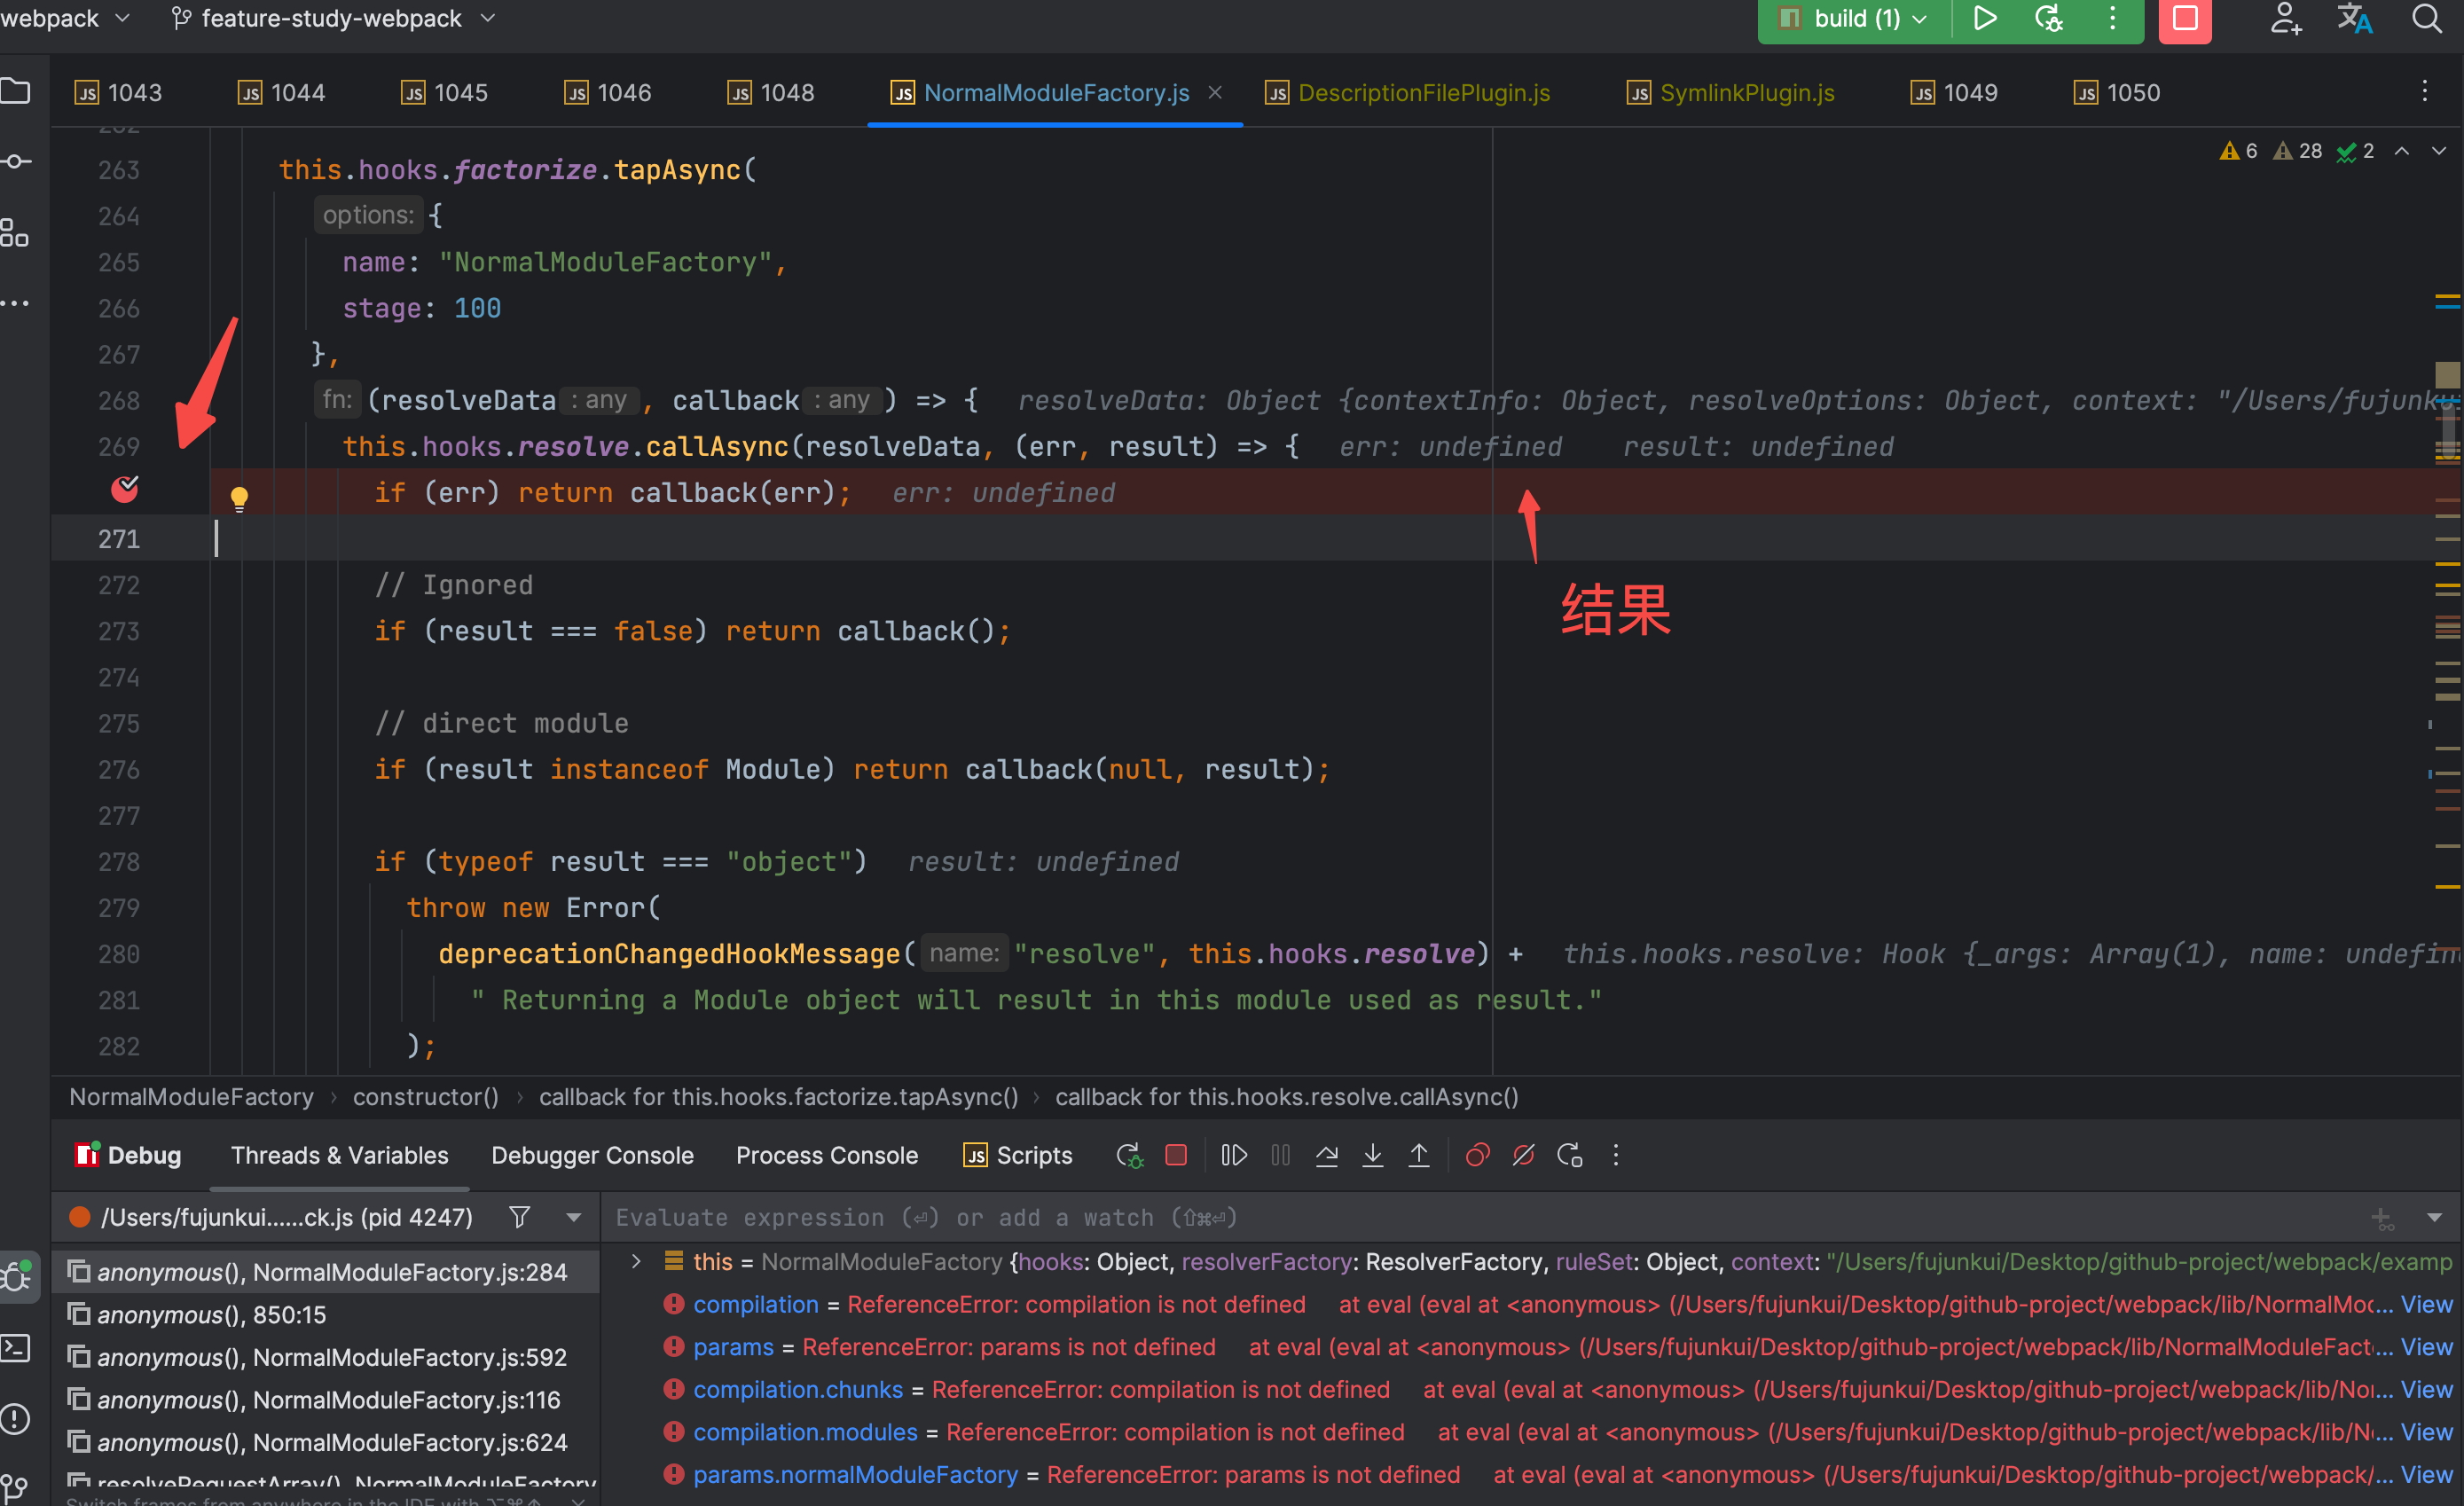
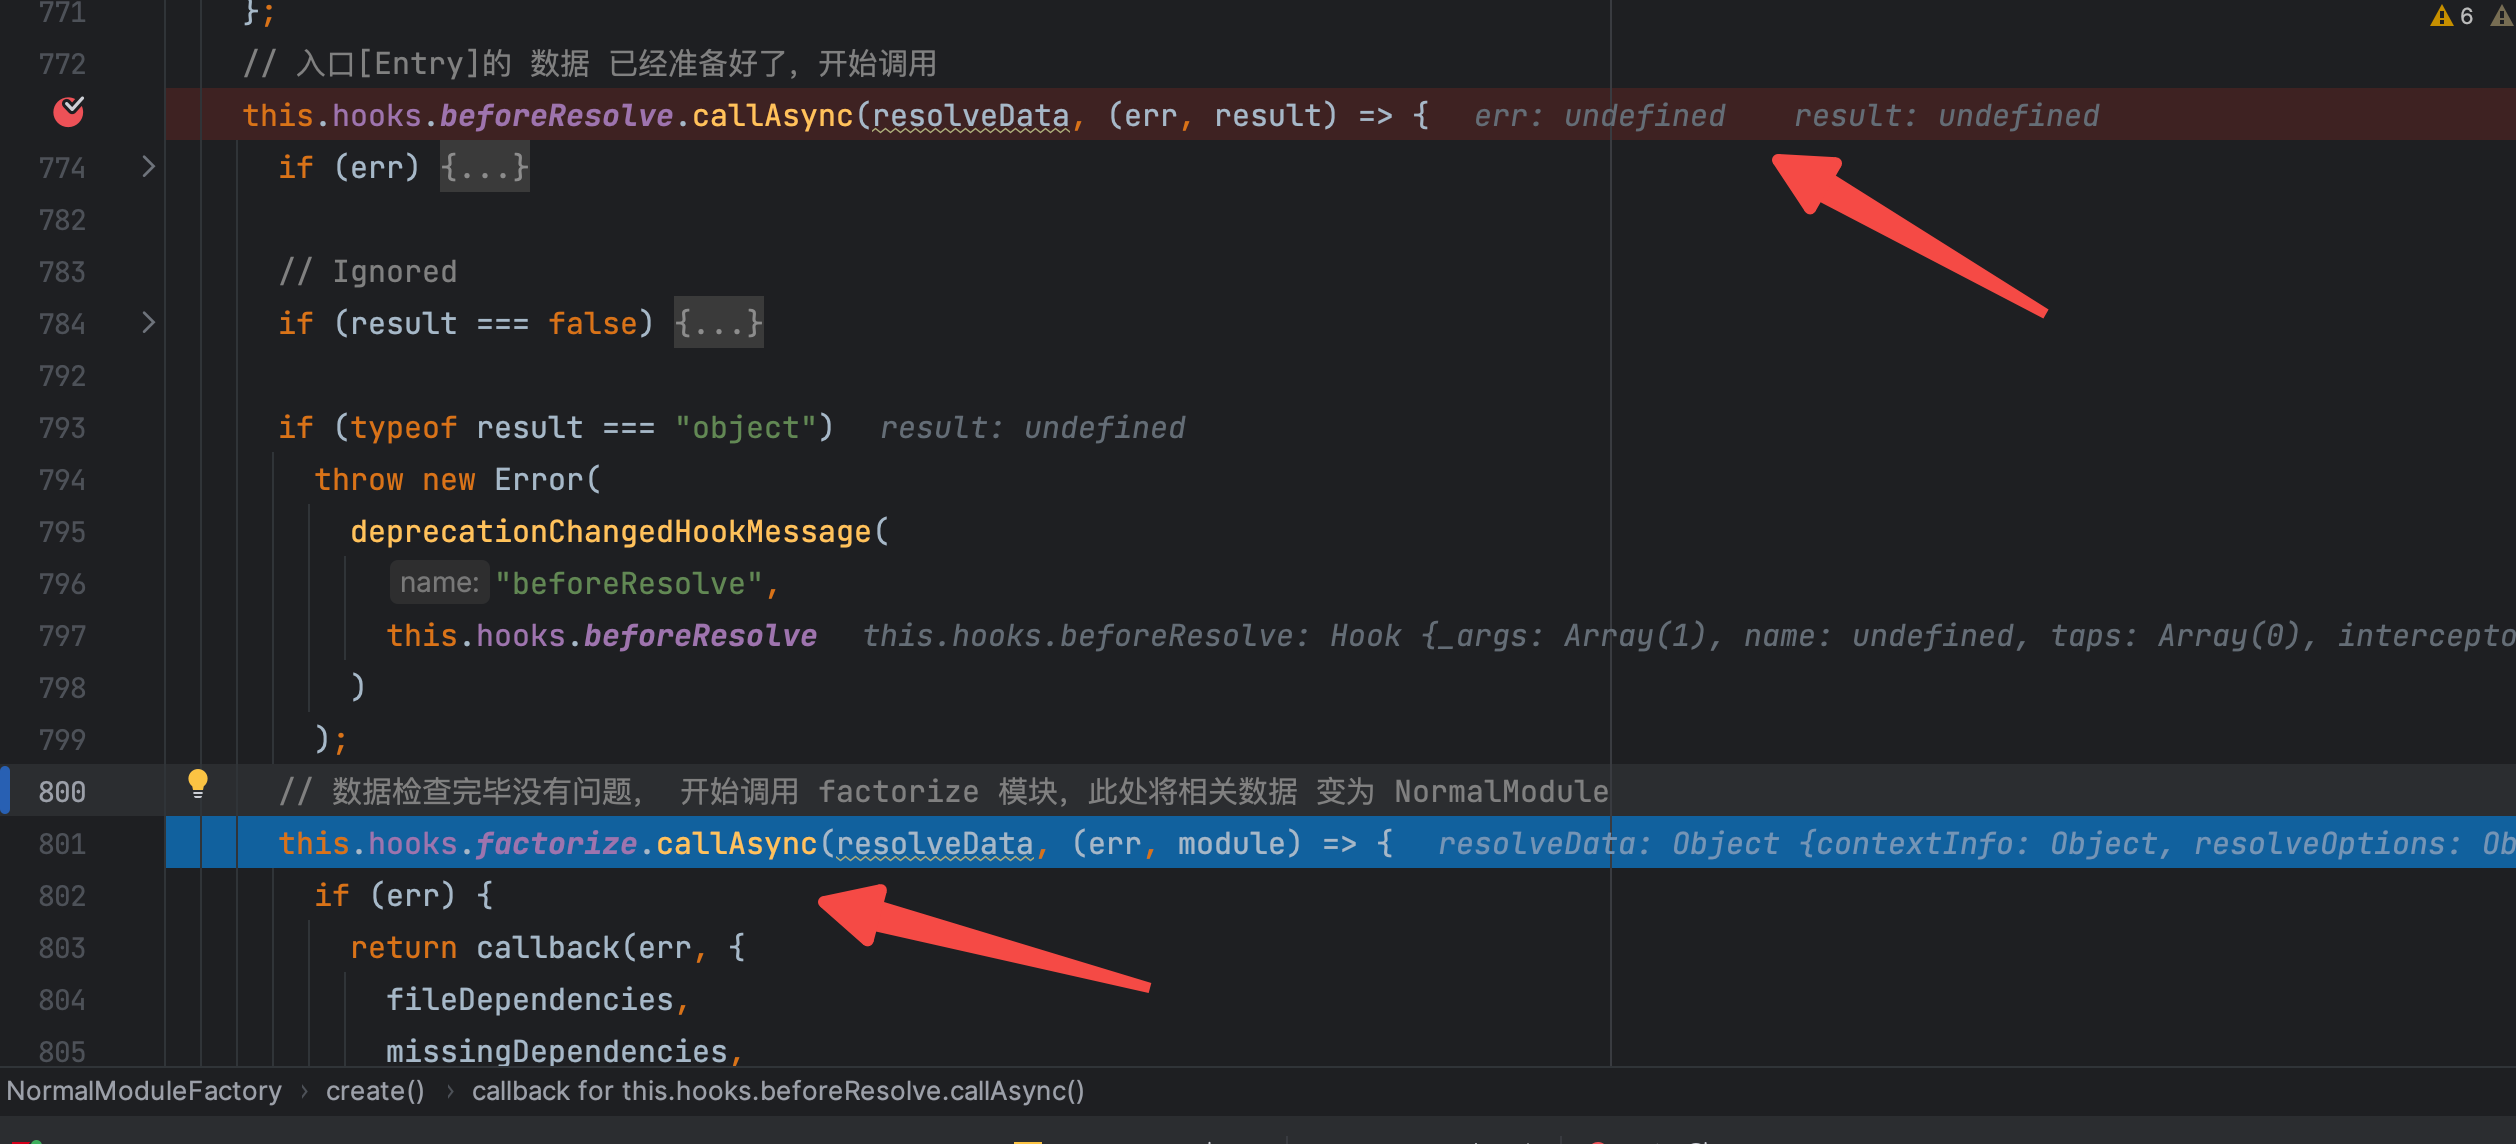 err 和 result 变量都是undefined,毫无疑问的又进入到了 801 行的 factorize 的hook了,那就继续断(慢慢的就会明白 webpack5 插件强大的背后,是难读的设计和调试)。开始调试 NormalModuleFactary 的 factorize 的 hook。
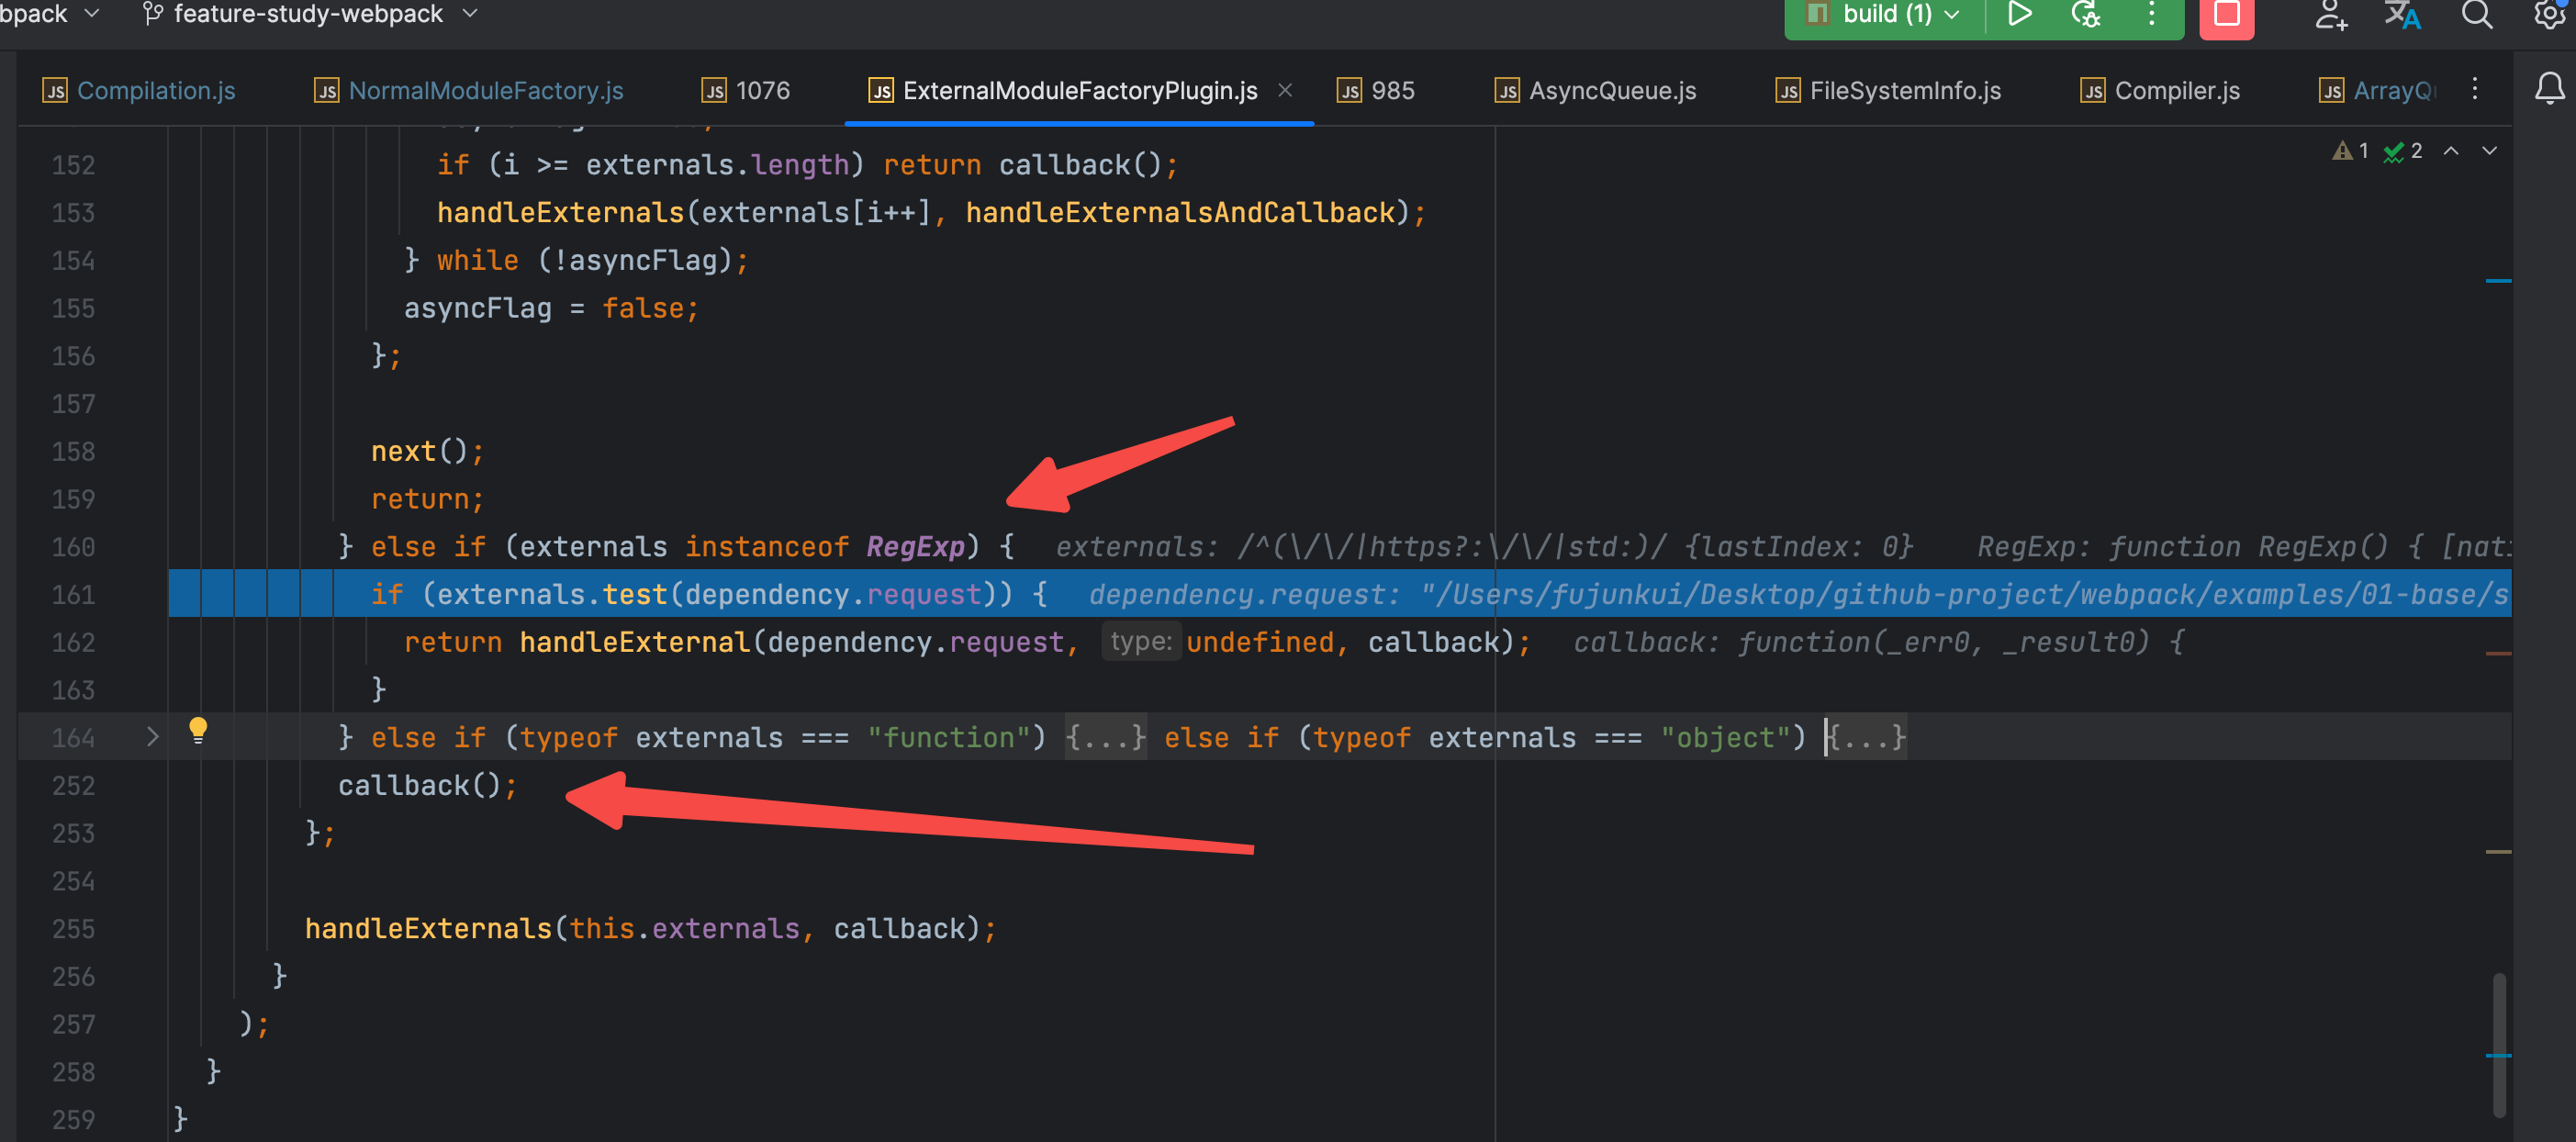 由于我们的本次的依赖是本地依赖,所以正则匹配失败了,那么结果就是要走到 callback 里了。转了一圈啥也没有做,callback 为空,那就继续断点,向下执行,进入 NormalModuleFactory 插件里。
 进入以后你会发现,这个hook 又触发了 resolve 的hook,这不就是套娃吗?然后继续断点看监听了resolve的hook上都有哪些插件?
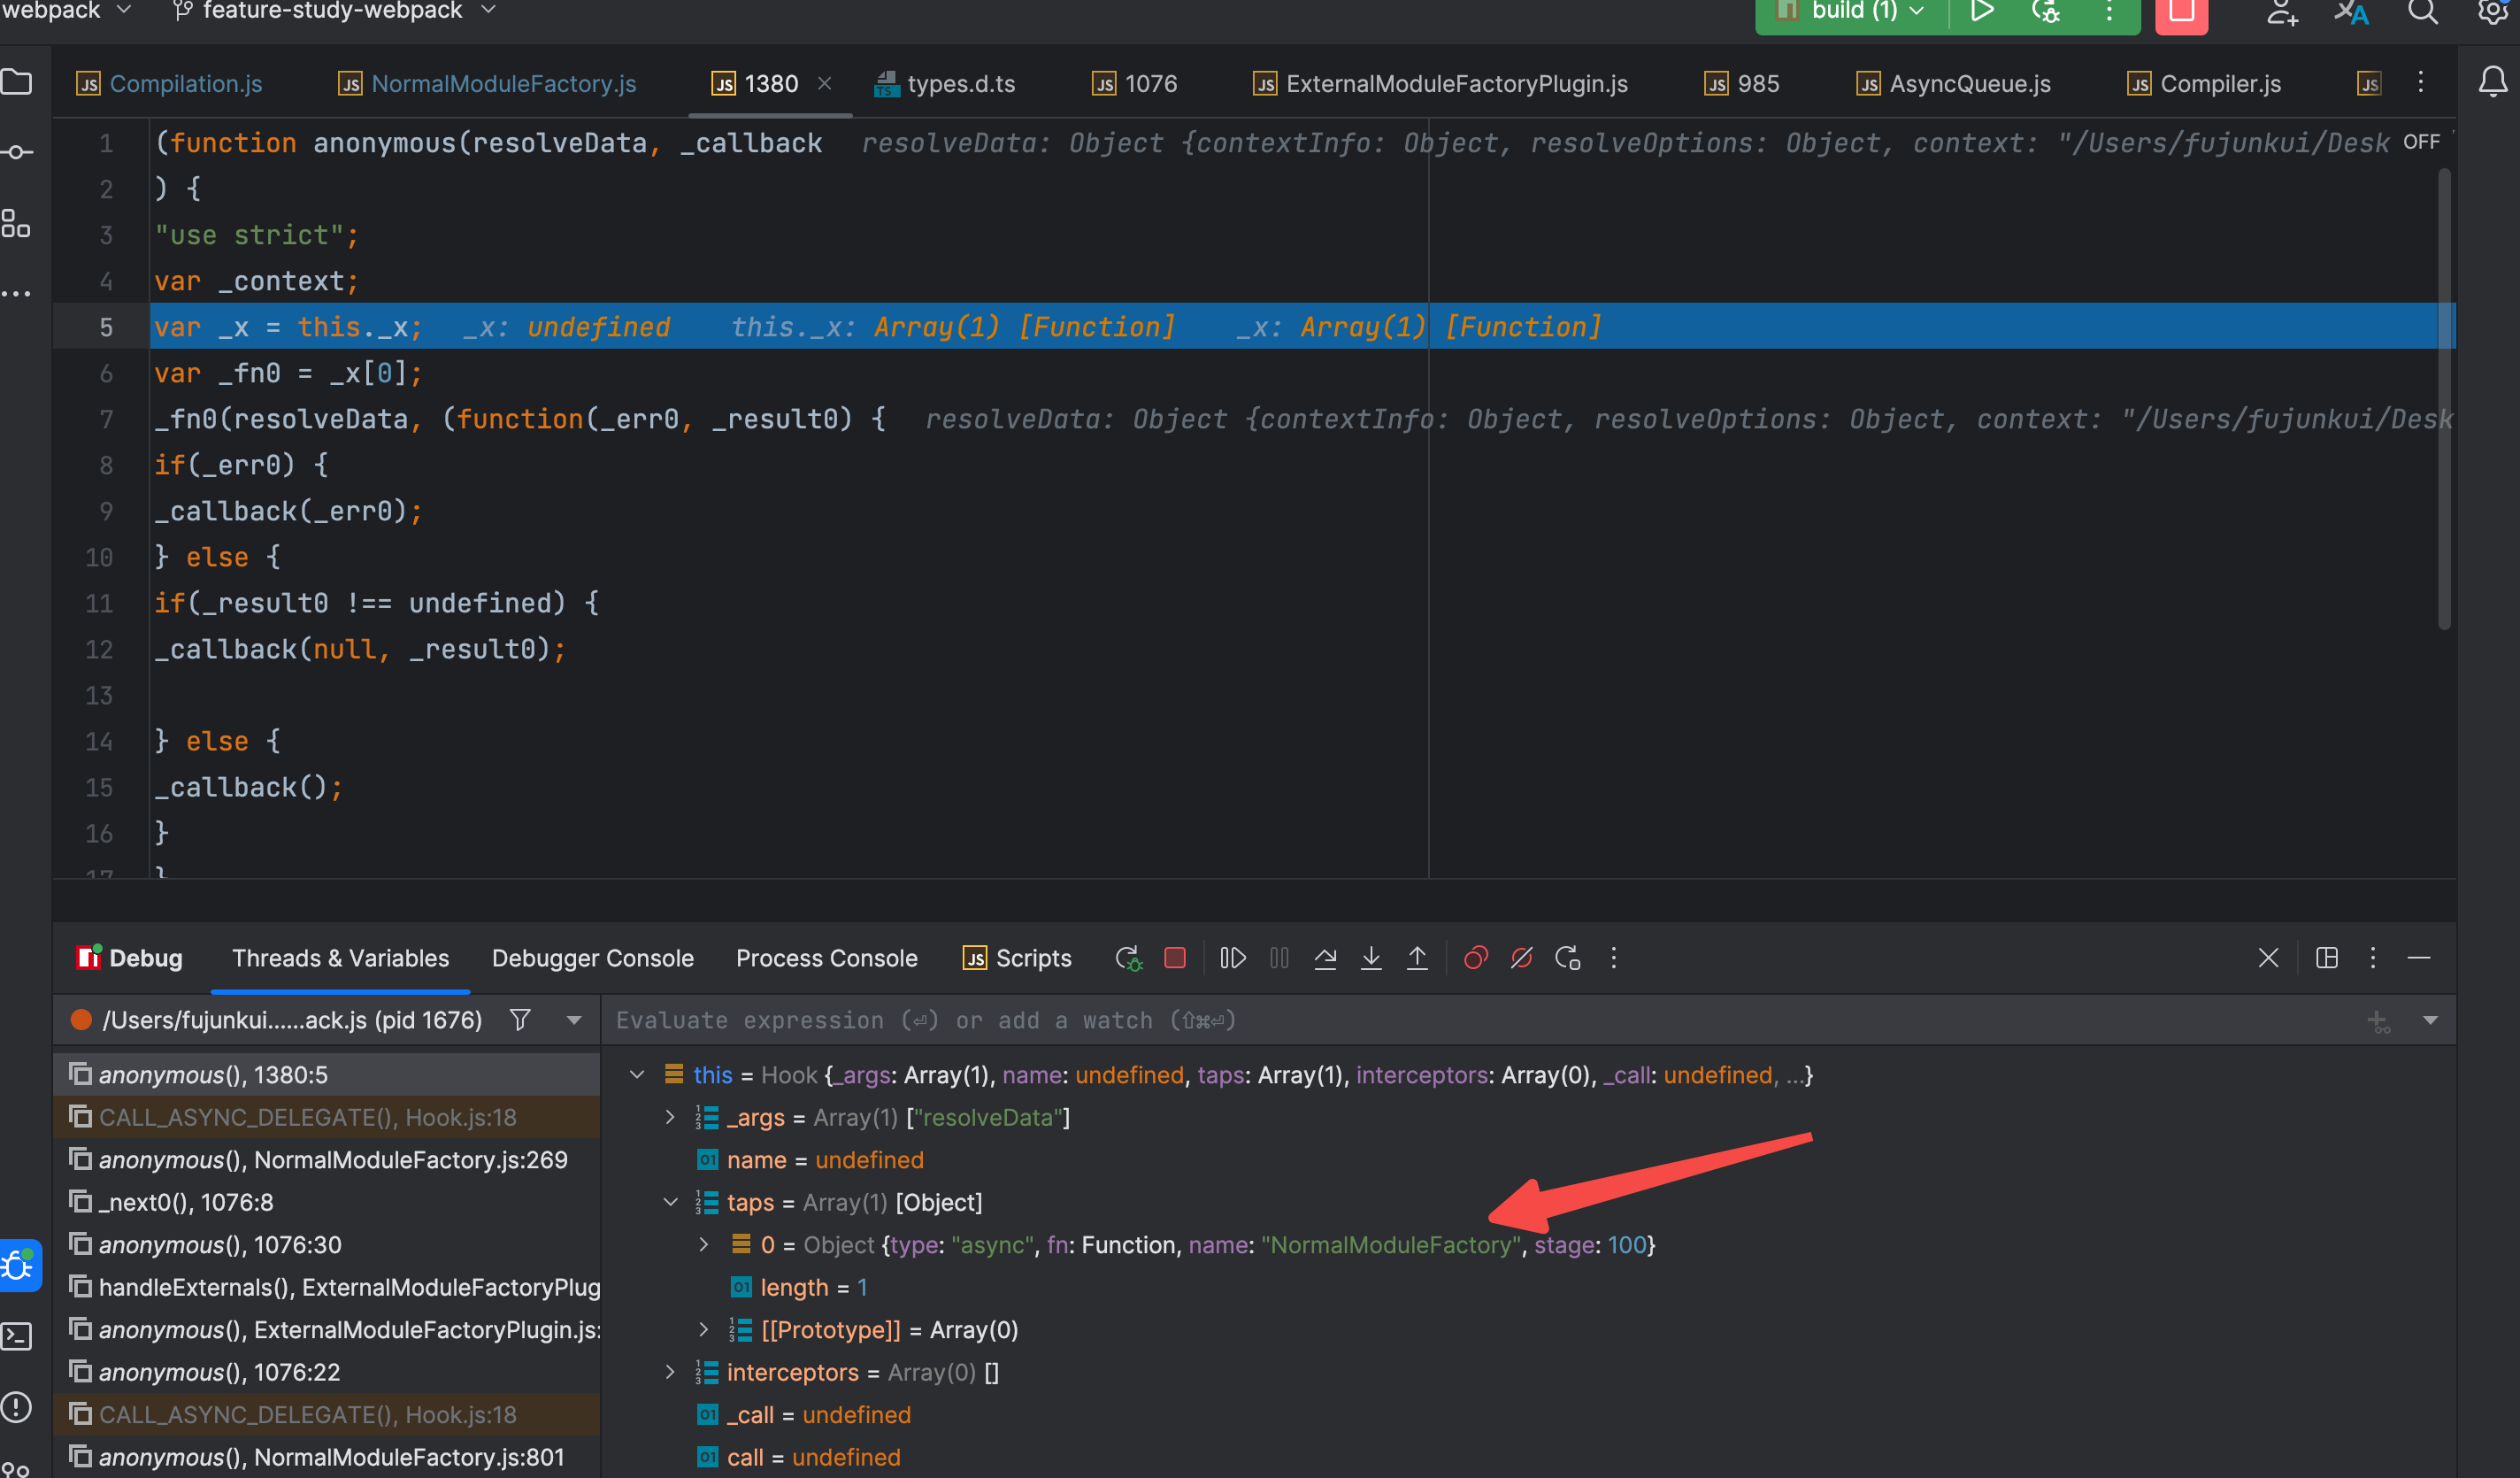 你会发现监听此hook的还是这哥们自身,这不是耍我们呢吗????? 实则不然,他完全可以写的很优雅,但是为了能尽可能的把hook给暴露出去,增强webpack的定制化能力,不得不这么做。
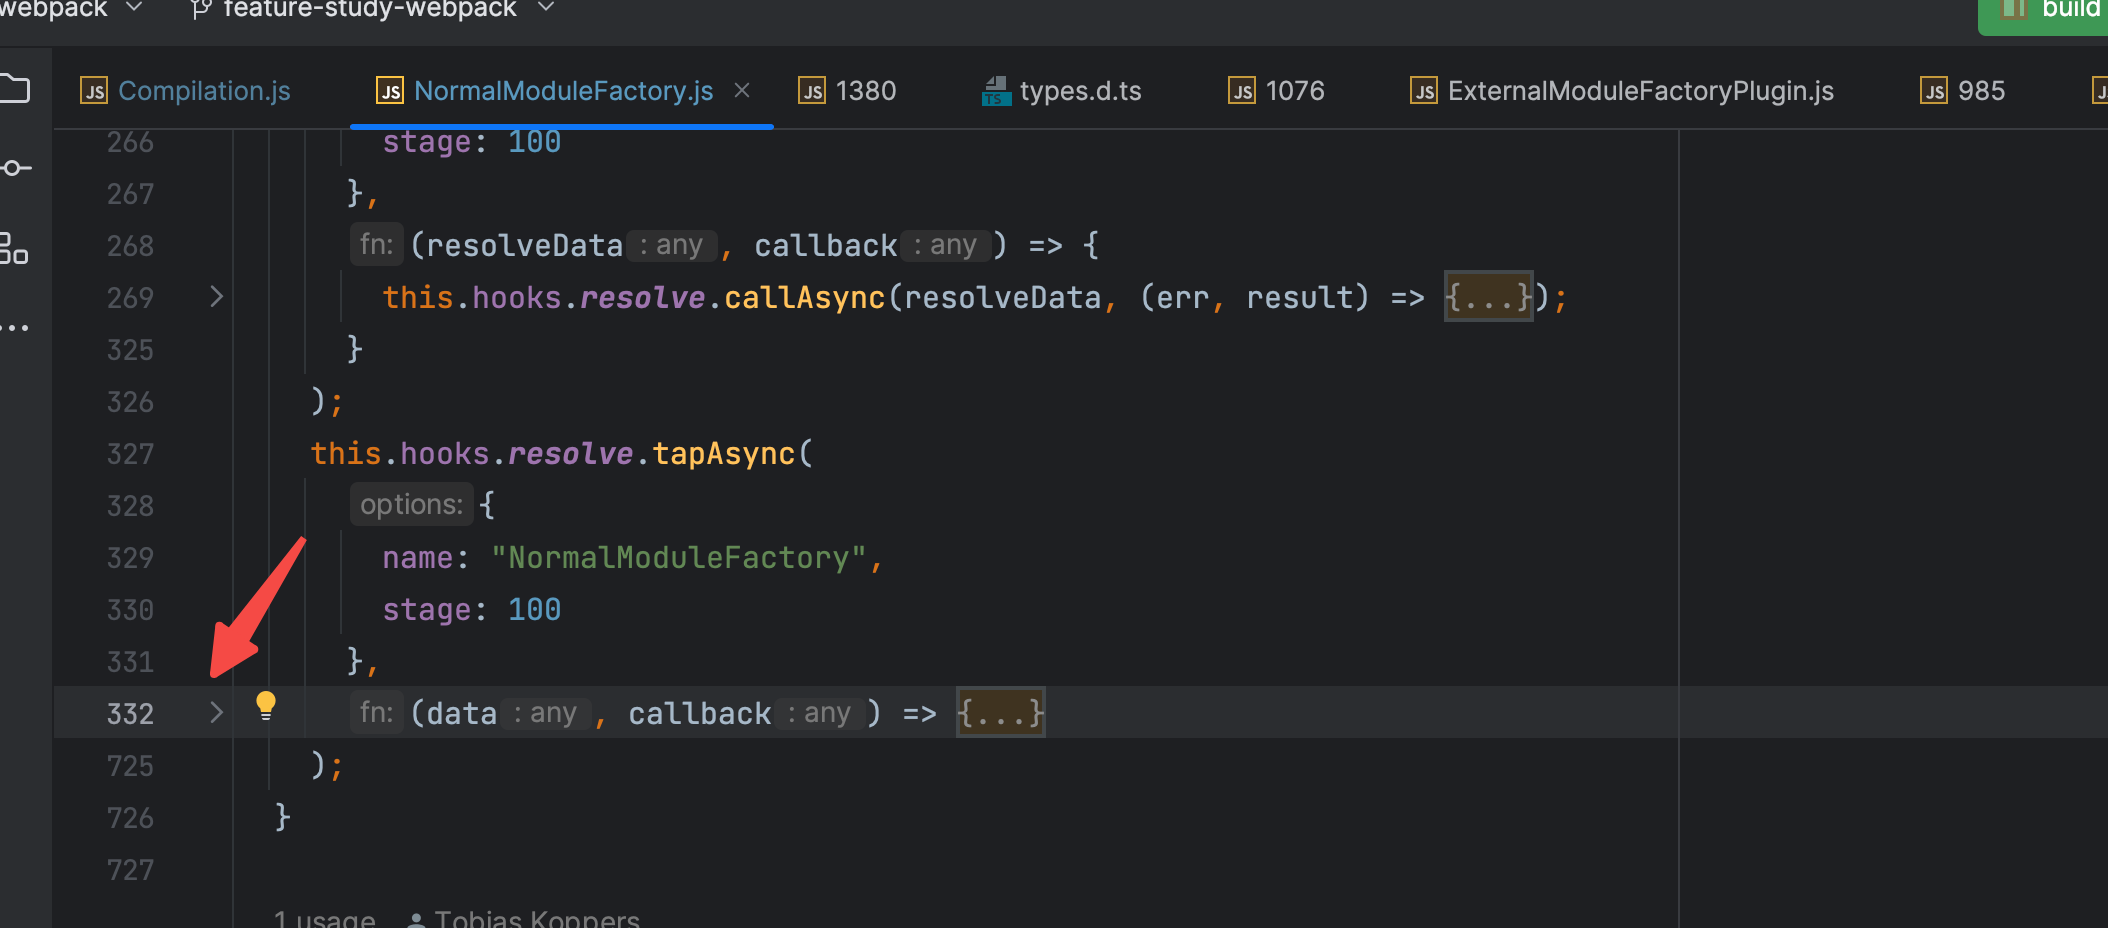 你会发现此hook的逻辑竟然高达 400 行左右的代码,一起去断点看看做了什么吧,我会把某些当前无用的方法过滤掉。
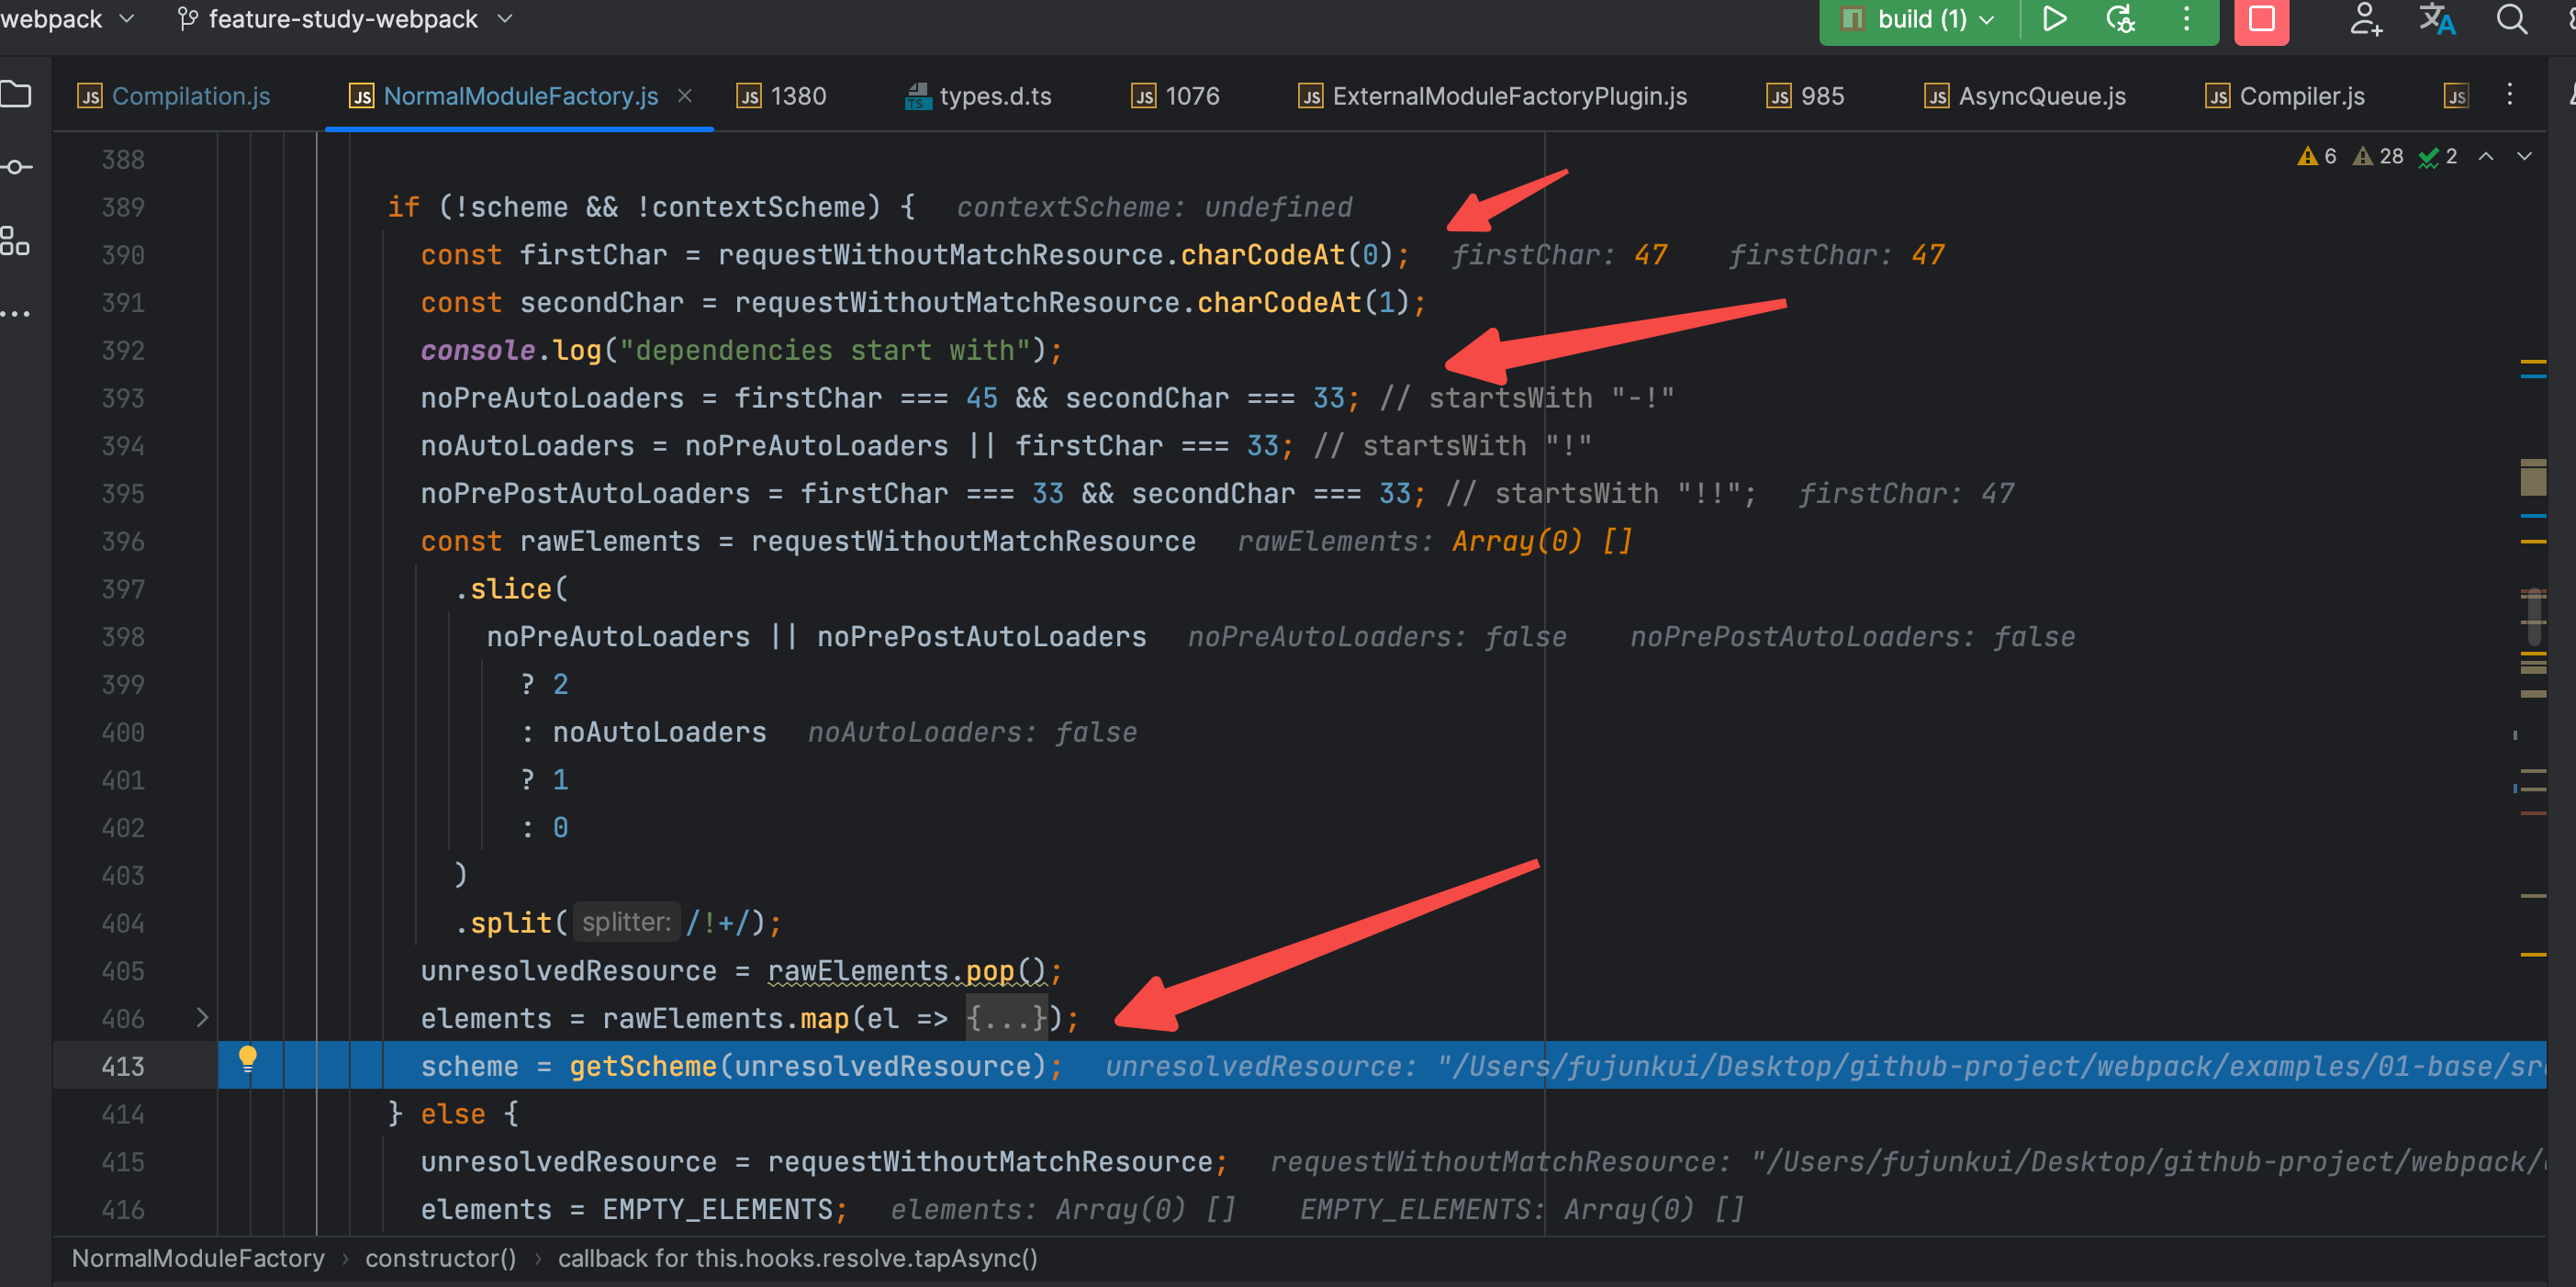 此处主要是判断 此文件的request路径是否以某些行内 loader 的方式进行开头的。 详情见官网
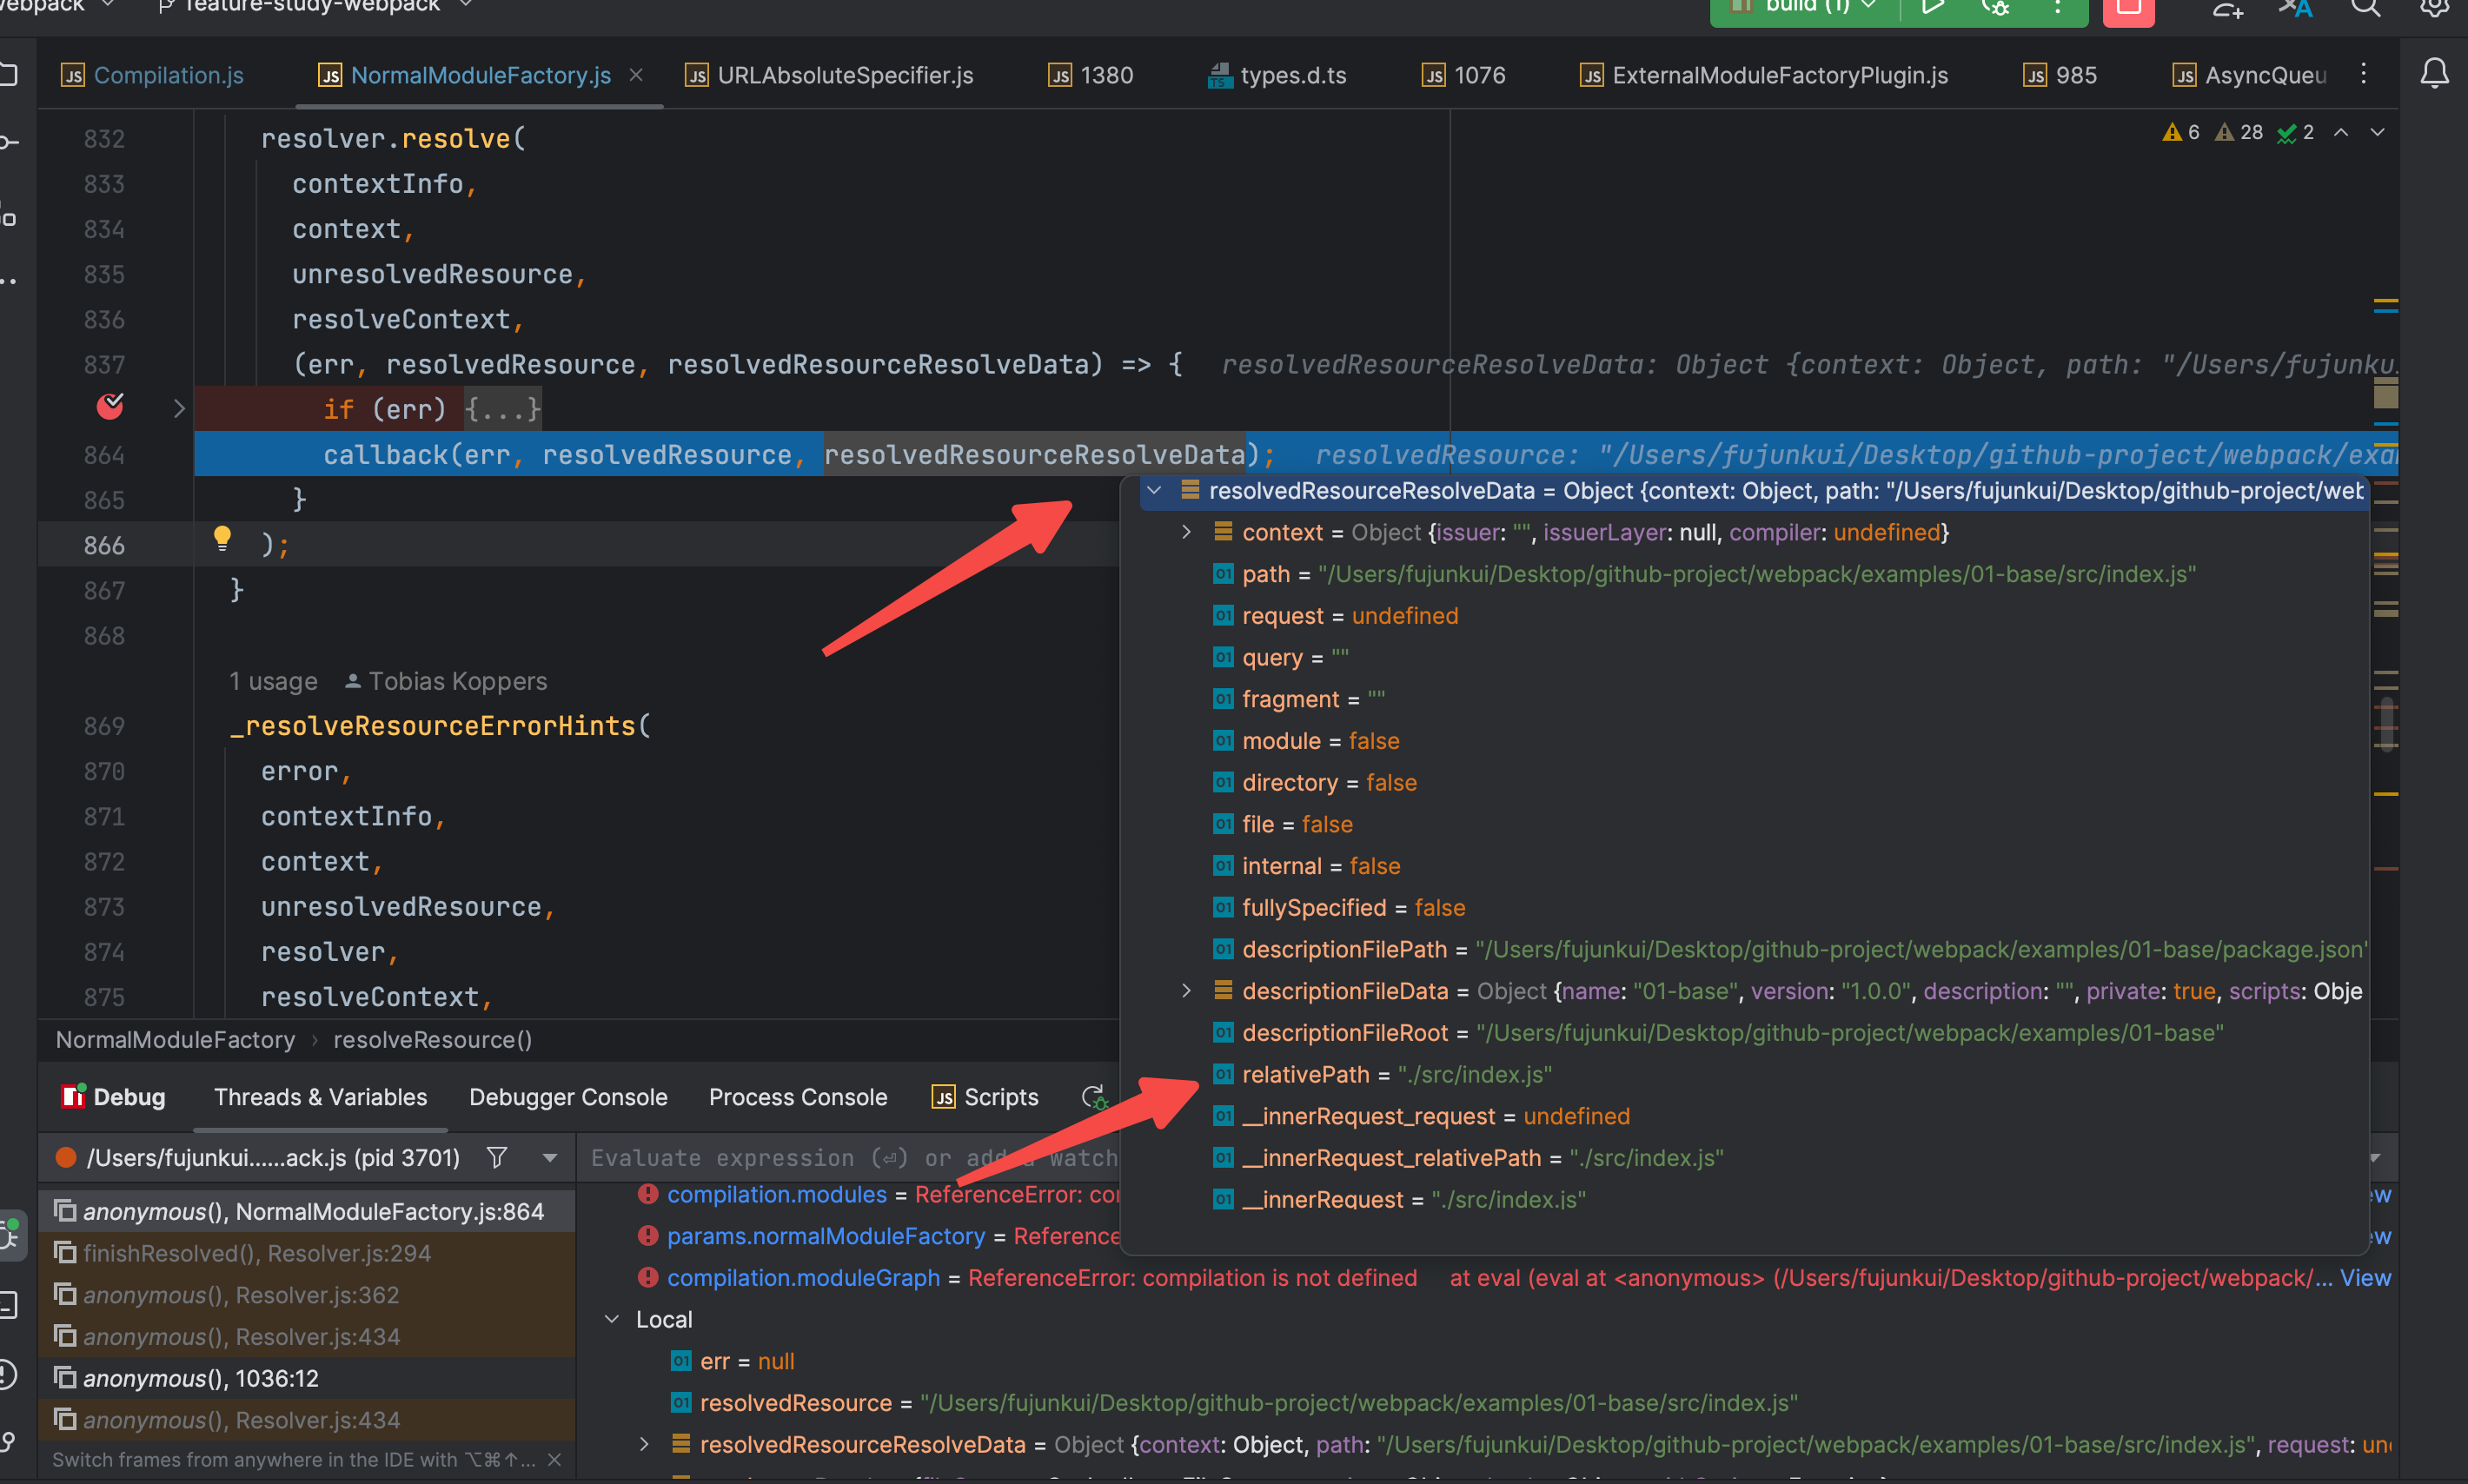
 这样就可以跳过continueCallback的部分,
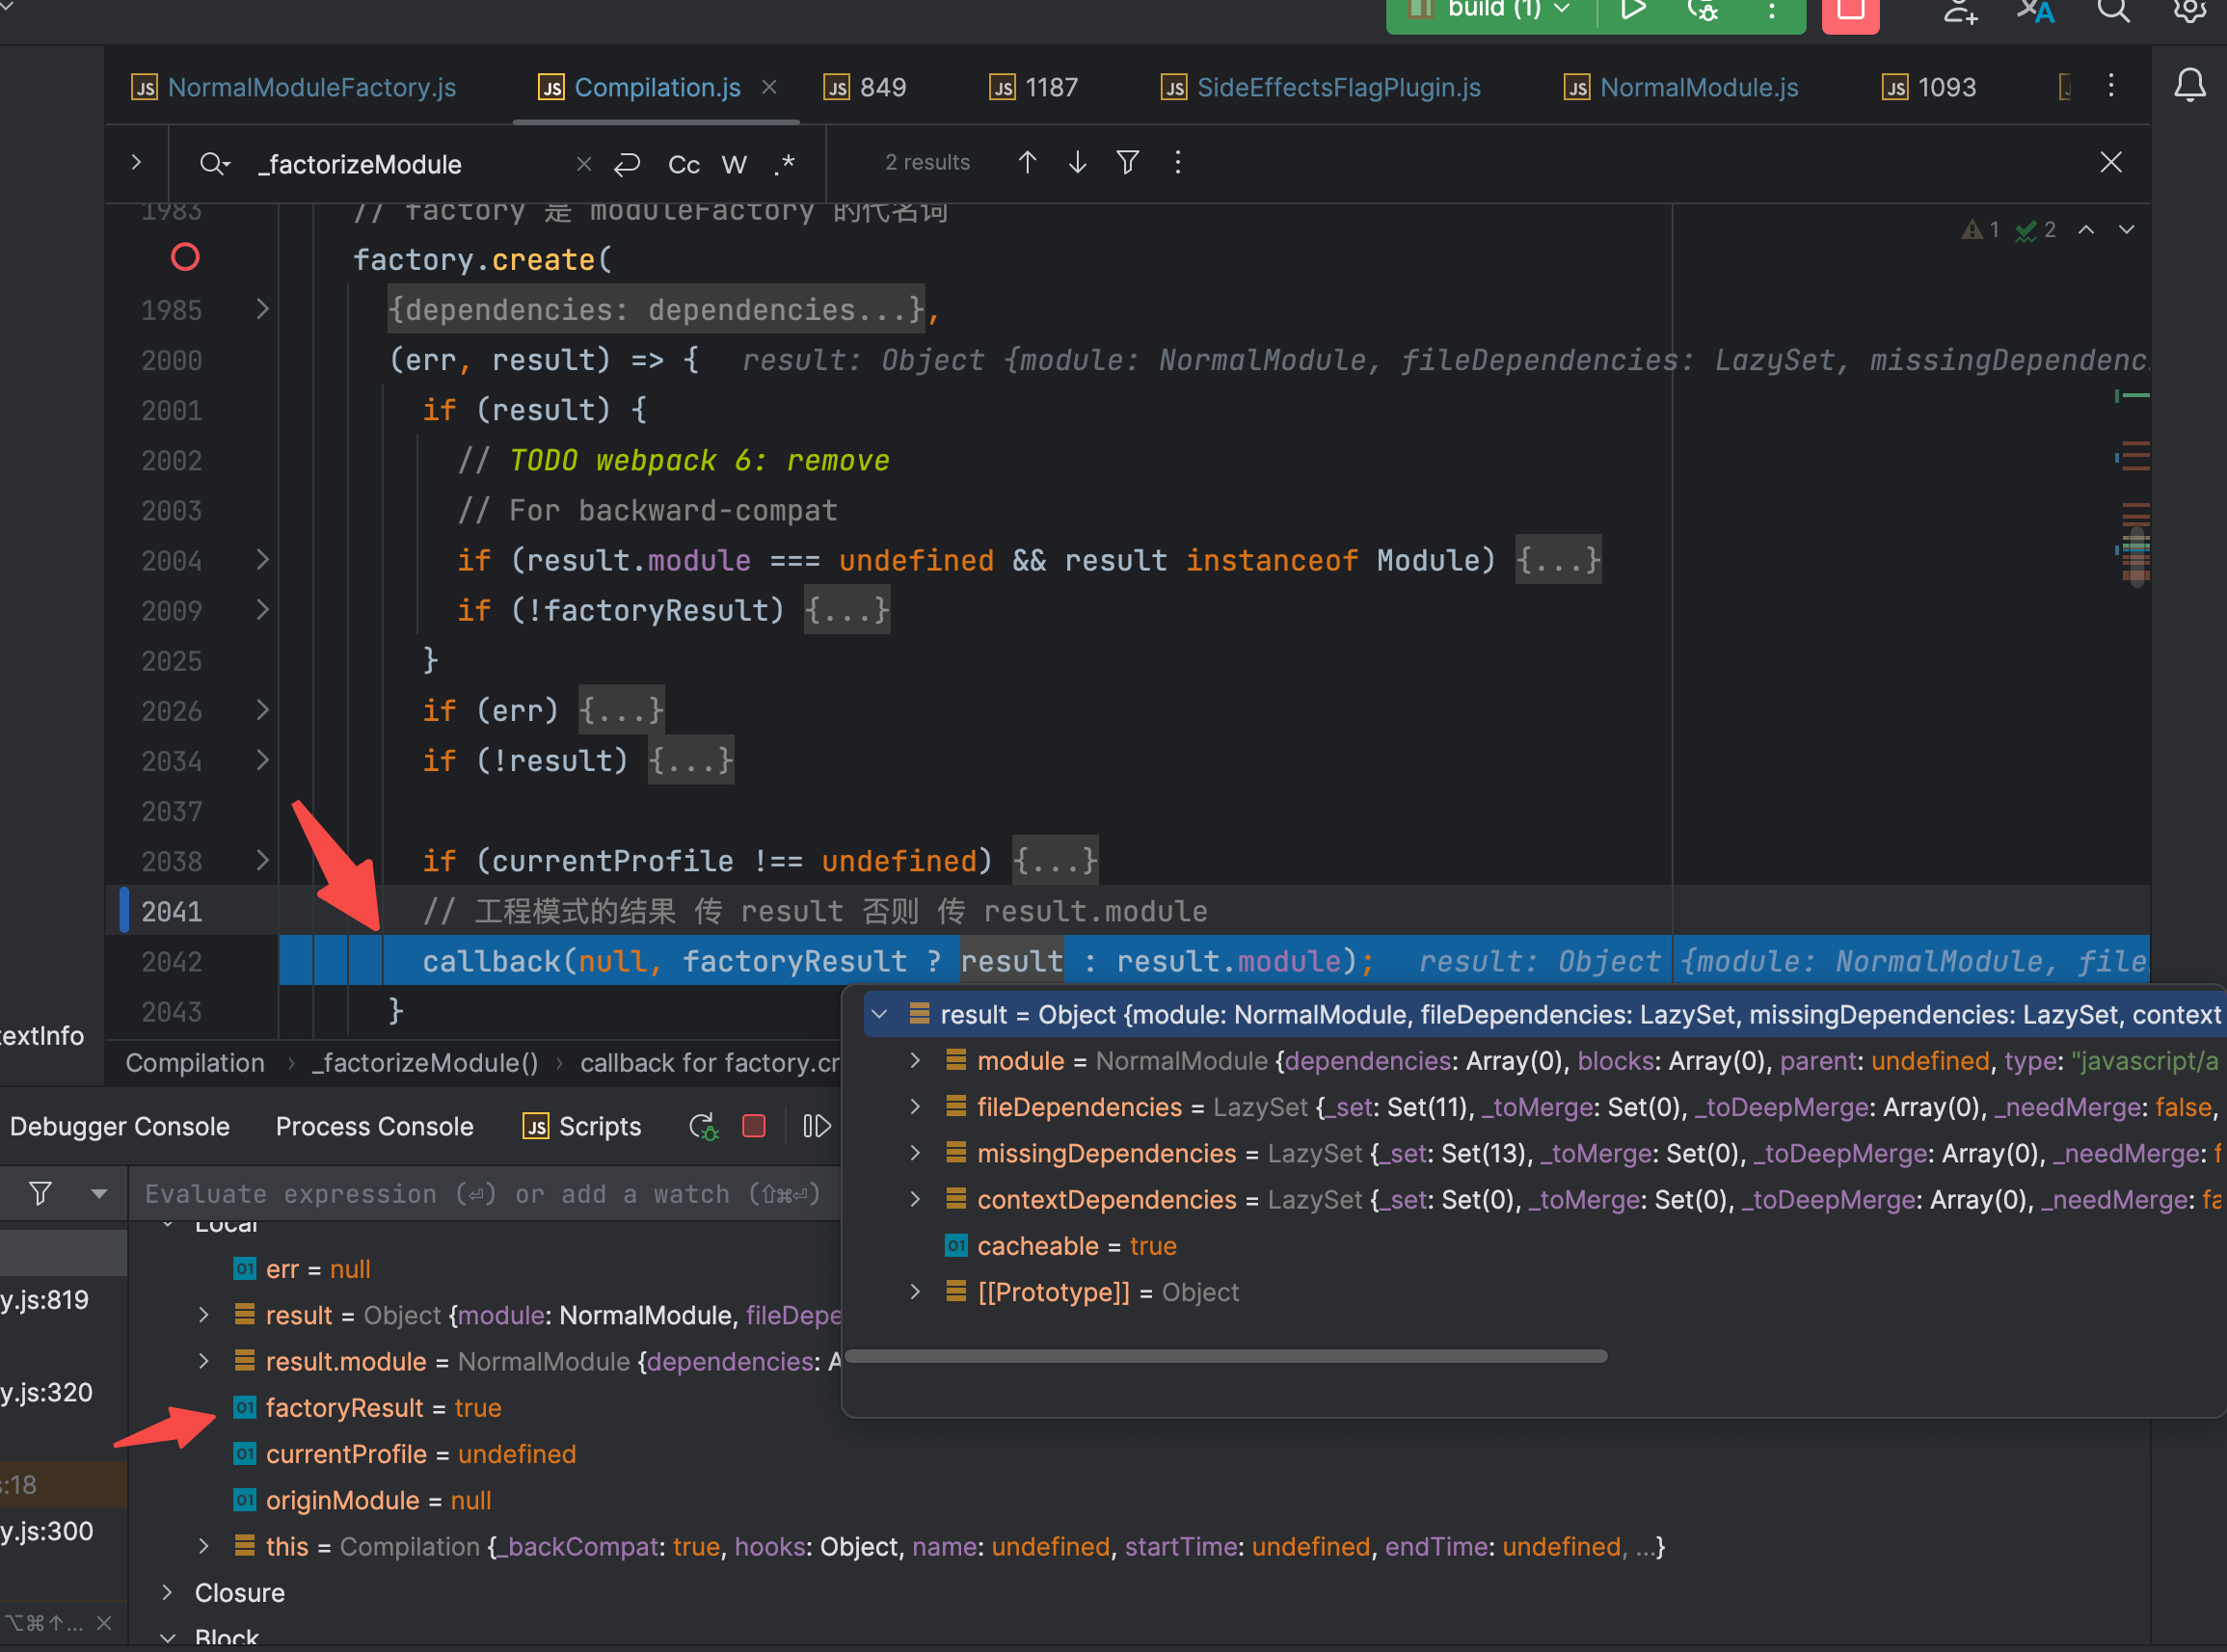 执行到 callback 里的 callback,继续进入此 callback(链路太长了,绕来绕去的)
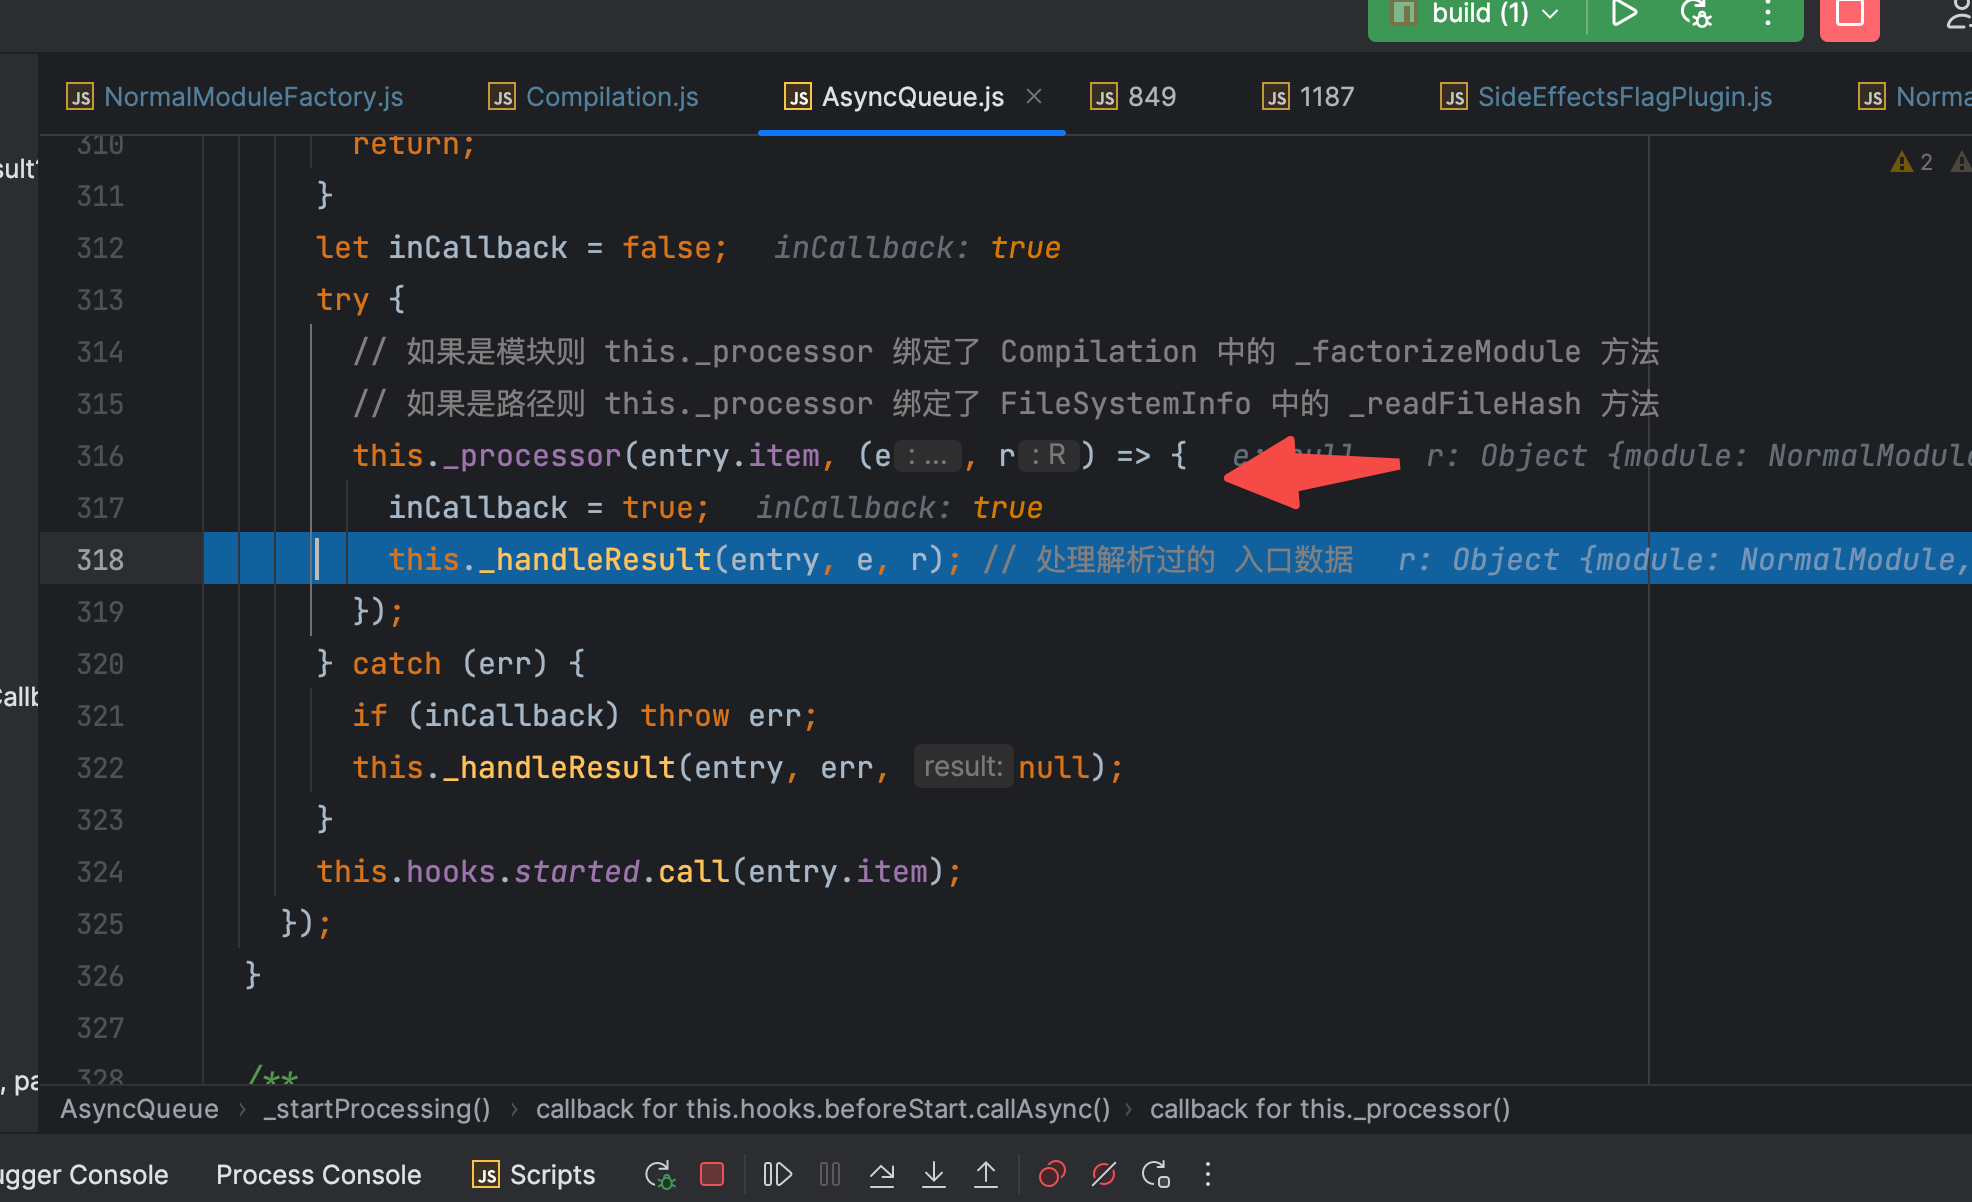 再调用 _handleResult 去处理_processor后的结果。
【本文地址】