蓝牙概览 |
您所在的位置:网站首页 › wacomctl4100蓝牙怎么连接 › 蓝牙概览 |
蓝牙概览
|
Android 平台包含蓝牙网络堆栈支持,此支持能让设备以无线方式与其他蓝牙设备交换数据。应用框架提供通过 Android Bluetooth API 访问蓝牙功能的权限。这些 API 允许应用以无线方式连接到其他蓝牙设备,从而实现点到点和多点无线功能。 Android 应用可通过 Bluetooth API 执行以下操作: 扫描其他蓝牙设备 查询本地蓝牙适配器的配对蓝牙设备 建立 RFCOMM 通道 通过服务发现连接到其他设备 与其他设备进行双向数据传输 管理多个连接本页面重点介绍传统蓝牙。传统蓝牙适用于较为耗电的操作,其中包括 Android 设备之间的流式传输和通信等。针对具有低功耗要求的蓝牙设备,Android 4.3(API 级别 18)中引入了面向低功耗蓝牙的 API 支持。如需了解更多信息,请参阅低功耗蓝牙。 本文介绍不同的蓝牙配置文件,包括健康设备配置文件。此外,本文还将介绍如何使用 Android Bluetooth API 来完成使用蓝牙进行通信的四大必需任务:设置蓝牙、查找局部区域内的配对设备或可用设备、连接设备,以及在设备之间传输数据。 基础知识为了让支持蓝牙的设备能够在彼此之间传输数据,它们必须先通过配对过程形成通信通道。其中一台设备(可检测到的设备)需将自身设置为可接收传入的连接请求。另一台设备会使用服务发现过程找到此可检测到的设备。在可检测到的设备接受配对请求后,这两台设备会完成绑定过程,并在此期间交换安全密钥。二者会缓存这些密钥,以供日后使用。完成配对和绑定过程后,两台设备会交换信息。当会话完成时,发起配对请求的设备会发布已将其链接到可检测设备的通道。但是,这两台设备仍保持绑定状态,因此在未来的会话期间,只要二者在彼此的范围内且均未移除绑定,便可自动重新连接。 蓝牙权限如要在应用中使用蓝牙功能,您必须声明两个权限。第一个是 BLUETOOTH。您需要此权限才能执行任何蓝牙通信,例如请求连接、接受连接和传输数据等。 第二个必须声明的权限是 ACCESS_FINE_LOCATION。您的应用需要此权限,因为蓝牙扫描可用于收集用户的位置信息。此类信息可能来自用户自己的设备,以及在商店和交通设施等位置使用的蓝牙信标。 注意:如果您的应用适配 Android 9(API 级别 28)或更低版本,则您可以声明 ACCESS_COARSE_LOCATION 权限而非 ACCESS_FINE_LOCATION 权限。 如果您想让应用启动设备发现或操纵蓝牙设置,则除了 BLUETOOTH 权限以外,您还必须声明 BLUETOOTH_ADMIN 权限。大多数应用只是需利用此权限发现本地蓝牙设备。除非应用是根据用户请求修改蓝牙设置的“超级管理员”,否则不应使用此权限所授予的其他功能。 在您的应用清单文件中声明蓝牙权限。例如: ...如需了解有关声明应用权限的更多信息,请参阅 参考资料。 使用配置文件从 Android 3.0 开始,Bluetooth API 便支持使用蓝牙配置文件。蓝牙配置文件是适用于设备间蓝牙通信的无线接口规范。举个例子:免提配置文件。如果手机要与无线耳机进行连接,则两台设备都必须支持免提配置文件。 Android Bluetooth API 为以下蓝牙配置文件提供实现: 耳机。耳机配置文件可为蓝牙耳机提供支持,以便与手机配合使用。Android 提供 BluetoothHeadset 类,该类是用于控制蓝牙耳机服务的代理。其中包括蓝牙耳机和免提 (v1.5) 的配置文件。BluetoothHeadset 类包含对 AT 命令的支持。有关此主题的详细讨论,请参阅供应商特定的 AT 命令 A2DP。蓝牙立体声音频传输配置文件 (A2DP) 定义如何通过蓝牙连接和流式传输,将高质量音频从一个设备传输至另一个设备。Android 提供 BluetoothA2dp 类,该类是用于控制蓝牙 A2DP 服务的代理。 健康设备。Android 4.0(API 级别 14)引入了对蓝牙健康设备配置文件 (HDP) 的支持。该配置文件允许您创建应用,从而使用蓝牙与支持蓝牙功能的健康设备(例如心率监测仪、血糖仪、温度计、台秤等)进行通信。有关支持的设备及其相应的设备数据专业化代码列表,请参阅蓝牙的 HDP 设备数据专业化。这些值在 ISO/IEEE 11073-20601 [7] 规范的“命名法规附录”中也被称为 MDC_DEV_SPEC_PROFILE_*。有关 HDP 的详细讨论,请参阅健康设备规范。以下是使用配置文件的基本步骤: 获取默认适配器(请参阅设置蓝牙)。 设置 BluetoothProfile.ServiceListener。此侦听器会在 BluetoothProfile 客户端连接到服务或断开服务连接时向其发送通知。 使用 getProfileProxy() 与配置文件所关联的配置文件代理对象建立连接。在以下示例中,配置文件代理对象是一个 BluetoothHeadset 实例。 在 onServiceConnected() 中,获取配置文件代理对象的句柄。 获得配置文件代理对象后,您可以用其监视连接状态,并执行与该配置文件相关的其他操作。例如,以下代码段展示如何连接至 BluetoothHeadset 代理对象,以便能够控制耳机配置文件: Kotlin var bluetoothHeadset: BluetoothHeadset? = null // Get the default adapter val bluetoothAdapter: BluetoothAdapter? = BluetoothAdapter.getDefaultAdapter() private val profileListener = object : BluetoothProfile.ServiceListener { override fun onServiceConnected(profile: Int, proxy: BluetoothProfile) { if (profile == BluetoothProfile.HEADSET) { bluetoothHeadset = proxy as BluetoothHeadset } } override fun onServiceDisconnected(profile: Int) { if (profile == BluetoothProfile.HEADSET) { bluetoothHeadset = null } } } // Establish connection to the proxy. bluetoothAdapter?.getProfileProxy(context, profileListener, BluetoothProfile.HEADSET) // ... call functions on bluetoothHeadset // Close proxy connection after use. bluetoothAdapter?.closeProfileProxy(BluetoothProfile.HEADSET, bluetoothHeadset) Java BluetoothHeadset bluetoothHeadset; // Get the default adapter BluetoothAdapter bluetoothAdapter = BluetoothAdapter.getDefaultAdapter(); private BluetoothProfile.ServiceListener profileListener = new BluetoothProfile.ServiceListener() { public void onServiceConnected(int profile, BluetoothProfile proxy) { if (profile == BluetoothProfile.HEADSET) { bluetoothHeadset = (BluetoothHeadset) proxy; } } public void onServiceDisconnected(int profile) { if (profile == BluetoothProfile.HEADSET) { bluetoothHeadset = null; } } }; // Establish connection to the proxy. bluetoothAdapter.getProfileProxy(context, profileListener, BluetoothProfile.HEADSET); // ... call functions on bluetoothHeadset // Close proxy connection after use. bluetoothAdapter.closeProfileProxy(bluetoothHeadset); 供应商特定的 AT 命令从 Android 3.0(API 级别 11)开始,应用可注册接收耳机发送的预定义供应商特定 AT 命令(例如 Plantronics +XEVENT 命令)的系统广播。例如,应用可接收指示所连接设备电池电量的广播,并根据需要通知用户或采取其他操作。为 ACTION_VENDOR_SPECIFIC_HEADSET_EVENT Intent 创建广播接收器,以处理耳机的供应商特定 AT 命令。 健康设备配置文件Android 4.0(API 级别 14)引入了对蓝牙健康设备配置文件 (HDP) 的支持。该配置文件允许您创建应用,从而使用蓝牙与支持蓝牙功能的健康设备(例如心率监测仪、血糖仪、温度计、台秤)进行通信。Bluetooth Health API 包含 BluetoothHealth、BluetoothHealthCallback 和 BluetoothHealthAppConfiguration 类(详情请参阅关键类和接口)。 在使用 Bluetooth Health API 时,了解以下关键 HDP 概念很有帮助: 源设备 向 Android 手机或平板电脑等智能设备传输医疗数据的健康设备,例如体重秤、血糖仪或温度计。 接收设备 接收医疗数据的智能设备。在 Android HDP 应用中,接收设备由 BluetoothHealthAppConfiguration 对象表示。 注册 用于注册接收设备(从而与特定健康设备进行通信)的过程。 连接 用于开放健康设备(源设备)与智能设备(接收设备)之间通道的过程。 创建 HDP 应用以下是创建 Android HDP 应用所涉及的基本步骤: 获取 BluetoothHealth 代理对象的引用。与常规耳机和采用 A2DP 配置文件的设备类似,您必须使用 BluetoothProfile.ServiceListener 和 HEALTH 配置文件类型来调用 getProfileProxy(),以便与配置文件代理对象建立连接。 创建 BluetoothHealthCallback,并注册充当健康接收设备的应用配置 (BluetoothHealthAppConfiguration)。建立与健康设备的连接。 注意:某些设备会自动发起连接。对于这类设备,无需执行该步骤。 成功连接至健康设备后,使用文件描述符对健康设备执行读/写操作。接收的数据需使用实现 IEEE 11073 规范的健康管理器进行解释。 完成后,关闭健康通道并取消注册该应用。该通道在长期闲置时也会关闭。 设置蓝牙您需验证设备支持蓝牙,确保在此情况下启用该功能,这样您的应用才能通过蓝牙进行通信。 如果设备不支持蓝牙,则应正常停用任何蓝牙功能。如果设备支持蓝牙但已停用此功能,则您可以请求用户在不离开应用的同时启用蓝牙。借助 BluetoothAdapter,您可以分两步完成此设置: 获取 BluetoothAdapter。所有蓝牙 Activity 都需要 BluetoothAdapter。如要获取 BluetoothAdapter,请调用静态的 getDefaultAdapter() 方法。此方法会返回一个 BluetoothAdapter 对象,表示设备自身的蓝牙适配器(蓝牙无线装置)。整个系统只有一个蓝牙适配器,并且您的应用可使用此对象与之进行交互。如果 getDefaultAdapter() 返回 null,则表示设备不支持蓝牙。例如: Kotlin val bluetoothAdapter: BluetoothAdapter? = BluetoothAdapter.getDefaultAdapter() if (bluetoothAdapter == null) { // Device doesn't support Bluetooth } Java BluetoothAdapter bluetoothAdapter = BluetoothAdapter.getDefaultAdapter(); if (bluetoothAdapter == null) { // Device doesn't support Bluetooth } 启用蓝牙。下一步,您需要确保已启用蓝牙。调用 isEnabled(),以检查当前是否已启用蓝牙。如果此方法返回 false,则表示蓝牙处于停用状态。如要请求启用蓝牙,请调用 startActivityForResult(),从而传入一个 ACTION_REQUEST_ENABLE Intent 操作。此调用会发出通过系统设置启用蓝牙的请求(无需停止应用)。例如: Kotlin if (bluetoothAdapter?.isEnabled == false) { val enableBtIntent = Intent(BluetoothAdapter.ACTION_REQUEST_ENABLE) startActivityForResult(enableBtIntent, REQUEST_ENABLE_BT) } Java if (!bluetoothAdapter.isEnabled()) { Intent enableBtIntent = new Intent(BluetoothAdapter.ACTION_REQUEST_ENABLE); startActivityForResult(enableBtIntent, REQUEST_ENABLE_BT); }如图 1 所示,系统将显示对话框,请求用户允许启用蓝牙。如果用户响应“Yes”,系统会开始启用蓝牙,并在该进程完成(或失败)后将焦点返回您的应用。 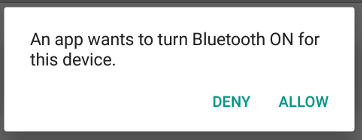 图 1:启用蓝牙对话框。 图 1:启用蓝牙对话框。
传递给 startActivityForResult() 的 REQUEST_ENABLE_BT 常量为局部定义的整型数(必须大于 0)。系统会以 onActivityResult() 实现中的 requestCode 参数形式,向您传回该常量。 如果成功启用蓝牙,您的 Activity 会在 onActivityResult() 回调中收到 RESULT_OK 结果代码。如果由于某个错误(或用户响应“No”)未成功启用蓝牙,则结果代码为 RESULT_CANCELED。 您的应用还可选择侦听 ACTION_STATE_CHANGED 广播 Intent,每当蓝牙状态发生变化时,系统都会广播此 Intent。此广播包含额外字段 EXTRA_STATE 和 EXTRA_PREVIOUS_STATE,二者分别包含新的和旧的蓝牙状态。这些额外字段可能为以下值:STATE_TURNING_ON、STATE_ON、STATE_TURNING_OFF 和 STATE_OFF。如果您的应用需检测对蓝牙状态所做的运行时更改,请侦听此广播。 提示:启用可检测性即可自动启用蓝牙。如果您计划在执行蓝牙 Activity 之前一直启用设备的可检测性,则可以跳过上述步骤 2。如需了解详情,请阅读本页面上的启用可检测性部分。 查找设备利用 BluetoothAdapter,您可以通过设备发现或查询配对设备的列表来查找远程蓝牙设备。 设备发现是一个扫描过程,它会搜索局部区域内已启用蓝牙功能的设备,并请求与每台设备相关的某些信息。此过程有时也被称为发现、查询或扫描。但是,只有在当下接受信息请求时,附近区域的蓝牙设备才会通过启用可检测性响应发现请求。如果设备已启用可检测性,它会通过共享一些信息(例如设备的名称、类及其唯一的 MAC 地址)来响应发现请求。借助此类信息,执行发现过程的设备可选择发起对已检测到设备的连接。 在首次与远程设备建立连接后,系统会自动向用户显示配对请求。当设备完成配对后,系统会保存关于该设备的基本信息(例如设备的名称、类和 MAC 地址),并且可使用 Bluetooth API 读取这些信息。借助远程设备的已知 MAC 地址,您可以随时向其发起连接,而无需执行发现操作(假定该设备仍处于有效范围内)。 请注意,被配对与被连接之间存在区别: 被配对是指两台设备知晓彼此的存在,具有可用于身份验证的共享链路密钥,并且能够与彼此建立加密连接。 被连接是指设备当前共享一个 RFCOMM 通道,并且能够向彼此传输数据。当前的 Android Bluetooth API 要求规定,只有先对设备进行配对,然后才能建立 RFCOMM 连接。在使用 Bluetooth API 发起加密连接时,系统会自动执行配对。以下部分介绍如何查找已配对的设备,或使用设备发现功能来发现新设备。 注意:Android 设备默认处于不可检测到状态。用户可通过系统设置将设备设为在有限的时间内处于可检测到状态,或者,应用可请求用户在不离开应用的同时启用可检测性。如需了解更多信息,请参阅本页面的启用可检测性部分。 查询已配对设备在执行设备发现之前,您必须查询已配对的设备集,以了解所需的设备是否处于已检测到状态。为此,请调用 getBondedDevices()。此方法会返回一组表示已配对设备的 BluetoothDevice 对象。例如,您可以查询所有已配对设备,并获取每台设备的名称和 MAC 地址,如以下代码段所示: Kotlin val pairedDevices: Set? = bluetoothAdapter?.bondedDevices pairedDevices?.forEach { device -> val deviceName = device.name val deviceHardwareAddress = device.address // MAC address } Java Set pairedDevices = bluetoothAdapter.getBondedDevices(); if (pairedDevices.size() > 0) { // There are paired devices. Get the name and address of each paired device. for (BluetoothDevice device : pairedDevices) { String deviceName = device.getName(); String deviceHardwareAddress = device.getAddress(); // MAC address } }如要发起与蓝牙设备的连接,您只需从关联的 BluetoothDevice 对象获取 MAC 地址,您可通过调用 getAddress() 检索此地址。有关创建连接的详情,请参阅连接设备部分。 注意:执行设备发现将消耗蓝牙适配器的大量资源。在找到要连接的设备后,请务必使用 cancelDiscovery() 停止发现,然后再尝试连接。此外,您不应在连接到设备的情况下执行设备发现,因为发现过程会大幅减少可供任何现有连接使用的带宽。 发现设备如要开始发现设备,只需调用 startDiscovery()。该进程为异步操作,并且会返回一个布尔值,指示发现进程是否已成功启动。发现进程通常包含约 12 秒钟的查询扫描,随后会对发现的每台设备进行页面扫描,以检索其蓝牙名称。 您的应用必须针对 ACTION_FOUND Intent 注册一个 BroadcastReceiver,以便接收每台发现的设备的相关信息。系统会为每台设备广播此 Intent。Intent 包含额外字段 EXTRA_DEVICE 和 EXTRA_CLASS,二者又分别包含 BluetoothDevice 和 BluetoothClass。以下代码段展示如何在发现设备时通过注册来处理广播: Kotlin override fun onCreate(savedInstanceState: Bundle?) { ... // Register for broadcasts when a device is discovered. val filter = IntentFilter(BluetoothDevice.ACTION_FOUND) registerReceiver(receiver, filter) } // Create a BroadcastReceiver for ACTION_FOUND. private val receiver = object : BroadcastReceiver() { override fun onReceive(context: Context, intent: Intent) { val action: String = intent.action when(action) { BluetoothDevice.ACTION_FOUND -> { // Discovery has found a device. Get the BluetoothDevice // object and its info from the Intent. val device: BluetoothDevice = intent.getParcelableExtra(BluetoothDevice.EXTRA_DEVICE) val deviceName = device.name val deviceHardwareAddress = device.address // MAC address } } } } override fun onDestroy() { super.onDestroy() ... // Don't forget to unregister the ACTION_FOUND receiver. unregisterReceiver(receiver) } Java @Override protected void onCreate(Bundle savedInstanceState) { ... // Register for broadcasts when a device is discovered. IntentFilter filter = new IntentFilter(BluetoothDevice.ACTION_FOUND); registerReceiver(receiver, filter); } // Create a BroadcastReceiver for ACTION_FOUND. private final BroadcastReceiver receiver = new BroadcastReceiver() { public void onReceive(Context context, Intent intent) { String action = intent.getAction(); if (BluetoothDevice.ACTION_FOUND.equals(action)) { // Discovery has found a device. Get the BluetoothDevice // object and its info from the Intent. BluetoothDevice device = intent.getParcelableExtra(BluetoothDevice.EXTRA_DEVICE); String deviceName = device.getName(); String deviceHardwareAddress = device.getAddress(); // MAC address } } }; @Override protected void onDestroy() { super.onDestroy(); ... // Don't forget to unregister the ACTION_FOUND receiver. unregisterReceiver(receiver); }如要发起与蓝牙设备的连接,您只需从关联的 BluetoothDevice 对象获取 MAC 地址,您可通过调用 getAddress() 检索此地址。有关创建连接的详情,请参阅连接设备部分。 注意:执行设备发现将消耗蓝牙适配器的大量资源。在找到要连接的设备后,请务必使用 cancelDiscovery() 停止发现,然后再尝试连接。此外,您不应在连接到设备的情况下执行设备发现,因为发现过程会大幅减少可供任何现有连接使用的带宽。 启用可检测性如果您希望将本地设备设为可被其他设备检测到,请使用 ACTION_REQUEST_DISCOVERABLE Intent 调用 startActivityForResult(Intent, int)。这样便可发出启用系统可检测到模式的请求,从而无需导航至设置应用,避免暂停使用您的应用。默认情况下,设备处于可检测到模式的时间为 120 秒(2 分钟)。通过添加 EXTRA_DISCOVERABLE_DURATION Extra 属性,您可以定义不同的持续时间,最高可达 3600 秒(1 小时)。 注意:如果您将 EXTRA_DISCOVERABLE_DURATION Extra 属性的值设置为 0,则设备将始终处于可检测到模式。此配置安全性低,因而非常不建议使用。 以下代码段将设备处于可检测到模式的时间设置为 5 分钟(300 秒): Kotlin val discoverableIntent: Intent = Intent(BluetoothAdapter.ACTION_REQUEST_DISCOVERABLE).apply { putExtra(BluetoothAdapter.EXTRA_DISCOVERABLE_DURATION, 300) } startActivity(discoverableIntent) Java Intent discoverableIntent = new Intent(BluetoothAdapter.ACTION_REQUEST_DISCOVERABLE); discoverableIntent.putExtra(BluetoothAdapter.EXTRA_DISCOVERABLE_DURATION, 300); startActivity(discoverableIntent);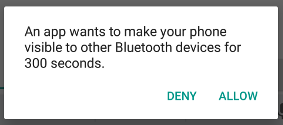 图 2:启用可检测性对话框。 图 2:启用可检测性对话框。
如图 2 所示,系统将显示对话框,请求用户允许将设备设为可检测到模式。如果用户响应“Yes”,则设备会变为可检测到模式,并在指定时间内保持该模式。然后,您的 Activity 将会收到对 onActivityResult() 回调的调用,其结果代码等于设备可检测到的持续时间。如果用户响应“No”或出现错误,则结果代码为 RESULT_CANCELED。 注意:如果尚未在设备上启用蓝牙,则启用设备可检测性会自动启用蓝牙。 设备将在分配的时间内以静默方式保持可检测到模式。如果您希望在可检测到模式发生变化时收到通知,则可以为 ACTION_SCAN_MODE_CHANGED Intent 注册 BroadcastReceiver。此 Intent 将包含额外字段 EXTRA_SCAN_MODE 和 EXTRA_PREVIOUS_SCAN_MODE,二者分别提供新的和旧的扫描模式。每个 Extra 属性可能拥有以下值: SCAN_MODE_CONNECTABLE_DISCOVERABLE 设备处于可检测到模式。 SCAN_MODE_CONNECTABLE 设备未处于可检测到模式,但仍能收到连接。 SCAN_MODE_NONE 设备未处于可检测到模式,且无法收到连接。如果您要发起对远程设备的连接,则无需启用设备可检测性。只有当您希望应用对接受传入连接的服务器套接字进行托管时,才有必要启用可检测性,因为在发起对其他设备的连接之前,远程设备必须能够发现这些设备。 连接设备如要在两台设备之间创建连接,您必须同时实现服务器端和客户端机制,因为其中一台设备必须开放服务器套接字,而另一台设备必须使用服务器设备的 MAC 地址发起连接。服务器设备和客户端设备均会以不同方法获得所需的 BluetoothSocket。接受传入连接后,服务器会收到套接字信息。在打开与服务器相连的 RFCOMM 通道时,客户端会提供套接字信息。 当服务器和客户端在同一 RFCOMM 通道上分别拥有已连接的 BluetoothSocket 时,即可将二者视为彼此连接。这种情况下,每台设备都能获得输入和输出流式传输,并开始传输数据,相关详细介绍请参阅管理连接部分。本部分介绍如何在两台设备之间发起连接。 连接技术一种实现技术是自动将每台设备准备为一个服务器,从而使每台设备开放一个服务器套接字并侦听连接。在此情况下,任一设备都可发起与另一台设备的连接,并成为客户端。或者,其中一台设备可显式托管连接并按需开放一个服务器套接字,而另一台设备则发起连接。 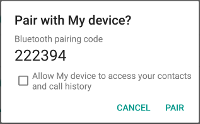 图 3:蓝牙配对对话框。 图 3:蓝牙配对对话框。
注意:如果两台设备之前尚未配对,则在连接过程中,Android 框架会自动向用户显示配对请求通知或对话框(如图 3 所示)。因此,在尝试连接设备时,您的应用无需担心设备是否已配对。在用户成功配对两台设备之前,您的 RFCOMM 连接尝试会一直阻塞,并且如果用户拒绝配对,或者配对过程失败或超时,则该尝试便会失败。 作为服务器连接当您需要连接两台设备时,其中一台设备必须保持开放的 BluetoothServerSocket,从而充当服务器。服务器套接字的用途是侦听传入的连接请求,并在接受请求后提供已连接的 BluetoothSocket。从 BluetoothServerSocket 获取 BluetoothSocket 后,您可以(并且应该)舍弃 BluetoothServerSocket,除非您的设备需要接受更多连接。 如要设置服务器套接字并接受连接,请依次完成以下步骤: 通过调用 listenUsingRfcommWithServiceRecord() 获取 BluetoothServerSocket。该字符串是服务的可识别名称,系统会自动将其写入到设备上的新服务发现协议 (SDP) 数据库条目。此名称没有限制,可直接使用您的应用名称。SDP 条目中也包含通用唯一标识符 (UUID),这也是客户端设备连接协议的基础。换言之,当客户端尝试连接此设备时,它会携带 UUID,从而对其想要连接的服务进行唯一标识。为了让服务器接受连接,这些 UUID 必须互相匹配。 UUID 是一种标准化的 128 位格式,可供字符串 ID 用来对信息进行唯一标识。UUID 的特点是其足够庞大,因此您可以选择任意随机 ID,而不会与其他任何 ID 发生冲突。在本例中,其用于对应用的蓝牙服务进行唯一标识。如要获取供应用使用的 UUID,您可以从网络上的众多随机 UUID 生成器中任选一种,然后使用 fromString(String) 初始化一个 UUID。 通过调用 accept() 开始侦听连接请求。这是一个阻塞调用。当服务器接受连接或异常发生时,该调用便会返回。只有当远程设备发送包含 UUID 的连接请求,并且该 UUID 与使用此侦听服务器套接字注册的 UUID 相匹配时,服务器才会接受连接。连接成功后,accept() 将返回已连接的 BluetoothSocket。 如果您无需接受更多连接,请调用 close()。此方法调用会释放服务器套接字及其所有资源,但不会关闭 accept() 所返回的已连接的 BluetoothSocket。与 TCP/IP 不同,RFCOMM 一次只允许每个通道有一个已连接的客户端,因此大多数情况下,在接受已连接的套接字后,您可以立即在 BluetoothServerSocket 上调用 close()。 由于 accept() 是阻塞调用,因此您不应在主 Activity 界面线程中执行该调用,这样您的应用才仍然可以响应其他用户的交互。通常,您可以在应用所管理的新线程中完成所有涉及 BluetoothServerSocket 或 BluetoothSocket 的工作。如要取消 accept() 等被阻塞的调用,请通过另一个线程,在 BluetoothServerSocket 或 BluetoothSocket 上调用 close()。请注意,BluetoothServerSocket 或 BluetoothSocket 中的所有方法都是线程安全的方法。 示例服务器组件可通过以下简化线程接受传入连接: Kotlin private inner class AcceptThread : Thread() { private val mmServerSocket: BluetoothServerSocket? by lazy(LazyThreadSafetyMode.NONE) { bluetoothAdapter?.listenUsingInsecureRfcommWithServiceRecord(NAME, MY_UUID) } override fun run() { // Keep listening until exception occurs or a socket is returned. var shouldLoop = true while (shouldLoop) { val socket: BluetoothSocket? = try { mmServerSocket?.accept() } catch (e: IOException) { Log.e(TAG, "Socket's accept() method failed", e) shouldLoop = false null } socket?.also { manageMyConnectedSocket(it) mmServerSocket?.close() shouldLoop = false } } } // Closes the connect socket and causes the thread to finish. fun cancel() { try { mmServerSocket?.close() } catch (e: IOException) { Log.e(TAG, "Could not close the connect socket", e) } } } Java private class AcceptThread extends Thread { private final BluetoothServerSocket mmServerSocket; public AcceptThread() { // Use a temporary object that is later assigned to mmServerSocket // because mmServerSocket is final. BluetoothServerSocket tmp = null; try { // MY_UUID is the app's UUID string, also used by the client code. tmp = bluetoothAdapter.listenUsingRfcommWithServiceRecord(NAME, MY_UUID); } catch (IOException e) { Log.e(TAG, "Socket's listen() method failed", e); } mmServerSocket = tmp; } public void run() { BluetoothSocket socket = null; // Keep listening until exception occurs or a socket is returned. while (true) { try { socket = mmServerSocket.accept(); } catch (IOException e) { Log.e(TAG, "Socket's accept() method failed", e); break; } if (socket != null) { // A connection was accepted. Perform work associated with // the connection in a separate thread. manageMyConnectedSocket(socket); mmServerSocket.close(); break; } } } // Closes the connect socket and causes the thread to finish. public void cancel() { try { mmServerSocket.close(); } catch (IOException e) { Log.e(TAG, "Could not close the connect socket", e); } } }在此示例中,只需要一个传入连接,因此在接受连接并获取 BluetoothSocket 之后,应用会立即将获取的 BluetoothSocket 传送到单独的线程、关闭 BluetoothServerSocket 并中断循环。 请注意,如果 accept() 返回 BluetoothSocket,则表示已连接套接字。因此,您不应像从客户端那样调用 connect()。 应用特定的 manageMyConnectedSocket() 方法旨在启动用于传输数据的线程(详情请参阅管理连接部分)。 通常,在完成传入连接的侦听后,您应立即关闭您的 BluetoothServerSocket。在此示例中,获取 BluetoothSocket 后会立即调用 close()。此外,您可能还希望在线程中提供一个公共方法,以便在需要停止侦听服务器套接字时关闭私有 BluetoothSocket。 作为客户端连接如果远程设备在开放服务器套接字上接受连接,则为了发起与此设备的连接,您必须首先获取表示该远程设备的 BluetoothDevice 对象。如要了解如何创建 BluetoothDevice,请参阅查找设备。然后,您必须使用 BluetoothDevice 来获取 BluetoothSocket 并发起连接。 基本步骤如下所示: 使用 BluetoothDevice,通过调用 createRfcommSocketToServiceRecord(UUID) 获取 BluetoothSocket。此方法会初始化 BluetoothSocket 对象,以便客户端连接至 BluetoothDevice。此处传递的 UUID 必须与服务器设备在调用 listenUsingRfcommWithServiceRecord(String, UUID) 开放其 BluetoothServerSocket 时所用的 UUID 相匹配。如要使用匹配的 UUID,请通过硬编码方式将 UUID 字符串写入您的应用,然后通过服务器和客户端代码引用该字符串。 通过调用 connect() 发起连接。请注意,此方法为阻塞调用。当客户端调用此方法后,系统会执行 SDP 查找,以找到带有所匹配 UUID 的远程设备。如果查找成功并且远程设备接受连接,则其会共享 RFCOMM 通道以便在连接期间使用,并且 connect() 方法将会返回。如果连接失败,或者 connect() 方法超时(约 12 秒后),则此方法将引发 IOException。 由于 connect() 是阻塞调用,因此您应始终在主 Activity(界面)线程以外的线程中执行此连接步骤。 注意:您应始终调用 cancelDiscovery(),以确保设备在您调用 connect() 之前不会执行设备发现。如果正在执行发现操作,则会大幅降低连接尝试的速度,并增加连接失败的可能性。 示例以下是发起蓝牙连接的客户端线程的基本示例: Kotlin private inner class ConnectThread(device: BluetoothDevice) : Thread() { private val mmSocket: BluetoothSocket? by lazy(LazyThreadSafetyMode.NONE) { device.createRfcommSocketToServiceRecord(MY_UUID) } public override fun run() { // Cancel discovery because it otherwise slows down the connection. bluetoothAdapter?.cancelDiscovery() mmSocket?.use { socket -> // Connect to the remote device through the socket. This call blocks // until it succeeds or throws an exception. socket.connect() // The connection attempt succeeded. Perform work associated with // the connection in a separate thread. manageMyConnectedSocket(socket) } } // Closes the client socket and causes the thread to finish. fun cancel() { try { mmSocket?.close() } catch (e: IOException) { Log.e(TAG, "Could not close the client socket", e) } } } Java private class ConnectThread extends Thread { private final BluetoothSocket mmSocket; private final BluetoothDevice mmDevice; public ConnectThread(BluetoothDevice device) { // Use a temporary object that is later assigned to mmSocket // because mmSocket is final. BluetoothSocket tmp = null; mmDevice = device; try { // Get a BluetoothSocket to connect with the given BluetoothDevice. // MY_UUID is the app's UUID string, also used in the server code. tmp = device.createRfcommSocketToServiceRecord(MY_UUID); } catch (IOException e) { Log.e(TAG, "Socket's create() method failed", e); } mmSocket = tmp; } public void run() { // Cancel discovery because it otherwise slows down the connection. bluetoothAdapter.cancelDiscovery(); try { // Connect to the remote device through the socket. This call blocks // until it succeeds or throws an exception. mmSocket.connect(); } catch (IOException connectException) { // Unable to connect; close the socket and return. try { mmSocket.close(); } catch (IOException closeException) { Log.e(TAG, "Could not close the client socket", closeException); } return; } // The connection attempt succeeded. Perform work associated with // the connection in a separate thread. manageMyConnectedSocket(mmSocket); } // Closes the client socket and causes the thread to finish. public void cancel() { try { mmSocket.close(); } catch (IOException e) { Log.e(TAG, "Could not close the client socket", e); } } }请注意,此段代码在尝试连接之前先调用了 cancelDiscovery()。您应始终在 connect() 之前调用 cancelDiscovery(),这是因为无论当前是否正在执行设备发现,cancelDiscovery() 都会成功。但是,如果应用需要确定是否正在执行设备发现,您可以使用 isDiscovering() 进行检测。 应用特定 manageMyConnectedSocket() 方法旨在启动用于传输数据的线程(详情请参阅管理连接部分)。 使用完 BluetoothSocket 后,请务必调用 close()。这样,您便可立即关闭连接的套接字,并释放所有相关的内部资源。 管理连接成功连接多台设备后,每台设备都会有已连接的 BluetoothSocket。这一点非常有趣,因为这表示您可以在设备之间共享信息。使用 BluetoothSocket 传输数据的一般过程如下所示: 使用 getInputStream() 和 getOutputStream(),分别获取通过套接字处理数据传输的 InputStream 和 OutputStream。 使用 read(byte[]) 和 write(byte[]) 读取数据以及将其写入数据流。当然,您还需考虑实现细节。具体来说,您应使用专门的线程从数据流读取数据,以及将数据写入数据流。这一点非常重要,因为 read(byte[]) 和 write(byte[]) 方法都是阻塞调用。read(byte[]) 方法将会阻塞,直至从数据流中读取数据。write(byte[]) 方法通常不会阻塞,但若远程设备调用 read(byte[]) 方法的速度不够快,进而导致中间缓冲区已满,则该方法可能会保持阻塞状态以实现流量控制。因此,线程中的主循环应专门用于从 InputStream 中读取数据。您可使用线程中单独的公共方法,发起对 OutputStream 的写入操作。 示例以下示例介绍如何在通过蓝牙连接的两台设备之间传输数据: Kotlin private const val TAG = "MY_APP_DEBUG_TAG" // Defines several constants used when transmitting messages between the // service and the UI. const val MESSAGE_READ: Int = 0 const val MESSAGE_WRITE: Int = 1 const val MESSAGE_TOAST: Int = 2 // ... (Add other message types here as needed.) class MyBluetoothService( // handler that gets info from Bluetooth service private val handler: Handler) { private inner class ConnectedThread(private val mmSocket: BluetoothSocket) : Thread() { private val mmInStream: InputStream = mmSocket.inputStream private val mmOutStream: OutputStream = mmSocket.outputStream private val mmBuffer: ByteArray = ByteArray(1024) // mmBuffer store for the stream override fun run() { var numBytes: Int // bytes returned from read() // Keep listening to the InputStream until an exception occurs. while (true) { // Read from the InputStream. numBytes = try { mmInStream.read(mmBuffer) } catch (e: IOException) { Log.d(TAG, "Input stream was disconnected", e) break } // Send the obtained bytes to the UI activity. val readMsg = handler.obtainMessage( MESSAGE_READ, numBytes, -1, mmBuffer) readMsg.sendToTarget() } } // Call this from the main activity to send data to the remote device. fun write(bytes: ByteArray) { try { mmOutStream.write(bytes) } catch (e: IOException) { Log.e(TAG, "Error occurred when sending data", e) // Send a failure message back to the activity. val writeErrorMsg = handler.obtainMessage(MESSAGE_TOAST) val bundle = Bundle().apply { putString("toast", "Couldn't send data to the other device") } writeErrorMsg.data = bundle handler.sendMessage(writeErrorMsg) return } // Share the sent message with the UI activity. val writtenMsg = handler.obtainMessage( MESSAGE_WRITE, -1, -1, mmBuffer) writtenMsg.sendToTarget() } // Call this method from the main activity to shut down the connection. fun cancel() { try { mmSocket.close() } catch (e: IOException) { Log.e(TAG, "Could not close the connect socket", e) } } } } Java public class MyBluetoothService { private static final String TAG = "MY_APP_DEBUG_TAG"; private Handler handler; // handler that gets info from Bluetooth service // Defines several constants used when transmitting messages between the // service and the UI. private interface MessageConstants { public static final int MESSAGE_READ = 0; public static final int MESSAGE_WRITE = 1; public static final int MESSAGE_TOAST = 2; // ... (Add other message types here as needed.) } private class ConnectedThread extends Thread { private final BluetoothSocket mmSocket; private final InputStream mmInStream; private final OutputStream mmOutStream; private byte[] mmBuffer; // mmBuffer store for the stream public ConnectedThread(BluetoothSocket socket) { mmSocket = socket; InputStream tmpIn = null; OutputStream tmpOut = null; // Get the input and output streams; using temp objects because // member streams are final. try { tmpIn = socket.getInputStream(); } catch (IOException e) { Log.e(TAG, "Error occurred when creating input stream", e); } try { tmpOut = socket.getOutputStream(); } catch (IOException e) { Log.e(TAG, "Error occurred when creating output stream", e); } mmInStream = tmpIn; mmOutStream = tmpOut; } public void run() { mmBuffer = new byte[1024]; int numBytes; // bytes returned from read() // Keep listening to the InputStream until an exception occurs. while (true) { try { // Read from the InputStream. numBytes = mmInStream.read(mmBuffer); // Send the obtained bytes to the UI activity. Message readMsg = handler.obtainMessage( MessageConstants.MESSAGE_READ, numBytes, -1, mmBuffer); readMsg.sendToTarget(); } catch (IOException e) { Log.d(TAG, "Input stream was disconnected", e); break; } } } // Call this from the main activity to send data to the remote device. public void write(byte[] bytes) { try { mmOutStream.write(bytes); // Share the sent message with the UI activity. Message writtenMsg = handler.obtainMessage( MessageConstants.MESSAGE_WRITE, -1, -1, mmBuffer); writtenMsg.sendToTarget(); } catch (IOException e) { Log.e(TAG, "Error occurred when sending data", e); // Send a failure message back to the activity. Message writeErrorMsg = handler.obtainMessage(MessageConstants.MESSAGE_TOAST); Bundle bundle = new Bundle(); bundle.putString("toast", "Couldn't send data to the other device"); writeErrorMsg.setData(bundle); handler.sendMessage(writeErrorMsg); } } // Call this method from the main activity to shut down the connection. public void cancel() { try { mmSocket.close(); } catch (IOException e) { Log.e(TAG, "Could not close the connect socket", e); } } } }当构造函数获取必要的数据流后,线程会等待通过 InputStream 传入的数据。当 read(byte[]) 返回数据流中的数据时,将使用来自父类的 Handler 成员将数据发送到主 Activity。然后,线程会等待从 InputStream 中读取更多字节。 发送传出数据不外乎从主 Activity 调用线程的 write() 方法,并传入要发送的字节。此方法会调用 write(byte[]),从而将数据发送到远程设备。如果在调用 write(byte[]) 时引发 IOException,则线程会发送一条 Toast 至主 Activity,向用户说明设备无法将给定的字节发送到另一台(连接的)设备。 借助线程的 cancel() 方法,您可通过关闭 BluetoothSocket 随时终止连接。当您结束蓝牙连接的使用时,应始终调用此方法。 有关使用 Bluetooth API 的演示,请参阅蓝牙聊天示例应用。 关键类和接口android.bluetooth 包中提供所有 Bluetooth API。以下概要列出了创建蓝牙连接所需的类和接口: BluetoothAdapter 表示本地蓝牙适配器(蓝牙无线装置)。BluetoothAdapter 是所有蓝牙交互的入口点。借助该类,您可以发现其他蓝牙设备、查询已绑定(已配对)设备的列表、使用已知的 MAC 地址实例化 BluetoothDevice,以及通过创建 BluetoothServerSocket 侦听来自其他设备的通信。 BluetoothDevice 表示远程蓝牙设备。借助该类,您可以通过 BluetoothSocket 请求与某个远程设备建立连接,或查询有关该设备的信息,例如设备的名称、地址、类和绑定状态等。 BluetoothSocket 表示蓝牙套接字接口(类似于 TCP Socket)。这是允许应用使用 InputStream 和 OutputStream 与其他蓝牙设备交换数据的连接点。 BluetoothServerSocket 表示用于侦听传入请求的开放服务器套接字(类似于 TCP ServerSocket)。如要连接两台 Android 设备,其中一台设备必须使用此类开放一个服务器套接字。当远程蓝牙设备向此设备发出连接请求时,该设备接受连接,然后返回已连接的 BluetoothSocket。 BluetoothClass 描述蓝牙设备的一般特征和功能。这是一组只读属性,用于定义设备的类和服务。虽然这些信息会提供关于设备类型的有用提示,但该类的属性未必描述设备支持的所有蓝牙配置文件和服务。 BluetoothProfile 表示蓝牙配置文件的接口。蓝牙配置文件是适用于设备间蓝牙通信的无线接口规范。举个例子:免提配置文件。如需了解有关配置文件的详细讨论,请参阅使用配置文件。 BluetoothHeadset 提供蓝牙耳机支持,以便与手机配合使用。这包括蓝牙耳机配置文件和免提 (v1.5) 配置文件。 BluetoothA2dp 定义如何使用蓝牙立体声音频传输配置文件 (A2DP),通过蓝牙连接将高质量音频从一个设备流式传输至另一个设备。 BluetoothHealth 表示用于控制蓝牙服务的健康设备配置文件代理。 BluetoothHealthCallback 用于实现 BluetoothHealth 回调的抽象类。您必须扩展此类并实现回调方法,以接收关于应用注册状态和蓝牙通道状态变化的更新内容。 BluetoothHealthAppConfiguration 表示第三方蓝牙健康应用注册的应用配置,该配置旨在实现与远程蓝牙健康设备的通信。 BluetoothProfile.ServiceListener 当 BluetoothProfile 进程间通信 (IPC) 客户端连接到运行特定配置文件的内部服务或断开该服务连接时,向该客户端发送通知的接口。 |
【本文地址】
今日新闻 |
推荐新闻 |