使用vscode创建c++项目 |
您所在的位置:网站首页 › vsc怎么新建一个项目 › 使用vscode创建c++项目 |
使用vscode创建c++项目
|
Vscode创建c++项目
1.初始化并配置C++项目
目标:创建C++文件,并自动生成tasks.json和launch.json,能够支持单文件和多文件的编译和调试 步骤: 创建一个空文件夹,然后选择用vscode打开 在文件夹里编写一个c++文件 (也可以在里面再次创建一个存放c++源码的文件夹) 然后选择g++编译运行该文件,此时会自动生成tasks.json文件 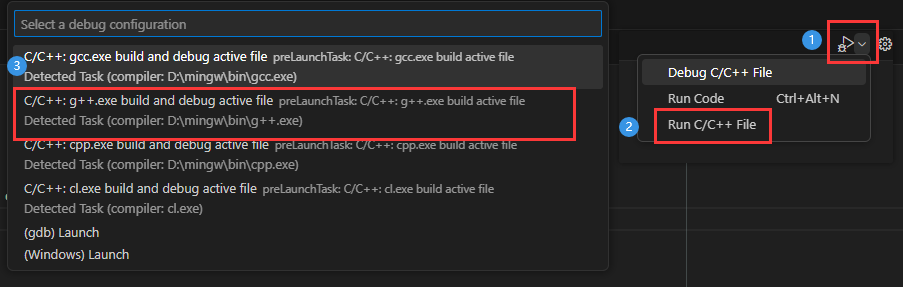
tasks.json文件在.vscode文件夹下,按需求可以自行修改 { "tasks": [ { "type": "cppbuild", "label": "C/C++: g++.exe build active file", "command": "D:\\mingw\\bin\\g++.exe", // 编译器的路径 "args": [ // 编译参数 "-fdiagnostics-color=always", "-g", // "${file}", //需要编译的当前文件名,只能编译单文件 ----> "${fileDirname}\\*.c*", //将文件夹下的所有.c*文件都编译,用于多文件编译 "-o", //对象名,不进行编译优化 "${fileDirname}\\${fileBasenameNoExtension}.exe", //生成的可执行文件存放路径及名字 // "-std=c++17", //使用c++17标准编译 // "-std=c++2a", //使用c++20标准编译 // "-fexec-" //如果出现乱码的情况,可以加上这一句 ], "options": { "cwd": "${fileDirname}" //当前工作目录 }, "problemMatcher": [ "$gcc" ], "group": { "kind": "build", "isDefault": true }, "detail": "Task generated by Debugger." } ], "version": "2.0.0" }创建launch.json文件用于调试 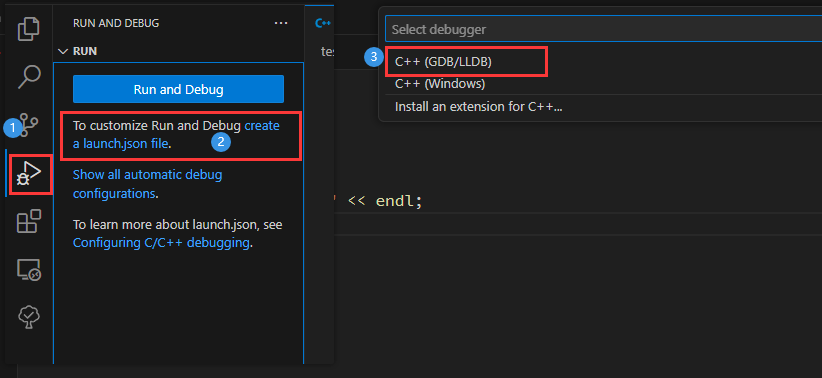
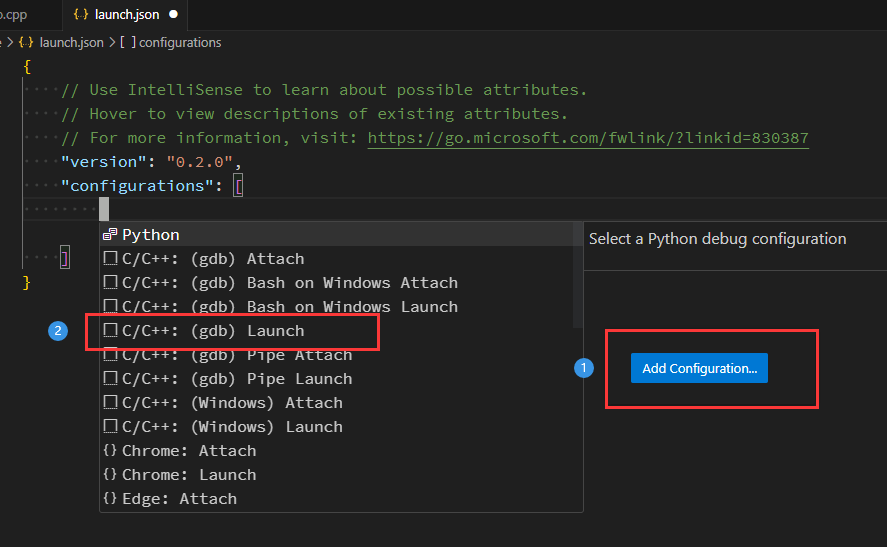
launch.json文件在.vscode文件夹下,有几处需要自行修改 { // Use IntelliSense to learn about possible attributes. // Hover to view descriptions of existing attributes. // For more information, visit: https://go.microsoft.com/fwlink/?linkid=830387 "version": "0.2.0", "configurations": [ { "name": "(gdb) Launch", "type": "cppdbg", "request": "launch", "program": "${fileDirname}\\${fileBasenameNoExtension}.exe", //这一处需要修改,修改成需要调试的文件的路径 "args": [], "stopAtEntry": false, "cwd": "${fileDirname}", "environment": [], "externalConsole": false, "MIMode": "gdb", "miDebuggerPath": "D:\\mingw\\bin\\gdb.exe", //这一处需要修改,就修改成这个路径 "setupCommands": [ { "description": "Enable pretty-printing for gdb", "text": "-enable-pretty-printing", "ignoreFailures": true }, { "description": "Set Disassembly Flavor to Intel", "text": "-gdb-set disassembly-flavor intel", "ignoreFailures": true } ] } ] }根据以上配置,基本就可以实现一个c++项目的创建了。 补充: 如果我们使用Code Runner来运行多文件,需要对它的编译命令进行修改 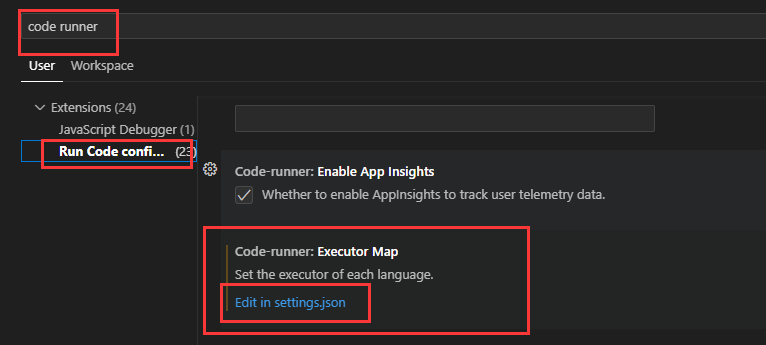 // "c": "cd $dir && gcc $fileName -o $fileNameWithoutExt && $dir$fileNameWithoutExt", //单文件
"c": "cd $dir && gcc *.c* -o $fileNameWithoutExt && $dir$fileNameWithoutExt", //多文件
// "cpp": "cd $dir && g++ $fileName -o $fileNameWithoutExt && $dir$fileNameWithoutExt",
"cpp": "cd $dir && g++ *.c* -o $fileNameWithoutExt && $dir$fileNameWithoutExt",
// "cpp": "cd $dir && g++ -std=c++2a *.c* -o $fileNameWithoutExt && $dir$fileNameWithoutExt",
// 使用c++20标准编译,暂不支持23
// 如果出现乱码情况,可以添加如下配置
"c": "cd $dir && gcc *.c* -o $fileNameWithoutExt -fexec-charset=GBK && $dir$fileNameWithoutExt",
"cpp": "cd $dir && g++ *.c* -o $fileNameWithoutExt -fexec-charset=GBK && $dir$fileNameWithoutExt",
2.进阶:配置C++项目
2.1 根据项目结构配置tasks.json
|---include
| |---*.h
|---src
| |---baseline
| |---*.c
| |---bean
| |---*.c
| |---util
| |---*.c
|---main.cpp
2.1.1 修改tasks.json
// "c": "cd $dir && gcc $fileName -o $fileNameWithoutExt && $dir$fileNameWithoutExt", //单文件
"c": "cd $dir && gcc *.c* -o $fileNameWithoutExt && $dir$fileNameWithoutExt", //多文件
// "cpp": "cd $dir && g++ $fileName -o $fileNameWithoutExt && $dir$fileNameWithoutExt",
"cpp": "cd $dir && g++ *.c* -o $fileNameWithoutExt && $dir$fileNameWithoutExt",
// "cpp": "cd $dir && g++ -std=c++2a *.c* -o $fileNameWithoutExt && $dir$fileNameWithoutExt",
// 使用c++20标准编译,暂不支持23
// 如果出现乱码情况,可以添加如下配置
"c": "cd $dir && gcc *.c* -o $fileNameWithoutExt -fexec-charset=GBK && $dir$fileNameWithoutExt",
"cpp": "cd $dir && g++ *.c* -o $fileNameWithoutExt -fexec-charset=GBK && $dir$fileNameWithoutExt",
2.进阶:配置C++项目
2.1 根据项目结构配置tasks.json
|---include
| |---*.h
|---src
| |---baseline
| |---*.c
| |---bean
| |---*.c
| |---util
| |---*.c
|---main.cpp
2.1.1 修改tasks.json
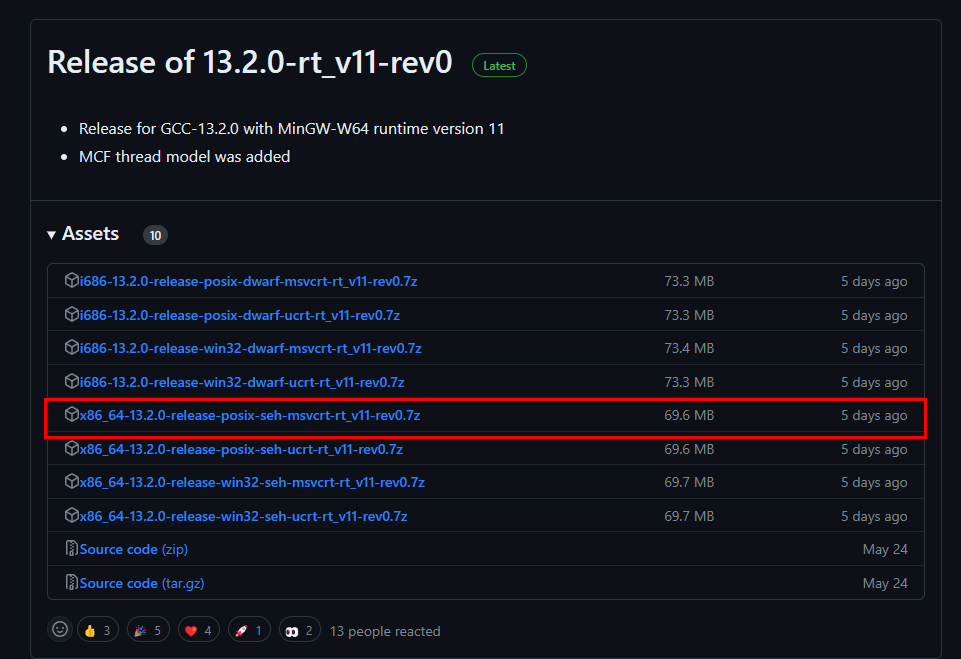
tasks.json文件的配置,主要体现在对args部分的修改: { "tasks": [ { "type": "cppbuild", "label": "C/C++: g++.exe build active file", "command": "D:\\Software\\mingw64\\bin\\g++.exe", // "command": "D:\\MinGW\\bin\\g++.exe", "args": [ "-fdiagnostics-color=always", "-g", "${workspaceFolder}\\*.c*", "${workspaceFolder}\\src\\util\\*.c*", "${workspaceFolder}\\src\\bean\\*.c*", "${workspaceFolder}\\src\\baseline\\*.c*", "-I", "${workspaceFolder}\\include", "-o", "${workspaceFolder}\\main.exe", "-std=c++2a", ], "options": { "cwd": "${workspaceFolder}" }, "problemMatcher": [ "$gcc" ], "group": { "kind": "build", "isDefault": true }, "detail": "Task generated by Debugger." } } 2.1.2 修改c_cpp_properties.jsonc_cpp_properties.json主要用来设置包含头文件的路径,设置C/C++支持的版本号等等。 如果我们将头文件统一放在了include文件夹下,为了避免在写代码时报一些找不到头文件的错误(这可能并不会影响编译运行,只是在代码提示上有些问题),我们需要修改该文件。如果没有该文件,可以ctrl+shift+p输入C/C++:Edit Configurations(JSON),让其自动生成。 { "configurations": [ { "name": "Win32", "includePath": [ "${workspaceFolder}/**", "${workspaceFolder}/include" // 加上该文件夹 ], "defines": [ "_DEBUG", "UNICODE", "_UNICODE" ], "intelliSenseMode": "windows-gcc-x64" } ], "version": 4 } 2.2 编译运行带参数的项目 2.2.1 方法介绍在 tasks.json 中定义编译和运行任务。以下是一个例子: { "version": "2.0.0", "tasks": [ { "label": "build", "type": "shell", "command": "g++", "args": [ "-g", "${file}", "-o", "${fileDirname}/${fileBasenameNoExtension}" ], "group": { "kind": "build", "isDefault": true } }, { "label": "run_with_args", "type": "shell", "command": "./${fileBasenameNoExtension}", "options": { "cwd": "${fileDirname}" }, "args": ["arg1", "arg2"], "group": "test", "dependsOn": "build" // 这里说明该任务依赖于"label"="build"的任务, // 因此会先执行build,再执行该任务。 } ] }在这样的配置中,我们定义了两个任务: build 用于编译C++程序。 run_with_args 用于运行已编译的程序,并传递参数 "arg1" 和 "arg2"。保存 tasks.json 文件。 打开你的C++源代码文件,并按下 Ctrl+Shift+B(或者选择 "Terminal" -> "Run Build Task"),选择 "build" 任务来编译你的程序。 编译完成后,可以按下 Ctrl+Shift+B 再次,并选择 "run_with_args" 任务来运行你的程序,并且传递参数。 希望这个步骤可以帮助你成功在VSCode中编译并运行带参数的C++程序!如果有其他问题,欢迎随时向我提问! 2.2.2 案例 { "tasks": [ { "type": "cppbuild", "label": "C/C++: g++.exe build active file", "command": "D:\\Software\\mingw64\\bin\\g++.exe", // "command": "D:\\MinGW\\bin\\g++.exe", "args": [ "-fdiagnostics-color=always", "-g", "${workspaceFolder}\\*.c*", "${workspaceFolder}\\src\\util\\*.c*", "${workspaceFolder}\\src\\bean\\*.c*", "${workspaceFolder}\\src\\baseline\\*.c*", "-I", "${workspaceFolder}\\include", "-o", "${workspaceFolder}\\main.exe", "-std=c++2a", ], "options": { "cwd": "${workspaceFolder}" }, "problemMatcher": [ "$gcc" ], "group": { "kind": "build", "isDefault": true }, "detail": "Task generated by Debugger." }, // 主要是下面这一部分代码 { "label": "run_with_args", "type": "process", "command": "${workspaceFolder}\\main.exe", "options": { "cwd": "${workspaceFolder}" }, "args": [ "./data/Case_Product/", "0.75", "3", "1", "0 0 1 2 2 3 1 1 0", "homoGraph.txt", "2" ], "group": "test", "dependsOn": "C/C++: g++.exe build active file", } ], "version": "2.0.0" } 补充1:MinGW下载如何下载最新版本的MinGW 网址:Downloads - MinGW-w64
也可以参考 Integrate with External Tools via Tasks 官方文档 文档进一步了解 2. launch.json { "version": "0.2.0", "configurations": [ { "name": "运行和调试", //运行和调试任务的名称,可自定义 "type": "cppdbg", //配置类型,默认即可 "request": "launch", //launch模式允许我们打断点进行调试,默认即可 "program": "${fileDirname}/hello", //(常用)程序目录,这里相当于在命令行执行"hello" "args": [], //(常用)程序(main函数)的入口参数 "stopAtEntry": false, //在入口处暂停,选true相当于在入口处增加断点 "cwd": "${workspaceFolder}",//当前的文件目录 "environment": [], //添加到程序的环境变量 "externalConsole": false, //外部控制台,true在调试时会开启系统控制台窗口,false会使用vscode自带的调试控制台 "MIMode": "gdb", //使用gdb进行调试 "setupCommands": [ //用来设置gdb的参数,默认即可 { "description": "为 gdb 启用整齐打印", "text": "-enable-pretty-printing", "ignoreFailures": true } ], "preLaunchTask": "环境配置测试", //(常用)运行和调试前要执行的task(编译)任务,任务名要和task.json里的"label"对应 "miDebuggerPath": "/usr/bin/gdb" //debug调试工具的路径,这里使用gdb所在的路径 } ] }也可以参考 Configuring C/C++ debugging官方文档 和 Debugging in VS Code官方文档 进行设置 3. c_cpp_properties.json { "configurations": [ { "name": "Linux", //配置名称,默认为系统名,可以自行更改 "includePath": [ //(常用)运行项目包含.h头文件的目录, "${workspaceFolder}/**"//此处会匹配工作文件下的所有文件 ], //添加"compilerPath"后,系统include路径可不写明 "defines": [], //(常用)定义一些需要的变量,等价于在编译时写"-D变量" "compilerPath": "/usr/bin/gcc", //编译器的路径 "cStandard": "gnu17", //C标准的版本 "cppStandard": "gnu++14", //C++标准的版本 "intelliSenseMode": "gcc-x64" //IntelliSense的一些配置,默认即可 } ], "version": 4 }也可参考 c_cpp_properties.json 官方文档 设置更多内容。 如果我们在使用vscode引入头文件时,如果没有提示,可以在settings.json中配置以下选项: "C_Cpp.default.includePath": [ "${workspaceFolder}/**", "D:\\MinGW\\lib\\gcc\\x86_64-w64-mingw32\\13.2.0\\include\\c++", ], |
【本文地址】
今日新闻 |
推荐新闻 |