SpringBoot 实现定时任务动态管理,太爽了! |
您所在的位置:网站首页 › vivo定时任务太少 › SpringBoot 实现定时任务动态管理,太爽了! |
SpringBoot 实现定时任务动态管理,太爽了!
|
SpringBoot的定时任务的加强工具,实现对SpringBoot原生的定时任务进行动态管理,完全兼容原生@Scheduled注解,无需对原本的定时任务进行修改。 快速使用具体的功能已经封装成SpringBoot-starter即插即用: com.github.guoyixing spring-boot-starter-super-scheduled 0.3.1使用方法和源码: https://gitee.com/qiaodaimadewangcai/super-scheduled https://github.com/guoyixing/super-scheduled 实现原理 1、动态管理实现(1) 配置管理介绍 @Component("superScheduledConfig") public class SuperScheduledConfig { /** * 执行定时任务的线程池 */ private ThreadPoolTaskScheduler taskScheduler; /** * 定时任务名称与定时任务回调钩子 的关联关系容器 */ private Map nameToScheduledFuture = new ConcurrentHashMap(); /** * 定时任务名称与定时任务需要执行的逻辑 的关联关系容器 */ private Map nameToRunnable = new ConcurrentHashMap(); /** * 定时任务名称与定时任务的源信息 的关联关系容器 */ private Map nameToScheduledSource = new ConcurrentHashMap(); /* 普通的get/sets省略 */ }(2) 使用后处理器拦截SpringBoot原本的定时任务 实现ApplicationContextAware接口拿到SpringBoot的上下文 实现BeanPostProcessor接口,将这个类标记为后处理器,后处理器会在每个bean实例化之后执行 使用@DependsOn注解强制依赖SuperScheduledConfig类,让SpringBoot实例化SuperScheduledPostProcessor类之前先实例化SuperScheduledConfig类 主要实现逻辑在postProcessAfterInitialization()方法中 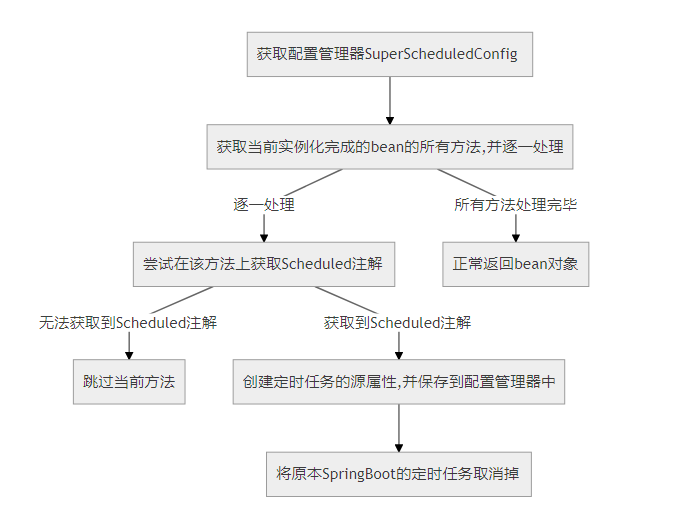 @DependsOn({"superScheduledConfig"})
@Component
@Order
public class SuperScheduledPostProcessor implements BeanPostProcessor, ApplicationContextAware {
protected final Log logger = LogFactory.getLog(getClass());
private ApplicationContext applicationContext;
/**
* 实例化bean之前的操作
* @param bean bean实例
* @param beanName bean的Name
*/
@Override
public Object postProcessBeforeInitialization(Object bean, String beanName) throws BeansException {
return bean;
}
/**
* 实例化bean之后的操作
* @param bean bean实例
* @param beanName bean的Name
*/
@Override
public Object postProcessAfterInitialization(Object bean,
String beanName) throws BeansException {
//1.获取配置管理器
SuperScheduledConfig superScheduledConfig = applicationContext.getBean(SuperScheduledConfig.class);
//2.获取当前实例化完成的bean的所有方法
Method[] methods = bean.getClass().getDeclaredMethods();
//循环处理对每个方法逐一处理
if (methods.length > 0) {
for (Method method : methods) {
//3.尝试在该方法上获取@Scheduled注解(SpringBoot的定时任务注解)
Scheduled annotation = method.getAnnotation(Scheduled.class);
//如果无法获取到@Scheduled注解,就跳过这个方法
if (annotation == null) {
continue;
}
//4.创建定时任务的源属性
//创建定时任务的源属性(用来记录定时任务的配置,初始化的时候记录的是注解上原本的属性)
ScheduledSource scheduledSource = new ScheduledSource(annotation, method, bean);
//对注解上获取到源属性中的属性进行检测
if (!scheduledSource.check()) {
throw new SuperScheduledException("在" + beanName + "Bean中" + method.getName() + "方法的注解参数错误");
}
//生成定时任务的名称(id),使用beanName+“.”+方法名
String name = beanName + "." + method.getName();
//将以key-value的形式,将源数据存入配置管理器中,key:定时任务的名称 value:源数据
superScheduledConfig.addScheduledSource(name, scheduledSource);
try {
//5.将原本SpringBoot的定时任务取消掉
clearOriginalScheduled(annotation);
} catch (Exception e) {
throw new SuperScheduledException("在关闭原始方法" + beanName + method.getName() + "时出现错误");
}
}
}
//最后bean保持原有返回
return bean;
}
/**
* 修改注解原先的属性
* @param annotation 注解实例对象
* @throws Exception
*/
private void clearOriginalScheduled(Scheduled annotation) throws Exception {
changeAnnotationValue(annotation, "cron", Scheduled.CRON_DISABLED);
changeAnnotationValue(annotation, "fixedDelay", -1L);
changeAnnotationValue(annotation, "fixedDelayString", "");
changeAnnotationValue(annotation, "fixedRate", -1L);
changeAnnotationValue(annotation, "fixedRateString", "");
changeAnnotationValue(annotation, "initialDelay", -1L);
changeAnnotationValue(annotation, "initialDelayString", "");
}
/**
* 获取SpringBoot的上下文
* @param applicationContext SpringBoot的上下文
*/
@Override
public void setApplicationContext(ApplicationContext applicationContext) throws BeansException {
this.applicationContext = applicationContext;
}
}
@DependsOn({"superScheduledConfig"})
@Component
@Order
public class SuperScheduledPostProcessor implements BeanPostProcessor, ApplicationContextAware {
protected final Log logger = LogFactory.getLog(getClass());
private ApplicationContext applicationContext;
/**
* 实例化bean之前的操作
* @param bean bean实例
* @param beanName bean的Name
*/
@Override
public Object postProcessBeforeInitialization(Object bean, String beanName) throws BeansException {
return bean;
}
/**
* 实例化bean之后的操作
* @param bean bean实例
* @param beanName bean的Name
*/
@Override
public Object postProcessAfterInitialization(Object bean,
String beanName) throws BeansException {
//1.获取配置管理器
SuperScheduledConfig superScheduledConfig = applicationContext.getBean(SuperScheduledConfig.class);
//2.获取当前实例化完成的bean的所有方法
Method[] methods = bean.getClass().getDeclaredMethods();
//循环处理对每个方法逐一处理
if (methods.length > 0) {
for (Method method : methods) {
//3.尝试在该方法上获取@Scheduled注解(SpringBoot的定时任务注解)
Scheduled annotation = method.getAnnotation(Scheduled.class);
//如果无法获取到@Scheduled注解,就跳过这个方法
if (annotation == null) {
continue;
}
//4.创建定时任务的源属性
//创建定时任务的源属性(用来记录定时任务的配置,初始化的时候记录的是注解上原本的属性)
ScheduledSource scheduledSource = new ScheduledSource(annotation, method, bean);
//对注解上获取到源属性中的属性进行检测
if (!scheduledSource.check()) {
throw new SuperScheduledException("在" + beanName + "Bean中" + method.getName() + "方法的注解参数错误");
}
//生成定时任务的名称(id),使用beanName+“.”+方法名
String name = beanName + "." + method.getName();
//将以key-value的形式,将源数据存入配置管理器中,key:定时任务的名称 value:源数据
superScheduledConfig.addScheduledSource(name, scheduledSource);
try {
//5.将原本SpringBoot的定时任务取消掉
clearOriginalScheduled(annotation);
} catch (Exception e) {
throw new SuperScheduledException("在关闭原始方法" + beanName + method.getName() + "时出现错误");
}
}
}
//最后bean保持原有返回
return bean;
}
/**
* 修改注解原先的属性
* @param annotation 注解实例对象
* @throws Exception
*/
private void clearOriginalScheduled(Scheduled annotation) throws Exception {
changeAnnotationValue(annotation, "cron", Scheduled.CRON_DISABLED);
changeAnnotationValue(annotation, "fixedDelay", -1L);
changeAnnotationValue(annotation, "fixedDelayString", "");
changeAnnotationValue(annotation, "fixedRate", -1L);
changeAnnotationValue(annotation, "fixedRateString", "");
changeAnnotationValue(annotation, "initialDelay", -1L);
changeAnnotationValue(annotation, "initialDelayString", "");
}
/**
* 获取SpringBoot的上下文
* @param applicationContext SpringBoot的上下文
*/
@Override
public void setApplicationContext(ApplicationContext applicationContext) throws BeansException {
this.applicationContext = applicationContext;
}
}
(3) 使用ApplicationRunner初始化自定义的定时任务运行器 实现ApplicationContextAware接口拿到SpringBoot的上下文 使用@DependsOn注解强制依赖threadPoolTaskScheduler类 实现ApplicationRunner接口,在所有bean初始化结束之后,运行自定义逻辑 主要实现逻辑在run()方法中 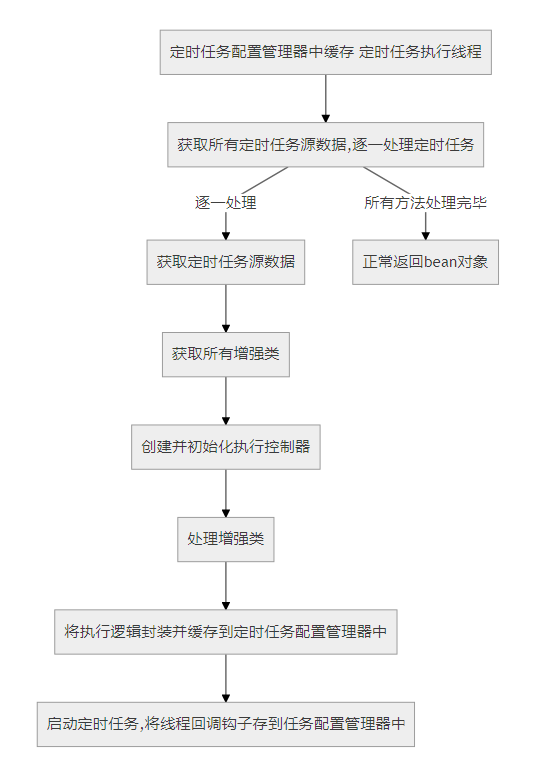 @DependsOn("threadPoolTaskScheduler")
@Component
public class SuperScheduledApplicationRunner implements ApplicationRunner, ApplicationContextAware {
protected final Log logger = LogFactory.getLog(getClass());
private DateTimeFormatter df = DateTimeFormatter.ofPattern("yyyy-MM-dd HH:mm:ss");
private ApplicationContext applicationContext;
/**
* 定时任务配置管理器
*/
@Autowired
private SuperScheduledConfig superScheduledConfig;
/**
* 定时任务执行线程
*/
@Autowired
private ThreadPoolTaskScheduler threadPoolTaskScheduler;
@Override
public void run(ApplicationArguments args) {
//1.定时任务配置管理器中缓存 定时任务执行线程
superScheduledConfig.setTaskScheduler(threadPoolTaskScheduler);
//2.获取所有定时任务源数据
Map nameToScheduledSource = superScheduledConfig.getNameToScheduledSource();
//逐一处理定时任务
for (String name : nameToScheduledSource.keySet()) {
//3.获取定时任务源数据
ScheduledSource scheduledSource = nameToScheduledSource.get(name);
//4.获取所有增强类
String[] baseStrengthenBeanNames = applicationContext.getBeanNamesForType(BaseStrengthen.class);
//5.创建执行控制器
SuperScheduledRunnable runnable = new SuperScheduledRunnable();
//配置执行控制器
runnable.setMethod(scheduledSource.getMethod());
runnable.setBean(scheduledSource.getBean());
//6.逐一处理增强类(增强器实现原理后面具体分析)
List points = new ArrayList(baseStrengthenBeanNames.length);
for (String baseStrengthenBeanName : baseStrengthenBeanNames) {
//7.将增强器代理成point
Object baseStrengthenBean = applicationContext.getBean(baseStrengthenBeanName);
//创建代理
Point proxy = ProxyUtils.getInstance(Point.class, new RunnableBaseInterceptor(baseStrengthenBean, runnable));
proxy.setSuperScheduledName(name);
//8.所有的points连成起来
points.add(proxy);
}
//将point形成调用链
runnable.setChain(new Chain(points));
//将执行逻辑封装并缓存到定时任务配置管理器中
superScheduledConfig.addRunnable(name, runnable::invoke);
try {
//8.启动定时任务
ScheduledFuture schedule = ScheduledFutureFactory.create(threadPoolTaskScheduler
, scheduledSource, runnable::invoke);
//将线程回调钩子存到任务配置管理器中
superScheduledConfig.addScheduledFuture(name, schedule);
logger.info(df.format(LocalDateTime.now()) + "任务" + name + "已经启动...");
} catch (Exception e) {
throw new SuperScheduledException("任务" + name + "启动失败,错误信息:" + e.getLocalizedMessage());
}
}
}
@Override
public void setApplicationContext(ApplicationContext applicationContext) throws BeansException {
this.applicationContext = applicationContext;
}
}
@DependsOn("threadPoolTaskScheduler")
@Component
public class SuperScheduledApplicationRunner implements ApplicationRunner, ApplicationContextAware {
protected final Log logger = LogFactory.getLog(getClass());
private DateTimeFormatter df = DateTimeFormatter.ofPattern("yyyy-MM-dd HH:mm:ss");
private ApplicationContext applicationContext;
/**
* 定时任务配置管理器
*/
@Autowired
private SuperScheduledConfig superScheduledConfig;
/**
* 定时任务执行线程
*/
@Autowired
private ThreadPoolTaskScheduler threadPoolTaskScheduler;
@Override
public void run(ApplicationArguments args) {
//1.定时任务配置管理器中缓存 定时任务执行线程
superScheduledConfig.setTaskScheduler(threadPoolTaskScheduler);
//2.获取所有定时任务源数据
Map nameToScheduledSource = superScheduledConfig.getNameToScheduledSource();
//逐一处理定时任务
for (String name : nameToScheduledSource.keySet()) {
//3.获取定时任务源数据
ScheduledSource scheduledSource = nameToScheduledSource.get(name);
//4.获取所有增强类
String[] baseStrengthenBeanNames = applicationContext.getBeanNamesForType(BaseStrengthen.class);
//5.创建执行控制器
SuperScheduledRunnable runnable = new SuperScheduledRunnable();
//配置执行控制器
runnable.setMethod(scheduledSource.getMethod());
runnable.setBean(scheduledSource.getBean());
//6.逐一处理增强类(增强器实现原理后面具体分析)
List points = new ArrayList(baseStrengthenBeanNames.length);
for (String baseStrengthenBeanName : baseStrengthenBeanNames) {
//7.将增强器代理成point
Object baseStrengthenBean = applicationContext.getBean(baseStrengthenBeanName);
//创建代理
Point proxy = ProxyUtils.getInstance(Point.class, new RunnableBaseInterceptor(baseStrengthenBean, runnable));
proxy.setSuperScheduledName(name);
//8.所有的points连成起来
points.add(proxy);
}
//将point形成调用链
runnable.setChain(new Chain(points));
//将执行逻辑封装并缓存到定时任务配置管理器中
superScheduledConfig.addRunnable(name, runnable::invoke);
try {
//8.启动定时任务
ScheduledFuture schedule = ScheduledFutureFactory.create(threadPoolTaskScheduler
, scheduledSource, runnable::invoke);
//将线程回调钩子存到任务配置管理器中
superScheduledConfig.addScheduledFuture(name, schedule);
logger.info(df.format(LocalDateTime.now()) + "任务" + name + "已经启动...");
} catch (Exception e) {
throw new SuperScheduledException("任务" + name + "启动失败,错误信息:" + e.getLocalizedMessage());
}
}
}
@Override
public void setApplicationContext(ApplicationContext applicationContext) throws BeansException {
this.applicationContext = applicationContext;
}
}
(4) 进行动态管理 @Component public class SuperScheduledManager { protected final Log logger = LogFactory.getLog(getClass()); private DateTimeFormatter df = DateTimeFormatter.ofPattern("yyyy-MM-dd HH:mm:ss"); @Autowired private SuperScheduledConfig superScheduledConfig; /** * 修改Scheduled的执行周期 * * @param name scheduled的名称 * @param cron cron表达式 */ public void setScheduledCron(String name, String cron) { //终止原先的任务 cancelScheduled(name); //创建新的任务 ScheduledSource scheduledSource = superScheduledConfig.getScheduledSource(name); scheduledSource.clear(); scheduledSource.setCron(cron); addScheduled(name, scheduledSource); } /** * 修改Scheduled的fixedDelay * * @param name scheduled的名称 * @param fixedDelay 上一次执行完毕时间点之后多长时间再执行 */ public void setScheduledFixedDelay(String name, Long fixedDelay) { //终止原先的任务 cancelScheduled(name); //创建新的任务 ScheduledSource scheduledSource = superScheduledConfig.getScheduledSource(name); scheduledSource.clear(); scheduledSource.setFixedDelay(fixedDelay); addScheduled(name, scheduledSource); } /** * 修改Scheduled的fixedRate * * @param name scheduled的名称 * @param fixedRate 上一次开始执行之后多长时间再执行 */ public void setScheduledFixedRate(String name, Long fixedRate) { //终止原先的任务 cancelScheduled(name); //创建新的任务 ScheduledSource scheduledSource = superScheduledConfig.getScheduledSource(name); scheduledSource.clear(); scheduledSource.setFixedRate(fixedRate); addScheduled(name, scheduledSource); } /** * 查询所有启动的Scheduled */ public List getRunScheduledName() { Set names = superScheduledConfig.getNameToScheduledFuture().keySet(); return new ArrayList(names); } /** * 查询所有的Scheduled */ public List getAllSuperScheduledName() { Set names = superScheduledConfig.getNameToRunnable().keySet(); return new ArrayList(names); } /** * 终止Scheduled * * @param name scheduled的名称 */ public void cancelScheduled(String name) { ScheduledFuture scheduledFuture = superScheduledConfig.getScheduledFuture(name); scheduledFuture.cancel(true); superScheduledConfig.removeScheduledFuture(name); logger.info(df.format(LocalDateTime.now()) + "任务" + name + "已经终止..."); } /** * 启动Scheduled * * @param name scheduled的名称 * @param scheduledSource 定时任务的源信息 */ public void addScheduled(String name, ScheduledSource scheduledSource) { if (getRunScheduledName().contains(name)) { throw new SuperScheduledException("定时任务" + name + "已经被启动过了"); } if (!scheduledSource.check()) { throw new SuperScheduledException("定时任务" + name + "源数据内容错误"); } scheduledSource.refreshType(); Runnable runnable = superScheduledConfig.getRunnable(name); ThreadPoolTaskScheduler taskScheduler = superScheduledConfig.getTaskScheduler(); ScheduledFuture schedule = ScheduledFutureFactory.create(taskScheduler, scheduledSource, runnable); logger.info(df.format(LocalDateTime.now()) + "任务" + name + "已经启动..."); superScheduledConfig.addScheduledSource(name, scheduledSource); superScheduledConfig.addScheduledFuture(name, schedule); } /** * 以cron类型启动Scheduled * * @param name scheduled的名称 * @param cron cron表达式 */ public void addCronScheduled(String name, String cron) { ScheduledSource scheduledSource = new ScheduledSource(); scheduledSource.setCron(cron); addScheduled(name, scheduledSource); } /** * 以fixedDelay类型启动Scheduled * * @param name scheduled的名称 * @param fixedDelay 上一次执行完毕时间点之后多长时间再执行 * @param initialDelay 第一次执行的延迟时间 */ public void addFixedDelayScheduled(String name, Long fixedDelay, Long... initialDelay) { ScheduledSource scheduledSource = new ScheduledSource(); scheduledSource.setFixedDelay(fixedDelay); if (initialDelay != null && initialDelay.length == 1) { scheduledSource.setInitialDelay(initialDelay[0]); } else if (initialDelay != null && initialDelay.length > 1) { throw new SuperScheduledException("第一次执行的延迟时间只能传入一个参数"); } addScheduled(name, scheduledSource); } /** * 以fixedRate类型启动Scheduled * * @param name scheduled的名称 * @param fixedRate 上一次开始执行之后多长时间再执行 * @param initialDelay 第一次执行的延迟时间 */ public void addFixedRateScheduled(String name, Long fixedRate, Long... initialDelay) { ScheduledSource scheduledSource = new ScheduledSource(); scheduledSource.setFixedRate(fixedRate); if (initialDelay != null && initialDelay.length == 1) { scheduledSource.setInitialDelay(initialDelay[0]); } else if (initialDelay != null && initialDelay.length > 1) { throw new SuperScheduledException("第一次执行的延迟时间只能传入一个参数"); } addScheduled(name, scheduledSource); } /** * 手动执行一次任务 * * @param name scheduled的名称 */ public void runScheduled(String name) { Runnable runnable = superScheduledConfig.getRunnable(name); runnable.run(); } } 2、增强接口实现增强器实现的整体思路与SpringAop的思路一致,实现没有Aop复杂 (1) 增强接口 @Order(Ordered.HIGHEST_PRECEDENCE) public interface BaseStrengthen { /** * 前置强化方法 * * @param bean bean实例(或者是被代理的bean) * @param method 执行的方法对象 * @param args 方法参数 */ void before(Object bean, Method method, Object[] args); /** * 后置强化方法 * 出现异常不会执行 * 如果未出现异常,在afterFinally方法之后执行 * * @param bean bean实例(或者是被代理的bean) * @param method 执行的方法对象 * @param args 方法参数 */ void after(Object bean, Method method, Object[] args); /** * 异常强化方法 * * @param bean bean实例(或者是被代理的bean) * @param method 执行的方法对象 * @param args 方法参数 */ void exception(Object bean, Method method, Object[] args); /** * Finally强化方法,出现异常也会执行 * * @param bean bean实例(或者是被代理的bean) * @param method 执行的方法对象 * @param args 方法参数 */ void afterFinally(Object bean, Method method, Object[] args); }(2) 代理抽象类 public abstract class Point { /** * 定时任务名 */ private String superScheduledName; /** * 抽象的执行方法,使用代理实现 * @param runnable 定时任务执行器 */ public abstract Object invoke(SuperScheduledRunnable runnable); /* 普通的get/sets省略 */ }(3) 调用链类 public class Chain { private List list; private int index = -1; /** * 索引自增1 */ public int incIndex() { return ++index; } /** * 索引还原 */ public void resetIndex() { this.index = -1; } }(4) cglib动态代理实现 使用cglib代理增强器,将增强器全部代理成调用链节点Point public class RunnableBaseInterceptor implements MethodInterceptor { /** * 定时任务执行器 */ private SuperScheduledRunnable runnable; /** * 定时任务增强类 */ private BaseStrengthen strengthen; @Override public Object intercept(Object obj, Method method, Object[] args, MethodProxy methodProxy) throws Throwable { Object result; //如果执行的是invoke()方法 if ("invoke".equals(method.getName())) { //前置强化方法 strengthen.before(obj, method, args); try { //调用执行器中的invoke()方法 result = runnable.invoke(); } catch (Exception e) { //异常强化方法 strengthen.exception(obj, method, args); throw new SuperScheduledException(strengthen.getClass() + "中强化执行时发生错误", e); } finally { //Finally强化方法,出现异常也会执行 strengthen.afterFinally(obj, method, args); } //后置强化方法 strengthen.after(obj, method, args); } else { //直接执行方法 result = methodProxy.invokeSuper(obj, args); } return result; } public RunnableBaseInterceptor(Object object, SuperScheduledRunnable runnable) { this.runnable = runnable; if (BaseStrengthen.class.isAssignableFrom(object.getClass())) { this.strengthen = (BaseStrengthen) object; } else { throw new SuperScheduledException(object.getClass() + "对象不是BaseStrengthen类型"); } } public RunnableBaseInterceptor() { } }(5) 定时任务执行器实现 public class SuperScheduledRunnable { /** * 原始的方法 */ private Method method; /** * 方法所在的bean */ private Object bean; /** * 增强器的调用链 */ private Chain chain; public Object invoke() { Object result; //索引自增1 if (chain.incIndex() == chain.getList().size()) { //调用链中的增强方法已经全部执行结束 try { //调用链索引初始化 chain.resetIndex(); //增强器全部执行完毕,执行原本的方法 result = method.invoke(bean); } catch (IllegalAccessException | InvocationTargetException e) { throw new SuperScheduledException(e.getLocalizedMessage()); } } else { //获取被代理后的方法增强器 Point point = chain.getList().get(chain.getIndex()); //执行增强器代理 //增强器代理中,会回调方法执行器,形成调用链,逐一运行调用链中的增强器 result = point.invoke(this); } return result; } /* 普通的get/sets省略 */ }(6) 增强器代理逻辑 com.gyx.superscheduled.core.SuperScheduledApplicationRunner类中的代码片段 //创建执行控制器 SuperScheduledRunnable runnable = new SuperScheduledRunnable(); runnable.setMethod(scheduledSource.getMethod()); runnable.setBean(scheduledSource.getBean()); //用来存放 增强器的代理对象 List points = new ArrayList(baseStrengthenBeanNames.length); //循环所有的增强器的beanName for (String baseStrengthenBeanName : baseStrengthenBeanNames) { //获取增强器的bean对象 Object baseStrengthenBean = applicationContext.getBean(baseStrengthenBeanName); //将增强器代理成Point节点 Point proxy = ProxyUtils.getInstance(Point.class, new RunnableBaseInterceptor(baseStrengthenBean, runnable)); proxy.setSuperScheduledName(name); //增强器的代理对象缓存到list中 points.add(proxy); } //将增强器代理实例的集合生成调用链 //执行控制器中设置调用链 runnable.setChain(new Chain(points));来源:blog.csdn.net/qq_34886352/article/ details/106494637 精品推荐 1.为何 Spring 和 IDEA 不推荐使用 @Autowired 注解? 2.SpringBoot + minio实现分片上传、秒传、续传 3.赶快卸载 Navicat和DataGrip吧,阿里又开源了一款数据库神器,太炸了 4.JetBrains 全系涨价,个人订阅版起售价达1400元!中国业务落户上海! 5.SpringBoot项目限流就该这么设计(万能通用),稳的一批! 6.SpringBoot 集成 Camunda 流程引擎,实现一套完整的业务流程 7.百度开源,一款强大的压测工具,可模拟几十亿并发场景! 8.MySQL 被 PG 干翻了。。
|

【本文地址】