Android10.0实现本地音乐播放(附源码) |
您所在的位置:网站首页 › usb独享音乐播放软件 › Android10.0实现本地音乐播放(附源码) |
Android10.0实现本地音乐播放(附源码)
|
Android实现本地音乐播放(歌词部分请看概述)
1.概述新版本带有歌词,使用的是别人的歌词显示库,下载地址:[歌词版](https://download.csdn.net/download/weixin_43773816/12524477)
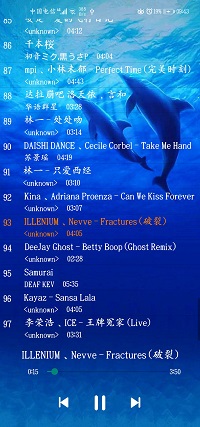
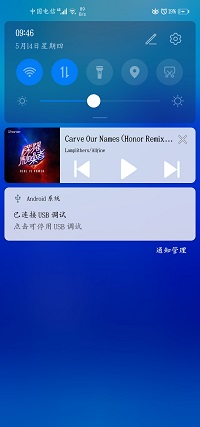
2.效果截3.读取本地音乐以及保存歌曲4.使用Service实现后台播放5.使用Notification通知栏通知6.全屏显示7.设置歌曲选中后的样式8.资源地址
1.概述
本篇文章仅是Android小白在写一个小程序,内容仅供参考,有很多不足之处希望各位大神指出,文章末尾有整个项目的下载,不需要币,只求帮你们解决到问题的同时收获到一颗小小的赞。这个项目中还有很多不足的地方,如:在按键中设置图片文字,这些正常的应该交给Handler处理,我只是粗略地完成这个项目。测试环境:Android10.0。实现:自动播放下一首,正常音乐的功能,全屏显示。 Android10.0是内外分存了的,应用是没有权限读取内存的,需要在配置文件中application中加上属性:android:requestLegacyExternalStorage=“true”,不加可能可以读取歌曲,但是无法播放。 新版本带有歌词,使用的是别人的歌词显示库,下载地址:歌词版 2.效果截截图显示不同是因为这不是同一时间截的,只是一个效果图 ①先在AndroidManifest文件里面配置权限 ②目前基本上的手机使用静态权限是不够的,需要动态获取权限,因此需要在MainActivity里面动态获取,在onCreate方法里调用方法 private void check(){ if (Build.VERSION.SDK_INT >= Build.VERSION_CODES.M) { if (checkSelfPermission(Manifest.permission.WRITE_EXTERNAL_STORAGE) != PackageManager.PERMISSION_GRANTED ) { requestPermissions(new String[]{Manifest.permission.WRITE_EXTERNAL_STORAGE}, 1); Log.d(TAG,"---------------------写权限不够-----------------"); } if(checkSelfPermission(Manifest.permission.READ_EXTERNAL_STORAGE)!= PackageManager.PERMISSION_GRANTED ){ requestPermissions(new String[]{Manifest.permission.READ_EXTERNAL_STORAGE}, 2); Log.d(TAG,"---------------------读权限不够-----------------"); } } }③再去实现权限的回调方法,与Activity的onCreate方法是同一级别的 @Override public void onRequestPermissionsResult(int requestCode, @NonNull String[] permissions, @NonNull int[] grantResults) { super.onRequestPermissionsResult(requestCode, permissions, grantResults); switch (requestCode) { case 1: if (grantResults.length > 0 && grantResults[0] == PackageManager.PERMISSION_GRANTED) { Log.d(TAG, "---------------------写权限够了-----------------------------"); } break; case 2: if (grantResults.length > 0 && grantResults[0] == PackageManager.PERMISSION_GRANTED) { Log.d(TAG, "---------------------读权限够了-----------------------------"); } break; } }④创建一个工具类Mp3Info,用来保存音乐信息的,里面主要是一些get和set方法 public class Mp3Info { private String url;//路径 private String title;//歌曲名 private String artist;//艺术家 private long duration;//歌曲时长 private long id; private long album;//专辑图片 }⑤创建一个MusicUtil类,通过ContentPorvider的接口获取歌曲信息 public class MusicUtil { //获取专辑封面的UI private static final String TAG="MusicUtil"; private static final Uri albumArtUri=Uri.parse("content://media/external/audio/albumart"); //生成歌曲列表 public static List getMp3InfoList(Context context){ Cursor cursor=context.getContentResolver().query(MediaStore.Audio.Media.EXTERNAL_CONTENT_URI, null, null, null,null); List mp3InfoList=new ArrayList(); while(cursor.moveToNext()){ Mp3Info mp3Info=new Mp3Info(); mp3Info.setUrl(cursor.getString(cursor.getColumnIndex(MediaStore.Audio.Media.DATA)));//path mp3Info.setTitle(cursor.getString(cursor.getColumnIndex(MediaStore.Audio.Media.TITLE))); mp3Info.setArtist(cursor.getString(cursor.getColumnIndex(MediaStore.Audio.Media.ARTIST))); mp3Info.setDuration(cursor.getLong(cursor.getColumnIndex(MediaStore.Audio.Media.DURATION))); mp3Info.setId(cursor.getLong(cursor.getColumnIndex(MediaStore.Audio.Media._ID))); mp3Info.setAlbum(cursor.getInt(cursor.getColumnIndex(MediaStore.Audio.Media.ALBUM_ID))); mp3InfoList.add(mp3Info); } return mp3InfoList; } //格式化时间,转换为分/秒 public static String formatTime(long time){ String min = time / (1000 * 60) + ""; String sec = time % (1000 * 60) + ""; if (min.length() < 2) { min = "0" + time / (1000 * 60) + ""; } else { min = time / (1000 * 60) + ""; } if (sec.length() == 4) { sec = "0" + (time % (1000 * 60)) + ""; } else if (sec.length() == 3) { sec = "00" + (time % (1000 * 60)) + ""; } else if (sec.length() == 2) { sec = "000" + (time % (1000 * 60)) + ""; } else if (sec.length() == 1) { sec = "0000" + (time % (1000 * 60)) + ""; } return min + ":" + sec.trim().substring(0, 2); } //获取专辑图片,目前是只能获取手机自带歌曲的专辑图片,如果手机有酷狗,qq音乐之类的,可能无法获取专辑图片 //因为他们的uri不知道。 public Bitmap getArtwork(Context context, long song_id, long album_id, boolean allowdefalut, boolean small){ if(album_id < 0) { if(song_id < 0) { Bitmap bm = getArtworkFromFile(context, song_id, -1); if(bm != null) { return bm; } } if(allowdefalut) { return getDefaultArtwork(context, small); } return null; } ContentResolver res = context.getContentResolver(); Uri uri = ContentUris.withAppendedId(albumArtUri, album_id); if(uri != null) { InputStream in = null; try { in = res.openInputStream(uri); BitmapFactory.Options options = new BitmapFactory.Options(); //先制定原始大小 options.inSampleSize = 1; //只进行大小判断 options.inJustDecodeBounds = true; //调用此方法得到options得到图片的大小 BitmapFactory.decodeStream(in, null, options); /** 我们的目标是在你N pixel的画面上显示。 所以需要调用computeSampleSize得到图片缩放的比例 **/ /** 这里的target为800是根据默认专辑图片大小决定的,800只是测试数字但是试验后发现完美的结合 **/ if(small){ options.inSampleSize = computeSampleSize(options, 40); } else{ options.inSampleSize = computeSampleSize(options, 600); } // 我们得到了缩放比例,现在开始正式读入Bitmap数据 options.inJustDecodeBounds = false; options.inDither = false; options.inPreferredConfig = Bitmap.Config.ARGB_8888; in = res.openInputStream(uri); return BitmapFactory.decodeStream(in, null, options); } catch (FileNotFoundException e) { Bitmap bm = getArtworkFromFile(context, song_id, album_id); if(bm != null) { if(bm.getConfig() == null) { bm = bm.copy(Bitmap.Config.RGB_565, false); if(bm == null && allowdefalut) { return getDefaultArtwork(context, small); } } } else if(allowdefalut) { bm = getDefaultArtwork(context, small); } return bm; } finally { try { if(in != null) { in.close(); } } catch (IOException e) { e.printStackTrace(); } } } return null; } /** * 从文件当中获取专辑封面位图 * @param context * @param songid * @param albumid * @return */ private static Bitmap getArtworkFromFile(Context context, long songid, long albumid){ Bitmap bm = null; if(albumid < 0 && songid < 0) { throw new IllegalArgumentException("---------------------"+TAG+"Must specify an album or a song id"); } try { BitmapFactory.Options options = new BitmapFactory.Options(); FileDescriptor fd = null; if(albumid < 0){ Uri uri = Uri.parse("content://media/external/audio/media/" + songid + "/albumart"); ParcelFileDescriptor pfd = context.getContentResolver().openFileDescriptor(uri, "r"); if(pfd != null) { fd = pfd.getFileDescriptor(); } } else { Uri uri = ContentUris.withAppendedId(albumArtUri, albumid); ParcelFileDescriptor pfd = context.getContentResolver().openFileDescriptor(uri, "r"); if(pfd != null) { fd = pfd.getFileDescriptor(); } } options.inSampleSize = 1; // 只进行大小判断 options.inJustDecodeBounds = true; // 调用此方法得到options得到图片大小 BitmapFactory.decodeFileDescriptor(fd, null, options); // 我们的目标是在800pixel的画面上显示 // 所以需要调用computeSampleSize得到图片缩放的比例 options.inSampleSize = 100; // 我们得到了缩放的比例,现在开始正式读入Bitmap数据 options.inJustDecodeBounds = false; options.inDither = false; options.inPreferredConfig = Bitmap.Config.ARGB_8888; //根据options参数,减少所需要的内存 bm = BitmapFactory.decodeFileDescriptor(fd, null, options); } catch (FileNotFoundException e) { e.printStackTrace(); } return bm; } /** * 获取默认专辑图片 * @param context * @return */ @SuppressLint("ResourceType") public static Bitmap getDefaultArtwork(Context context, boolean small) { BitmapFactory.Options opts = new BitmapFactory.Options(); opts.inPreferredConfig = Bitmap.Config.RGB_565; if(small){ //返回小图片 //return BitmapFactory.decodeStream(context.getResources().openRawResource(R.drawable.default_picture), null, opts); } return BitmapFactory.decodeStream(context.getResources().openRawResource(R.drawable.default_picture), null, opts); } /** * 对图片进行合适的缩放 * @param options * @param target * @return */ public static int computeSampleSize(BitmapFactory.Options options, int target) { int w = options.outWidth; int h = options.outHeight; int candidateW = w / target; int candidateH = h / target; int candidate = Math.max(candidateW, candidateH); if(candidate == 0) { return 1; } if(candidate > 1) { if((w > target) && (w / candidate) < target) { candidate -= 1; } } if(candidate > 1) { if((h > target) && (h / candidate) < target) { candidate -= 1; } } return candidate; } }⑥为列表设置adapter,新建一个MyAdapter类继承BaseAdapter,然后在重写的getView里面设置显示的控件 @Override public View getView(int position, View convertView, ViewGroup parent) { if(convertView==null){ holder=new ViewHolder(); convertView=View.inflate(context, R.layout.list_item,null); holder.tv_title=convertView.findViewById(R.id.tv_title); holder.tv_artist=convertView.findViewById(R.id.tv_artist); holder.tv_duration=convertView.findViewById(R.id.tv_duration); holder.tv_position=convertView.findViewById(R.id.tv_position); convertView.setTag(holder); }else { holder= (ViewHolder) convertView.getTag(); } holder.tv_title.setText(list.get(position).getTitle()); holder.tv_artist.setText(list.get(position).getArtist()); long duration = list.get(position).getDuration(); String time= MusicUtil.formatTime(duration); holder.tv_duration.setText(time); holder.tv_position.setText(position+1+""); if(currentItem == position){ holder.tv_title.setSelected(true); holder.tv_position.setSelected(true); holder.tv_duration.setSelected(true); holder.tv_artist.setSelected(true); }else{ holder.tv_title.setSelected(false); holder.tv_position.setSelected(false); holder.tv_duration.setSelected(false); holder.tv_artist.setSelected(false); } return convertView; } class ViewHolder{ TextView tv_title;//歌曲名 TextView tv_artist;//歌手 TextView tv_duration;//时长 TextView tv_position;//序号 } 4.使用Service实现后台播放使用的是bindService,这样Service的生命周期就和Activity的生命周期绑定在一起了。创建一个MusicService。注意:销毁Service的时候需要将音乐对象release。 ①Service实现功能,在onBind方法里面实例化音乐播放对象 @Override public IBinder onBind(Intent intent) { Log.d(TAG,"onBind is call"); myBinder=new MyBinder(); return myBinder; }②在MyBinder()里面实现音乐的各种功能,使用的是内部类,初始化部分请看源代码包 public class MyBinder extends Binder{ private int index=0;//歌曲索引 //播放音乐 public void playMusic(int index){ this.index=index; try { File file=new File(list.get(this.index).getUrl()); if(!file.exists()){ Log.d(TAG,"------------------------------文件不存在------------------------------"); return ; }else{ Log.d(TAG,"------------------------------文件:"+file.getPath()+"存在 ------------------------------"); } if(mediaPlayer!=null){ mediaPlayer.reset(); mediaPlayer.release(); } mediaPlayer=new MediaPlayer(); String str=list.get(this.index).getUrl(); mediaPlayer.setDataSource(str); Log.d(TAG,list.get(this.index).getUrl()+""); mediaPlayer.prepare(); mediaPlayer.start(); } catch (IOException e) { e.printStackTrace(); } } //暂停音乐 public void pauseMusic(){ if(mediaPlayer.isPlaying()){ mediaPlayer.pause(); } } //关闭音乐 public void closeMusic(){ if(mediaPlayer!=null){ mediaPlayer.release(); } } //下一首 public void nextMusic(){ if(index>=list.size()-1){ this.index=0; }else{ this.index+=1; } playMusic(this.index); } //上一首 public void preciousMusic(){ if(index= Build.VERSION_CODES.O) { notify=new Notification.Builder(MainActivity.this,channelID) .setWhen(System.currentTimeMillis()) .setSound(null) .build(); } notify.icon=android.R.drawable.btn_star; notify.contentIntent=pi; notify.contentView=remoteViews; notify.flags=Notification.FLAG_ONGOING_EVENT; remoteViews.setOnClickPendingIntent(R.id.notice,pi); //上一首 Intent prevIntent=new Intent(BUTTON_PREV_ID); PendingIntent prevPendingIntent=PendingIntent.getBroadcast(this,0,prevIntent,0); remoteViews.setOnClickPendingIntent(R.id.widget_prev,prevPendingIntent); //播放暂停 Intent playIntent=new Intent(BUTTON_PLAY_ID); PendingIntent playPendingIntent=PendingIntent.getBroadcast(this,0,playIntent,0); remoteViews.setOnClickPendingIntent(R.id.widget_play,playPendingIntent); //下一首 Intent nextIntent=new Intent(BUTTON_NEXT_ID); PendingIntent nextPendingIntent=PendingIntent.getBroadcast(this,0,nextIntent,0); remoteViews.setOnClickPendingIntent(R.id.widget_next,nextPendingIntent); //关闭 Intent closeIntent=new Intent(BUTTON_CLOSE_ID); PendingIntent closePendingIntent=PendingIntent.getBroadcast(this,0,closeIntent,0); remoteViews.setOnClickPendingIntent(R.id.widget_close,closePendingIntent); }②动态注册广播 //注册广播 private void initButtonReceiver(){ buttonBroadcastReceiver=new ButtonBroadcastReceiver(); IntentFilter intentFilter=new IntentFilter(); intentFilter.addAction(BUTTON_PREV_ID); intentFilter.addAction(BUTTON_PLAY_ID); intentFilter.addAction(BUTTON_NEXT_ID); intentFilter.addAction(BUTTON_CLOSE_ID); registerReceiver(buttonBroadcastReceiver,intentFilter); }③显示广播,需要注意的是,每次在Activity里面点击上一首或者下一首都需要调用这个方法,刷新通知栏的标题,以及状态专辑 //展示通知 private void showNotification(){ if(isPlaying){ remoteViews.setImageViewResource(R.id.widget_play,R.drawable.stop); }else{ remoteViews.setImageViewResource(R.id.widget_play,R.drawable.start); } remoteViews.setImageViewBitmap(R.id.widget_album,utils.getArtwork(MainActivity.this,list.get(music_index).getId(),list.get(music_index).getAlbum(),true,false)); remoteViews.setImageViewResource(R.id.widget_close,android.R.drawable.ic_menu_close_clear_cancel); remoteViews.setTextViewText(R.id.widget_title,list.get(music_index).getTitle()); remoteViews.setTextViewText(R.id.widget_artist,list.get(music_index).getArtist()); remoteViews.setTextColor(R.id.widget_title,Color.BLACK); remoteViews.setTextColor(R.id.widget_artist,Color.BLACK); notify.contentView=remoteViews; manager.notify(100,notify); }④通知栏动作接收,使用的是内部类 public class ButtonBroadcastReceiver extends BroadcastReceiver{ @Override public void onReceive(Context context, Intent intent) { String action=intent.getAction(); Log.d(TAG,"--------------------收到action:"+action+"--------------------------"); if(action.equals(BUTTON_PREV_ID)){ runOnUiThread(new Runnable() { @Override public void run() { ib_precious.performClick(); return; } }); } if(action.equals(BUTTON_PLAY_ID)){ runOnUiThread(new Runnable() { @Override public void run() { ib_state.performClick(); return; } }); } if(action.equals(BUTTON_NEXT_ID)){ runOnUiThread(new Runnable() { @Override public void run() { ib_next.performClick(); return; } }); } if(action.equals(BUTTON_CLOSE_ID)){ handler.removeCallbacks(runnable); myBinder.closeMusic(); unbindService(connection); if(remoteViews!=null){ manager.cancel(100); } unregisterReceiver(buttonBroadcastReceiver); finish(); } } } 6.全屏显示①在AndroidManifest文件里面配置主题样式android:theme="@style/Theme.AppCompat.Light.NoActionBar"> 然后在onCreate方法里在setContentView(R.layout.activity_main);之前 设置: if(Build.VERSION.SDK_INT>=21){ View decorView=getWindow().getDecorView(); decorView.setSystemUiVisibility(View.SYSTEM_UI_FLAG_LAYOUT_FULLSCREEN|View.SYSTEM_UI_FLAG_LAYOUT_STABLE); getWindow().setStatusBarColor(Color.TRANSPARENT); } 7.设置歌曲选中后的样式①在res目录下的drawable资源下新建一个类型为selector的xml文件,里面设置属性 ②在Adapter里面设置getView currentItem == position){ holder.tv_title.setSelected(true); holder.tv_position.setSelected(true); holder.tv_duration.setSelected(true); holder.tv_artist.setSelected(true); }else{ holder.tv_title.setSelected(false); holder.tv_position.setSelected(false); holder.tv_duration.setSelected(false); holder.tv_artist.setSelected(false); } 8.资源地址注意:在使用的时候可能需要手动去设置里面打开权限 代码包里面的Music_Player\app\release下的MusicPlayer.apk是app安装包哦,期待您的点赞,与评论 地址:https://download.csdn.net/download/weixin_43773816/12418931 gitee地址点此 转载说明出处 |
【本文地址】
今日新闻 |
推荐新闻 |