Ubuntu系统下c语言的简单编程 |
您所在的位置:网站首页 › ubuntu编写c语言 › Ubuntu系统下c语言的简单编程 |
Ubuntu系统下c语言的简单编程
|
本文主要讲述关于在ubuntu系统下编程c语言的流程,包括网络设置、apt源的更换、简单的c语言在Linux和Windows下的对比以及用Makelife编写上述程序。 文章目录 一、网络设置二、更换apt源三、简单程序hello world的c语言1.安装vim,gcc2.新建hello.c3.编译hello.c 四、整型参数的运算(Linux和Windows对比)1.要求2.对比(1) Linux下的c语言编写(2) Windows下的c语言编写 五、用Makefile编写上述程序1.Makefile介绍2.安装make3.用vim编辑Makefile 一、网络设置准备一台PC机并安装好Vmware(笔者采用的是15.5版本),我们使用NetworkManager进行网络配置。 1.将虚拟机网络适配器调为桥接模式 选择虚拟机->设置->网络适配器->桥接模式 1.输入 ifconfig -a
2.输入sudo vi /etc/network/interfaces
然后按esc退出编辑模式,接着输入:wq!保存并退出 二、更换apt源1.查询版本信息 lsb_release -c
输入sudo vim /etc/apt/sources.list 按a进入编辑模式后,替换为下面内容,然后esc,输入:wq!保存并退出 deb http://mirrors.aliyun.com/ubuntu/ bionic main restricted universe multiverse deb-src http://mirrors.aliyun.com/ubuntu/ bionic main restricted universe multiverse deb http://mirrors.aliyun.com/ubuntu/ bionic-security main restricted universe multiverse deb-src http://mirrors.aliyun.com/ubuntu/ bionic-security main restricted universe multiverse deb http://mirrors.aliyun.com/ubuntu/ bionic-updates main restricted universe multiverse deb-src http://mirrors.aliyun.com/ubuntu/ bionic-updates main restricted universe multiverse deb http://mirrors.aliyun.com/ubuntu/ bionic-backports main restricted universe multiverse deb-src http://mirrors.aliyun.com/ubuntu/ bionic-backports main restricted universe multiverse deb http://mirrors.aliyun.com/ubuntu/ bionic-proposed main restricted universe multiverse deb-src http://mirrors.aliyun.com/ubuntu/ bionic-proposed main restricted universe multiverse3.更新软件包 sudo apt-get update等待进度条加载完毕 sudo apt-get upgrade等待进度条加载完毕 三、简单程序hello world的c语言 1.安装vim,gccsudo apt-get install vim 安装vim编译器 sudo apt-get install gcc 安装gcc编译器 2.新建hello.c输入命令 vim hello.c 进入编辑模式,输入以下代码保存并退出 #include int main() { printf("hello world!"); return 0; } 3.编译hello.cgcc hello.c -o hello 此时会生成一个hello文件 再输入 ./hello 即可完成 编写一个主程序文件 main1.c 和一个子程序文件 sub1.c, 要求:子程序sub1.c 包含一个算术运算函数 float x2x(int a,int b),此函数功能为对两个输入整型参数做某个运算,将结果做浮点数返回;主程序main1.c,定义并赋值两整型变量,然后调用函数 x2x,将x2x的返回结果printf出来。 2.对比 (1) Linux下的c语言编写1.建立main.c主程序 vi main.c 进入编辑模式书写下列代码并保存退出 #include #include"sub.c" int main(){ int a=2,b=3; float i; i=f1(a,b); printf("%f\n",i); return 0; }2.建立子程序sub.c vi.sub.c 进入编辑模式书写下列代码保存并退出 #include float f1(int a,int b){ float i; i=a+b; return i; }3.编译main.c gcc main.c -o main 4.运行main.c ./main (2) Windows下的c语言编写这里笔者采用Dev c++进行编程 1.编写main.c文件 #include #include "sub.h" int main() { int x,y; x=2;y=3; float r; r=x2x(x,y); printf("%f",r); return 0; }2.编写头文件sub.h #include float x2x(int x,int y) { float r; r=x+y; return r; } 五、用Makefile编写上述程序 1.Makefile介绍makefile定义了一系列的规则来指定哪些文件需要先编译,哪些文件需要后编译,哪些文件需要重新编译,甚至于进行更复杂的功能操作,因为 makefile就像一个Shell脚本一样,也可以执行操作系统的命令。Makefile文件中的命令有一定规范,一旦该文件编写好以后在Linux命令行中执行一条make命令即可自动编译整个工程。 2.安装makesudo apt-get install make 3.用vim编辑Makefile1.主程序main.c #include #include"sub.c" int main(){ int a=1,b=1; float i; i=f1(a,b); printf("%f\n",i); return 0; }2.子程序sub.c #include float f1(int a,int b){ float i; i=a+b; return i; }3.用vim编辑Makefile main: main.o sub.o gcc -o main main.o sub.o main.o:main.c sub.h gcc -c main.c sub.o:sub.c sub.h gcc -c sub.c最后在命令行输入make即可实现。 |
 2.虚拟网络编辑器设置 选择编辑->虚拟网络编辑器->更改设置->添加网络(默认Vment0)->设置为桥接模式,自动->最后确认
 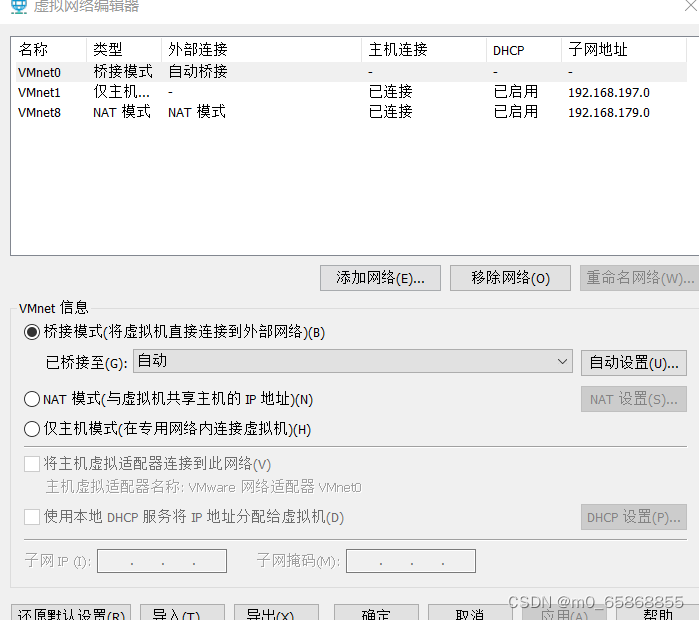 3.网卡与DNS配置
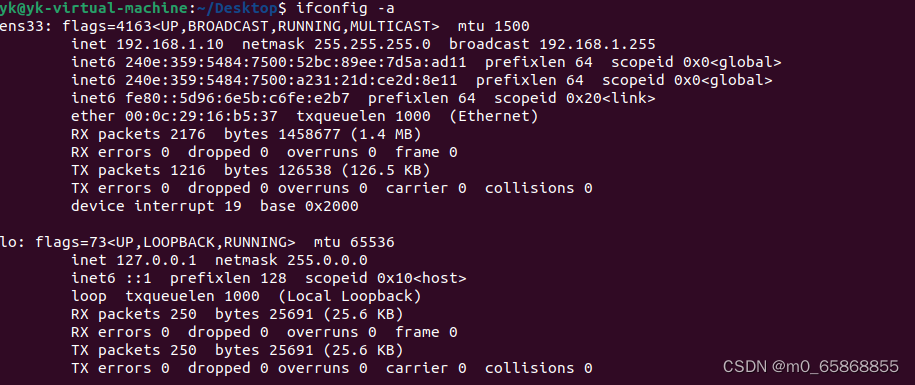 记住是ens33的第二行,把这行的3个地址都记住,一会要进行替换
 按a进入编辑模式,全部更换为下面形式。注意:三个地址换为你自己刚才记住的
 2.更换源,这里采用的是阿里源
【本文地址】
今日新闻 |
推荐新闻 |