解决Ubuntu下升级openssh以及openssl全过程 |
您所在的位置:网站首页 › ubuntu升级ssh › 解决Ubuntu下升级openssh以及openssl全过程 |
解决Ubuntu下升级openssh以及openssl全过程
|
项目场景:
由于ubuntu的openssh版本过低导致无法远程链接服务器 需要升级ssh方能远程连接服务器 过程描述闲话不多说,开始记录全过程 网上说要先进行以下步骤: apt-get install openbsd-inetd telnetd telnet /etc/init.d/openbsd-inetd restart # 启动服务 netstat -anpt|grep 23 # 查看telnet服务的默认端口是否启动 telnet ip # 测试是否成功登陆注意: 如果确保你的网络是没问题的,那这步骤可以跳过 openssh以及openssl的资源链接: openssl 官方下载地址: https://www.openssl.org/source/openssh 官方下载地址: https://fastly.cdn.openbsd.org/pub/OpenBSD/OpenSSH/portable/zlib 官方下载地址: http://www.zlib.net/ 第一步:#卸载原openssh apt-get remove openssh-server openssh-client #安装 libpam0g-dev apt-get install libpam0g-dev 重点强调:ubuntu下是安装libpam0g-dev ,不装下面安装会报错PAM headers not found 第二步:正式开始安装openssl和openssh,以下步骤如果出现权限问题需要用sudo 1.安装zlib tar xf zlib-1.2.11.tar.gz cd zlib-1.2.11 ./configure --prefix=/usr/local/zlib make && make install2.升级openssl tar xf openssl-1.0.2o.tar.gz cd openssl-1.0.2o ./config --prefix=/usr/local/openssl shared zlib #一定要加上shared 参数,要不在安装openssh的时候就无法找到,最好指定安装路径,不然找不到安装好的openssl在哪 make && make install #备份原来的openssl mv /usr/bin/openssl /usr/bin/openssl.bak mv /usr/include/openssl /usr/include/openssl.bak #因为源码安装默认安装的位置是 /usr/local/ssl 需要将创建软链接到系统位置 ln -s /usr/local/ssl/bin/openssl /usr/bin/openssl ln -s /usr/local/ssl/include/openssl /usr/include/openssl #将openssl 的lib 库添加到系统 echo "/usr/local/ssl/lib" > /etc/ld.so.conf.d/openssl.conf 如果echo不行,可以直接使用vim添加 #使新添加的lib 被系统找到 ldconfig #查看openssl版本 openssl version -a如果能正常显示openssl最新的版本,证明安装成功 3.升级openssh #备份原openssh文件 mv /etc/init.d/ssh /etc/init.d/ssh.old cp -r /etc/ssh /etc/ssh.old #开始安装对应版本的openssh tar xf openssh-xxx.xx.xx.tar.gz cd openssh xxx.xxx ./configure --prefix=/usr --sysconfdir=/etc/ssh --with-md5-passwords --with-pam --with-zlib --with-ssl-dir=/usr/local/ssl --with-privsep-path=/var/lib/sshd #需要指定openssl的安装路径 make && make install 重点:如果这个config过程中报错configure: error: PAM headers not found,说明一开始的pam依赖没装好 #可查看当前SSH的版本。 ssh -V sshd -V 到目前所有升级就已经完成了 下面进行还原ssh配置 cd /etc/ssh mv sshd_config sshd_config.default cp ../ssh.old/sshd_config ./ #使用原来的/etc/init.d/ssh mv /etc/init.d/ssh.old /etc/init.d/ssh #取消注销指定服务 systemctl unmask ssh #重启服务 systemctl restart sshd在将ssh升级完后,重新进行ssh IP,遇到的问题以及解决方案(请大家对号入座) 问题1: /etc/ssh/ssh_config line 55: Unsupported option “gssapiauthentication” /etc/ssh/ssh_config line 56: Unsupported option “gssapidelegatecredentials” 解决办法: 修改/etc/ssh/ssh_config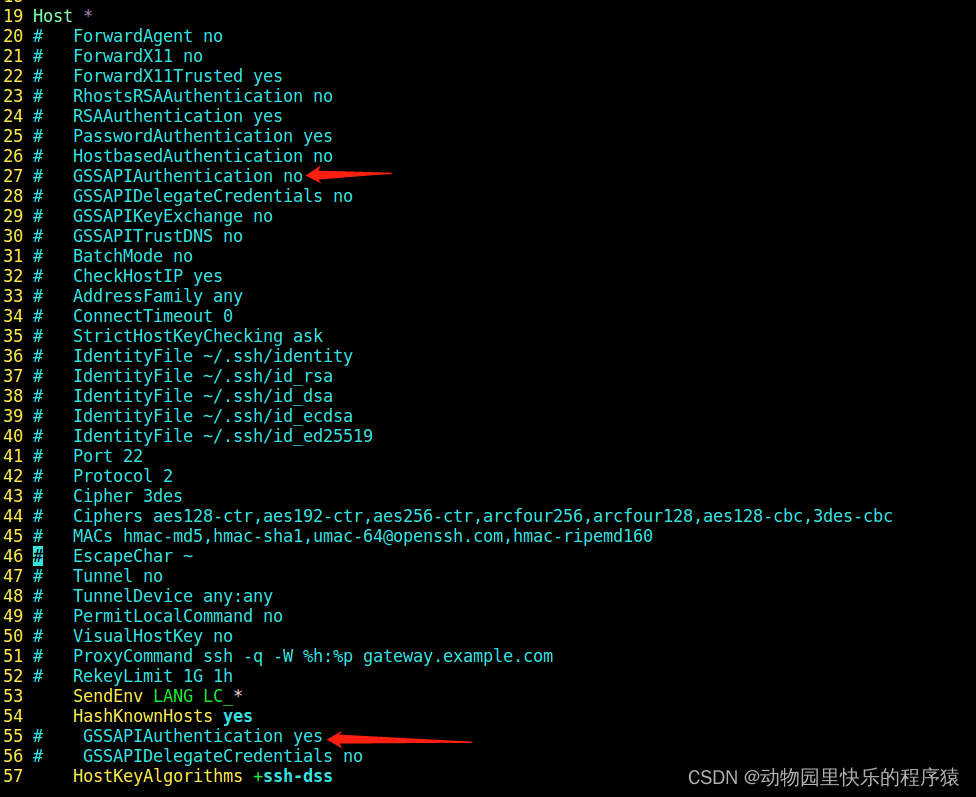 注释掉这两个地方问题2: Unable to negotiate with xxx.xx.xxx.xx port 22: no matching host key type found. Their offer: ssh-rsa,ssh-dss 解决办法: vim ~/.ssh/config,有就修改,没有就新增 添加一行 HostKeyAlgorithms +ssh-dss 然后重启sshd: service sshd restart 3 问题3: 如果出现这类问题 注释掉这两个地方问题2: Unable to negotiate with xxx.xx.xxx.xx port 22: no matching host key type found. Their offer: ssh-rsa,ssh-dss 解决办法: vim ~/.ssh/config,有就修改,没有就新增 添加一行 HostKeyAlgorithms +ssh-dss 然后重启sshd: service sshd restart 3 问题3: 如果出现这类问题 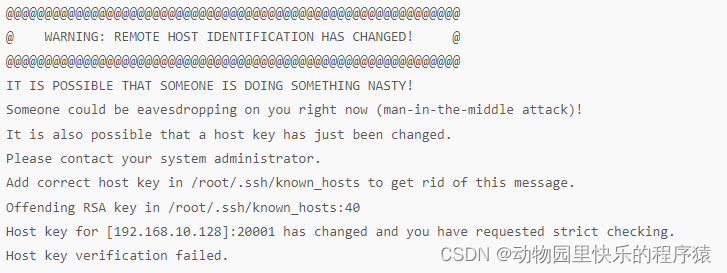 直接删除掉~/.ssh/known_hosts文件,或者备份改名 就可以ssh了 直接删除掉~/.ssh/known_hosts文件,或者备份改名 就可以ssh了
总结:过程可能比较繁琐,会遇到各种问题,但一定要静下心来处理,没有bug是解决不了,只是可能心一急,思维就乱了。解决完一个问题在再进行下一步,按部就班,千万不要跳过出现的问题,进行下一步,最后结果可能也不会让你满意 |
【本文地址】
今日新闻 |
推荐新闻 |