pytesseract安装和基本使用 |
您所在的位置:网站首页 › tesseract下载安装 › pytesseract安装和基本使用 |
pytesseract安装和基本使用
|
文章目录
1. 安装配置和测试1.1 tesseract安装1.2 pytessract安装
2. 简单使用和参数说明2.1 无法调用2.2 基本用法
1. 安装配置和测试
pytesseract是google的tesseract的一个python版本的接口库,想要真正使用,首先需要安装tesseract 1.1 tesseract安装 下载安装tesseract,去这个网址下载:https://digi.bib.uni-mannheim.de/tesseract/。(或者在github的wiki页面上也可以找到这个页面进行下载),根据Tesseract document可知,Tesseract4.0及以上配备了LSTM网络,之前的低版本是没有的,所以按照自己需求去找相应的版本。双击安装,记得勾选中文包(这个下载比较慢)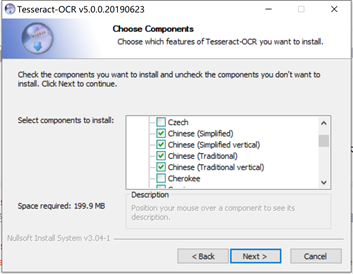 配置系统环境变量,只要配置到tesseract.exe所在的文件夹那一级就行(记住你的安装路径,经评论区提醒,有的可能在C:\Program Files\Tessercat-OCR里) 配置系统环境变量,只要配置到tesseract.exe所在的文件夹那一级就行(记住你的安装路径,经评论区提醒,有的可能在C:\Program Files\Tessercat-OCR里) 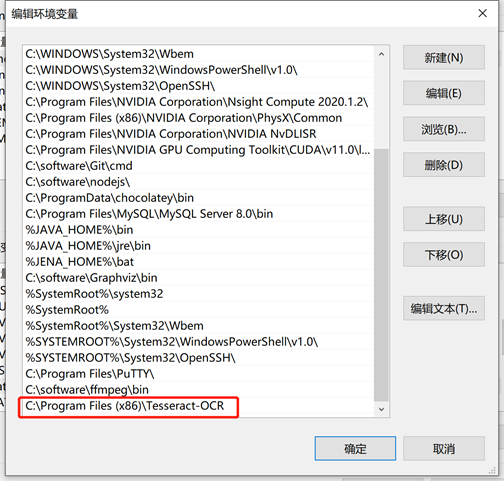  测试是否安装成功,在命令行输入tesseract --help查看是否会返回一些提示信息。 测试是否安装成功,在命令行输入tesseract --help查看是否会返回一些提示信息。 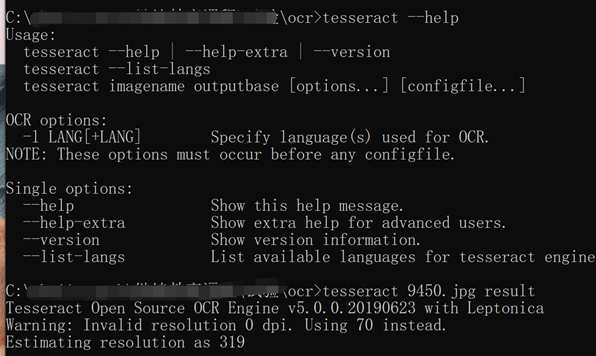 或者可以直接测试一张含有文字的图片,看看效果,tesseract image.png result > tesseract 9450.jpg result
> Tesseract Open Source OCR Engine v5.0.0.20190623 with Leptonica
> Warning: Invalid resolution 0 dpi. Using 70 instead. Estimating resolution as 319
# 然后会在当前命令路径下看到一个result.txt,其中存放在识别结果
1.2 pytessract安装 或者可以直接测试一张含有文字的图片,看看效果,tesseract image.png result > tesseract 9450.jpg result
> Tesseract Open Source OCR Engine v5.0.0.20190623 with Leptonica
> Warning: Invalid resolution 0 dpi. Using 70 instead. Estimating resolution as 319
# 然后会在当前命令路径下看到一个result.txt,其中存放在识别结果
1.2 pytessract安装
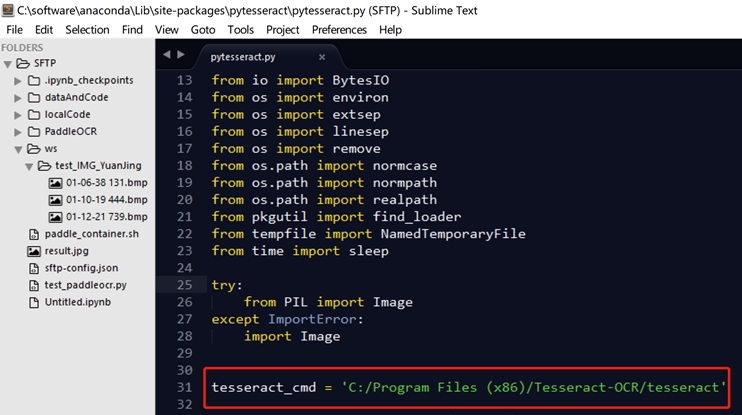
上面那个搞好了,这个就很好搞,直接 pip install pytesseract # 或者通过conda安装 conda install -c conda-forge pytesseract 2. 简单使用和参数说明 2.1 无法调用如果报错: XXXX FileNotFoundError: [WinError 2] 系统找不到指定的文件。 XXXX pytesseract.pytesseract.TesseractNotFoundError: tesseract is not installed or it's not in your path有两种解决方案, 一种是在pytesseract.py脚本中更改tesseract_cmd路径为tesseract安装路径(根据自己本机的安装路径去写),要具体到tesseract.exe文件,但是不用写.exe这个后缀 另一种就是每次在代码中加入以下代码,指明tesseract_cmd命令的位置,方便pytesseract调用: tesseract_cmd = r'C:\Program Files (x86)\Tesseract-OCR\tesseract' pytesseract.pytesseract.tesseract_cmd =tesseract_cmd 2.2 基本用法以下代码粘贴自jupyter notebook文件, from PIL import Image import pytesseract import matplotlib.pyplot as plt %matplotlib inline path="9450.jpg" """ 🐬指明tesseract命令位置 """ tesseract_cmd = r'C:\Program Files (x86)\Tesseract-OCR\tesseract' pytesseract.pytesseract.tesseract_cmd =tesseract_cmd """ 👻基础的图片转换为文字 """ # 显示 image=Image.open(path) plt.figure(figsize=(2,2)) plt.axis('off') plt.imshow(image) print(pytesseract.image_to_string(image)) """ 🤠当前支持的语言 osd On Screen Display 屏幕显示字符 """ print(pytesseract.get_languages(config='')) """ 🤓尝试修改语言参数 """ print(pytesseract.image_to_string(image, lang='osd')) """ 🐱👓识别超时就停止 """ try: print(pytesseract.image_to_string(image, timeout=2)) # Timeout after 2 seconds print(pytesseract.image_to_string(image, timeout=0.5)) # Timeout after half a second except RuntimeError as timeout_error: # Tesseract processing is terminated pass """ 🎅将识别结果导出成文字可选的pdf 这个达成的效果,就是会把图片转成pdf,同时其中的文字会是可编辑/可选的 """ pdf = pytesseract.image_to_pdf_or_hocr(Image.open("1.png"), extension='pdf') with open('test.pdf', 'w+b') as f: f.write(pdf) # pdf type is bytes by default """ 💌修改参数 """ configdigit='--psm 6 --oem 1' print(pytesseract.image_to_string(img_cv,config=configdigit)) configdigit='--psm 6 --oem 3 -c tessedit_char_whitelist=0123456789' print(pytesseract.image_to_string(img_cv,config=configdigit)) """ 🍳关于其中的psm参数和oem参数,可以查看帮助文档 """ ! tesseract --help-extra > Page segmentation modes: 0 Orientation and script detection (OSD) only. 1 Automatic page segmentation with OSD. 2 Automatic page segmentation, but no OSD, or OCR. (not implemented) 3 Fully automatic page segmentation, but no OSD. (Default) 4 Assume a single column of text of variable sizes. 5 Assume a single uniform block of vertically aligned text. 6 Assume a single uniform block of text. 7 Treat the image as a single text line. 8 Treat the image as a single word. 9 Treat the image as a single word in a circle. 10 Treat the image as a single character. 11 Sparse text. Find as much text as possible in no particular order. 12 Sparse text with OSD. 13 Raw line. Treat the image as a single text line, bypassing hacks that are Tesseract-specific. OCR Engine modes: 0 Legacy engine only. 1 Neural nets LSTM engine only. 2 Legacy + LSTM engines. 3 Default, based on what is available.参考: pytesseract psm 选项参数 |
【本文地址】