撰写双端平台代码(插件编写实现) |
您所在的位置:网站首页 › studio无法运行flutter项目 › 撰写双端平台代码(插件编写实现) |
撰写双端平台代码(插件编写实现)
|
撰写双端平台代码(插件编写实现)
Contents
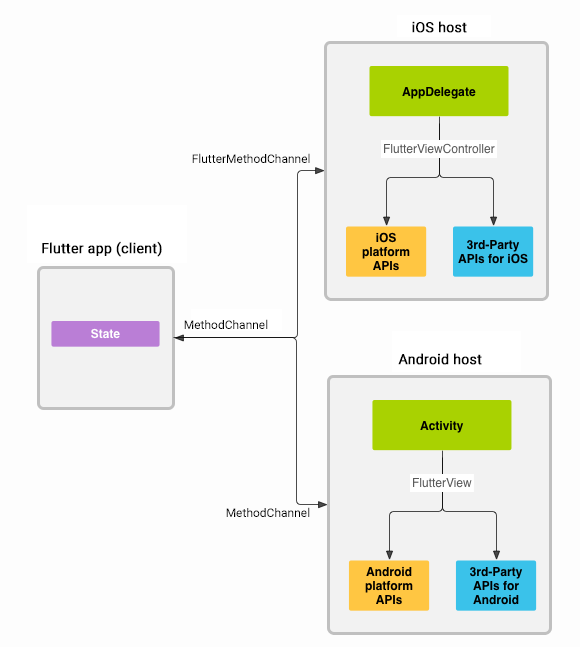
架构概述:平台通道 平台通道数据类型及编解码器 示例: 通过平台通道调用平台的 iOS、Android 和 Windows 代码 第一步:创建一个新的应用项目 第二步:创建 Flutter 平台客户端 步骤 3: 添加 Android 平台的实现 步骤 4:添加 iOS 平台的实现 第五步:添加 Windows 平台特定实现 Step 6: Add a Linux platform-specific implementation通过 Pigeon 获得类型安全的通道 Pigeon 样例 从 UI 代码中分离平台相关代码 将平台相关代码作为 Package 进行提交 自定义通道和编解码器 通道和平台线程 Using plugins and channels from background isolates在后台线程中执行 channel 的 handlers 跳转到 Android 中的 UI 线程 跳转到 iOS 中的主线程 本指南介绍了如何编写自定义的平台相关代码,某些平台相关功能可通过已有的软件包获得,具体细节可查看: 在 Flutter 里使用 Packages。 提示 本页面的内容适用于大多数平台,但 Web 插件的实现一般都是通过 JS 交互 或者 dart:html 库 实现的。 Flutter 构建了一个灵活的系统,你可以调用各种相关平台的 API,具体如下所示: Android 中的 Java 或 Kotlin API iOS 中的 Objective-C 或 Swift API Windows 操作系统中的 C++ API macOS 系统中的 Objective-C Linux 操作系统中的 C Flutter 使用了灵活系统,无论是在 Android 上的 Kotlin 还是 Java,亦或是 iOS 上的 Swift 或 Objective-C,它都允许你调用平台特定 API。 Flutter 内置的平台特定 API 支持不依赖于任何生成代码,而是灵活的依赖于传递消息格式。或者,你也可以使用 Pigeon 这个 package,通过生成代码来 发送结构化类型安全消息。 应用中的 Flutter 部分通过平台通道向其宿主 (非 Dart 部分) 发送消息。 宿主监听平台通道并接收消息。然后,它使用原生编程语言来调用任意数量的相关平台 API,并将响应发送回客户端(即应用程序中的 Flutter 部分)。 提示 本篇教程主要介绍如何在非 Dart 语言中,利用平台通道的机制调用平台 API。但是当你在 Flutter 应用里编写 Dart 代码时,你也可以通过判断 defaultTargetPlatform,在不同的平台上执行对应的代码。 不同平台操作体验的差异和适配 文档中列举了部分 Flutter 框架自动为你处理的平台适配行为。 架构概述:平台通道消息使用平台通道在客户端(UI)和宿主(平台)之间传递,如下图所示:
消息和响应以异步的形式进行传递,以确保用户界面能够保持响应。 提示 Flutter 是通过 Dart 异步发送消息的。即便如此,当你调用一个平台方法时,也需要在主线程上做调用。在 这里 查看更多。 客户端做方法调用的时候 MethodChannel 会负责响应,从平台一侧来讲,Android 系统上使用 MethodChannelAndroid、 iOS 系统使用 MethodChanneliOS 来接收和返回来自 MethodChannel 的方法调用。在开发平台插件的时候,可以减少样板代码。 提示 如果需要,方法调用也可以反向发送,由平台充当客户端来调用 Dart 实现的方法。一个具体的例子是 quick_actions 插件。 平台通道数据类型及编解码器标准平台通道使用标准消息编解码器,它支持简单的类似 JSON 值的高效二进制序列化,例如布尔值、数字、字符串、字节缓冲区及这些类型的列表和映射(详情请参阅 StandardMessageCodec)。当你发送和接收值时,它会自动对这些值进行序列化和反序列化。 下表展示了如何在平台端接收 Dart 值,反之亦然: Java Kotlin Obj-C Swift C++ C Dart Java null null bool java.lang.Boolean int java.lang.Integer int, if 32 bits not enough java.lang.Long double java.lang.Double String java.lang.String Uint8List byte[] Int32List int[] Int64List long[] Float32List float[] Float64List double[] List java.util.ArrayList Map java.util.HashMap Dart Kotlin null null bool Boolean int Int int, if 32 bits not enough Long double Double String String Uint8List ByteArray Int32List IntArray Int64List LongArray Float32List FloatArray Float64List DoubleArray List List Map HashMap Dart Objective-C null nil (NSNull when nested) bool NSNumber numberWithBool: int NSNumber numberWithInt: int, if 32 bits not enough NSNumber numberWithLong: double NSNumber numberWithDouble: String NSString Uint8List FlutterStandardTypedData typedDataWithBytes: Int32List FlutterStandardTypedData typedDataWithInt32: Int64List FlutterStandardTypedData typedDataWithInt64: Float32List FlutterStandardTypedData typedDataWithFloat32: Float64List FlutterStandardTypedData typedDataWithFloat64: List NSArray Map NSDictionary Dart Swift null nil bool NSNumber(value: Bool) int NSNumber(value: Int32) int, if 32 bits not enough NSNumber(value: Int) double NSNumber(value: Double) String String Uint8List FlutterStandardTypedData(bytes: Data) Int32List FlutterStandardTypedData(int32: Data) Int64List FlutterStandardTypedData(int64: Data) Float32List FlutterStandardTypedData(float32: Data) Float64List FlutterStandardTypedData(float64: Data) List Array Map Dictionary Dart C++ null EncodableValue() bool EncodableValue(bool) int EncodableValue(int32_t) int, if 32 bits not enough EncodableValue(int64_t) double EncodableValue(double) String EncodableValue(std::string) Uint8List EncodableValue(std::vector) Int32List EncodableValue(std::vector) Int64List EncodableValue(std::vector) Float32List EncodableValue(std::vector) Float64List EncodableValue(std::vector) List EncodableValue(std::vector) Map EncodableValue(std::map) Dart C (GObject) null FlValue() bool FlValue(bool) int FlValue(int64_t) double FlValue(double) String FlValue(gchar*) Uint8List FlValue(uint8_t*) Int32List FlValue(int32_t*) Int64List FlValue(int64_t*) Float32List FlValue(float*) Float64List FlValue(double*) List FlValue(FlValue) Map FlValue(FlValue, FlValue) 示例: 通过平台通道调用平台的 iOS、Android 和 Windows 代码以下代码演示了如何调用平台相关 API 来检索并显示当前的电池电量。它通过平台消息 getBatteryLevel() 来调用 Android 的 BatteryManager API、 iOS 的 device.batteryLevel API、以及 indows 上的 GetSystemPowerStatus。 该示例在主应用程序中添加平台相关代码。如果想要将该代码重用于多个应用程序,那么项目的创建步骤将略有差异(查看 Flutter Packages 的开发和提交),但平台通道代码仍以相同方式编写。 提示 可在 /examples/platform_channel/ 中获得使用 Java 实现的 Android 及使用 Objective-C 实现的 iOS 的该示例完整可运行的代码。对于用 Swift 实现的 iOS 代码,请参阅 /examples/platform_channel_swift/。 第一步:创建一个新的应用项目首先创建一个新的应用: 在终端中运行:flutter create batterylevel 默认情况下,我们的模板使用 Kotlin 编写 Android 或使用 Swift 编写 iOS 代码。要使用 Java 或 Objective-C,请使用 -i 和/或 -a 标志: 在终端中运行:flutter create -i objc -a java batterylevel 第二步:创建 Flutter 平台客户端应用程序的 State 类保持当前应用的状态。扩展它以保持当前的电池状态。 首先,构建通道。在返回电池电量的单一平台方法中使用 MethodChannel。 通道的客户端和宿主端通过传递给通道构造函数的通道名称进行连接。一个应用中所使用的所有通道名称必须是唯一的;使用唯一的 域前缀 为通道名称添加前缀,比如:samples.flutter.dev/battery。 import 'dart:async'; import 'package:flutter/material.dart'; import 'package:flutter/services.dart'; class _MyHomePageState extends State { static const platform = MethodChannel('samples.flutter.dev/battery'); // Get battery level.接下来,在方法通道上调用方法(指定通过 String 标识符 getBatteryLevel 调用的具体方法)。调用可能会失败—比如,如果平台不支持此平台 API(比如在模拟器中运行),所以将 invokeMethod 调用包裹在 try-catch 语句中。 在 setState 中使用返回结果来更新 _batteryLevel 内的用户界面状态。 // Get battery level. String _batteryLevel = 'Unknown battery level.'; Future _getBatteryLevel() async { String batteryLevel; try { final int result = await platform.invokeMethod('getBatteryLevel'); batteryLevel = 'Battery level at $result % .'; } on PlatformException catch (e) { batteryLevel = "Failed to get battery level: '${e.message}'."; } setState(() { _batteryLevel = batteryLevel; }); }最后,将模板中的 build 方法替换为包含以字符串形式显示电池状态、并包含一个用于刷新该值的按钮的小型用户界面。 @override Widget build(BuildContext context) { return Material( child: Center( child: Column( mainAxisAlignment: MainAxisAlignment.spaceEvenly, children: [ ElevatedButton( onPressed: _getBatteryLevel, child: const Text('Get Battery Level'), ), Text(_batteryLevel), ], ), ), ); } 步骤 3: 添加 Android 平台的实现 Kotlin Java首先在 Android Studio 中打开 Flutter 应用的 Android 宿主部分: 启动 Android Studio 选择菜单项 File > Open… 导航到包含 Flutter 应用的目录,然后选择其中的 android 文件夹。点击 OK。 在项目视图中打开 kotlin 文件夹下的 MainActivity.kt 文件。 在 configureFlutterEngine() 方法中创建一个 MethodChannel 并调用 setMethodCallHandler()。确保使用的通道名称与 Flutter 客户端使用的一致。 import androidx.annotation.NonNull import io.flutter.embedding.android.FlutterActivity import io.flutter.embedding.engine.FlutterEngine import io.flutter.plugin.common.MethodChannel class MainActivity: FlutterActivity() { private val CHANNEL = "samples.flutter.dev/battery" override fun configureFlutterEngine(@NonNull flutterEngine: FlutterEngine) { super.configureFlutterEngine(flutterEngine) MethodChannel(flutterEngine.dartExecutor.binaryMessenger, CHANNEL).setMethodCallHandler { call, result -> // This method is invoked on the main thread. // TODO } } }添加使用 Android battery API 来检索电池电量的 Android Kotlin 代码。该代码与你在原生 Android 应用中编写的代码完全相同。 首先在文件头部添加所需的依赖: import android.content.Context import android.content.ContextWrapper import android.content.Intent import android.content.IntentFilter import android.os.BatteryManager import android.os.Build.VERSION import android.os.Build.VERSION_CODES然后在 MainActivity 类中的 configureFlutterEngine() 方法下方添加以下新方法: private fun getBatteryLevel(): Int { val batteryLevel: Int if (VERSION.SDK_INT >= VERSION_CODES.LOLLIPOP) { val batteryManager = getSystemService(Context.BATTERY_SERVICE) as BatteryManager batteryLevel = batteryManager.getIntProperty(BatteryManager.BATTERY_PROPERTY_CAPACITY) } else { val intent = ContextWrapper(applicationContext).registerReceiver(null, IntentFilter(Intent.ACTION_BATTERY_CHANGED)) batteryLevel = intent!!.getIntExtra(BatteryManager.EXTRA_LEVEL, -1) * 100 / intent.getIntExtra(BatteryManager.EXTRA_SCALE, -1) } return batteryLevel }最后,完成前面添加的 onMethodCall() 方法。你需要处理单个平台方法 getBatteryLevel(),所以在参数 call 中对其进行验证。该平台方法的实现是调用上一步编写的 Android 代码,并使用 result 参数来返回成功和错误情况下的响应。如果调用了未知方法,则报告该方法。 删除以下代码: MethodChannel(flutterEngine.dartExecutor.binaryMessenger, CHANNEL).setMethodCallHandler { call, result -> // This method is invoked on the main thread. // TODO }并替换成以下内容: MethodChannel(flutterEngine.dartExecutor.binaryMessenger, CHANNEL).setMethodCallHandler { // This method is invoked on the main thread. call, result -> if (call.method == "getBatteryLevel") { val batteryLevel = getBatteryLevel() if (batteryLevel != -1) { result.success(batteryLevel) } else { result.error("UNAVAILABLE", "Battery level not available.", null) } } else { result.notImplemented() } }首先在 Android Studio 中打开 Flutter 应用的 Android 宿主部分: 启动 Android Studio 选择菜单项 File > Open… 导航到包含 Flutter 应用的目录,然后选择其中的 android 文件夹。点击 OK。 在项目视图中打开 java 文件夹下的 MainActivity.java 文件。 接下来,在 configureFlutterEngine() 方法中创建一个 MethodChannel 并设置一个 MethodCallHandler。确保使用的通道名称与 Flutter 客户端使用的一致。 import androidx.annotation.NonNull; import io.flutter.embedding.android.FlutterActivity; import io.flutter.embedding.engine.FlutterEngine; import io.flutter.plugin.common.MethodChannel; public class MainActivity extends FlutterActivity { private static final String CHANNEL = "samples.flutter.dev/battery"; @Override public void configureFlutterEngine(@NonNull FlutterEngine flutterEngine) { super.configureFlutterEngine(flutterEngine); new MethodChannel(flutterEngine.getDartExecutor().getBinaryMessenger(), CHANNEL) .setMethodCallHandler( (call, result) -> { // This method is invoked on the main thread. // TODO } ); } }添加使用 Android battery API 来检索电池电量的 Android Java 代码。该代码与你在原生 Android 应用中编写的代码完全相同。 首先在文件头部添加所需的依赖: import android.content.ContextWrapper; import android.content.Intent; import android.content.IntentFilter; import android.os.BatteryManager; import android.os.Build.VERSION; import android.os.Build.VERSION_CODES; import android.os.Bundle;然后在 Activity 类中的 onCreate() 方法下方添加以下新方法: private int getBatteryLevel() { int batteryLevel = -1; if (VERSION.SDK_INT >= VERSION_CODES.LOLLIPOP) { BatteryManager batteryManager = (BatteryManager) getSystemService(BATTERY_SERVICE); batteryLevel = batteryManager.getIntProperty(BatteryManager.BATTERY_PROPERTY_CAPACITY); } else { Intent intent = new ContextWrapper(getApplicationContext()). registerReceiver(null, new IntentFilter(Intent.ACTION_BATTERY_CHANGED)); batteryLevel = (intent.getIntExtra(BatteryManager.EXTRA_LEVEL, -1) * 100) / intent.getIntExtra(BatteryManager.EXTRA_SCALE, -1); } return batteryLevel; }最后,完成前面添加的 onMethodCall() 方法,你需要处理单个平台方法 getBatteryLevel(),所以在参数 call 中对其进行验证。该平台方法的实现是调用上一步编写的 Android 代码,并使用 result 参数来返回成功和错误情况下的响应。如果调用了未知方法,则报告该方法。 移除以下代码: (call, result) -> { // This method is invoked on the main thread. // TODO }并替换成以下内容: (call, result) -> { // This method is invoked on the main thread. if (call.method.equals("getBatteryLevel")) { int batteryLevel = getBatteryLevel(); if (batteryLevel != -1) { result.success(batteryLevel); } else { result.error("UNAVAILABLE", "Battery level not available.", null); } } else { result.notImplemented(); } }现在你应该可以在 Android 中运行该应用。如果使用了 Android 模拟器,请在扩展控件面板中设置电池电量,可从工具栏中的 … 按钮访问。 步骤 4:添加 iOS 平台的实现 Swift Objective-C首先在 Xcode 中打开 Flutter 应用的 iOS 宿主部分: 启动 Xcode 选择菜单项 File > Open… 导航到包含 Flutter 应用的目录,然后选择其中的 ios 文件夹。点击 OK。 在使用 Objective-C 的标准模板设置中添加对 Swift 的支持: 在项目导航中展开 Expand Runner > Runner。 打开项目导航 Runner > Runner 下的 AppDelegate.swift 文件。 重写 application:didFinishLaunchingWithOptions: 方法,然后创建一个 FlutterMethodChannel 绑定到名字为 samples.flutter.dev/battery 名称的 channel: @UIApplicationMain @objc class AppDelegate: FlutterAppDelegate { override func application( _ application: UIApplication, didFinishLaunchingWithOptions launchOptions: [UIApplication.LaunchOptionsKey: Any]?) -> Bool { let controller : FlutterViewController = window?.rootViewController as! FlutterViewController let batteryChannel = FlutterMethodChannel(name: "samples.flutter.dev/battery", binaryMessenger: controller.binaryMessenger) batteryChannel.setMethodCallHandler({ (call: FlutterMethodCall, result: @escaping FlutterResult) -> Void in // This method is invoked on the UI thread. // Handle battery messages. }) GeneratedPluginRegistrant.register(with: self) return super.application(application, didFinishLaunchingWithOptions: launchOptions) } }然后,添加 iOS Swift 代码,使用电池相关的 API 获取电量。这里的代码和你写原生 iOS 代码别无二致。 在 AppDelegate.swift 末尾添加以下新的方法: private func receiveBatteryLevel(result: FlutterResult) { let device = UIDevice.current device.isBatteryMonitoringEnabled = true if device.batteryState == UIDevice.BatteryState.unknown { result(FlutterError(code: "UNAVAILABLE", message: "Battery level not available.", details: nil)) } else { result(Int(device.batteryLevel * 100)) } }最后,完成前面添加的 setMethodCallHandler() 方法。你需要处理单个平台方法 getBatteryLevel(),所以在参数 call 中对其进行验证。该平台方法的实现是调用上一步编写的 iOS 代码。如果调用了未知方法,则报告该方法。 batteryChannel.setMethodCallHandler({ [weak self] (call: FlutterMethodCall, result: FlutterResult) -> Void in // This method is invoked on the UI thread. guard call.method == "getBatteryLevel" else { result(FlutterMethodNotImplemented) return } self?.receiveBatteryLevel(result: result) })首先在 Xcode 中打开 Flutter 应用的 iOS 宿主部分: 启动 Xcode 选择菜单项 File > Open… 导航到包含 Flutter 应用的目录,然后选择其中的 ios 文件夹。点击 OK。 确保 Xcode 项目构建没有错误。 打开项目导航 Runner > Runner 下的 AppDelegate.m 文件。 在 application didFinishLaunchingWithOptions: 方法中创建一个 FlutterMethodChannel 并添加一个处理程序。确保使用的通道名称与 Flutter 客户端使用的一致。 #import #import "GeneratedPluginRegistrant.h" @implementation AppDelegate - (BOOL)application:(UIApplication*)application didFinishLaunchingWithOptions:(NSDictionary*)launchOptions { FlutterViewController* controller = (FlutterViewController*)self.window.rootViewController; FlutterMethodChannel* batteryChannel = [FlutterMethodChannel methodChannelWithName:@"samples.flutter.dev/battery" binaryMessenger:controller.binaryMessenger]; [batteryChannel setMethodCallHandler:^(FlutterMethodCall* call, FlutterResult result) { // This method is invoked on the UI thread. // TODO }]; [GeneratedPluginRegistrant registerWithRegistry:self]; return [super application:application didFinishLaunchingWithOptions:launchOptions]; }接下来添加使用 iOS battery API 来检索电池电量的 iOS Objective-C 代码。该代码与你在原生 iOS 应用中编写的代码完全相同。 在 AppDelegate 类中的 @end 之前添加以下方法: - (int)getBatteryLevel { UIDevice* device = UIDevice.currentDevice; device.batteryMonitoringEnabled = YES; if (device.batteryState == UIDeviceBatteryStateUnknown) { return -1; } else { return (int)(device.batteryLevel * 100); } }最后,完成前面添加的 setMethodCallHandler() 方法。你需要处理单个平台方法 getBatteryLevel(),所以在参数call 中对其进行验证。该平台方法的实现是调用上一步编写的 iOS 代码,并使用 result 参数来返回成功和错误情况下的响应。如果调用了未知方法,则报告该方法。 __weak typeof(self) weakSelf = self; [batteryChannel setMethodCallHandler:^(FlutterMethodCall* call, FlutterResult result) { // This method is invoked on the UI thread. if ([@"getBatteryLevel" isEqualToString:call.method]) { int batteryLevel = [weakSelf getBatteryLevel]; if (batteryLevel == -1) { result([FlutterError errorWithCode:@"UNAVAILABLE" message:@"Battery level not available." details:nil]); } else { result(@(batteryLevel)); } } else { result(FlutterMethodNotImplemented); } }];现在你应该可以在 iOS 中运行该应用。如果使用了 iOS 模拟器(注意它并不支持 battery API),应用则会显示 ‘battery info unavailable’。 第五步:添加 Windows 平台特定实现首先在 Visual Studio 中打开你 Flutter 应用 Windows 的 host 部分: 在你项目的目录夹下运行一次 flutter build windows 以生成 Visual Studio solution 文件。 启动 Visual Studio。 选择 Open a project or solution 导航至含有你 Flutter 应用的目录下,然后进入 build 文件夹,然后是 windows 文件夹,然后选择 batterylevel.sln 文件,点击 Open。 然后添加 platform channel 方法的 c++ 实现: 在 Solution 浏览器中展开 batterylevel > Source Files 打开 flutter_window.cpp。 首先,在文件的最顶部添加必要的引用,在 #include "flutter_window.h" 下面写上就行: #include #include #include #include #include #include #include编辑 FlutterWindow::OnCreate 方法,然后创建一个 flutter::MethodChannel 绑定 samples.flutter.dev/battery 名字: bool FlutterWindow::OnCreate() { // ... RegisterPlugins(flutter_controller_->engine()); flutter::MethodChannel channel( flutter_controller_->engine()->messenger(), "samples.flutter.dev/battery", &flutter::StandardMethodCodec::GetInstance()); channel.SetMethodCallHandler( [](const flutter::MethodCall& call, std::unique_ptr result) { // TODO }); SetChildContent(flutter_controller_->view()->GetNativeWindow()); return true; }接下来添加使用 Windows battery API 来检索电池电量的代码。该代码与你在原生 Windows 应用中编写代码别无二致。 在 flutter_window.cpp 顶部添加下面的新方法,在 #include 下面添加: static int GetBatteryLevel() { SYSTEM_POWER_STATUS status; if (GetSystemPowerStatus(&status) == 0 || status.BatteryLifePercent == 255) { return -1; } return status.BatteryLifePercent; }最后,完成 setMethodCallHandler() 方法。你可以在这里处理平台方法,getBatteryLevel(),然后可以在 call 参数中进行测试。这个平台方法调用的实现,在之前的步骤中已经完成了。如果调用了一个未知的,请报告它。 移除下面的代码: channel.SetMethodCallHandler( [](const flutter::MethodCall& call, std::unique_ptr result) { // TODO });然后替换为这个: channel.SetMethodCallHandler( [](const flutter::MethodCall& call, std::unique_ptr result) { if (call.method_name() == "getBatteryLevel") { int battery_level = GetBatteryLevel(); if (battery_level != -1) { result->Success(battery_level); } else { result->Error("UNAVAILABLE", "Battery level not available."); } } else { result->NotImplemented(); } });You should now be able to run the application on Windows. If your device doesn’t have a battery, it displays ‘Battery level not available’. Step 6: Add a Linux platform-specific implementationFor this example you need to install the upower developer headers. This is likely available from your distribution, for example with: sudo apt install libupower-glib-devStart by opening the Linux host portion of your Flutter app in the editor of your choice. The instructions below are for Visual Studio Code with the “C/C++” and “CMake” extensions installed, but can be adjusted for other IDEs. Launch Visual Studio Code. Open the linux directory inside your project. Choose Yes in the prompt asking: Would you like to configure project "linux"?. This enables C++ autocomplete. Open the file my_application.cc. First, add the necessary includes to the top of the file, just after #include dart_entrypoint_arguments, g_strfreev); g_clear_object(&self->battery_channel); G_OBJECT_CLASS(my_application_parent_class)->dispose(object); } Edit the my_application_activate method and initialize battery_channel using the channel name samples.flutter.dev/battery, just after the call to fl_register_plugins: static void my_application_activate(GApplication* application) { // ... fl_register_plugins(FL_PLUGIN_REGISTRY(self->view)); g_autoptr(FlStandardMethodCodec) codec = fl_standard_method_codec_new(); self->battery_channel = fl_method_channel_new( fl_engine_get_binary_messenger(fl_view_get_engine(view)), "samples.flutter.dev/battery", FL_METHOD_CODEC(codec)); fl_method_channel_set_method_call_handler( self->battery_channel, battery_method_call_handler, self, nullptr); gtk_widget_grab_focus(GTK_WIDGET(self->view)); }Next, add the C code that uses the Linux battery APIs to retrieve the battery level. This code is exactly the same as you would write in a native Linux application. Add the following as a new function at the top of my_application.cc just after the G_DEFINE_TYPE line: static FlMethodResponse* get_battery_level() { // Find the first available battery and report that. g_autoptr(UpClient) up_client = up_client_new(); g_autoptr(GPtrArray) devices = up_client_get_devices2(up_client); if (devices->len == 0) { return FL_METHOD_RESPONSE(fl_method_error_response_new( "UNAVAILABLE", "Device does not have a battery.", nullptr)); } UpDevice* device = (UpDevice*)(g_ptr_array_index(devices, 0)); double percentage = 0; g_object_get(device, "percentage", &percentage, nullptr); g_autoptr(FlValue) result = fl_value_new_int(static_cast(round(percentage))); return FL_METHOD_RESPONSE(fl_method_success_response_new(result)); }Finally, add the battery_method_call_handler function referenced in the earlier call to fl_method_channel_set_method_call_handler. You need to handle a single platform method, getBatteryLevel, so test for that in the method_call argument. The implementation of this function calls the Linux code written in the previous step. If an unknown method is called, report that instead. Add the following code after the get_battery_level function: static void battery_method_call_handler(FlMethodChannel* channel, FlMethodCall* method_call, gpointer user_data) { g_autoptr(FlMethodResponse) response = nullptr; if (strcmp(fl_method_call_get_name(method_call), "getBatteryLevel") == 0) { response = get_battery_level(); } else { response = FL_METHOD_RESPONSE(fl_method_not_implemented_response_new()); } g_autoptr(GError) error = nullptr; if (!fl_method_call_respond(method_call, response, &error)) { g_warning("Failed to send response: %s", error->message); } }你现在应该可以在 Windows 上运行应用了。如果你的设备没有电池的话,它会提示 ‘Battery level not available’。 通过 Pigeon 获得类型安全的通道在之前的样例中,我们使用 MethodChannel 在 host 和 client 之间进行通信,然而这并不是类型安全的。为了正确通信,调用/接收消息取决于 host 和 client 声明相同的参数和数据类型。 Pigeon 包可以用作 MethodChannel 的替代品,它将生成以结构化类型安全方式发送消息的代码。 在 Pigeon 中,消息接口在 Dart 中进行定义,然后它将生成对应的 Android 以及 iOS 的代码。更复杂的例子以及更多信息尽在 pigeon。 使用 Pigeon 消除了在主机和客户端之间匹配字符串的需要消息的名称和数据类型。它支持:嵌套类,消息转换为 API,生成异步包装代码并发送消息。生成的代码具有相当的可读性并保证在不同版本的多个客户端之间没有冲突。支持 Objective-C,Java,Kotlin 和 Swift(通过 Objective-C 互操作)语言。 Pigeon 样例Pigeon 文件: import 'package:pigeon/pigeon.dart'; class SearchRequest { final String query; SearchRequest({required this.query}); } class SearchReply { final String result; SearchReply({required this.result}); } @HostApi() abstract class Api { @async SearchReply search(SearchRequest request); }Dart 用法: import 'generated_pigeon.dart'; Future onClick() async { SearchRequest request = SearchRequest(query: 'test'); Api api = SomeApi(); SearchReply reply = await api.search(request); print('reply: ${reply.result}'); } 从 UI 代码中分离平台相关代码如果你想要在多个 Flutter 应用中使用你的平台相关代码,则将代码分离为位于主应用目录之外的平台插件会很有用。相关细节查看 Flutter Packages 的开发和提交。 将平台相关代码作为 Package 进行提交与 Flutter 生态中的其他开发者共享你的平台相关代码,可查看 提交 package。 自定义通道和编解码器除了上面提到的 MethodChannel,你还可以使用更基础的 BasicMessageChannel,它支持使用自定义的消息编解码器进行基本的异步消息传递。你还可以使用专门的 BinaryCodec、StringCodec 和 JSONMessageCodec 类,或创建自己的编解码器。 您还可以在 cloud_firestore 插件中查看自定义编解码器的示例,该插件可以序列化和反序列化比默认类型更多的类型。 通道和平台线程目标平台向 Flutter 发起 channel 调用的时候,需要在对应平台的主线程执行。同样的,在 Flutter 向目标平台发起 channel 调用的时候,需要在根 Isolate 中执行。对应平台侧的 handler 既可以在平台的主线程执行,也可以通过事件循环在后台执行。对应平台侧 handler 的返回值可以在任意线程异步执行。 提示 在 2.10 正式版中,Task Queue API 在 Android 上已经可以使用,若要在 iOS 上使用,需要切换到 master 渠道。 提示 在 Android 平台上时,平台的 main 线程有时候被叫做主线程,但是它在技术上被看作 UI 线程。被 @UiThread 注解标记的方法需要在 UI 线程上执行。在 iOS 上,这个线程被官方标记为主线程。 Using plugins and channels from background isolatesPlugins and channels can be used by any Isolate, but that Isolate has to be a root Isolate (the one created by Flutter) or registered as a background Isolate for a root Isolate. The following example shows how to register a background Isolate in order to use a plugin from a background Isolate. import 'package:flutter/services.dart'; import 'package:shared_preferences/shared_preferences.dart'; void _isolateMain(RootIsolateToken rootIsolateToken) async { BackgroundIsolateBinaryMessenger.ensureInitialized(rootIsolateToken); SharedPreferences sharedPreferences = await SharedPreferences.getInstance(); print(sharedPreferences.getBool('isDebug')); } void main() { RootIsolateToken rootIsolateToken = RootIsolateToken.instance!; Isolate.spawn(_isolateMain, rootIsolateToken); } 在后台线程中执行 channel 的 handlers要在 channel 对应的平台侧的后台中执行 handler,需要使用 Task Queue API。当前该功能仅支持在 iOS 和 Android。 对应的 Java 代码: @Override public void onAttachedToEngine(@NonNull FlutterPluginBinding binding) { BinaryMessenger messenger = binding.getBinaryMessenger(); BinaryMessenger.TaskQueue taskQueue = messenger.makeBackgroundTaskQueue(); channel = new MethodChannel( messenger, "com.example.foo", StandardMethodCodec.INSTANCE, taskQueue); channel.setMethodCallHandler(this); }Kotlin 版本: override fun onAttachedToEngine(@NonNull flutterPluginBinding: FlutterPlugin.FlutterPluginBinding) { val taskQueue = flutterPluginBinding.binaryMessenger.makeBackgroundTaskQueue() channel = MethodChannel(flutterPluginBinding.binaryMessenger, "com.example.foo", StandardMethodCodec.INSTANCE, taskQueue) channel.setMethodCallHandler(this) }Swift 版本: 提示 在 2.10 的发布中,若要在 iOS 上使用 Task Queue API,只能切换到 master 渠道。 public static func register(with registrar: FlutterPluginRegistrar) { let taskQueue = registrar.messenger.makeBackgroundTaskQueue() let channel = FlutterMethodChannel(name: "com.example.foo", binaryMessenger: registrar.messenger(), codec: FlutterStandardMethodCodec.sharedInstance, taskQueue: taskQueue) let instance = MyPlugin() registrar.addMethodCallDelegate(instance, channel: channel) }Objective-C 版本: 提示 在 2.10 的发布中,若要在 iOS 上使用 Task Queue API,只能切换到 master 渠道。 + (void)registerWithRegistrar:(NSObject*)registrar { NSObject* taskQueue = [[registrar messenger] makeBackgroundTaskQueue]; FlutterMethodChannel* channel = [FlutterMethodChannel methodChannelWithName:@"com.example.foo" binaryMessenger:[registrar messenger] codec:[FlutterStandardMethodCodec sharedInstance] taskQueue:taskQueue]; MyPlugin* instance = [[MyPlugin alloc] init]; [registrar addMethodCallDelegate:instance channel:channel]; } 跳转到 Android 中的 UI 线程为了符合通道跳转到 Android UI 线程的要求,你可能需要从后台线程跳转到 Android 的 UI 线程以执行通道的方法。在 Android 中的实现方式是:在一个叫 Looper 的 Android UI 线程里 post() 一个 Runnable。这能使得 Runnable 在下一次机会时在主线程上执行。 Java 代码: new Handler(Looper.getMainLooper()).post(new Runnable() { @Override public void run() { // Call the desired channel message here. } });Kotlin 代码: Handler(Looper.getMainLooper()).post { // Call the desired channel message here. } 跳转到 iOS 中的主线程为了符合通道跳转到 iOS 主线程的要求,您可能需要从后台线程跳转到 iOS 的主线程来执行通道方法。在iOS中,这是通过在主 dispatch queue上执行 block来实现的: Objective-C 代码: dispatch_async(dispatch_get_main_queue(), ^{ // Call the desired channel message here. });Swift 代码: DispatchQueue.main.async { // Call the desired channel message here. } |
【本文地址】
今日新闻 |
推荐新闻 |