Day621.Spring Test 常见错误 |
您所在的位置:网站首页 › spring编程常见错误50例资源 › Day621.Spring Test 常见错误 |
Day621.Spring Test 常见错误
|
Spring Test 常见错误
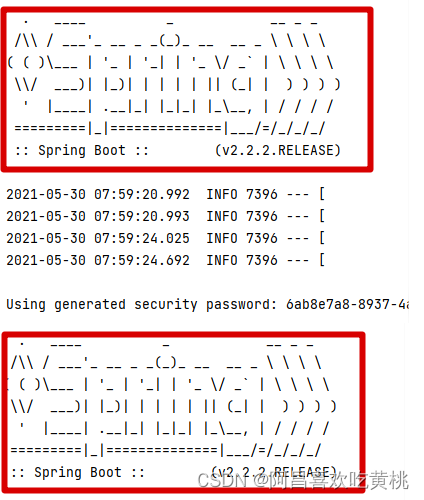
在 Spring Test 的应用上,有哪些常见错误呢? 以下举例2个错误: 一、资源文件扫描不到首先,我们来写一个 HelloWorld 版的 Spring Boot 程序以做测试备用。 先来定义一个 Controller: @RestController public class HelloController { @Autowired HelloWorldService helloWorldService; @RequestMapping(path = "hi", method = RequestMethod.GET) public String hi() throws Exception{ return helloWorldService.toString() ; }; }当访问 http://localhost:8080/hi 时,上述接口会打印自动注入的 HelloWorldService 类型的 Bean。而对于这个 Bean 的定义,我们这里使用配置文件的方式进行。 定义 HelloWorldService,具体到 HelloWorldService 的实现并非本讲的重点,所以我们可以简单实现如下: public class HelloWorldService {}定义一个 spring.xml,在这个 XML 中定义 HelloWorldServic 的 Bean,并把这个 spring.xml 文件放置在 /src/main/resources 中: 定义一个 Configuration 引入上述定义 XML,具体实现方式如下: @Configuration @ImportResource(locations = {"spring.xml"}) public class Config { }完成上述步骤后,我们就可以使用 main() 启动起来。测试这个接口,一切符合预期。那么接下来,我们来写一个测试: @SpringBootTest() class ApplicationTests { @Autowired public HelloController helloController; @Test public void testController() throws Exception { String response = helloController.hi(); Assert.notNull(response, "not null"); } }当我们运行上述测试的时候,会发现测试失败了,报错如下:
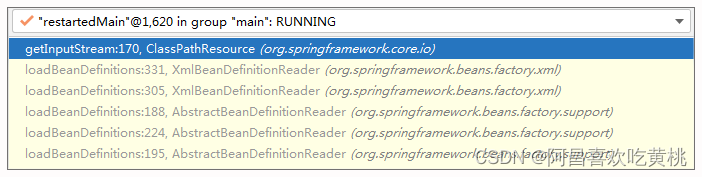
在了解这个问题的根本原因之前,我们先从调试的角度来对比下启动程序和测试加载 spring.xml 的不同之处。 启动程序加载 spring.xml首先看下调用栈: 可以看出,它最终以 ClassPathResource 形式来加载,这个资源的情况如下:
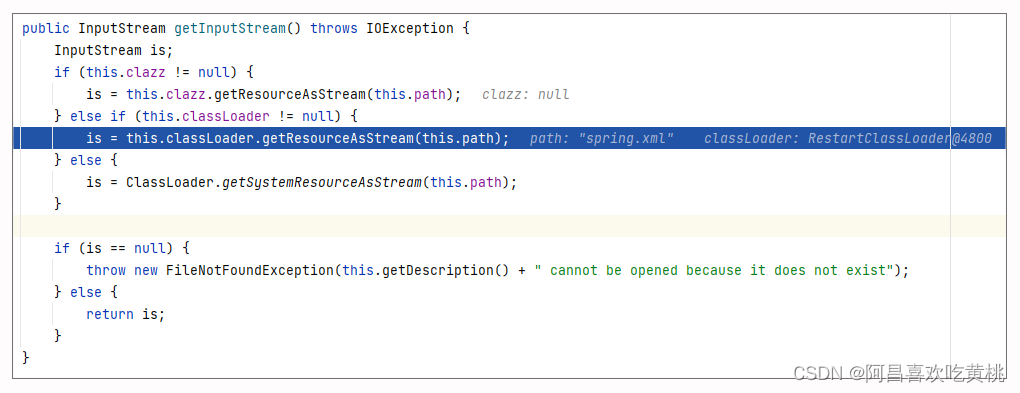
而具体到加载实现,它使用的是 ClassPathResource#getInputStream 来加载 spring.xml 文件:
从上述调用及代码实现,可以看出最终是可以加载成功的。 测试加载 spring.xml首先看下调用栈:
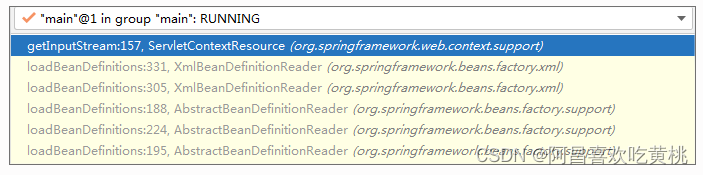
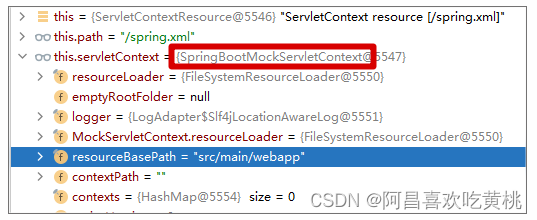
可以看出它是按 ServletContextResource 来加载的,这个资源的情况如下: 你可以继续跟踪它的加载位置相关代码,即 getResourceLocation(): protected String getResourceLocation(String path) { if (!path.startsWith("/")) { path = "/" + path; } //加上前缀:/src/main/resources String resourceLocation = this.getResourceBasePathLocation(path); if (this.exists(resourceLocation)) { return resourceLocation; } else { //{"classpath:META-INF/resources", "classpath:resources", "classpath:static", "classpath:public"}; String[] var3 = SPRING_BOOT_RESOURCE_LOCATIONS; int var4 = var3.length; for(int var5 = 0; var5 return resourceLocation; } } return super.getResourceLocation(path); } }你会发现,它尝试从下面的一些位置进行加载: classpath:META-INF/resources classpath:resources classpath:static classpath:public src/main/webapp如果你仔细看这些目录,你还会发现,这些目录都没有 spring.xml。 或许你认为源文件 src/main/resource 下面不是有一个 spring.xml 么?那上述位置中的 classpath:resources 不就能加载了么?那你肯定是忽略了一点: 当程序运行起来后,src/main/resource 下的文件最终是不带什么 resource 的。 关于这点,你可以直接查看编译后的目录(本地编译后是 target*classes* 目录),示例如下:
所以,最终我们在所有的目录中都找不到 spring.xml,并且会报错提示加载不了文件。 报错的地方位于 ServletContextResource#getInputStream 中: @Override public InputStream getInputStream() throws IOException { InputStream is = this.servletContext.getResourceAsStream(this.path); if (is == null) { throw new FileNotFoundException("Could not open " + getDescription()); } return is; }解决方案: 在加载目录上放置 spring.xml 加载目录有很多,所以修正方式也不少,我们可以建立一个 src/main/webapp,然后把 spring.xml 复制一份进去就可以了。也可以在 /src/main/resources 下面再建立一个 resources 目录,然后放置进去也可以。在 @ImportResource 使用 classpath 加载方式@Configuration //@ImportResource(locations = {"spring.xml"}) @ImportResource(locations = {"classpath:spring.xml"}) public class Config { }这里,我们可以通过 Spring 的官方文档简单了解下不同加载方式的区别,参考 官方文档 很明显,我们一般都不会使用本案例的方式(即 locations = {“spring.xml”},无任何“前缀”的方式),毕竟它已经依赖于使用的 ApplicationContext。 而 classPath 更为普适些,而一旦你按上述方式修正后,你会发现它加载的资源已经不再是 ServletContextResource,而是和应用程序一样的 ClassPathResource,这样自然可以加载到了。 所以说到底,表面上看,这个问题是关于测试的案例,但是实际上是 ImportResource 的使用问题。 不过通过这个案例,你也会明白,很多用法真的只能在某个特定场合才能工作起来,你只是比较幸运而已。 二、容易出错的 Mock有时候,我们会发现 Spring Test 运行起来非常缓慢,寻根溯源之后,你会发现主要是因为很多测试都启动了 Spring Context,示例如下:
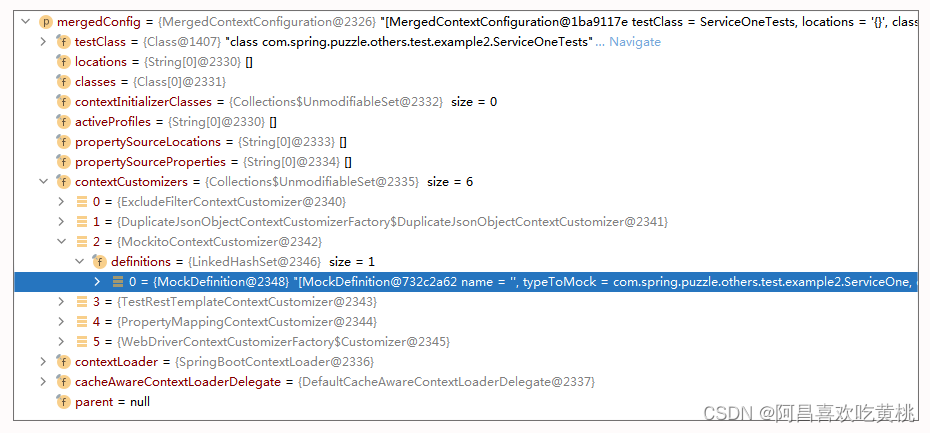
那么为什么有的测试会多次启动 Spring Context? 在具体解析这个问题之前,我们先模拟写一个案例来复现这个问题。 我们先在 Spring Boot 程序中写几个被测试类: @Service public class ServiceOne { } @Service public class ServiceTwo { }然后分别写出对应的测试类: @SpringBootTest() class ServiceOneTests { @MockBean ServiceOne serviceOne; @Test public void test(){ System.out.println(serviceOne); } } @SpringBootTest() class ServiceTwoTests { @MockBean ServiceTwo serviceTwo; @Test public void test(){ System.out.println(serviceTwo); } }在上述测试类中,我们都使用了 @MockBean。 写完这些程序,批量运行测试,你会发现 Spring Context 果然会被运行多次。 那么如何理解这个现象,是错误还是符合预期?接下来我们具体来解析下。 当我们运行一个测试的时候,正常情况是不会重新创建一个 Spring Context 的。 这是因为 Spring Test 使用了 Context 的缓存以避免重复创建 Context。那么这个缓存是怎么维护的呢? 我们可以通过 DefaultCacheAwareContextLoaderDelegate#loadContext 来看下 Context 的获取和缓存逻辑: public ApplicationContext loadContext(MergedContextConfiguration mergedContextConfiguration) { synchronized(this.contextCache) { ApplicationContext context = this.contextCache.get(mergedContextConfiguration); if (context == null) { try { context = this.loadContextInternal(mergedContextConfiguration); //省略非关键代码 this.contextCache.put(mergedContextConfiguration, context); } catch (Exception var6) { //省略非关键代码 } } else if (logger.isDebugEnabled()) { //省略非关键代码 } this.contextCache.logStatistics(); return context; } }从上述代码可以看出,缓存的 Key 是 MergedContextConfiguration。 所以一个测试要不要启动一个新的 Context,就取决于根据这个测试 Class 构建的 MergedContextConfiguration 是否相同。 而是否相同取决于它的 hashCode() 实现: public int hashCode() { int result = Arrays.hashCode(this.locations); result = 31 * result + Arrays.hashCode(this.classes); result = 31 * result + this.contextInitializerClasses.hashCode(); result = 31 * result + Arrays.hashCode(this.activeProfiles); result = 31 * result + Arrays.hashCode(this.propertySourceLocations); result = 31 * result + Arrays.hashCode(this.propertySourceProperties); result = 31 * result + this.contextCustomizers.hashCode(); result = 31 * result + (this.parent != null ? this.parent.hashCode() : 0); result = 31 * result + nullSafeClassName(this.contextLoader).hashCode(); return result; }从上述方法,你可以看出只要上述元素中的任何一个不同都会导致一个 Context 会重新创建出来。 关于这个缓存机制和 Key 的关键因素你可以参考 Spring 的官方文档,也有所提及,这里我直接给出了链接,你可以对照着去阅读。 点击获取 现在回到本案例,为什么会创建一个新的 Context 而不是复用? 根源在于两个测试的 contextCustomizers 这个元素的不同。 如果你不信的话,你可以调试并对比下。 ServiceOneTests 的 MergedContextConfiguration 示例如下:
很明显,MergedContextConfiguration(即 Context Cache 的 Key)的 ContextCustomizer 是不同的,所以 Context 没有共享起来。 而追溯到 ContextCustomizer 的创建,我们可以具体来看下。 当我们运行一个测试(testClass)时,我们会使用 MockitoContextCustomizerFactory#createContextCustomizer 来创建一个 ContextCustomizer,代码示例如下: class MockitoContextCustomizerFactory implements ContextCustomizerFactory { MockitoContextCustomizerFactory() { } public ContextCustomizer createContextCustomizer(Class testClass, List configAttributes) { DefinitionsParser parser = new DefinitionsParser(); parser.parse(testClass); return new MockitoContextCustomizer(parser.getDefinitions()); } }创建的过程是由 DefinitionsParser 来解析这个测试 Class(例如案例中的 ServiceOneTests),如果这个测试 Class 中包含了 MockBean 或者 SpyBean 标记的情况,则将对应标记的情况转化为 MockDefinition,最终添加到 ContextCustomizer 中。 解析的过程参考 DefinitionsParser#parse: void parse(Class source) { this.parseElement(source); ReflectionUtils.doWithFields(source, this::parseElement); } private void parseElement(AnnotatedElement element) { MergedAnnotations annotations = MergedAnnotations.from(element, SearchStrategy.SUPERCLASS); //MockBean 处理 annotations.stream(MockBean.class).map(MergedAnnotation::synthesize).forEach((annotation) -> { this.parseMockBeanAnnotation(annotation, element); }); //SpyBean 处理 annotations.stream(SpyBean.class).map(MergedAnnotation::synthesize).forEach((annotation) -> { this.parseSpyBeanAnnotation(annotation, element); }); } private void parseMockBeanAnnotation(MockBean annotation, AnnotatedElement element) { Set typesToMock = this.getOrDeduceTypes(element, annotation.value()); //省略非关键代码 Iterator var4 = typesToMock.iterator(); while(var4.hasNext()) { ResolvableType typeToMock = (ResolvableType)var4.next(); MockDefinition definition = new MockDefinition(annotation.name(), typeToMock, annotation.extraInterfaces(), annotation.answer(), annotation.serializable(), annotation.reset(), QualifierDefinition.forElement(element)); //添加到 DefinitionsParser#definitions this.addDefinition(element, definition, "mock"); } }那说了这么多,Spring Context 重新创建的根本原因还是在于使用了 @MockBean 且不同,从而导致构建的 MergedContextConfiguration 不同,而 MergedContextConfiguration 正是作为 Cache 的 Key,Key 不同,Context 不能被复用,所以被重新创建了。 这就是为什么在案例介绍部分,你会看到多次 Spring Context 的启动过程。而正因为“重启”,测试速度变缓慢了。 解决方案: 到这,你会发现其实这种缓慢的根源是使用了 @MockBean 带来的一个正常现象。 但是假设你非要去提速下,那么你可以尝试使用 Mockito 去手工实现类似的功能。 当然你也可以尝试使用下面的方式来解决,即把相关的 MockBean 都定义到一个地方去。例如针对本案例,修正方案如下: public class ServiceTests { @MockBean ServiceOne serviceOne; @MockBean ServiceTwo serviceTwo; } @SpringBootTest() class ServiceOneTests extends ServiceTests{ @Test public void test(){ System.out.println(serviceOne); } } @SpringBootTest() class ServiceTwoTests extends ServiceTests{ @Test public void test(){ System.out.println(serviceTwo); } } |


 具体到实现,它最终使用的是 MockServletContext#getResourceAsStream 来加载文件:
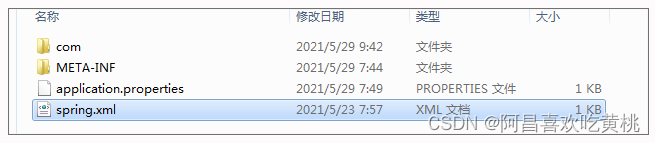

 ServiceTwoTests 的 MergedContextConfiguration 示例如下:
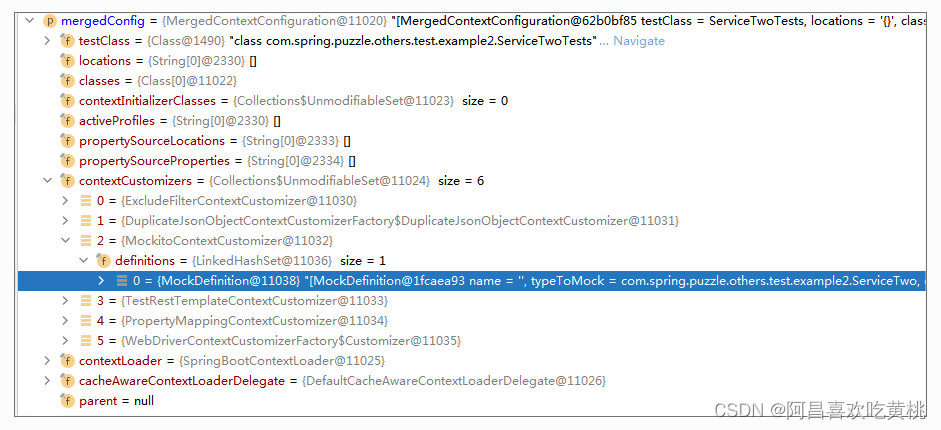
【本文地址】
今日新闻 |
推荐新闻 |