spring |
您所在的位置:网站首页 › springcloud配置中心作用 › spring |
spring
|
org.springframework.cloud
spring-cloud-dependencies
Finchley.SR3
pom
import
org.springframework.cloud
spring-cloud-starter-config
org.springframework.cloud
spring-cloud-config-server
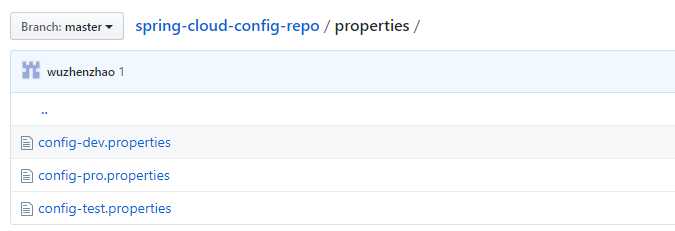
2.启动类注解(@EnableConfigServer) @SpringBootApplication @EnableConfigServer public class App { private final static Logger log = LoggerFactory.getLogger(App.class); public static void main(String[] args) { SpringApplication.run(App.class, args); log.info("服务启动成功"); } }3.application.properties 文件配置 server.port = 8888 spring.application.name=config# 选择的同步工具 spring.profiles.active=git # git地址 spring.cloud.config.server.git.uri=https://github.com/wuzhenzhao/spring-cloud-config-repo.git # 搜索目录 spring.cloud.config.server.git.search-paths=properties # git仓库default-label默认值是master spring.cloud.config.server.git.default-label=master如果仓库是私有的还需要配置如下: spring.cloud.config.server.git.username= spring.cloud.config.server.git.password=github 上有如下3个环境的配置文件,内容分别是foo=hello-dev / foo=hello-pro / foo=hello-test
就这样完成了简单的配置,启动程序,如果想获取开发配置,访问http://localhost:8888/config/dev可以读取到config-dev.properties的配置内容。请求配置的参数通过路径参数设置。 完成了这些准备工作之后,我们就可以通过浏览器、 POSTMAN或CURL等工具直接来访问我们的配置内容了。访问配置信息的URL与配置文件的映射关系如下所示: /{ application } / {profile} [/{label}] /{ application }-{profile}. yml /{ label }/{ application }-{profile}.yml /{ application }-{profile}.properties /{ label }/{ application }-{profile}.properties上面的 url 会映射 {application}-{profile} .properties 对应的配置文件,其中 {label} 对应Git上不同的分支,默认为 master 。我们可以尝试构造不同的 url 来访问不同的配置内容, 例如:http://localhost:8888/{applicationName}/{profile}/{label} , label分支,不传的话默认master。并获得如下返回信息:
同时, 我们可以看到 config-server 的控制台中还输出了下面的内容,配置服务器在从 Git 中获取配置信息后, 会存储 一 份在 config-server 的文件系统中, 实质上config-server 是通过 git clone 命令将配置内容复制了一 份在本地存储, 然后读取这些内容并返回给微服务应用进行加载。config-server 通过 Git 在本地仓库暂存,可以有效防止当 Git 仓库出现故障而引起无法加载配置信息的情况。
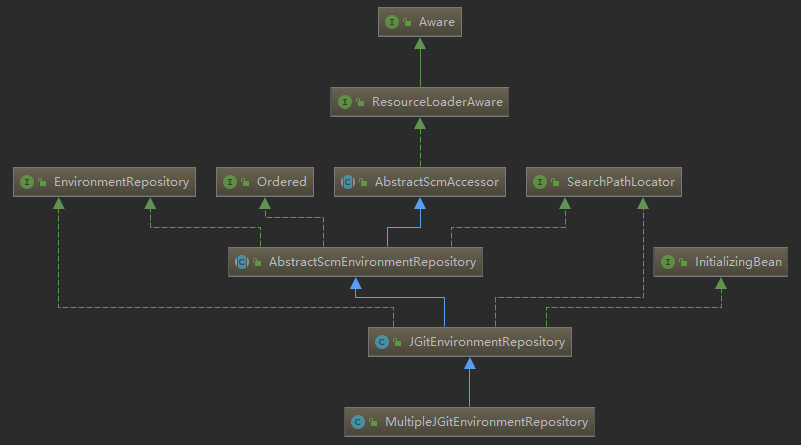
1.依赖管理(.pom) org.springframework.cloud spring-cloud-dependencies Finchley.SR3 pom import org.springframework.cloud spring-cloud-starter-config2.bootstrap.properties 配置 server.port = 8889 spring.application.name=config spring.cloud.config.label=master spring.cloud.config.profile=test spring.cloud.config.uri=http://localhost:8888/3.测试类 @RestController public class TestRestController { @Value("${foo}") String foo; @RequestMapping(value = "/hello") public String hello(){ return foo; } }4.启动类注解 @EnableConfigServer @Target({ElementType.TYPE}) @Retention(RetentionPolicy.RUNTIME) @Documented @Import({ConfigServerConfiguration.class}) public @interface EnableConfigServer { }项目启动后访问测试类的接口,可以根据配置文件中的spring.cloud.config.profile所配置的环境获取到不同的值。 服务端源码详解:注解 EnableConfigServer 可以开启应用服务对配置中心的支持。当开启之后,配置服务器就会在启动时进行自动配置。通过该注解寻找到如下配置。 @Configuration public class ConfigServerConfiguration { public ConfigServerConfiguration() { } @Bean public ConfigServerConfiguration.Marker enableConfigServerMarker() { return new ConfigServerConfiguration.Marker(); } class Marker { Marker() { } } }可以看到好像没有继续前进的入口了,仅仅是注入了这个Marker类嘛?通过寻找我们可以发现该类唯一被引用的地方,就是如下类。 @Configuration @ConditionalOnBean({Marker.class}) @EnableConfigurationProperties({ConfigServerProperties.class}) @Import({EnvironmentRepositoryConfiguration.class, CompositeConfiguration.class, ResourceRepositoryConfiguration.class, ConfigServerEncryptionConfiguration.class, ConfigServerMvcConfiguration.class}) public class ConfigServerAutoConfiguration { public ConfigServerAutoConfiguration() { } }@ConditionalOnBean(Marker.class)表示当装配了ConfigServerConfiguration.Marker的实例时才会执行ConfigServerAutoConfiguration的处理。 这里又另外引入了5个配置类。 EnvironmentRepositoryConfiguration: 环境变量存储相关的配置类 CompositeConfiguration:组合方式的环境仓库配置类 ResourceRepositoryConfiguration:资源仓库相关的配置类 ConfigServerEncryptionConfiguration:加密断点相关的配置类 ConfigServerMvcConfiguration:对外暴露的MVC端点控制器的配置类, 对于服务端来说,其基本职责就是能够将具体存储中的配置信息先拿到,然后提供出 API 供客户端来调用。下面从ConfigServerAutoConfiguration 中 import的这些配置类来具体看下实现。 重点是 EnvironmentRepositoryConfiguration 类。 @Configuration @EnableConfigurationProperties({ SvnKitEnvironmentProperties.class, JdbcEnvironmentProperties.class, NativeEnvironmentProperties.class, VaultEnvironmentProperties.class}) @Import({CompositeRepositoryConfiguration.class, JdbcRepositoryConfiguration.class, VaultRepositoryConfiguration.class, SvnRepositoryConfiguration.class, NativeRepositoryConfiguration.class, GitRepositoryConfiguration.class, DefaultRepositoryConfiguration.class}) public class EnvironmentRepositoryConfiguration { ....... }这里的@Import又引入了7种配置类,会发现其实刚好对应config server的几种实现方式git的实现方式使用的配置类就是GitRepositoryConfiguration。以GitRepositoryConfiguration的为例分析。 @Configuration @Profile({"git"}) class GitRepositoryConfiguration extends DefaultRepositoryConfiguration { GitRepositoryConfiguration() { } }GitRepositoryConfiguration 集成了 DefaultRepositoryConfiguration,这也说明了 Spring Cloud Config 默认使用的是Git。不同的配置类实现都会被标注一个@Profile,可以通过这个来激活相应的配置类;具体做法是在配置服务端的 application.properties(application.yml) 中来指定: spring.profile.active=gitDefaultRepositoryConfiguration 的 ConditionalOnMissingBean 可以知道,如果上下文中没有 EnvironmentRepository,那么就使用 DefaultRepositoryConfiguration。最后DefaultRepositoryConfiguration是封装了一个 MultipleJGitEnvironmentRepository 这个bean。 @Configuration @ConditionalOnMissingBean( value = {EnvironmentRepository.class}, search = SearchStrategy.CURRENT ) class DefaultRepositoryConfiguration { @Autowired private ConfigurableEnvironment environment; @Autowired private ConfigServerProperties server; @Autowired( required = false ) private TransportConfigCallback customTransportConfigCallback; DefaultRepositoryConfiguration() { } @Bean public MultipleJGitEnvironmentRepository defaultEnvironmentRepository( MultipleJGitEnvironmentRepositoryFactory gitEnvironmentRepositoryFactory, MultipleJGitEnvironmentProperties environmentProperties) throws Exception { return gitEnvironmentRepositoryFactory.build(environmentProperties); } }我们可以先来看一下 MultipleJGitEnvironmentRepository 类的类图:
这里我们可以发现 MultipleJGitEnvironmentRepository 实现了 InitializingBean 接口,那么在配置加载完以后一定要调用 afterPropertiesSet 方法,我们来看一下具体都做了什么: public synchronized void afterPropertiesSet() throws Exception { Assert.state(this.getUri() != null, "You need to configure a uri for the git repository."); this.initialize(); if (this.cloneOnStart) { this.initClonedRepository(); } }从源码中我们看到,首先会将配置从git上clone到本地,然后再进行其他的操作。接着就本地的git仓库中获取指定的数据了。 MultipleJGitEnvironmentRepository 的顶层接口是 EnvironmentRepository ,当然其他的实现也都是实现了这个接口的。另外一个需要关注的是 SearchPathLocator。EnvironmentRepository:定义了获取指定应用服务环境信息的方法,返回一个Enviroment SearchPathLocator 中有一个内部类 Locations ,Locdations中定义了应用服务配置存储信息。 public interface EnvironmentRepository { Environment findOne(String application, String profile, String label); }AbstractScmEnvironmentRepository 实现了 AbstractScmAccessor 和 EnvironmentRepository ,主要就是EnvironmentRepository 中 findOne 的实现: public synchronized Environment findOne(String application, String profile, String label) { //新建了一个本地仓库作为代理仓库来使用 NativeEnvironmentRepository delegate = new NativeEnvironmentRepository(this.getEnvironment(), new NativeEnvironmentProperties()); //获取本地仓库中指定应用的位置 Locations locations = this.getLocations(application, profile, label); delegate.setSearchLocations(locations.getLocations()); //根据这个路径搜索应用服务的配置信息 Environment result = delegate.findOne(application, profile, ""); result.setVersion(locations.getVersion()); result.setLabel(label); return this.cleaner.clean(result, this.getWorkingDirectory().toURI().toString(), this.getUri()); }getLocations 是一个模板方法,Config Server中提供了三种实现:
以 git 方式为例 最后会调到 JGitEnvironmentRepository#getLocations 方法: public synchronized Locations getLocations(String application, String profile, String label) { if (label == null) { label = this.defaultLabel; } // 获取最新的版本号 String version = this.refresh(label); // 根据最新的版本号返回 Locations 定位到资源的搜索路径 return new Locations(application, profile, label, version, this.getSearchLocations(this.getWorkingDirectory(), application, profile, label)); }refresh 方法做的作用就是刷新本地仓库的配置状态,这样就能保证每次都能拉取到最新的配置信息。下面来分析这个方法。 public String refresh(String label) { Git git = null; String var20; try { // 创建一个git客户端 git = this.createGitClient(); // 是否需要执行 git pull if (this.shouldPull(git)) { FetchResult fetchStatus = this.fetch(git, label); if (this.deleteUntrackedBranches && fetchStatus != null) { this.deleteUntrackedLocalBranches(fetchStatus.getTrackingRefUpdates(), git); } // 获取后checkout,这样我们就可以获得任何新的分支、tag等。 this.checkout(git, label); this.tryMerge(git, label); } else { // 没有什么要更新,所以只是checkout和merge。 // 合并是因为远程分支以前可能已经更新过 this.checkout(git, label); this.tryMerge(git, label); } // 返回当前的版本 var20 = git.getRepository().findRef("HEAD").getObjectId().getName(); } catch (RefNotFoundException var15) { throw new NoSuchLabelException("No such label: " + label, var15); } catch (NoRemoteRepositoryException var16) { throw new NoSuchRepositoryException("No such repository: " + this.getUri(), var16); } catch (GitAPIException var17) { throw new NoSuchRepositoryException("Cannot clone or checkout repository: " + this.getUri(), var17); } catch (Exception var18) { throw new IllegalStateException("Cannot load environment", var18); } finally { try { if (git != null) { git.close(); } } catch (Exception var14) { this.logger.warn("Could not close git repository", var14); } } return var20; }这个里面基本就是通过git客户端的一些操作。先是检查远程仓库的状态,然后判断本地仓库是否要执行刷新操作。如果有状态更新,比如新的提交时,Git客户端就会执行fetch,然后再进行merge,更新到本地仓库。最终是装配一个MultipleJGitEnvironmentRepository的bean,实际每种配置类的实现的最终都是装配一个EnvironmentRepository的子类,可以认为,有一个地方最终会引用到EnvironmentRepository的bean,在ConfigServerAutoConfiguration类中曾经导入了ConfigServerMvcConfiguration 类,而这个类正是向外暴露出端口供客户端访问的配置,在里面组装了两个的 Controller: @Bean public EnvironmentController environmentController(EnvironmentRepository envRepository, ConfigServerProperties server) { EnvironmentController controller = new EnvironmentController(this.encrypted(envRepository, server), this.objectMapper); controller.setStripDocumentFromYaml(server.isStripDocumentFromYaml()); controller.setAcceptEmpty(server.isAcceptEmpty()); return controller; } @Bean @ConditionalOnBean({ResourceRepository.class}) public ResourceController resourceController(ResourceRepository repository, EnvironmentRepository envRepository, ConfigServerProperties server) { ResourceController controller = new ResourceController(repository, this.encrypted(envRepository, server)); return controller; }而这两个应该是客户端获取服务端配置的入口,以 EnvironmentController 为例查看代码如下。 @RequestMapping({"/{name}/{profiles}/{label:.*}"}) public Environment labelled(@PathVariable String name, @PathVariable String profiles, @PathVariable String label) { if (name != null && name.contains("(_)")) { name = name.replace("(_)", "/"); } if (label != null && label.contains("(_)")) { label = label.replace("(_)", "/"); } Environment environment = this.repository.findOne(name, profiles, label); if (this.acceptEmpty || environment != null && !environment.getPropertySources().isEmpty()) { return environment; } else { throw new EnvironmentNotFoundException("Profile Not found"); } }注意这里的EnvironmentController#repository属性就是GitRepositoryConfiguration实例化的MultipleJGitEnvironmentRepository,如果是别的实现方式就是别的EnvironmentRepository。可以看出”/{name}/{profiles}/{label:.*}”路径参数正好与我们的请求方式相对应,因此Config Server是通过建立一个RestController来接收读取配置请求的,然后使用EnvironmentRepository来进行配置查询,最后返回一个这个对象的JSON。 public class Environment { private String name; private String[] profiles; private String label; private List propertySources; private String version; private String state; ......... }通过访问 http://localhost:8888/config/pro/master 会得到信息如下,而这个信息正是 Environment 类 { "name":"config", "profiles":["pro"], "label":"master", "version":"e6a0ce237a9f9e05608e5c276a9365f0fdd67ed6", "state":null, "propertySources":[{ "name":"https://github.com/wuzhenzhao/spring-cloud-config-repo.git/properties/config-pro.properties", "source":{"foo":"hello-pro"} }] } SVN仓库配置:Config Server除了支持Git仓库之外, 也能 使用SYN仓库, 只需要做如下配置。 在 pom.xml中引入SYN的依赖配置,让ConfigServer拥有读取SYN内容的能力: org.tmatesoft.svnkit svnkit 1.8.10在application.properties中使用SVN的配置属性来指定SVN服务器的位置, 以及访问的账户名与密码: spring.cloud.config.server.svn.uri=svn://localhost:443/wuzz/config-repo spring.cloud.config.server.svn.username = username spring.cloud.config.server.svn.password = password通过上面的配置修改,ConfigServer就可以使用SVN作为仓库来存储配置文件了, 而对于客户端来说, 这个过程是透明的, 所以不需要做任何变动。 本地仓库:在使用了Git或SVN仓库之后, 文件都会在ConfigServer的本地文件系统中存储一 份,这点上面也体现了。这 些文 件默认会被存 储于以 config-repo 为前缀的临 时 目录中, 比如名为/tmp/config-repo- |


【本文地址】
今日新闻 |
推荐新闻 |