Android中级――滑动分析 |
您所在的位置:网站首页 › scrollby和scrollto › Android中级――滑动分析 |
Android中级――滑动分析
|
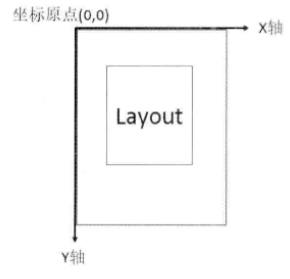
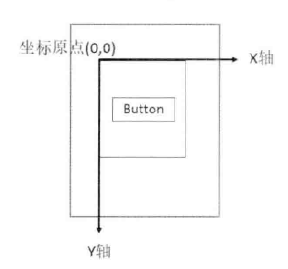
Srcoll Android坐标系视图坐标系常见方法实现滑动layout()offsetLeftAndRight()和offsetTopAndBottom()LayoutParamsscrollTo()与scrollBy()ScrollerVierDragHepler Android坐标系 将屏幕左上角的顶点作为Android坐标系的原点,向右为X轴正方向,向下为Y轴正方向
可通过如下方式获取控件在Android坐标系的(x, y)坐标 int[] location = new int[2]; getLocationOnScreen(location);或通过 @Override public boolean onTouchEvent(MotionEvent event) { int x = (int) event.getRawX(); int y = (int) event.getRawY(); } 视图坐标系描述子视图在父视图中的位置关系,将父视图左上角作为坐标系原点
View中获取坐标的方法有 getTop():View顶边到其父布局顶边的距离getLeft():View左边到其父布局左边的距离getTop():View右边到其父布局左边的距离getTop():View底边到其父布局顶边的距离
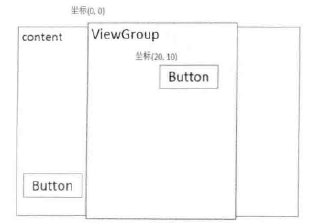
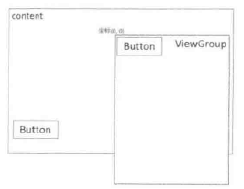
MotionEvent中获取坐标的方法有 getX():点击事件距离控件左边的距离,即视图坐标getX():点击事件距离控件顶边的距离,即视图坐标getX():点击事件距离屏幕左边的距离,即绝对坐标getX():点击事件距离控件顶边的距离,即绝对坐标 实现滑动基本思想是:当触摸View时记下坐标,当手指移动时记下移动后的坐标,从而获取偏移量修改View的坐标,不断重复实现滑动 layout()布局如下 在View移动时计算偏移量,并加到layout()方法中(若使用绝对坐标,每次都需重新设置初始坐标) public class MyView extends View { private static final String TAG = MyView.class.getSimpleName(); private int lastX; private int lastY; public MyView(Context context) { this(context, null); } public MyView(Context context, AttributeSet attrs) { this(context, attrs, 0); } public MyView(Context context, AttributeSet attrs, int defStyleAttr) { this(context, attrs, defStyleAttr, 0); } public MyView(Context context, @Nullable AttributeSet attrs, int defStyleAttr, int defStyleRes) { super(context, attrs, defStyleAttr, defStyleRes); } @Override public boolean onTouchEvent(MotionEvent event) { int x = (int) event.getX(); int y = (int) event.getY(); /*int x = (int) event.getRawX(); int y = (int) event.getRawY();*/ switch (event.getAction()) { case MotionEvent.ACTION_DOWN: lastX = x; lastY = y; break; case MotionEvent.ACTION_MOVE: int offsetX = x - lastX; int offsetY = y - lastY; layout(getLeft() + offsetX, getTop() + offsetY, getRight() + offsetX, getBottom() + offsetY); /*lastX = x; lastY = y;*/ break; } return true; } } offsetLeftAndRight()和offsetTopAndBottom()这两个方法只需传入偏移量,效果与Layout()一样 offsetLeftAndRight(offsetX); offsetTopAndBottom(offsetY); LayoutParams使用LayoutParams修改Margin加上偏移量,效果同上 LinearLayout.LayoutParams layoutParams = (LinearLayout.LayoutParams) getLayoutParams(); layoutParams.leftMargin = getLeft() + offsetX; layoutParams.topMargin = getTop() + offsetY; setLayoutParams(layoutParams);如上,获取LayoutParams时需要根据父布局的类型,或通过ViewGroup.MarginLayoutParams,这样就无需考虑父布局 ViewGroup.MarginLayoutParams layoutParams = (ViewGroup.MarginLayoutParams) getLayoutParams(); layoutParams.leftMargin = getLeft() + offsetX; layoutParams.topMargin = getTop() + offsetY; scrollTo()与scrollBy() scrollTo(x, y) 表示移动到坐标点(x, y)scrollBy(dx, dy) 表示移动的增量为 dx、dy但上面方法移动对象是控件的content 对于ViewGroup,content是其所有子View对于View,content是其内容(如TextView中的文本)故如果要移动View,应该要调用其父类的scrollBy() ((View) getParent()).scrollBy(offsetX, offsetY);但是如上无法得到想要的结果,原因是scrollBy()移动的是屏幕的可视区域 如上,后面的矩形为画布,中间的矩形则为屏幕的可视区域,若调用scrollBy(20,10),则结果为可视区域向右下方移动(而对于Button则是向左上方移动),如下图
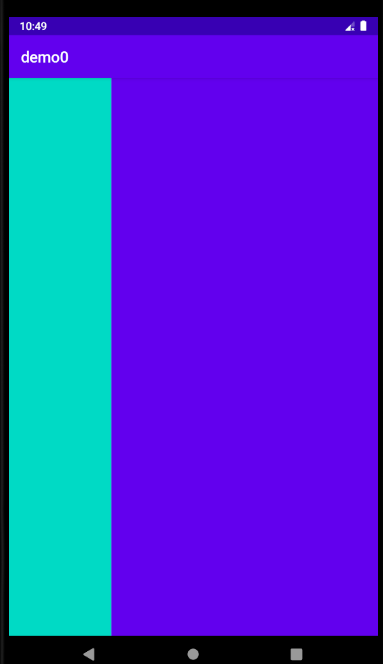
故在传入参数时应设置为负数才会使控件的content向正方向移动 ((View) getParent()).scrollBy(-offsetX, -offsetY);同理scrollTo()也是如此 Scroller 若在点击事件中使用scrollBy()或scrollTo(),其会在瞬间完成而ACTION_MOVE中会不断获取偏移量从而形成连续移动效果Scroller的出现就是为了实现平滑移动,原理也是通过不断的偏移 public class MyView extends View { private static final String TAG = MyView.class.getSimpleName(); private int lastX; private int lastY; private Scroller mScroller; public MyView(Context context) { this(context, null); } public MyView(Context context, AttributeSet attrs) { this(context, attrs, 0); } public MyView(Context context, AttributeSet attrs, int defStyleAttr) { this(context, attrs, defStyleAttr, 0); } public MyView(Context context, @Nullable AttributeSet attrs, int defStyleAttr, int defStyleRes) { super(context, attrs, defStyleAttr, defStyleRes); mScroller = new Scroller(context); } @Override public boolean onTouchEvent(MotionEvent event) { int x = (int) event.getX(); int y = (int) event.getY(); switch (event.getAction()) { case MotionEvent.ACTION_DOWN: lastX = x; lastY = y; break; case MotionEvent.ACTION_MOVE: int offsetX = x - lastX; int offsetY = y - lastY; ((View) getParent()).scrollBy(-offsetX, -offsetY); break; case MotionEvent.ACTION_UP: View viewGroup = (View) getParent(); mScroller.startScroll( viewGroup.getScrollX(), viewGroup.getScrollY(), -viewGroup.getScrollX(), -viewGroup.getScrollY()); invalidate(); break; } return true; } @Override public void computeScroll() { super.computeScroll(); if (mScroller.computeScrollOffset()) { //判断是否完成滑动 ((View) getParent()).scrollTo( mScroller.getCurrX(), mScroller.getCurrY()); invalidate(); //computeScroll()会在draw()方法中调用,通过不断重绘实现平滑移动 } } }如上实现在ACTION_UP时,将控件回归原位,利用Scroller和computeScroll(),通过不断获取当前滚动值,调用scrollTo(),实现平滑移动 VierDragHepler如下实现在ViewGroup中,将其2个子View分为Menu和Main,当侧滑拖动Main时显示Menu public class DragViewGroup extends FrameLayout { private ViewDragHelper mViewDragHelper; private View mMenuView, mMainView; private int mWidth; public DragViewGroup(Context context) { this(context, null); } public DragViewGroup(Context context, AttributeSet attrs) { this(context, attrs, 0); } public DragViewGroup(Context context, AttributeSet attrs, int defStyleAttr) { super(context, attrs, defStyleAttr); initView(); } private void initView() { mViewDragHelper = ViewDragHelper.create(this, callback); } @Override protected void onFinishInflate() { super.onFinishInflate(); mMenuView = getChildAt(0); //将传入的View分为Menu和Main mMainView = getChildAt(1); } @Override protected void onSizeChanged(int w, int h, int oldw, int oldh) { super.onSizeChanged(w, h, oldw, oldh); mWidth = mMenuView.getMeasuredWidth(); //获取Menu的宽度,暂未使用 } @Override public boolean onInterceptTouchEvent(MotionEvent ev) { //将事件拦截传给ViewDragHelper return mViewDragHelper.shouldInterceptTouchEvent(ev); } @Override public boolean onTouchEvent(MotionEvent event) { //将触摸事件传给ViewDragHelper mViewDragHelper.processTouchEvent(event); return true; } private ViewDragHelper.Callback callback = new ViewDragHelper.Callback() { @Override public boolean tryCaptureView(View child, int pointerId) { //指示哪个View可以被拖动,为true则所有View都可 return mMainView == child; } //是否需要水平滑动,为0则不需要,当不需要处理padding时可直接返回left @Override public int clampViewPositionHorizontal(View child, int left, int dx) { return left; } //是否需要垂直滑动,同上 @Override public int clampViewPositionVertical(View child, int top, int dy) { return 0; } //拖动结束后调用 @Override public void onViewReleased(View releasedChild, float xvel, float yvel) { super.onViewReleased(releasedChild, xvel, yvel); if (mMainView.getLeft() < 500) { //滑动距离不超过500,菜单将回滚 mViewDragHelper.smoothSlideViewTo(mMainView, 0, 0); } else { //打开菜单 mViewDragHelper.smoothSlideViewTo(mMainView, 300, 0); } ViewCompat.postInvalidateOnAnimation(DragViewGroup.this); } }; @Override public void computeScroll() { if (mViewDragHelper.continueSettling(true)) { ViewCompat.postInvalidateOnAnimation(this); } } }布局如下,在内部放置2个不同颜色全屏的TextView 对其进行侧滑,效果如图
|
 可通过如下方式获取控件在视图坐标系的(x, y)坐标
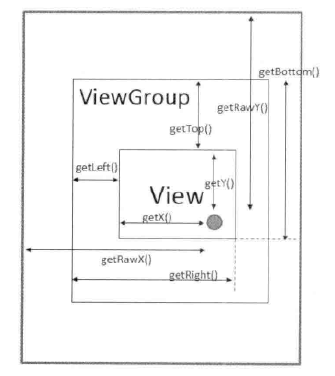
【本文地址】