【RabbitMQ |
您所在的位置:网站首页 › rabbitmq源码解析 › 【RabbitMQ |
【RabbitMQ
|
文章目录
1. 读取注解配置1.1 后置处理器的核心方法1.2 读取注解信息
2. 创建消费者线程2.1 创建MethodRabbitListenerEndpoint2.2 端点的注册2.3 监听容器的创建2.4 监听容器的启动2.5 总结
3. 为什么将SimpleMessageListenerContainer对象加入到Spring容器便可以监听队列?
为何配置
@RabbitListener注解,对应的方法便可以消费MQ的消息?
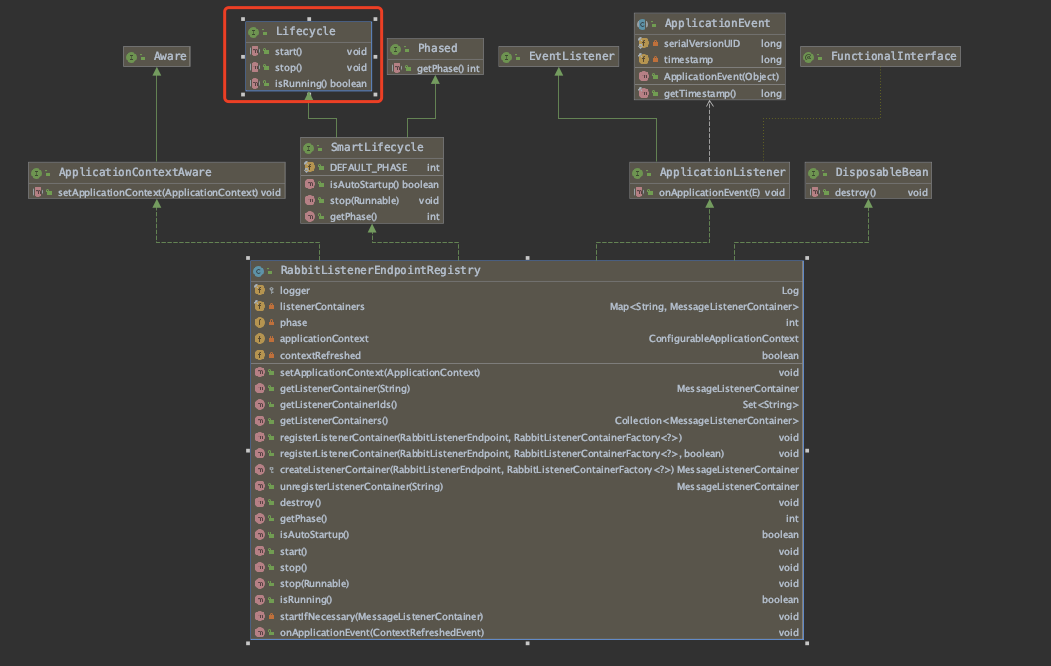
核心思想: 读取注解的配置;根据配置去监听queue的信息(即创建消费者线程)。 1. 读取注解配置读取注解配置时机:创建bean对象,执行BeanPostProcessor的postProcessAfterInitialization方法时,将bean对象及其方法的注解配置读取到缓存中。 //bean执行BeanPostProcessor的方法 public Object applyBeanPostProcessorsAfterInitialization(Object existingBean, String beanName) throws BeansException { Object result = existingBean; for (BeanPostProcessor processor: getBeanPostProcessors()) { Object current = processor.postProcessAfterInitialization(result, beanName); if (current == null) { return result; } result = current; } return result; }会被org.springframework.amqp.rabbit.annotation.RabbitListenerAnnotationBeanPostProcessor处理,解析注解配置。 RabbitListenerAnnotationBeanPostProcessor类被@EnableRabbit注解加入到本项目的Spring容器中,所以若想MQ的注解生效,项目启动类需要使用@EnableRabbit注解。 注:RabbitListenerAnnotationBeanPostProcessor处理后并不会生成代理对象,这个处理器仅仅是解析注解。 1.1 后置处理器的核心方法 public Object postProcessAfterInitialization(final Object bean, final String beanName) throws BeansException { //获取到目标对象(作为Map缓存的key) Class < ?>targetClass = AopUtils.getTargetClass(bean); //在Map中若取不到,那么执行buildMetadata()方法生成。 final TypeMetadata metadata = this.typeCache.computeIfAbsent(targetClass, this: :buildMetadata); //第一层是获取到ListenerMethod对象(见下文) for (ListenerMethod lm: metadata.listenerMethods) { //一个方法上可能有多个注解,于是循环多个注解配置。 for (RabbitListener rabbitListener: lm.annotations) { processAmqpListener(rabbitListener, lm.method, bean, beanName); } } if (metadata.handlerMethods.length > 0) { processMultiMethodListeners(metadata.classAnnotations, metadata.handlerMethods, bean, beanName); } return bean; } 1.2 读取注解信息 private TypeMetadata buildMetadata(Class targetClass) { //读取目标类的注解 Collection classLevelListeners = findListenerAnnotations(targetClass); final boolean hasClassLevelListeners = classLevelListeners.size() > 0; final List methods = new ArrayList (); final List multiMethods = new ArrayList (); //遍历该类上满足USER_DECLARED_METHODS条件的方法(用户定义的方法) ReflectionUtils.doWithMethods(targetClass, method - >{ //解析方法上的注解 Collection listenerAnnotations = findListenerAnnotations(method); if (listenerAnnotations.size() > 0) { //放入到List集合中 methods.add(new ListenerMethod(method, listenerAnnotations.toArray(new RabbitListener[listenerAnnotations.size()]))); } //若是类上有@RabbitListener注解,那么取解析@RabbitHandler注解 if (hasClassLevelListeners) { RabbitHandler rabbitHandler = AnnotationUtils.findAnnotation(method, RabbitHandler.class); if (rabbitHandler != null) { multiMethods.add(method); } } }, ReflectionUtils.USER_DECLARED_METHODS); if (methods.isEmpty() && multiMethods.isEmpty()) { return TypeMetadata.EMPTY; } //返回对象 return new TypeMetadata(methods.toArray(new ListenerMethod[methods.size()]), multiMethods.toArray(new Method[multiMethods.size()]), classLevelListeners.toArray(new RabbitListener[classLevelListeners.size()]));而TypeMetadata实际上是多个集合的对象 private static class TypeMetadata { //方法上带有@RabbitListener final ListenerMethod[] listenerMethods; // NOSONAR //方法上带有@RabbitHandler final Method[] handlerMethods; // NOSONAR //类上带有@RabbitListener final RabbitListener[] classAnnotations; // NOSONAR static final TypeMetadata EMPTY = new TypeMetadata(); .... }而ListenerMethod对象就是保存了Method对象和上面的注解配置。 private static class ListenerMethod { final Method method; // NOSONAR final RabbitListener[] annotations; // NOSONAR ... } 2. 创建消费者线程 2.1 创建MethodRabbitListenerEndpointMethodRabbitListenerEndpoint保存了方法信息和注解配置信息的对象(可以看做临时对象) protected void processAmqpListener(RabbitListener rabbitListener, Method method, Object bean, String beanName) { //检查是否是JDK代理,若是JDK代理是否实现接口。 Method methodToUse = checkProxy(method, bean); //创建端点对象 MethodRabbitListenerEndpoint endpoint = new MethodRabbitListenerEndpoint(); //填充方法对象 endpoint.setMethod(methodToUse); //填充端点对象 processListener(endpoint, rabbitListener, bean, methodToUse, beanName); }注意,registrar在属性上new RabbitListenerEndpointRegistrar()创建的。 protected void processListener(MethodRabbitListenerEndpoint endpoint, RabbitListener rabbitListener, Object bean, Object adminTarget, String beanName) { endpoint.setBean(bean); ...//填充配置的set方法 resolveAdmin(endpoint, rabbitListener, adminTarget); RabbitListenerContainerFactory < ?>factory = resolveContainerFactory(rabbitListener, adminTarget, beanName); //端点信息进行注册 this.registrar.registerEndpoint(endpoint, factory); } 2.2 端点的注册对应的类RabbitListenerEndpointRegistrar public void registerEndpoint(RabbitListenerEndpoint endpoint, @Nullable RabbitListenerContainerFactory < ?>factory) { Assert.notNull(endpoint, "Endpoint must be set"); Assert.hasText(endpoint.getId(), "Endpoint id must be set"); Assert.state(!this.startImmediately || this.endpointRegistry != null, "No registry available"); // Factory may be null, we defer the resolution right before actually creating the container AmqpListenerEndpointDescriptor descriptor = new AmqpListenerEndpointDescriptor(endpoint, factory); synchronized(this.endpointDescriptors) { //是否注册的时候立即启动? if (this.startImmediately) { // Register and start immediately this.endpointRegistry.registerListenerContainer(descriptor.endpoint, // NOSONAR never null resolveContainerFactory(descriptor), true); } else { //不是立即启动,那么放入到List中 this.endpointDescriptors.add(descriptor); } } }注意:RabbitListenerEndpointRegistrar实现了InitializingBean接口,在bean创建中会执行回调方法afterPropertiesSet()。SpringBoot2.x基础篇—Bean的生命周期方法(与容器耦合) 上面说到,注册时因为不是立即启动,将descriptor存放到了List中,而是回调方法中统一进行处理。 @Override public void afterPropertiesSet() { registerAllEndpoints(); } //注册所有端点 protected void registerAllEndpoints() { Assert.state(this.endpointRegistry != null, "No registry available"); synchronized(this.endpointDescriptors) { for (AmqpListenerEndpointDescriptor descriptor: this.endpointDescriptors) { //创建监听容器 this.endpointRegistry.registerListenerContainer( // NOSONAR never null descriptor.endpoint, resolveContainerFactory(descriptor)); } this.startImmediately = true; // trigger immediate startup } } 2.3 监听容器的创建对象信息:RabbitListenerEndpointRegistry public void registerListenerContainer(RabbitListenerEndpoint endpoint, RabbitListenerContainerFactory < ?>factory) { //立即启动为false registerListenerContainer(endpoint, factory, false); } public void registerListenerContainer(RabbitListenerEndpoint endpoint, RabbitListenerContainerFactory < ?>factory, boolean startImmediately) { Assert.notNull(endpoint, "Endpoint must not be null"); Assert.notNull(factory, "Factory must not be null"); String id = endpoint.getId(); Assert.hasText(id, "Endpoint id must not be empty"); synchronized(this.listenerContainers) { Assert.state(!this.listenerContainers.containsKey(id), "Another endpoint is already registered with id '" + id + "'"); //核心方法。创建容器 MessageListenerContainer container = createListenerContainer(endpoint, factory); //核心操作:将容器放入到List中 this.listenerContainers.put(id, container); ...//根据groupId分组,不关心 if (startImmediately) { //默认false,不关心 startIfNecessary(container); } } }上面说到MethodRabbitListenerEndpoint可以看做临时对象(临时存储对象信息和注解配置信息)。目的就是创建监听对象,注意监听对象最终也是放入了list对象中。 RabbitMQ使用默认的SimpleRabbitListenerContainerFactory监听工厂。 AbstractRabbitListenerContainerFactory实现的方法: 将endpoint的配置信息存入SimpleMessageListenerContainer对象中。 public C createListenerContainer(RabbitListenerEndpoint endpoint) { C instance = createContainerInstance(); JavaUtils javaUtils = JavaUtils.INSTANCE.acceptIfNotNull(this.connectionFactory, instance: :setConnectionFactory).acceptIfNotNull(this.errorHandler, instance: :setErrorHandler); if (this.messageConverter != null) { if (endpoint != null) { endpoint.setMessageConverter(this.messageConverter); if (endpoint.getMessageConverter() == null) { instance.setMessageConverter(this.messageConverter); } } else { instance.setMessageConverter(this.messageConverter); } } javaUtils.acceptIfNotNull(this.acknowledgeMode, instance: :setAcknowledgeMode).acceptIfNotNull(this.channelTransacted, instance: :setChannelTransacted).acceptIfNotNull(this.applicationContext, instance: :setApplicationContext).acceptIfNotNull(this.taskExecutor, instance: :setTaskExecutor).acceptIfNotNull(this.transactionManager, instance: :setTransactionManager).acceptIfNotNull(this.prefetchCount, instance: :setPrefetchCount).acceptIfNotNull(this.defaultRequeueRejected, instance: :setDefaultRequeueRejected).acceptIfNotNull(this.adviceChain, instance: :setAdviceChain).acceptIfNotNull(this.recoveryBackOff, instance: :setRecoveryBackOff).acceptIfNotNull(this.mismatchedQueuesFatal, instance: :setMismatchedQueuesFatal).acceptIfNotNull(this.missingQueuesFatal, instance: :setMissingQueuesFatal).acceptIfNotNull(this.consumerTagStrategy, instance: :setConsumerTagStrategy).acceptIfNotNull(this.idleEventInterval, instance: :setIdleEventInterval).acceptIfNotNull(this.failedDeclarationRetryInterval, instance: :setFailedDeclarationRetryInterval).acceptIfNotNull(this.applicationEventPublisher, instance: :setApplicationEventPublisher).acceptIfNotNull(this.autoStartup, instance: :setAutoStartup).acceptIfNotNull(this.phase, instance: :setPhase).acceptIfNotNull(this.afterReceivePostProcessors, instance: :setAfterReceivePostProcessors); if (endpoint != null) { if (endpoint.getAutoStartup() != null) { instance.setAutoStartup(endpoint.getAutoStartup()); } instance.setListenerId(endpoint.getId()); //绑定队列信息 endpoint.setupListenerContainer(instance); } if (instance.getMessageListener() instanceof AbstractAdaptableMessageListener) { AbstractAdaptableMessageListener messageListener = (AbstractAdaptableMessageListener) instance.getMessageListener(); javaUtils.acceptIfNotNull(this.beforeSendReplyPostProcessors, messageListener: :setBeforeSendReplyPostProcessors).acceptIfNotNull(this.retryTemplate, messageListener: :setRetryTemplate).acceptIfCondition(this.retryTemplate != null && this.recoveryCallback != null, this.recoveryCallback, messageListener: :setRecoveryCallback); } //个性化处理。 initializeContainer(instance, endpoint); if (this.containerConfigurer != null) { this.containerConfigurer.accept(instance); } return instance; }方法上每一个@RabbitListener注解都会创建一个SimpleMessageListenerContainer容器,并放入到List集合中。 2.4 监听容器的启动RabbitListenerEndpointRegistry对象的结构图:
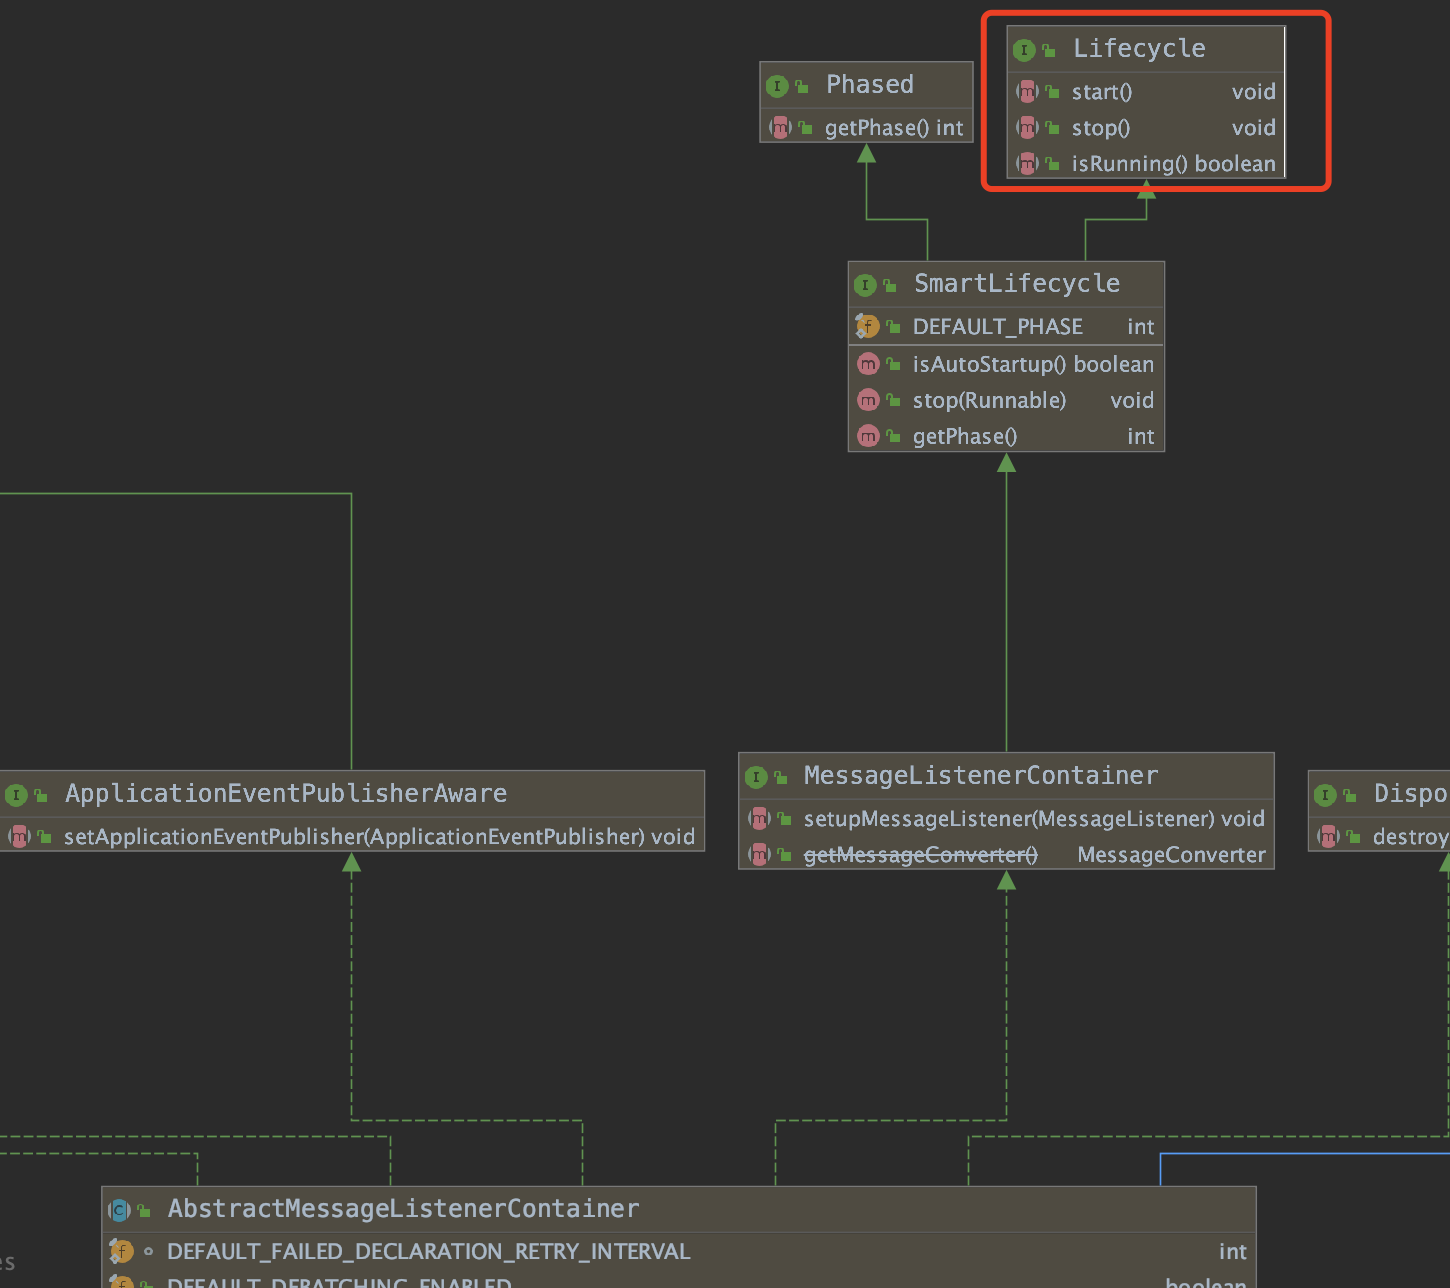
注意RabbitListenerEndpointRegistry接口实现了Lifecycle类,即Spring容器初始化完毕,会执行start()方法。 SpringBoot2.x基础篇—Bean的生命周期方法(实现Lifecycle接口) 执行RabbitListenerEndpointRegistry#start()方法,实际上是遍历所有的监听容器对象,执行监听容器的start()方法开启监听。 @Override public void start() { //bean创建完毕后,遍历存储ListenerContainer的集合,并且开启监听容器 for (MessageListenerContainer listenerContainer: getListenerContainers()) { startIfNecessary(listenerContainer); } } private void startIfNecessary(MessageListenerContainer listenerContainer) { if (this.contextRefreshed || listenerContainer.isAutoStartup()) { listenerContainer.start(); } }监听容器的start()方法: //对应源码:org.springframework.amqp.rabbit.listener.AbstractMessageListenerContainer#start @Override public void start() { .... try { logger.debug("Starting Rabbit listener container."); configureAdminIfNeeded(); checkMismatchedQueues(); //子类实现,开启监听容器 doStart(); } catch(Exception ex) { throw convertRabbitAccessException(ex); } }子类开启监听容器: 消费者线程一旦开启启动,那么便会一直去监听消息,并且去处理消息。 //org.springframework.amqp.rabbit.listener.SimpleMessageListenerContainer#doStart @Override protected void doStart() { checkListenerContainerAware(); super.doStart(); synchronized(this.consumersMonitor) { if (this.consumers != null) { throw new IllegalStateException("A stopped container should not have consumers"); } //根据配置的concurrentConsumers参数,创建消费者并存储到Set中 int newConsumers = initializeConsumers(); ... Set processors = new HashSet (); //根据配置的concurrentConsumers创建消费者线程 for (BlockingQueueConsumer consumer: this.consumers) { //创建消费者线程 AsyncMessageProcessingConsumer processor = new AsyncMessageProcessingConsumer(consumer); processors.add(processor); //使用线程池去执行消费者线程 getTaskExecutor().execute(processor); if (getApplicationEventPublisher() != null) { getApplicationEventPublisher().publishEvent(new AsyncConsumerStartedEvent(this, consumer)); } } //等待消费者线程执行成功 waitForConsumersToStart(processors); } } 2.5 总结@RabbitListener生效的核心流程是:读取@RabbitListener配置,创建SimpleMessageListenerContainer对象。并且调用SimpleMessageListenerContainer对象的start()方法,创建消费者线程并且启动。 3. 为什么将SimpleMessageListenerContainer对象加入到Spring容器便可以监听队列?AbstractMessageListenerContainer接口实现了Lifecycle接口,将其放入到Spring容器后,会执行生命周期的回调方法,即自动执行start()方法,开启队列监听。
|
【本文地址】
今日新闻 |
推荐新闻 |