Qt的network模块实现TCP客户端和服务端 |
您所在的位置:网站首页 › qq邮箱的正确使用 › Qt的network模块实现TCP客户端和服务端 |
Qt的network模块实现TCP客户端和服务端
|
TCP协议即英文的简写,transform control protocol 传输控制协议单词的首字母大写拼接而成。 TCP协议是传输层协议,具有客户端和服务端,是面向连接(三次握手和四次挥手过程),基于IP协议的可变大小的滑动窗口协议。不支持广播,数据传输失败可以重传,且具有排序检错功能。 TCP协议栈应用场景广泛,因其特点,常用于文件传输,保证接收到的文件是完整的和正确的。除此之外还用于邮件发送和接受,确保邮件正确发送正确接受。另外也常用于网页浏览,HTTP应用层协议就是使用TCP协议作为传输层协议,确保网页信息正确性。 使用C语言来实现TCP的通信过程是比较繁琐的,而Qt提供了network模块,network模块提供了丰富的函数,供我们直接使用,能大大的提高开发效率。 目录 TCP协议的实现流程图 TCP协议的三次握手和四次挥手的过程流程图 使用Qt Creator搭建TCP服务端和客户端 TCP服务端 项目效果图 TCP客户端 项目效果图 其他 程序打包 TCP协议的实现流程图
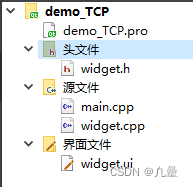
共五个文件,pro工程文件和widget.h头文件和widget.cpp的源文件和main.cpp主函数文件,包括界面文件widget.ui
demo.TCP.pro #------------------------------------------------- # # Project created by QtCreator 2023-06-11T11:04:50 # #------------------------------------------------- QT += core gui network #这里添加network模块 greaterThan(QT_MAJOR_VERSION, 4): QT += widgets TARGET = demo_TCP TEMPLATE = app # The following define makes your compiler emit warnings if you use # any feature of Qt which as been marked as deprecated (the exact warnings # depend on your compiler). Please consult the documentation of the # deprecated API in order to know how to port your code away from it. DEFINES += QT_DEPRECATED_WARNINGS # You can also make your code fail to compile if you use deprecated APIs. # In order to do so, uncomment the following line. # You can also select to disable deprecated APIs only up to a certain version of Qt. #DEFINES += QT_DISABLE_DEPRECATED_BEFORE=0x060000 # disables all the APIs deprecated before Qt 6.0.0 SOURCES += main.cpp\ widget.cpp HEADERS += widget.h FORMS += widget.uiwidget.h #ifndef WIDGET_H #define WIDGET_H #include #include #include #include namespace Ui { class Widget; } class Widget : public QWidget { Q_OBJECT public: explicit Widget(QWidget *parent = 0); ~Widget(); private slots: //三个按钮槽函数,分别是监听、发送和关闭 void on_btnClose_clicked(); void on_btnSend_clicked(); void on_btnListen_clicked(); //两个处理函数 void ConnectToClient(); void ReadInformation(); private: Ui::Widget *ui; QTcpServer *tcpserver;//用于监听 QTcpSocket *tcpsocket;//用于和客户端建立连接和交互 }; #endif // WIDGET_Hmain.cpp #include "widget.h" #include int main(int argc, char *argv[]) { QApplication a(argc, argv); Widget w; w.show(); return a.exec(); }widget.cpp #include "widget.h" #include "ui_widget.h" #include #include Widget::Widget(QWidget *parent) : QWidget(parent), ui(new Ui::Widget) { ui->setupUi(this); //创建TCP监听套接字 tcpserver=new QTcpServer(this); } Widget::~Widget() { delete ui; } void Widget::on_btnListen_clicked() { ui->btnClose->setText("Closed Connection"); bool res =tcpserver->listen(QHostAddress::Any,8888);//从8888端口监听任何一个IP的到来 if(res) { //监听客户端连接的到来 connect( tcpserver,&QTcpServer::newConnection,this, &Widget::ConnectToClient ); QMessageBox::information(this,"notice","Successfully monitored"); } else { QMessageBox::information(this,"warning","already listening"); } } void Widget::ConnectToClient() { //取出建立好的套接字 tcpsocket = tcpserver->nextPendingConnection(); //获取对方的端口号和IP地址,并且显示到文本编辑器中 QString ip=tcpsocket->peerAddress().toString().split("::ffff:")[1]; qint16 port = tcpsocket->peerPort(); ui->textEditRead->setText(QString("[%1:%2]Successfully connected").arg(ip).arg(port)); //必须建立连接后 再关联信号 connect( tcpsocket,&QTcpSocket::readyRead,this, &Widget::ReadInformation); } void Widget::ReadInformation() { //获取套接字中的内容 QByteArray temp = tcpsocket->readAll(); ui->textEditRead->append(temp); } void Widget::on_btnSend_clicked() { if(!ui->textEditRead->toPlainText().isEmpty()) { if(tcpsocket) { QString str=ui->textEditWrite->toPlainText(); int ret= tcpsocket->write(str.toUtf8().data()); if(ret!=-1 && !str.isEmpty()) { QMessageBox::information(this,"promote","Successfully sent"); } else { QMessageBox::information(this,"promote","Fail in send"); } } } else { QMessageBox::critical(this,"Error","Please wait for the client to establish a connection"); } } void Widget::on_btnClose_clicked() { if(ui->textEditRead->toPlainText().isEmpty()) { QMessageBox::warning(this,"Error","Please wait for the client to establish a connection"); } else if(ui->btnClose->text()=="Interruption") { QMessageBox::warning(this,"Warning","please reestablish listening"); } else if(!(tcpsocket->state() == QAbstractSocket::UnconnectedState)) { tcpsocket->disconnectFromHost();//主动和客户端断开连接 tcpsocket->close(); tcpsocket=NULL; QMessageBox::information(this,"promote","Connection interruption"); ui->btnClose->setText("Interruption"); } else { QMessageBox::critical(this,"Error","Please wait for the client to establish a connection"); } }widget.ui
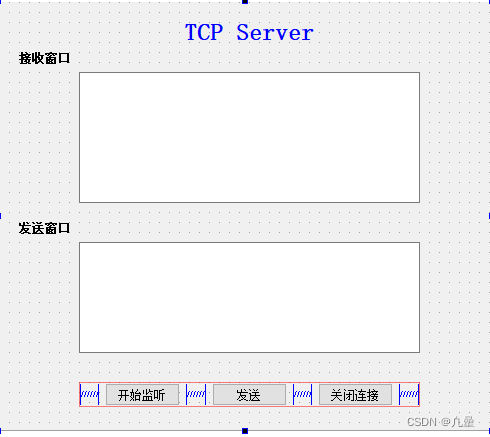
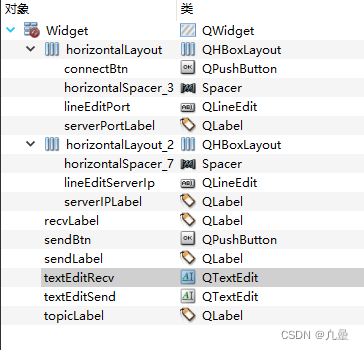
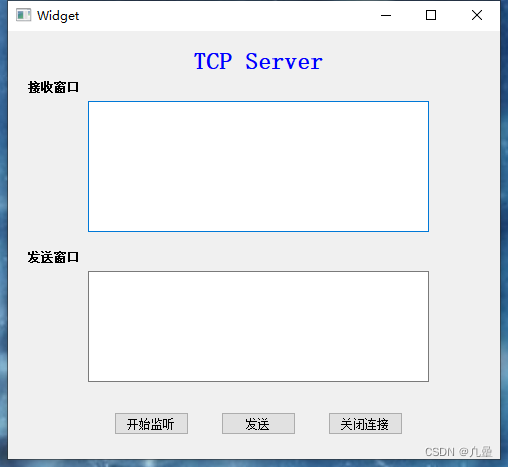
项目描述:创建一个工程文件后,在工程文件中添加network模块,此时就可以调用相关类和函数等。然后通过QTcpServer类创建一个指针,用该指针指向QTcpServer的实例化对象,并创建一个QTcpSocket类的指针,用来和TCP客户端通信。通过Qt的UI模块来实现界面的按钮等功能,比如监听按钮的信号和槽函数来监听客户端的到来,客户端与服务端建立连接之后就可以通过通过Qt的信号和槽机制、QTcpSocket类创建的指针来调用readAll或其他读取内容的函数,从而获取到信息并显示到终端或窗口上,就基本完成了TCP通信过程。 TCP客户端TCP客户端也共五个文件,分别是demo_TCPClient.pro工程文件、widget.h头文件、main.cpp主函数文件和widget.cpp源文件包括widget.ui界面文件
demo_TCPClient.pro #------------------------------------------------- # # Project created by QtCreator 2023-06-11T11:27:08 # #------------------------------------------------- QT += core gui network #这里添加network模块 greaterThan(QT_MAJOR_VERSION, 4): QT += widgets TARGET = demo_TCPClient TEMPLATE = app # The following define makes your compiler emit warnings if you use # any feature of Qt which as been marked as deprecated (the exact warnings # depend on your compiler). Please consult the documentation of the # deprecated API in order to know how to port your code away from it. DEFINES += QT_DEPRECATED_WARNINGS # You can also make your code fail to compile if you use deprecated APIs. # In order to do so, uncomment the following line. # You can also select to disable deprecated APIs only up to a certain version of Qt. #DEFINES += QT_DISABLE_DEPRECATED_BEFORE=0x060000 # disables all the APIs deprecated before Qt 6.0.0 SOURCES += main.cpp\ widget.cpp HEADERS += widget.h FORMS += widget.uiwidget.h #ifndef WIDGET_H #define WIDGET_H #include #include #include #include #include #include #include namespace Ui { class Widget; } class Widget : public QWidget { Q_OBJECT public: explicit Widget(QWidget *parent = 0); ~Widget(); private slots: //两个按钮槽函数,分别是连接和发送 void on_connectBtn_clicked(); void on_sendBtn_clicked(); //按钮槽函数触发的两个槽函数 void ReadInformation(); void connectToServer(); private: Ui::Widget *ui; QTcpSocket *tcpClient;//用于和服务端建立连接 }; #endif // WIDGET_Hmain.cpp #include "widget.h" #include int main(int argc, char *argv[]) { QApplication a(argc, argv); Widget w; w.show(); return a.exec(); }widget.cpp #include "widget.h" #include "ui_widget.h" #include Widget::Widget(QWidget *parent) : QWidget(parent), ui(new Ui::Widget) { ui->setupUi(this); ui->sendBtn->setEnabled(false); this->tcpClient = new QTcpSocket(this); connect( this->tcpClient, &QTcpSocket::connected, this, &Widget::connectToServer ); connect(this->tcpClient, &QTcpSocket::readyRead,this, &Widget::ReadInformation ); } Widget::~Widget() { delete ui; } void Widget::connectToServer() { ui->textEditRecv->setText("Successfully established a link with the server"); } void Widget::ReadInformation() { //获取套接字中的内容 QByteArray tmp =tcpClient->readAll(); if(!tmp.isEmpty()) ui->textEditRecv->append(tmp); } void Widget::on_connectBtn_clicked() { QString ip = ui->lineEditServerIp->text();//获取服务器的ip地址 qint16 port = ui->lineEditPort->text().toInt();//获取服务器的端口号 QString portText=ui->lineEditPort->text(); if(ip==NULL || portText.isEmpty())//第一步先判断是否是空 { QMessageBox::information(this,"promote","please input port and IP"); } else if(tcpClient->state() == QAbstractSocket::UnconnectedState)//第二步再判断tcpClient套接字的状态是否建立连接,这里判断是没有建立连接 { //主动和服务器进行连接 tcpClient->connectToHost(QHostAddress(ip),port); //连接成功进入if语句 if(tcpClient->waitForConnected(1000)) { ui->connectBtn->setText("break"); ui->sendBtn->setEnabled(true); } } else//这里判断建立连接的情况 { tcpClient->disconnectFromHost(); //已断开进入if语句 if(tcpClient->state() == QAbstractSocket::UnconnectedState||\ tcpClient->waitForDisconnected(1000)) { ui->connectBtn->setText("connection"); ui->sendBtn->setEnabled(false); } } } void Widget::on_sendBtn_clicked() { QString str= ui->textEditSend->toPlainText(); int ret= this->tcpClient->write(str.toUtf8().data()); if(ret==-1) { QMessageBox::information(this,"promote","Fail in send"); } else { QMessageBox::information(this,"promote","Successfully sent"); } }widget.ui
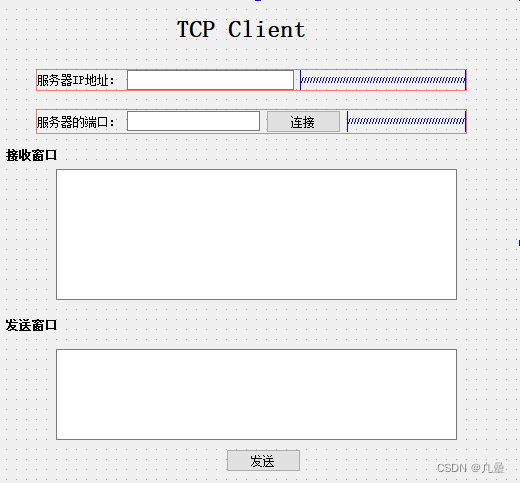
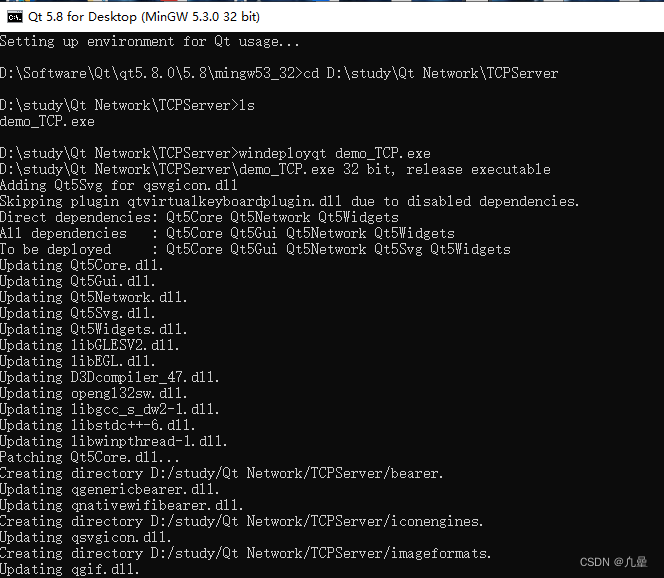
项目描述:创建一个pro工程文件之后,在工程文件中添加network网络模块,通过网络模块可以调用Qt提供的很多网络相关的类库或函数库,比如QHostInfo类、QTcpSocket等,通过QTcpSocket类创建一个指针指向QTcpSocket的实例化对象,TCP客户端先通过UI模块的按钮等控件来获取TCP服务端所在的目标IP和指定的端口,然后通过Qt的信号和槽机制和QTcpSocket类的成员函数与TCP服务端建立连接并获取数据或发送数据。这样就大致完成了TCP客户端和TCP服务端通信的过程。 其他网络调试助手资源下载 资源下载-野人家园-物联网技术专家平台 打包成exe可执行文件步骤 1.将qt的debug改成release,再重新运行,项目中的构建目录要与实际项目目录一致 2、将release目录下的可执行文件.exe的文件复制一份放入其他目录下 3、打开qt的Qt 5.8 for Desktop (MinGW 5.3.0 32 bit) 4、找到放入.exe程序的目录,使用命令windeployqt 可执行文件名字加.exe,这个时候这个.exe就可以直接运行了 5、为了更方便,直接将demo下的所有文件都压缩打包,使用Enigma Virtual Box 软件打包压缩成可执行文件 (https://enigmaprotector.com/en/downloads.html) 5.1、使用Enigma Virtual Box , 先把.exe文件输入到上方的框中 在add中选择增加文件夹(递归方式), 5.2、在files options中,选择压缩文件compress files 5.3、选择process,执行封包,最后在demo目录下找到boxed.exe的可执行文件,就可以直接运行了。 第一步、 将debug调试改为Release生成版本,然后编译运行,会生成一个release文件夹。将该文件夹的demo_TCP.exe放在独立的文件夹内,此时是不能直接使用的。
release文件夹内容 第二步、执行3、4步骤
存放 demo_TCP.exe放在独立的文件夹会生成很多dll动态链接库等文件,此时exe就可以运行。 第三步、执行5步骤 参考我的上一篇文章的目录下的“打包exe文件” Qt的network模块实现域名找IP_凢曐的博客-CSDN博客基于Qt Creator应用软件编写的查找IPv4和IPv6的应用层软件Qt 是一个跨平台的 C++图形用户界面应用程序。分为商业版和免费版(我是这么理解的,没有任何依据)Qt各个版本的软件下载链接:使用Qt的好处有很多,在我这儿就是极大地极高开发效率,最明显的就是大大的加快了开发一款app所需要的时间。 最终会生成可执行文件demo_TCP_boxed.exe,该程序可以独立运行在支持exe格式的环境下。
|


【本文地址】
今日新闻 |
推荐新闻 |