GEE学习 |
您所在的位置:网站首页 › qq怎么制长图 › GEE学习 |
GEE学习
|
绘制全区域NDVI变化曲线——一景一值
首先认真阅读数据集介绍,包括波段名、缩放因子、数据集持续时间、空间分辨率等。 准备好研究区域、处理好数据集(缩放),先print一下看看数据集是否处理完毕。这里选的数据集MOD13Q1是500m空间分辨率、16天时间分辨率的,也可以选用其他NDVI数据集(貌似不同数据集得出的结果差异还蛮大)。 //load roi var table = ee.FeatureCollection("projects/ee-lzying1999/assets/Boundary-wgs"); Map.centerObject(table, 9); Map.addLayer(ee.Image().paint(table, 0, 2), {}, 'roi'); //load imagecollection 类似的NDVI数据集还有MODIS/MOD09GA_006_NDVI;MODIS/061/MOD13Q1;MODIS/006/MOD13A1 var collection = ee.ImageCollection('MODIS/006/MOD13Q1') .filterDate('2000-01-01', '2022-12-31').filterBounds(table) .select('NDVI').map(function(image){ return image.multiply(0.0001).set(image.toDictionary(image.propertyNames())) }) //这里是NDVI产品的缩放因子,在数据集介绍里面有 print(collection);对一整个区域的NDVI均值绘制长时序曲线(之前找了很久函数,捣鼓了半天list\dictionary等的数据转换,结果发现一个函数就能解决= =): //绘制由全区域每景图像NDVI平均值构成的曲线图 print(ui.Chart.image.series({ imageCollection: collection, region: table, reducer: ee.Reducer.mean(), scale: 500 }).setOptions({ interpolateNulls: true, lineWidth: 2, title: 'NDVI_totalregion', vAxis: {title: 'NDVI'}, //viewWindow: {min: 0, max: 0.3}调整坐标轴上下限 hAxis: {title: 'Date'}, trendlines: { 0: {title: 'NDVI_trend',type:'linear', showR2: true, color:'red', visibleInLegend: true}} //添加趋势线 }));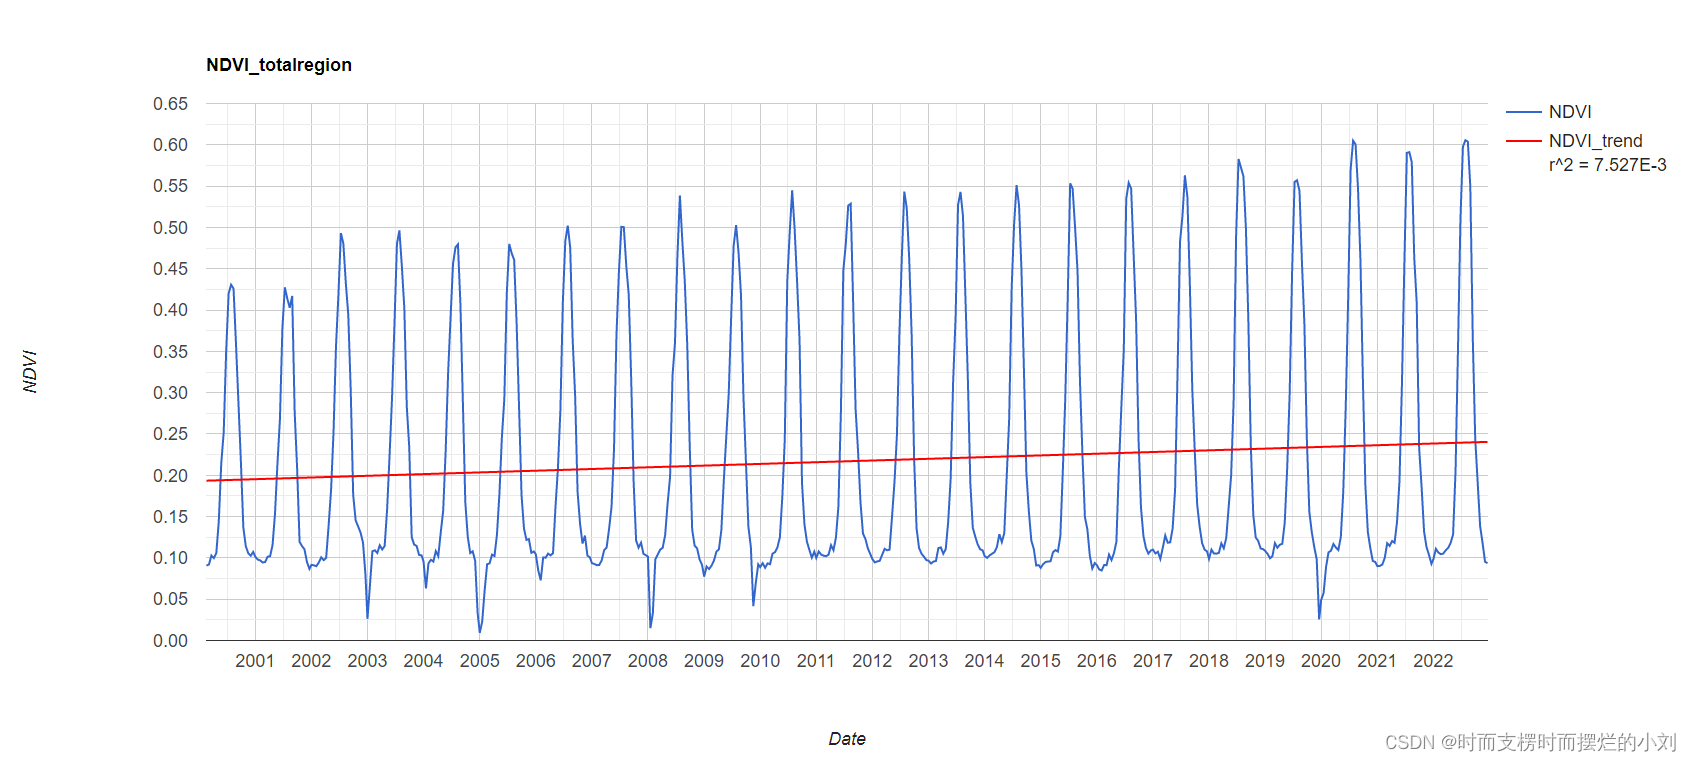 绘制全区域逐月平均的NDVI曲线——一月一值
关于月平均,实际上是在多个教程基础上修改了一点点绘图选项。最开始时间选择了2001-2022,结果又溢出了,所以换成了2001-2011年,这次可以显示了。 //date range var years = ee.List.sequence(2001, 2011); var months = ee.List.sequence(1, 12); //monthly mean var monthlymean = ee.ImageCollection.fromImages( years.map(function (y) { return months.map(function(m) { return collection.filter(ee.Filter.calendarRange(y,y, 'year')).filter(ee.Filter.calendarRange(m, m, 'month')).mean().set('year', y).set('month', m).set('system:time_start', ee.Date.fromYMD(y, m, 1)); }); }).flatten()); print(monthlymean); // Create and print charts. print(ui.Chart.image.series({ imageCollection:monthlymean, region:table, reducer:ee.Reducer.mean(), scale:500}).setOptions({ interpolateNulls: true, lineWidth: 2, title: 'NDVI Monthly Series', vAxis: {title: 'NDVI'}, hAxis: {title: 'Date'}, //trendlines: { 0: {title: 'NDVI_trend',type:'linear', showR2: true, color:'red', visibleInLegend: true}} }));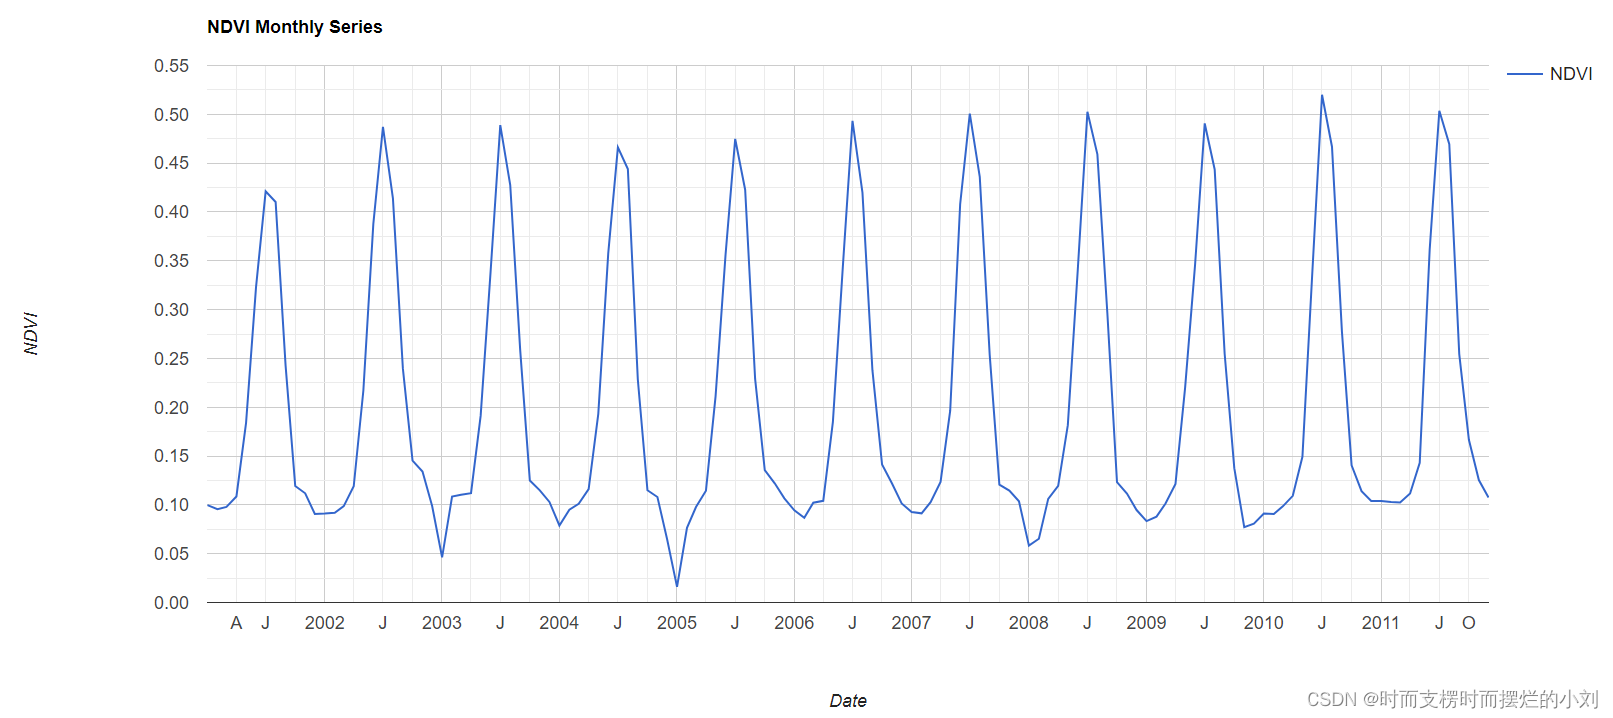 绘制全区域逐年平均的NDVI曲线——一年一值
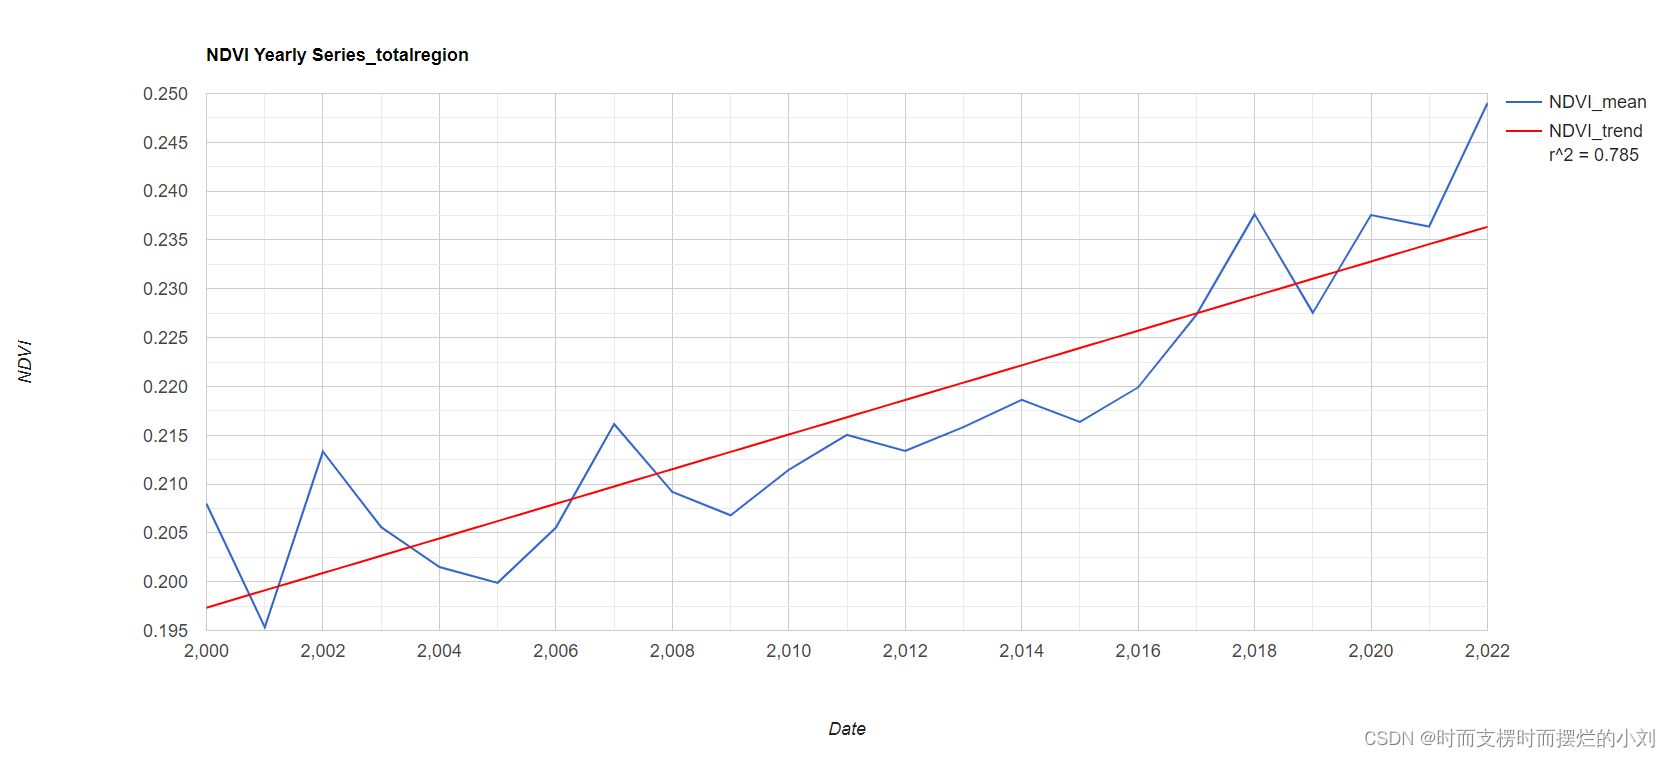
按年平均也有很多教程给代码,然而我到现在还是没看明白是怎么实现的QAQ,只是能用。先贴在这,找个时间恶补一下。。。 //create year list var years = ee.List.sequence(2000, 2022); var collectYear = ee.ImageCollection(years .map(function(y) { var start = ee.Date.fromYMD(y, 1, 1); var end = start.advance(12, 'month'); return collection.filterDate(start, end).reduce(ee.Reducer.mean()).float().set('system:time_start',y).set('year',y); })); print(collectYear); //create chart of NDVI_mean yearly of the total region var Yearly_chart = ui.Chart.image.series({ imageCollection: collectYear.select('NDVI_mean'), region: table, reducer: ee.Reducer.mean(), scale: 500, xProperty: 'year', }).setOptions({ interpolateNulls: true, lineWidth: 2, title: 'NDVI Yearly Series_totalregion', vAxis: {title: 'NDVI'},//,viewWindow: {min: 0, max: 0.3} hAxis: {title: 'Date'}, trendlines: { 0: {title: 'NDVI_trend',type:'linear', showR2: true, color:'red', visibleInLegend: true}} }); print(Yearly_chart);
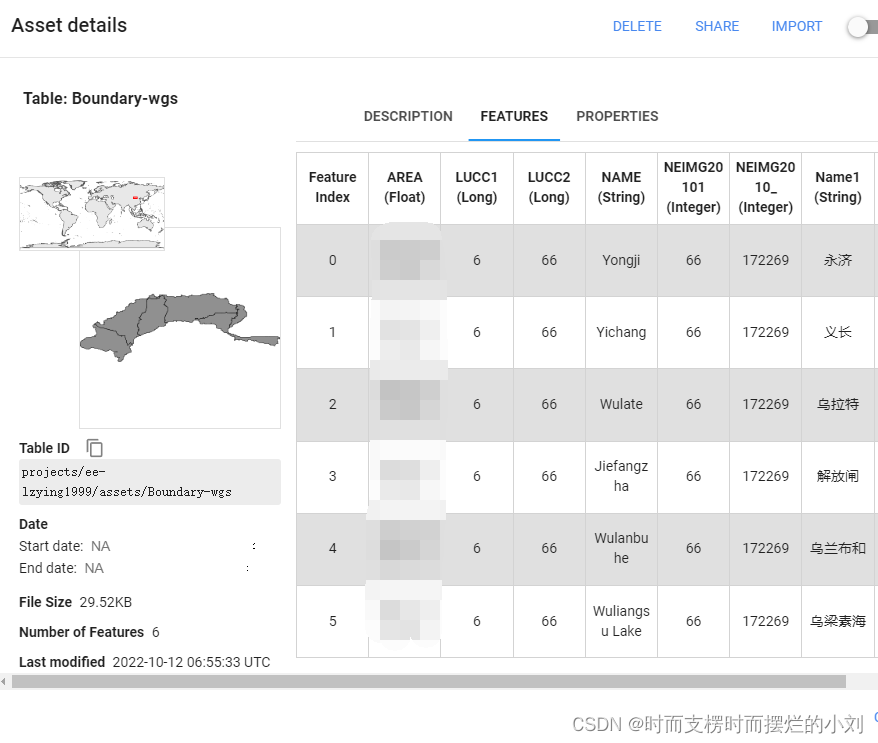
这个故事有点曲折,概括来讲就是:从ui.Chart.image.seriesByRegion到单独将灌域提取出来再手动聚合再回归ui.Chart.image.seriesByRegion。以下是我研究区的矢量文件,已经包含了各个子区域。
首先是昨天用for循环将灌域一个个提取出来的过程: //aggregate_array这个函数将featurecollection里面的Name1提取出来成为一个list var point = table.aggregate_array('Name1') print(point) //根据Name1构成的point(list)逐个提取feature(用filterMetadata方法) for(var i = 0; i |
【本文地址】
今日新闻 |
推荐新闻 |