python实现微信公众号自动定时推送天气、以及公众号聊天机器人(给心爱的人一点惊喜) |
您所在的位置:网站首页 › python获取天气源码 › python实现微信公众号自动定时推送天气、以及公众号聊天机器人(给心爱的人一点惊喜) |
python实现微信公众号自动定时推送天气、以及公众号聊天机器人(给心爱的人一点惊喜)
|
前言 一、项目展示 二、使用步骤 1.安装库 2.源代码 3.部署到服务器 总结 前言配置需求: 1.一台服务器 2.一个域名(用于聊天机器人) 3.一个微信测试公众号 4.python环境(这里用到的版本是3.6.4) 5.爬虫所需的库:bs4、requests 一、项目展示
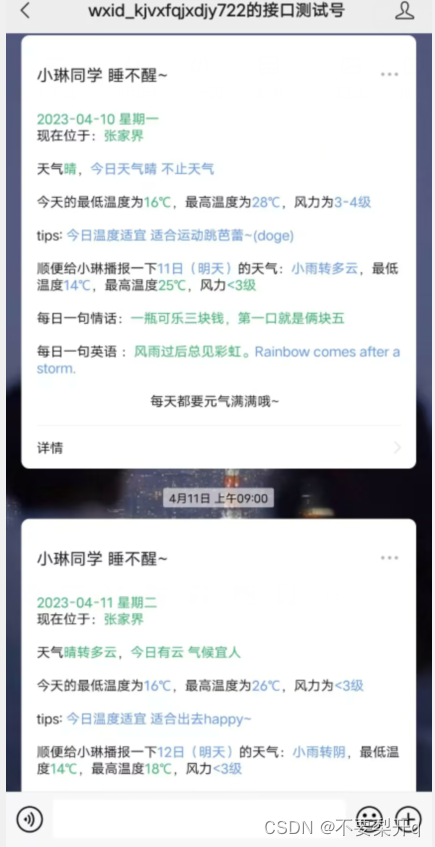
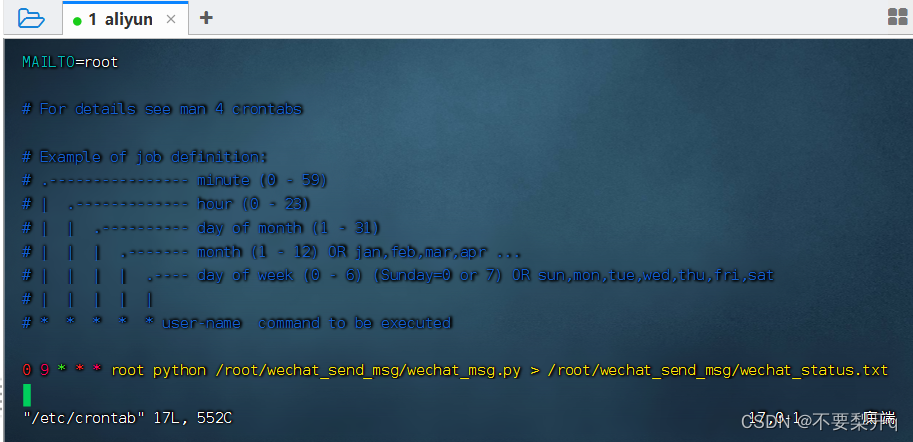
1.bs4、requests的安装 pip install -i http://pypi.douban.com/simple/ --trusted-host=pypi.douban.com/simple包名 2.注册微信公众测试号 微信公众平台 (qq.com) 3.获取测试号appid、appsecret、userid、templateId 2.源代码1.config.json { "appId": "你自己的", "appsecret": "你自己的", "userId": [ "你自己的","xxxx" ], "templateId": "你自己的" }我这里使用的模板是: {{date.DATA}} 现在位于:{{city.DATA}} 天气{{today_weather.DATA}},{{today_weather_str.DATA}} 今天的最低温度为{{today_min.DATA}},最高温度为{{today_max.DATA}},风力为{{today_wind.DATA}} tips: {{today_str.DATA}} 顺便给小琳播报一下{{tomorrow.DATA}}的天气:{{tomorrow_weather.DATA}},最低温度{{tomorrow_min.DATA}},最高温度{{tomorrow_max.DATA}},风力{{tomorrow_wind.DATA}} 每日一句情话:{{daily_love.DATA}} 每日一句英语 :{{note_ch.DATA}}{{note_en.DATA}} 每天都要元气满满哦~2.wechat_sendmsg.py 参考文章: (97条消息) python实现微信公众号给你的重要用户推送消息_python向微信公众号推送消息_DreamAtDawn的博客-CSDN博客 (这里采用的是白天的天气 晚上获取会出现问题) 代码如下(示例): from datetime import datetime from requests import get, post from time import localtime import json import os import random import sys import bs4 import requests def get_weather(): city_name = '张家界' headers = { 'Accept': 'text/html,application/xhtml+xml,application/xml;q=0.9,image/webp,image/apng,*/*;q=0.8,application/signed-exchange;v=b3;q=0.9', 'Accept-Encoding': 'gzip, deflate', 'Accept-Language': 'zh-CN,zh;q=0.9,en;q=0.8,en-GB;q=0.7,en-US;q=0.6', 'Cache-Control': 'max-age=0', 'Connection': 'keep-alive', 'Cookie': 'HttpOnly; userNewsPort0=1; Hm_lvt_080dabacb001ad3dc8b9b9049b36d43b=1660634957; f_city=%E9%87%91%E5%8D%8E%7C101210901%7C; defaultCty=101210901; defaultCtyName=%u91D1%u534E; Hm_lpvt_080dabacb001ad3dc8b9b9049b36d43b=1660639816', 'Host': 'www.weather.com.cn', 'Referer': 'http://www.weather.com.cn/weather1d/101251101.shtml', 'Upgrade-Insecure-Requests': '1', 'User-Agent': 'Mozilla/5.0 (Windows NT 10.0; Win64; x64) AppleWebKit/537.36 (KHTML, like Gecko) Chrome/104.0.5112.81 Safari/537.36 Edg/104.0.1293.54' } url = "http://www.weather.com.cn/weather/101251101.shtml" response = get(url=url, headers=headers) text = response.content.decode('utf-8') soup = bs4.BeautifulSoup(text, 'html.parser') # 存放日期 list_day = [] i = 0 day_list = soup.find_all('h1') for each in day_list: if i = 0 and i < 2: list_tem.append([each.span.text, each.i.text]) # 记录明天的最高温度和最低温度 i += 1 # 风力 list_wind = [] wind_list = soup.find_all('p', class_='win') for each in wind_list: list_wind.append(each.i.text.strip()) list_wind = list_wind[0:2] # 同只取今明两天 today_date = list_day[0] today_weather = list_weather[0] today_max = list_tem[0][0] + '℃' today_min = list_tem[0][1] today_wind = list_wind[0] tomorrow = list_day[1] tomorrow_weather = list_weather[1] tomorrow_max = list_tem[1][0] + '℃' tomorrow_min = list_tem[1][1] tomorrow_wind = list_wind[1] return city_name, today_date, today_weather, today_min, today_max, today_wind, tomorrow, tomorrow_weather, tomorrow_min, tomorrow_max, tomorrow_wind def get_daily_love(): # 每日一句情话 url = "https://api.lovelive.tools/api/SweetNothings/Serialization/Json" r = requests.get(url) all_dict = json.loads(r.text) sentence = all_dict['returnObj'][0] daily_love = sentence return daily_love def get_ciba(): # 每日一句英语(来自爱词霸) url = "http://open.iciba.com/dsapi/" r = get(url) note_en = r.json()["content"] note_ch = r.json()["note"] return note_ch, note_en def get_color(): # 往list中填喜欢的颜色即可 color_list = ['#6495ED', '#3CB371'] return random.choice(color_list) def get_config(): with open("config.json", "r") as f: config = json.load(f) return config def get_token(config): url = "https://api.weixin.qq.com/cgi-bin/token" param = { "grant_type": "client_credential", "appid": config['appId'], "secret": config['appsecret'] } response = requests.get(url=url, params=param) result = response.json().get("access_token") return result def send_message(to_user, access_token, city_name, today_date, today_weather, today_max, today_min, today_wind, tomorrow, tomorrow_weather, tomorrow_max, tomorrow_min, tomorrow_wind, daily_love, note_ch, note_en, today_weather_str, today_str): url = "https://api.weixin.qq.com/cgi-bin/message/template/send?access_token={}".format(access_token) week_list = ["星期日", "星期一", "星期二", "星期三", "星期四", "星期五", "星期六"] year = localtime().tm_year month = localtime().tm_mon day = localtime().tm_mday today = datetime.date(datetime(year=year, month=month, day=day)) week = week_list[today.isoweekday() % 7] print(today_max, today_min) for i in to_user: data = { "touser": i, "template_id": config["templateId"], "url": "http://www.baidu.com", "topcolor": "#FF0000", "data": { "date": { "value": "{} {}".format(today, week), "color": get_color() }, "city": { "value": city_name, "color": get_color() }, "today": { "value": today_date, "color": get_color() }, "today_weather": { "value": today_weather, "color": get_color() }, "today_max": { "value": today_max, "color": get_color() }, "today_min": { "value": today_min, "color": get_color() }, "today_wind": { "value": today_wind, "color": get_color() }, "tomorrow": { "value": tomorrow, "color": get_color() }, "tomorrow_weather": { "value": tomorrow_weather, "color": get_color() }, "tomorrow_max": { "value": tomorrow_max, "color": get_color() }, "tomorrow_min": { "value": tomorrow_min, "color": get_color() }, "tomorrow_wind": { "value": tomorrow_wind, "color": get_color() }, "daily_love": { "value": daily_love, "color": get_color() }, "note_en": { "value": note_en, "color": get_color() }, "note_ch": { "value": note_ch, "color": get_color() }, "today_weather_str": { "value": today_weather_str, "color": get_color() }, "today_str": { "value": today_str, "color": get_color() } } } headers = { 'Content-Type': 'application/json', 'User-Agent': 'Mozilla/5.0 (Windows NT 10.0; Win64; x64) ' 'AppleWebKit/537.36 (KHTML, like Gecko) Chrome/103.0.0.0 Safari/537.36' } response = post(url, headers=headers, json=data).json() if response["errcode"] == 40037: print("推送消息失败,请检查模板id是否正确") elif response["errcode"] == 40036: print("推送消息失败,请检查模板id是否为空") elif response["errcode"] == 40003: print("推送消息失败,请检查微信号是否正确") elif response["errcode"] == 0: print("推送消息成功") else: print(response) if __name__ == "__main__": try: config = get_config() except FileNotFoundError: print("推送消息失败,请检查config.txt文件是否与程序位于同一路径") os.system("pause") sys.exit(1) except SyntaxError: print("推送消息失败,请检查配置文件格式是否正确") os.system("pause") sys.exit(1) # 获取accessToken accessToken = get_token(config) # 接收的用户 users = config["userId"] # 传入省份和市获取天气信息 city_name, today_date, today_weather, today_min, today_max, today_wind, tomorrow, tomorrow_weather, tomorrow_min, tomorrow_max, tomorrow_wind = get_weather() # 判断今天天气并返回对应响应 # print(today_weather) today_weather_str = "" str_weather = ['雨', '云', '晴', '阴'] # 提示可以多想几条 放入列表 random.choice([]) today_weather_str_rain = ['今日可能有雨 记得带伞哦', '下雨天和巧克力更配哦~', '天街小雨润如酥 草色遥看近却无'] today_weather_str_cloud = ['等风起,漫随天外云卷云舒', '今日有云 气候宜人', '应是天仙狂醉,乱把白云揉碎'] today_weather_str_sun = ['快醒醒 太阳已经晒屁gu啦~', '今日天气晴 不止天气', '今天天气不错 多出门走走'] today_weather_str_overcast = ['今日天气较阴 适宜懒人瘫在家里~', '阴天雨天暴雨天 爱你爱到发晒癫'] for i in str_weather: if i in today_weather and i == '雨': today_weather_str = random.choice(today_weather_str_rain) break elif i in today_weather and i == '云': today_weather_str = random.choice(today_weather_str_cloud) break elif i in today_weather and i == '晴': today_weather_str = random.choice(today_weather_str_sun) break elif i in today_weather and i == '阴': today_weather_str = random.choice(today_weather_str_overcast) break else: today_weather_str = '啊哦 今天公众号有点不太聪明~ ' # print(today_weather_str) # 判断今日温度并返回对应响应 today_min_judge = today_min.split('℃') today_max_judge = today_max.split('℃') today_min_str = '' today_max_str = '' weather_min_str = ['今日温度较低 天冷记得加衣哦', '今日温度较低 要注意保暖哦'] weather_max_str = ['今日温度较高 奖励自己一个冰淇淋降降温吧~', '今天好像比较热 记得防晒和消暑降温哦'] weather_center_str = ['今日温度适宜 适合运动跳芭蕾~(doge)', '今日温度适宜 适合出去happy~'] if int(today_min_judge[0]) < 10: today_str = random.choice(weather_min_str) elif int(today_max[0]) > 30: today_str = random.choice(weather_max_str) else: today_str = random.choice(weather_center_str) # print(today_str) # 获取每日情话 daily_love = get_daily_love() # 获取每日一句英语 note_ch, note_en = get_ciba() # 公众号推送消息 # 传入提醒信息 send_message(users, accessToken, city_name, today_date, today_weather, today_max, today_min, today_wind, tomorrow, tomorrow_weather, tomorrow_max, tomorrow_min, tomorrow_wind, daily_love, note_ch, note_en, today_weather_str, today_str) # 这里系统暂停乱码 需要将pycharm设置成与cmd相同的GBK编码 在setting file encode中 os.system("pause") 3.部署到服务器本地测试无误后相同的操作部署到服务器 1.服务器这里用到系统是centos7 依据自己的情况 安装python 安装所需库 然后将代码上传到服务器(finalshell直接复制粘贴) 2.服务器运行代码测试 python /x/x.py 3.linux定时任务 配置/etc/crontab
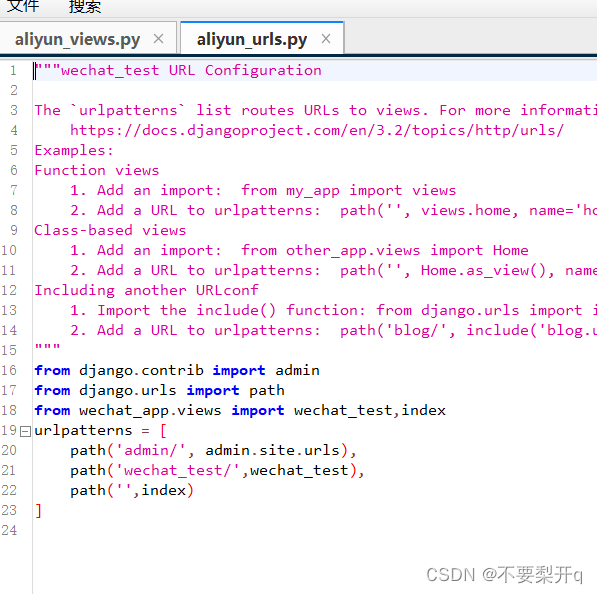
这里是每天早上九点定时推送 根据个人情况修改 到这里公众号推送就已经完成了 配置对话机器人 这里就会稍微有些麻烦 我就言简意赅一点 1.进入微信测试号 绑定接口配置url a.这里我使用的是django来处理微信回复消息 b.服务器安装django django-admin startproject xx 生成django项目 c.绑定服务器必须是域名形式 不能是公网ip地址 (绑定时微信会通过get请求发送四个参数)参考文章:接入概述 | 微信开放文档 (qq.com) 我这里是http://www.xxx.xxx/wechat_test/(你的django url地址) d.django中view.py的代码def wechat_test():(这里获取四个参数并指定加密方式来绑定微信url) import hashlib import json import requests import time from django.shortcuts import render,HttpResponse from xml.etree import ElementTree def wechat_test(request): if requesthod == 'GET': token = 'misimnya' timestamp = request.GET.get('timestamp') nonce = request.GET.get('nonce') echostr = request.GET.get('echostr') signature = request.GET.get('signature') # 进行字典排序 sort_list = [token, timestamp, nonce] sort_list.sort() result = hashlib.sha1((sort_list[0] + sort_list[1] + sort_list[2]).encode('utf-8')).hexdigest() # 判断参数是否相同 if result == signature: return HttpResponse(echostr) else: return HttpResponse('error!') elif requesthod == 'POST': return HttpResponse('no get')
e.启动服务 python manage.py runserver 去微信测试号绑定提交 token自定义 和代码参数一致就行
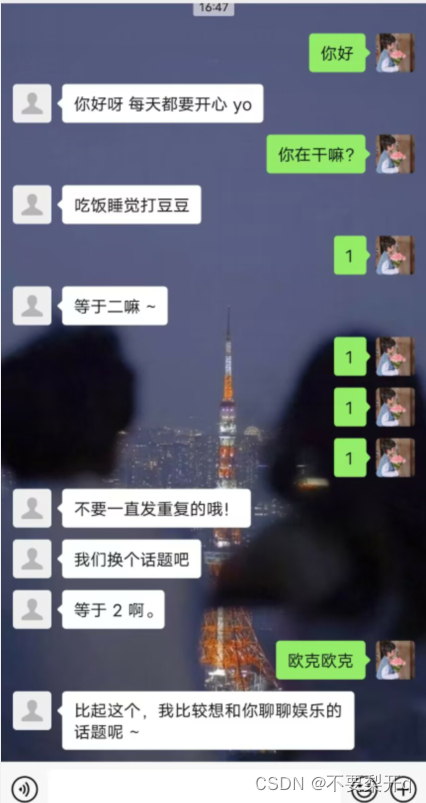
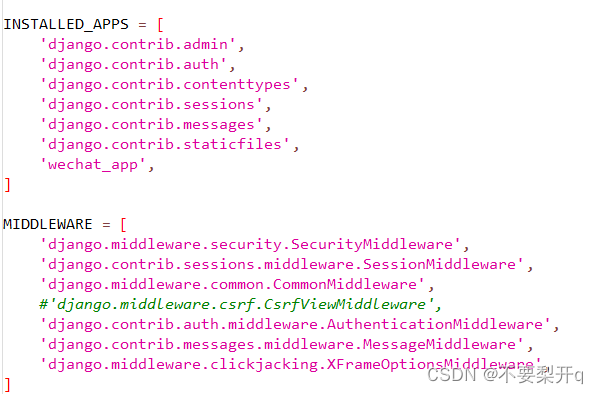
f.绑定成功后你已经完成一大半了 接下来就是对收到的消息进行处理(收到的是xml格式的消息) 采用什么机器人回复(这里是用的是免费的思知机器人) 进去官网注册:思知机器人 | 对话机器人 | 聊天机器人 | 知识图谱 - OwnThink 你也可以用官方的 我这里用的是自己的机器人 机器人管理登陆后创建自己的机器人 然后拿到机器人的appid views源代码: import hashlib import json import requests import time from django.shortcuts import render,HttpResponse from xml.etree import ElementTree # Create your views here. class ParseXmlMsg(object): def __init__(self, xmlData): self.ToUserName = xmlData.find('ToUserName').text self.FromUserName = xmlData.find('FromUserName').text self.CreateTime = xmlData.find('CreateTime').text self.MsgType = xmlData.find('MsgType').text self.MsgId = xmlData.find('MsgId').text if self.MsgType == 'text': self.Content = xmlData.find('Content').text.encode('utf-8') elif self.MsgType == 'image': self.PicUrl = xmlData.find('PicUrl').text self.MediaId = xmlData.find('MediaId').text class TextMsg(object): def __init__(self, toUserName, fromUserName, content): # 私有对象,禁止外部访问 self.__dict = dict() self.__dict['ToUserName'] = toUserName self.__dict['FromUserName'] = fromUserName self.__dict['CreateTime'] = int(time.time()) self.__dict['Content'] = content def send(self): XmlForm = """ {CreateTime} """ return XmlForm.format(**self.__dict) class ImageMsg(object): def __init__(self, toUserName, fromUserName, mediaId): self.__dict = dict() self.__dict['ToUserName'] = toUserName self.__dict['FromUserName'] = fromUserName self.__dict['CreateTime'] = int(time.time()) self.__dict['MediaId'] = mediaId def send(self): XmlForm = """ {CreateTime} """ return XmlForm.format(**self.__dict) def wechat_test(request): if requesthod == 'GET': token = 'misimnya' timestamp = request.GET.get('timestamp') nonce = request.GET.get('nonce') echostr = request.GET.get('echostr') signature = request.GET.get('signature') # 进行字典排序 sort_list = [token, timestamp, nonce] sort_list.sort() result = hashlib.sha1((sort_list[0] + sort_list[1] + sort_list[2]).encode('utf-8')).hexdigest() # 判断参数是否相同 if result == signature: return HttpResponse(echostr) else: return HttpResponse('error!') elif requesthod == 'POST': # 解析发送过来的body webData = request.body xmlData = ElementTree.fromstring(webData) recMsg = ParseXmlMsg(xmlData) if recMsg.MsgType == 'text': toUser = recMsg.FromUserName fromUser = recMsg.ToUserName # 获取用户发送过来的消息文本 usercontent = recMsg.Content # 一定要传解码的消息文本 这里获取到的是 /x84形式的 # print(usercontent.decode('utf-8')) # ownthink 返回json格式数据的对象 # 自己的机器人id userid ownthink_reply = requests.get('https://api.ownthink.com/bot?appid=自己的机器人id&userid=自己的userid&spoken={}'.format(usercontent.decode('utf-8'))) # text方法获取返回json数据 content_json = ownthink_reply.text answer = json.loads(content_json) # print(answer) content = answer['data']['info']['text'] # content = 'test' replyMsg = TextMsg(toUser, fromUser, content) return HttpResponse(content=replyMsg.send()) elif recMsg.MsgType == 'image': print('暂时不做处理') return HttpResponse(content='success') def index(request): return render(request, "love_story.html")g.更改setting.py将app加入 将csrf这里注释(post请求会拦截报错)用户发送的信息就是post请求过来
h.总的一句话 就是配置url 指向views里面的处理函数 也可以不加入app 不懂的话可以搜索看看django教程 最后就是关于django在服务器的后台挂起 参考文章:(97条消息) Centos下django项目的启动和停止(后台运行)_停止django项目_noob_python的博客-CSDN博客 总结 由于微信对公众号的整改 5.4日起微信公众号的颜色无了 不过问题不大哈哈 如果这篇文章对你有帮助的话 就点个赞 谢谢大家~ 大佬轻喷~ |

【本文地址】