python自动化爬虫实战 |
您所在的位置:网站首页 › python爬虫作业多少钱 › python自动化爬虫实战 |
python自动化爬虫实战
|
python自动化爬虫实战
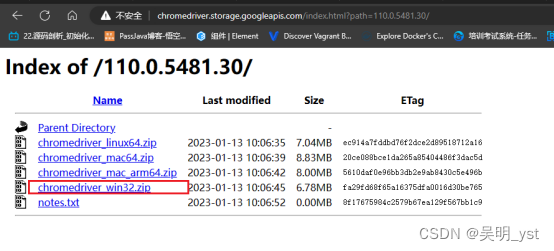
偶然的一次机会再次用到爬虫,借此机会记录一下爬虫的学习经历,方便后续复用。 需求:爬取网站数据并存入的csv文件中,总体分为两步 爬取网站数据存到到csv文件中 1、配置爬虫环境 1.1、下载自动化测试驱动由于需要实现模拟手动点击浏览器的效果,因此笔者使用到了chromedriver.exe自动化驱动文件。这里选择谷歌浏览器相同版本的驱动。 驱动下载中心 比如:笔者浏览器为110版本,因此下载110版本的driver,因为window只有32位,因此不用犹豫直接下载chromedriver_win32.zip文件
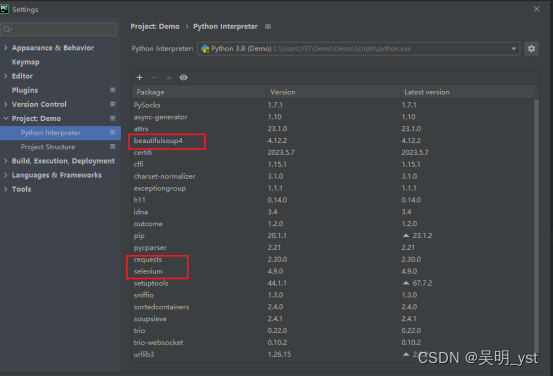
笔者这里用到了:request、 selenium、 beautifulsoup4 在Setting中的Project项目下载对应的库文件 以上爬虫环境配置完成后,接下来便可以编码了。 爬虫的基本逻辑: 配置谷歌浏览器的驱动文件和自动化测试文件创建保存爬取数据的字典和设置读取的起始页码和结束页码判断是否有下一页并进行等待,如果没有下一页则直接退出解析读取到的页面信息保存到csv文件中根据以上的逻辑,大致就可以理解代码的意思了 from selenium import webdriver from selenium.webdriver.common.by import By from selenium.webdriver.support.ui import WebDriverWait from selenium.webdriver.support import expected_conditions as EC from selenium.webdriver.chrome.options import Options from selenium.webdriver.chrome.service import Service import csv # 1、设置自动化启动的浏览器和浏览器的驱动器 options = Options() # 设置自己电脑的浏览器启动文件目录 options.binary_location = "C:\\Users\\wuming\\Google\\Chrome\\Application\\chrome.exe" options.add_argument('–-incognito') options.add_argument('--disable-infobars') options.add_argument('--start-maximized') # 自动化浏览器驱动器 driver = webdriver.Chrome(options=options, service=Service("D:\\chromedriver.exe")) # 2、设置爬取的网站 url = 'https://bj.zu.anjuke.com/fangyuan/' driver.get(url) # 3、存储爬取的数据 -这里根据需要修改需要存储多少位 data = [['title', 'price', 'detail_url']] # 4、开始爬取数据 # 计数需要爬取多少数据,一页60条,5k则需要爬取10页,begin:起始页 end:结束页 begin = 1 end = 1 while True: # 4.1、等待下一页按钮出现 try: next_button = WebDriverWait(driver, 10).until( EC.presence_of_element_located((By.LINK_TEXT, '下一页 >')) ) except: break # 4.2、点击下一页按钮 next_button.click() # 判断是否到达结束页,到达则退出 if begin > end: break begin = begin + 1 # 4.3、等待页面加载完成 WebDriverWait(driver, 10).until( EC.presence_of_element_located((By.CLASS_NAME, 'zu-itemmod')) ) # 4.4、解析页面数据 house_list = driver.find_elements(By.CLASS_NAME, 'zu-itemmod') for house in house_list: title = house.find_element(By.TAG_NAME, 'h3').text.strip() price = house.find_element(By.TAG_NAME, 'strong').text.strip() detail_url = house.find_element(By.TAG_NAME, 'a').get_attribute('href') print(title, price, detail_url) # 4.5、向data中添加数据 data.append([title, price, detail_url]) driver.quit() # 5、将爬取的数据存入csv文件中 with open('D:\\wuming\\data.csv', 'w', newline='') as file: writer = csv.writer(file) for row in data: writer.writerow(row)根据以上代码,相信大家已经可以爬取数据,至于内容的提取,则需要大家各显神通,后面会详细写一篇文章,说一说如何从爬取的网页中获取想要的信息。 |
【本文地址】
今日新闻 |
推荐新闻 |