|
文章目录
1. 查看所有环境2. 编写文件放置3.注册自己的模拟器4. 自定义环境实现5. 测试环境6. 自定义环境以及测试代码解释7. gym模块中环境的常用函数gym的初始化gym的各个参数的获取刷新环境
1. 查看所有环境
Gym是一个包含各种各样强化学习仿真环境的大集合,并且封装成通用的接口暴露给用户,查看所有环境的代码如下:
from gym import envs
print(envs.registry.all())
2. 编写文件放置
首先找到自己的环境下面的gym环境包envs(也可以在pycharm的外部库Lib/site-packages/gym/envs中找到):
我的环境是pytorch,对应的路径是D:\ProgramData\Anaconda3\envs\pytorch\Lib\site-packages\gym\envs 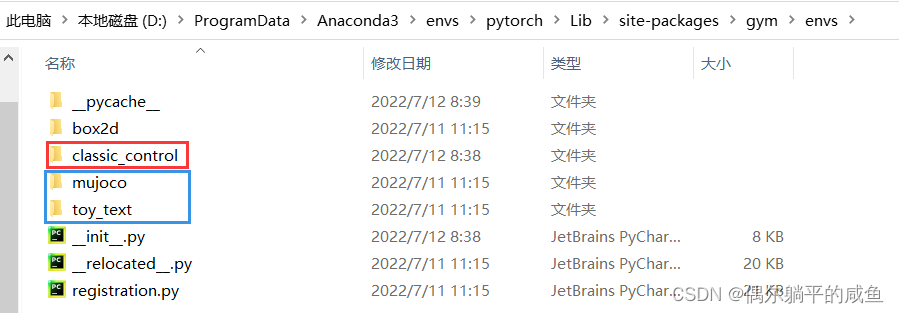
之后我们要创建自己的myenv.py文件,确保自己创建的环境可以在gym里使用,可以进入classic_control文件新建一个myenv的文件夹。  也可以直接将我们的环境放入classic_control中,只是新建一个文件夹不容易混淆。 注意:不推荐把文件放到robotics、mujoco文件夹里,因为这里是gym机器人环境的编辑文件,我们放进去后在运行调试会出错。 也可以直接将我们的环境放入classic_control中,只是新建一个文件夹不容易混淆。 注意:不推荐把文件放到robotics、mujoco文件夹里,因为这里是gym机器人环境的编辑文件,我们放进去后在运行调试会出错。
3.注册自己的模拟器
①打开classic_control文件夹中的__init__.py文件,添加from gym.envs.classic_control.myenv.myenv import MyEnv 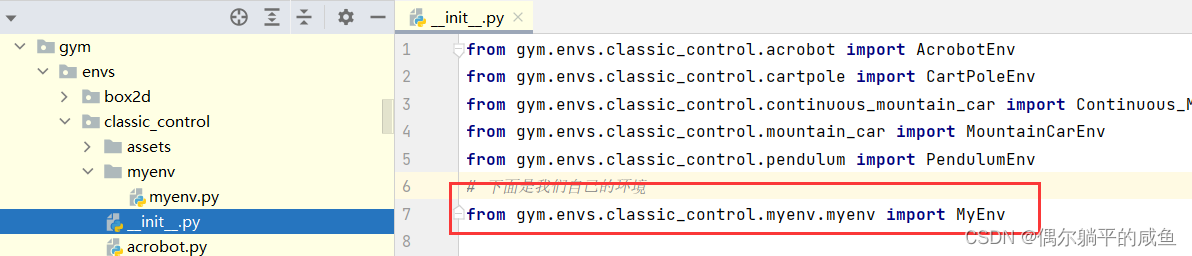
【直接将我们的环境放入classic_control中时添加from gym.envs.classic_control.myenv import MyEnv】
②返回gym/envs目录,在该目录的__init__.py中注册环境: 添加: 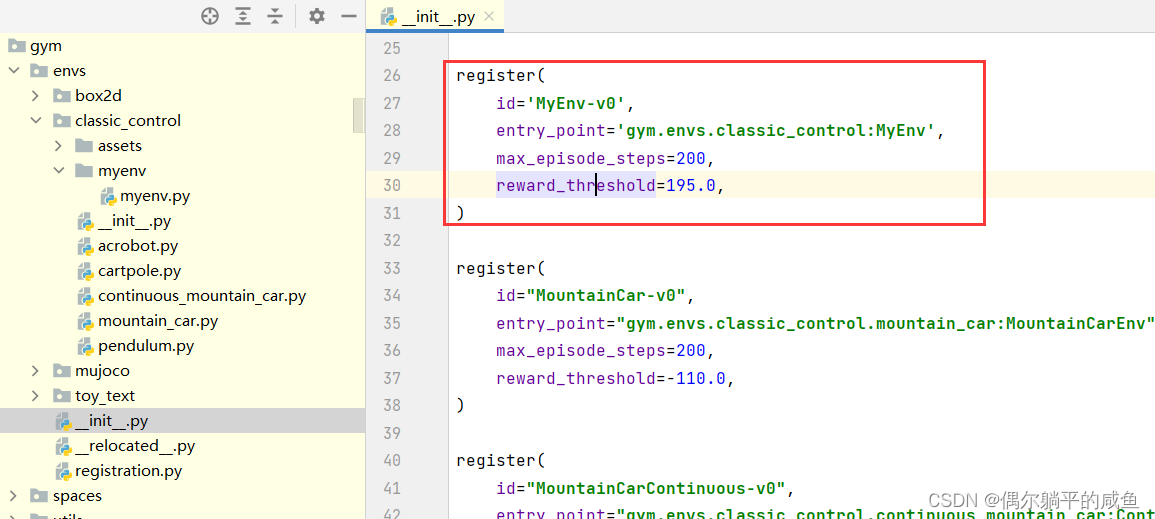
#自己创建的环境 register( id=‘MyEnv-v0’, entry_point=‘gym.envs.classic_control:MyEnv’, max_episode_steps=200, reward_threshold=195.0, ) 注意:MyEnv-v0中v0代表环境类的版本号,在定义类的的时候名字里可以不加,但是在id注册的时候要加,后面import的时候要加。 至此,就完成了环境的注册,就可以使用自定义的环境了!
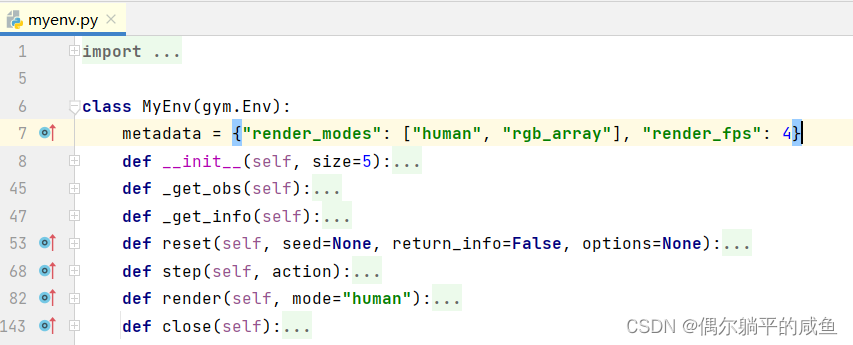
4. 自定义环境实现
直接上代码,在我们自定义的环境myenv/myenv.py中写入(详细降级在6) 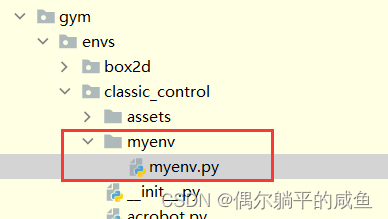
import gym
from gym import spaces
import pygame
import numpy as np
class MyEnv(gym.Env):
metadata = {"render_modes": ["human", "rgb_array"], "render_fps": 4}
def __init__(self, size=5):
self.size = size # The size of the square grid
self.window_size = 512 # The size of the PyGame window
# Observations are dictionaries with the agent's and the target's location.
# Each location is encoded as an element of {0, ..., `size`}^2, i.e. MultiDiscrete([size, size]).
self.observation_space = spaces.Dict(
{
"agent": spaces.Box(0, size - 1, shape=(2,), dtype=int),
"target": spaces.Box(0, size - 1, shape=(2,), dtype=int),
}
)
# We have 4 actions, corresponding to "right", "up", "left", "down", "right"
self.action_space = spaces.Discrete(4)
"""
The following dictionary maps abstract actions from `self.action_space` to
the direction we will walk in if that action is taken.
I.e. 0 corresponds to "right", 1 to "up" etc.
"""
self._action_to_direction = {
0: np.array([1, 0]),
1: np.array([0, 1]),
2: np.array([-1, 0]),
3: np.array([0, -1]),
}
"""
If human-rendering is used, `self.window` will be a reference
to the window that we draw to. `self.clock` will be a clock that is used
to ensure that the environment is rendered at the correct framerate in
human-mode. They will remain `None` until human-mode is used for the
first time.
"""
self.window = None
self.clock = None
def _get_obs(self):
return {"agent": self._agent_location, "target": self._target_location}
def _get_info(self):
return {
"distance": np.linalg.norm(
self._agent_location - self._target_location, ord=1
)
}
def reset(self, seed=None, return_info=False, options=None):
# We need the following line to seed self.np_random
super().reset(seed=seed)
# Choose the agent's location uniformly at random
self._agent_location = self.np_random.integers(0, self.size, size=2, dtype=int)
# We will sample the target's location randomly until it does not coincide with the agent's location
self._target_location = self._agent_location
while np.array_equal(self._target_location, self._agent_location):
self._target_location = self.np_random.integers(0, self.size, size=2, dtype=int)
observation = self._get_obs()
info = self._get_info()
return (observation, info) if return_info else observation
def step(self, action):
# Map the action (element of {0,1,2,3}) to the direction we walk in
direction = self._action_to_direction[action]
# We use `np.clip` to make sure we don't leave the grid
self._agent_location = np.clip(
self._agent_location + direction, 0, self.size - 1
)
# An episode is done iff the agent has reached the target
done = np.array_equal(self._agent_location, self._target_location)
reward = 1 if done else 0 # Binary sparse rewards
observation = self._get_obs()
info = self._get_info()
return observation, reward, done, info
def render(self, mode="human"):
if self.window is None and mode == "human":
pygame.init()
pygame.display.init()
self.window = pygame.display.set_mode((self.window_size, self.window_size))
if self.clock is None and mode == "human":
self.clock = pygame.time.Clock()
canvas = pygame.Surface((self.window_size, self.window_size))
canvas.fill((255, 255, 255))
pix_square_size = (
self.window_size / self.size
) # The size of a single grid square in pixels
# First we draw the target
pygame.draw.rect(
canvas,
(255, 0, 0),
pygame.Rect(
pix_square_size * self._target_location,
(pix_square_size, pix_square_size),
),
)
# Now we draw the agent
pygame.draw.circle(
canvas,
(0, 0, 255),
(self._agent_location + 0.5) * pix_square_size,
pix_square_size / 3,
)
# Finally, add some gridlines
for x in range(self.size + 1):
pygame.draw.line(
canvas,
0,
(0, pix_square_size * x),
(self.window_size, pix_square_size * x),
width=3,
)
pygame.draw.line(
canvas,
0,
(pix_square_size * x, 0),
(pix_square_size * x, self.window_size),
width=3,
)
if mode == "human":
# The following line copies our drawings from `canvas` to the visible window
self.window.blit(canvas, canvas.get_rect())
pygame.event.pump()
pygame.display.update()
# We need to ensure that human-rendering occurs at the predefined framerate.
# The following line will automatically add a delay to keep the framerate stable.
self.clock.tick(self.metadata["render_fps"])
else: # rgb_array
return np.transpose(
np.array(pygame.surfarray.pixels3d(canvas)), axes=(1, 0, 2)
)
def close(self):
if self.window is not None:
pygame.display.quit()
pygame.quit()
5. 测试环境
import gym
env = gym.make('MyEnv-v0')
env.action_space.seed(42)
observation, info = env.reset(seed=42, return_info=True)
for _ in range(1000):
observation, reward, done, info = env.step(env.action_space.sample())
env.render()
if done:
observation, info = env.reset(return_info=True)
env.close()
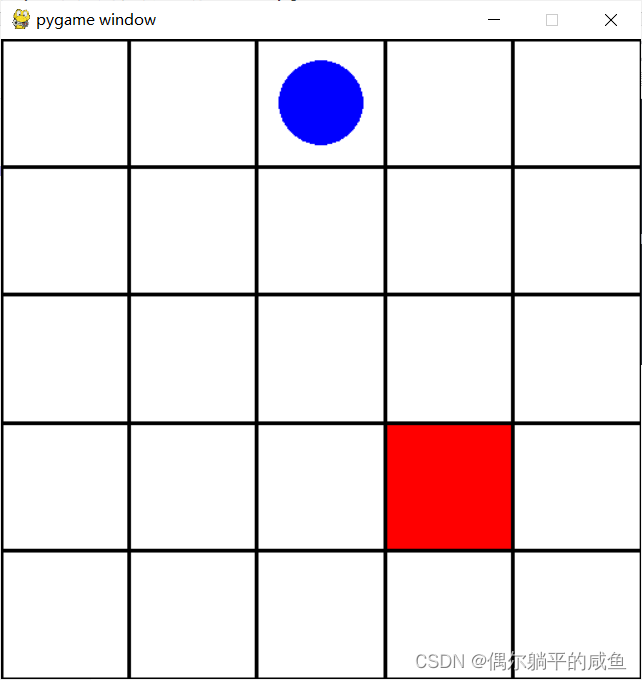 运行成功! 运行成功!
6. 自定义环境以及测试代码解释
 自定义环境,首先要继承环境基类env。 自定义环境,首先要继承环境基类env。
reset(self):重置环境的状态,即初始化状态step(self, action):环境针对action的反馈,返回observation(下一个状态), reward(奖励), done(结束标记), info(自定义信息)render(self, mode=‘human’, close=False):重绘环境的一帧,即可视化渲染seed:随机数种子close(self):关闭环境,并清除内存
对于step的详细说明
上面我们只是每次做随机的action, 为了更好的进行action, 我们需要知道每一步step之后的返回值. 事实上, step会返回四个值
① 观测 Observation (Object):当前step执行后,环境的观测。 ② Reward (Float): 执行上一步动作(action)后,智能体( agent)获得的奖励(浮点类型),不同的环境中奖励值变化范围也不相同,但是强化学习的目标就是使得总奖励值最大; ③ 完成 Done(Boolen): 表示是否需要将环境重置 env.reset。大多数情况下,当 Done 为True时,就表明当前回合(episode)或者试验(tial)结束。 ④ 信息 Info (Dict): 针对调试过程的诊断信息。在标准的智体仿真评估当中不会使用到这个info。
在 Gym 仿真中,每一次回合开始,需要先执行 reset() 函数,返回初始观测信息,然后根据标志位 done 的状态,来决定是否进行下一次回合。所以更恰当的方法是遵守done的标志.
7. gym模块中环境的常用函数
gym的初始化
env = gym.make('CartPole-v0')
# 定义使用gym库中的某一个环境,'CartPole-v0'可以改为其它环境
env = env.unwrapped
# unwrapped是打开限制的意思
gym的各个参数的获取
env.action_space
# 查看这个环境中可用的action有多少个,返回Discrete()格式
env.observation_space
# 查看这个环境中observation的特征【状态空间】,返回Box()格式
n_actions=env.action_space.n
# 查看这个环境中可用的action有多少个,返回int
n_features=env.observation_space.shape[0]
# 查看这个环境中observation的特征有多少个,返回int
刷新环境
env.reset()
# 用于一个done后环境的重启,获取回合的第一个observation
env.render()
# 用于每一步后刷新环境状态
observation_, reward, done, info = env.step(action)
# 获取下一步的环境、得分、检测是否完成。
参考链接: https://blog.csdn.net/sinat_39620217/article/details/115519622 https://github.com/Farama-Foundation/gym-examples/tree/main/gym_examples/envs
|