|
文章目录
1.训练的权重文件:2.文件的结构:3.测试结果:4.主程序文件predict.py文件:5.前端文件predict.html:6.CSS文件predict.css:
1.训练的权重文件:
自己训练的权重文件,其中数据集来自身边收集,只训练的5个类别: 分别是:cabbage-蔬菜,car-汽车,dog-狗,phone-手机,person-人: 链接:https://pan.baidu.com/s/1GY9_LDxzrvYYJvu3B2yLdQ 提取码:ha6l 注:这个权重文件是自己训练的,并且是采用迁移学习的方法,效果比不用迁移学习要好很多,但是毕竟是自己训练权重文件,数据集还是少了很多,所以你自己在进行图像识别的时候效果不一定好。
2.文件的结构:

3.测试结果:
点击运行predict.py文件:   注意这里的路由:所以如果你是像我这样写的路由方式,那么你在浏览器中输入的地址应该是这样:http://127.0.0.1:5000/index 注意这里的路由:所以如果你是像我这样写的路由方式,那么你在浏览器中输入的地址应该是这样:http://127.0.0.1:5000/index 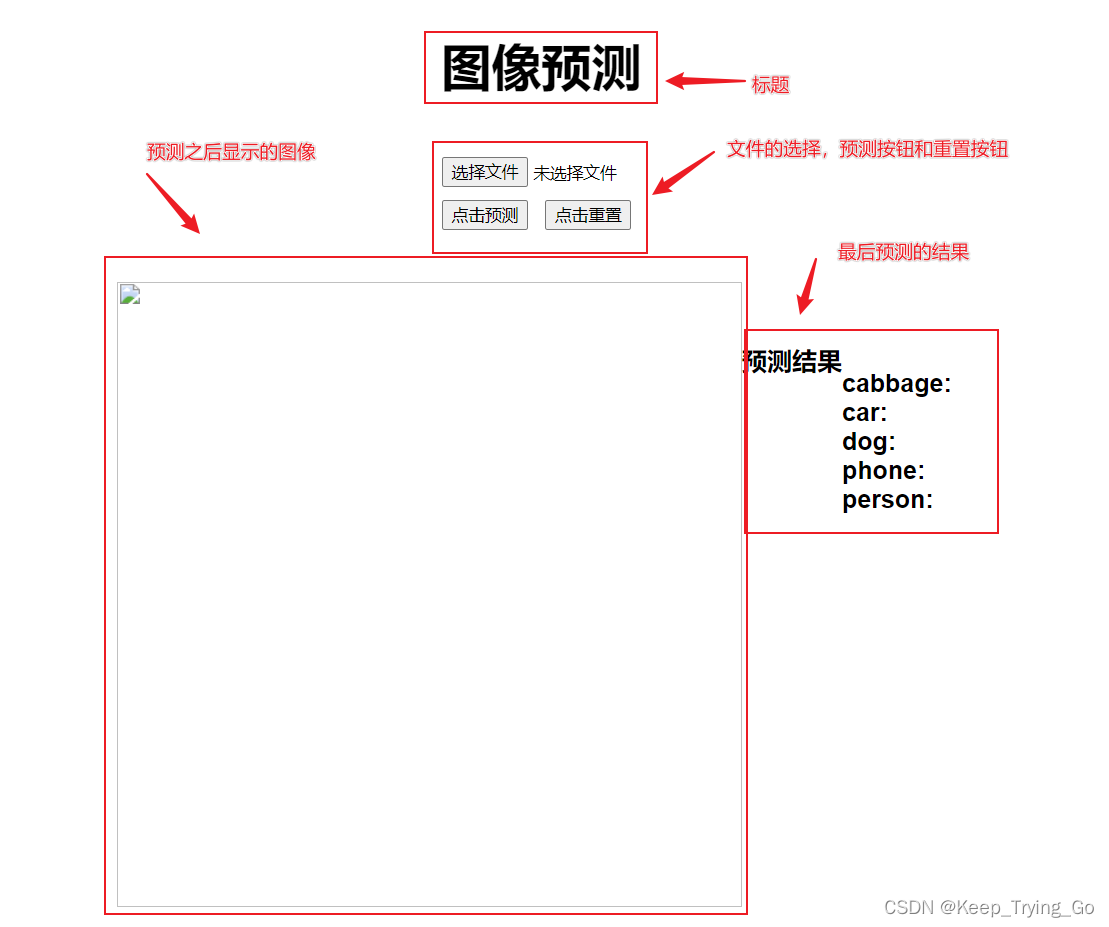 
4.主程序文件predict.py文件:
import os
import cv2
import numpy as np
from PIL import Image,ImageTk
from tensorflow.keras.models import load_model
from flask import Flask ,render_template,request
from tensorflow.keras.preprocessing.image import img_to_array
app=Flask(__name__)
#加载模型
model=load_model('model/InceptionV3.h5')
classes={0:'cabbage',1:'car',2:'dog',3:'phone',4:'person'}
#显示图片
def imshow(img_path):
"""
:param img_path: 图片路径
:return:
"""
image = cv2.imread(img_path)
print(type(image))
image = cv2.cvtColor(image, cv2.COLOR_RGBA2BGRA)
cv2.imshow('image', image)
cv2.waitKey(0)
#对图像进行预处理
def preprocess_image(img_path,target_size):
"""
:param img_path: 图片路径
:param target_size: 图片大小
:return:
"""
image=Image.open(img_path)
if image.mode!='RGB':
image=image.convert('RGB')
image=image.resize(target_size)
image=img_to_array(image)
image=image/255.0
image=np.expand_dims(image,axis=0)
return image
@app.route('/index',methods=['POST','GET'])
def index():
if requesthod=='POST':
file=request.files.get('filename')
if file is None:
return {
'message':'文件上传失败'
}
file_name=file.filename.replace("","")
#打印相关的参数查看
print('file: {}'.format(file))
print('filename: {}'.format(file.filename))
print('上传文件: {}'.format(file_name))
#os.path.dirname 去掉文件名,返回目录
file.save(os.path.dirname(__file__)+'\\static\\'+file_name)
#获取当前的图片路径
img_path=os.path.dirname(__file__)+'\\static\\'+file_name
image=preprocess_image(img_path,target_size=(224,224))
#预测的结果转换为列表形式
predictions=model.predict(image)[0].tolist()
max_pred=int(np.argmax(predictions))
print('predictions: {}'.format(predictions))
print('预测类别: {}'.format(classes[max_pred]))
#读取当前的图片路径并显示
# imshow(img_path)
response={
'predictions':{
'cabbage':predictions[0],
'car':predictions[1],
'dog':predictions[2],
'phone':predictions[3],
'person':predictions[4]
},
'image':'./static/'+file_name,
}
print('cabbage: {}'.format(response['predictions']['cabbage']))
print('car: {}'.format(response['predictions']['car']))
print('dog: {}'.format(response['predictions']['dog']))
print('phone: {}'.format(response['predictions']['phone']))
print('person: {}'.format(response['predictions']['person']))
return render_template('predict.html',response=response)
if requesthod=='GET':
response={
'predictions':'',
'image':''
}
return render_template('predict.html',response=response)
if __name__=='__main__':
print('Pycharm')
app.run(debug=True)

5.前端文件predict.html:
file
图像预测
预测结果
cabbage: {{response['predictions']['cabbage']}}
car: {{response['predictions']['car']}}
dog: {{response['predictions']['dog']}}
phone: {{response['predictions']['phone']}}
person: {{response['predictions']['person']}}

6.CSS文件predict.css:
关于CSS文件的创建和在html中导入CSS文件,看我这篇博客: https://mydreamambitious.blog.csdn.net/article/details/123232040
div {
width: 200px;
height: 50px;
margin: auto;
left: 500px;
font-weight: bold;
font-family: Arial, Helvetics, sans-serlf;
font-size: 20px;
color: '#00FF7F';
border: 2px solid '#000000';
margin-bottom: 50px;
}
#form {
width: 200px;
height: 50px;
font-size: 10px;
font-weight: 400;
}
#form input {
cursor: pointer;
margin-bottom: 10px;
margin-right: 10px;
}
#img {
width: 500px;
height: 400px;
margin-left: 400px;
}
#img img {
width: 500px;
height: 500px;
}
#predict {
width: 50px;
height: 20px;
margin-top: -50px;
margin-left: 980px;
}
#font {
width: 100px;
height: 20px;
margin-top: -400px;
margin-left: 900px;
}
参考的博客: https://blog.csdn.net/qq_43574741/article/details/117264416 其实关于前端显示图片这一块也可以使用js写,只是稍微有点不怎么好理解。
|